
## 一、构建Config Server
和Eureka Server一样,netflix出品的Config Server也是基于SpringBoot项目的。所以我们在spring-cloud新建一个module:zimug-server-config。
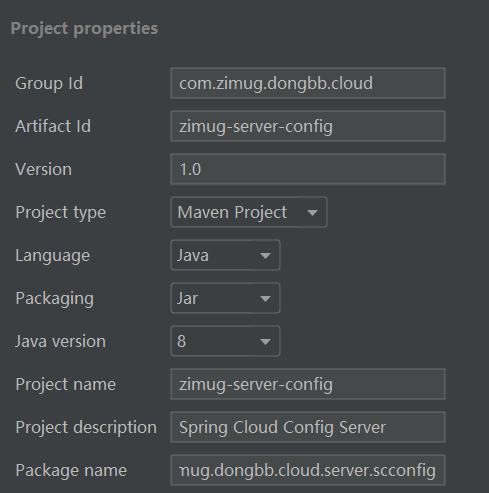
Spring Boot项目构建完成之后,调整一下它的pom.xml。
* 让它的父项目为dongbb-cloud,这样可以继承父项目的版本号管理策略。
* 父项目dongbb-cloud新增module,`<module>zimug-server-config</module>`
* 通过maven坐标引入关键类库:spring-cloud-config-server
~~~
<?xml version="1.0" encoding="UTF-8"?>
<project xmlns="http://maven.apache.org/POM/4.0.0" xmlns:xsi="http://www.w3.org/2001/XMLSchema-instance"
xsi:schemaLocation="http://maven.apache.org/POM/4.0.0 https://maven.apache.org/xsd/maven-4.0.0.xsd">
<modelVersion>4.0.0</modelVersion>
<parent>
<artifactId>dongbb-cloud</artifactId>
<groupId>com.zimug</groupId>
<version>1.0</version>
</parent>
<groupId>com.zimug.dongbb.cloud</groupId>
<artifactId>zimug-server-config</artifactId>
<version>1.0</version>
<name>zimug-server-config</name>
<description>Spring Cloud Config Server</description>
<dependencies>
<dependency>
<groupId>org.springframework.boot</groupId>
<artifactId>spring-boot-starter-web</artifactId>
</dependency>
<dependency>
<groupId>org.springframework.cloud</groupId>
<artifactId>spring-cloud-config-server</artifactId>
</dependency>
</dependencies>
</project>
~~~
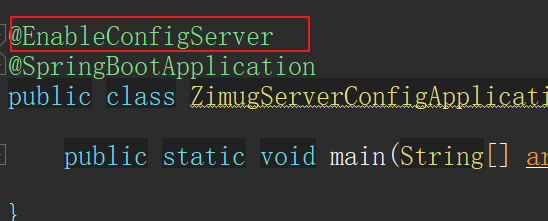
在项目启动类上面加上`@EnableConfigServer`注解
在application.yml中进行config server的基本配置。
~~~
server:
port: 8771 #端口自定义
spring:
application:
name: zimug-server-config #config server项目名称
cloud:
config:
server:
git:
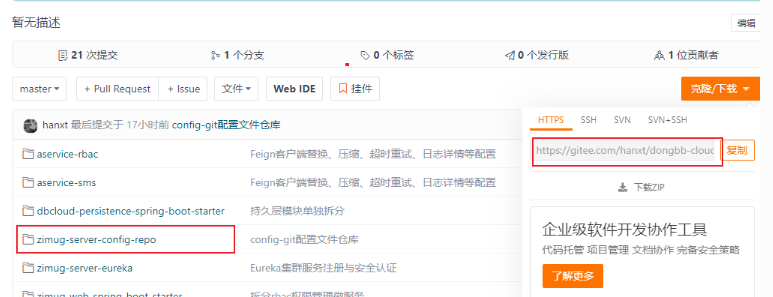
uri: https://gitee.com/hanxt/dongbb-cloud
searchPaths: zimug-server-config-repo
username:
password:
~~~
* spring.cloud.config.server.git.uri:配置git仓库位置的http访问地址
* spring.cloud.config.server.git.searchPaths:配置仓库路径下的相对搜索位置,可以配置多个。因为我们上一节把配置文件放在了zimug-server-config-repo目录下,所以配置该目录
* spring.cloud.config.server.git.username:git仓库的用户名
* spring.cloud.config.server.git.password:git仓库的用户密码
## 二、config server访问测试
config server构建完成之后,我们可以通过浏览器URL访问测试,读取配置文件。其配置文件的读取与URL之间的映射关系如下:
~~~
/{application}/{profile}[/{label}]
/{application}-{profile}.yml
/{label}/{application}-{profile}.yml
/{application}-{profile}.properties
/{label}/{application}-{profile}.properties
~~~
* {application} 就是应用名称,对应到配置文件上来,就是配置文件的名称部分,例如我上面创建的配置文件。
* {profile} 就是配置文件的版本,我们的项目有开发版本、测试环境版本、生产环境版本,对应到配置文件上来就是以 application-{profile}.yml 加以区分,例如application-dev.yml、application-sit.yml、application-prod.yml。
* {label} 表示 git 分支,默认是 master 分支,如果项目是以分支做区分也是可以的,那就可以通过不同的 label 来控制访问不同的配置文件了。
所以我们的这两个配置文件,可以通过如下的URL查看配置信息(以aservice-sms-dev.yml为例):
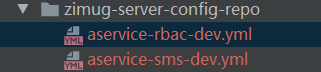
* [http://localhost:8771/aservice-sms-dev.yml](http://localhost:8771/aservice-sms-dev.yml)
* [http://localhost:8771/master/aservice-sms-dev.yml](http://localhost:8771/master/aservice-sms-dev.yml)
* [http://localhost:8771/aservice-sms/dev/master](http://localhost:8771/aservice-sms/dev/master)
* [http://localhost:8771/aservice-sms/dev](http://localhost:8771/aservice-sms/dev)
通过访问以上地址,如果可以正常返回数据,则说明配置中心Config Server服务端一切正常。至此,说明config server和git远程仓库之间的配置同步已经通了(红色边框部分)。

但是,大家可以明显的感觉到这里遗留了一个问题:那就是任何一个人都可以通过浏览器URL去访问任何一个项目的配置文件。关于Spring Cloud config配置的安全与权限管理做的肯定是没有apollo那么好,但是也是有一些可以自己实现的安全认证方式,否则就太不安全了。我们后面的章节会讲到。
- 文档简介
- 模块与代码分支说明
- dongbb-cloud项目核心架构
- 微服务架构进化论
- SpringBoot与Cloud选型兼容
- Spring Cloud组件的选型
- 单体应用拆分微服务
- 单体应用与微服务对比
- 微服务设计拆分原则
- 新建父工程及子模块框架
- 通用微服务初始化模块构建
- 持久层模块单独拆分
- 拆分rbac权限管理微服务
- Hello-microservice
- 构建eureka服务注册中心
- 向服务注册中心注册服务
- 第一个微服务调用
- 远程服务调用
- HttpClient远程服务调用
- RestTemplate远程服务调用
- RestTemplate多实例负载均衡
- Ribbon调用流程源码解析
- Ribbon负载均衡策略源码解析
- Ribbon重试机制与饥饿加载
- Ribbon自定义负载均衡策略
- Feign与OpenFeign
- Feign设计原理源码解析
- Feign请求压缩与超时等配置
- 服务注册与发现
- 白话服务注册与发现
- DiscoveryClient服务发现
- Eureka集群环境构建(linux)
- Eureka集群多网卡环境ip设置
- Eureka集群服务注册与安全认证
- Eureka自我保护与健康检查
- 主流服务注册中心对比(含nacos)
- zookeeper概念及功能简介
- zookeeper-linux集群安装
- zookeeper服务注册与发现
- consul概念及功能介绍
- consul-linux集群安装
- consul服务注册与发现
- 通用-auatator导致401问题
- 分布式配置中心-apollo
- 服务配置中心概念及使用场景
- apollo概念功能简介
- apollo架构详解
- apollo分布式部署之Portal
- apollo分布式部署之环境区分
- apollo项目权限管理实战
- apollo-java客户端基础
- apollo与SpringCloud服务集成
- apollo实例配置热更新
- apollo命名空间与集群
- apollo灰度发布(日志热更新为例)
- SpringCloudConfig配置中心
- config-git配置文件仓库
- config配置中心搭建与测试
- config客户端基础
- config配置安全认证
- config客户端配置刷新
- config配置中心高可用
- BUS消息总线
- bus消息总线简介
- docker安装rabbitMQ
- 基于rabbitMQ的消息总线
- bus实现批量配置刷新
- alibaba-nacos
- nacos介绍与单机部署
- nacos集群部署方式(linux)
- nacos服务注册与发现
- nacos服务注册中心详解
- nacos客户端配置加载
- nacos客户端配置刷新
- nacos服务配置隔离与共享
- nacos配置Beta发布
- 服务熔断降级hystrix
- 服务降级&熔断&限流
- Hystrix集成并实现服务熔断
- Jemter模拟触发服务熔断
- Hystrix服务降级fallback
- Hystrix结合Feign服务降级
- 远程服务调用异常传递的问题
- Hystrix-Feign异常拦截与处理
- Hystrix-DashBoard单服务监控
- Hystrix-dashboard集群监控
- 分布式系统流量卫兵sentinel
- sentinel简介与安装
- 客户端集成与实时监控
- 实战流控规则-QPS限流
- 实战流控规则-线程数限流
- 实战流控规则-关联限流
- 实战流控规则-链路限流
- 实战流控效果-WarmUp
- 实战流控效果-匀速排队
- BlockException处理
- 实战熔断降级-RT
- 实战熔断降级-异常数与比例
- DegradeException处理
- 注解与异常的归纳总结
- Feign降级及异常传递拦截
- 动态规则nacos集中存储
- 热点参数限流
- 系统自适应限流
- 微服务网关-GateWay
- 还有必要学习Zuul么?
- 简介与非阻塞异步IO模型
- GateWay概念与流程
- 新建一个GateWay项目
- 通用Predicate的使用
- 自定义PredicateFactory
- 编码方式构建静态路由
- Filter过滤器介绍与使用
- 自定义过滤器Filter
- 网关请求转发负载均衡
- 结合nacos实现动态路由配置
- 整合Sentinel实现资源限流
- 跨域访问配置
- 网关层面全局异常处理
- 微服务网关安全认证-JWT篇
- Gateway-JWT认证鉴权流程
- 登录认证JWT令牌颁发
- 全局过滤器实现JWT鉴权
- 微服务自身内部的权限管理