
# :-: Kylin-Server-V10-SP1-0711-DNS服务单机部署文档
| 适用范围 | 适用版本 | 人员 | 发布时间 | 文档版本 |备注 |
| --- | --- | --- | --- | --- |--- |
| 服务器操作系统 | V10-SP1 | 王国武 |2022.3.23| V1.0|发布|
| 服务器操作系统 | V10-SP1 | 张志勇 |2022.3.23| V1.1|模板调整|
*****
## 一、前期准备
### 1、防火墙
是否需要防火墙,如果不需要,可以关闭。
`[root@localhost ~]# systemctl stop firewalld`
`[root@localhost ~]# systemctl disable firewalld`
### 2、SELinux
是否需要SELinux,如果不需要,可以关闭。
`[root@localhost ~ ]# vim /etc/selinux/config`
```
# This file controls the state of SELinux on the system.
# SELINUX= can take one of these three values:
# enforcing - SELinux security policy is enforced.
# permissive - SELinux prints warnings instead of enforcing.
# disabled - No SELinux policy is loaded.
SELINUX=disabled
需要将上面的 SELINUX=enforcing 改成 SELINUX=disabled
# SELINUXTYPE= can take one of these three values:
# targeted - Targeted processes are protected,
# minimum - Modification of targeted policy. Only selected processes are protected.
# ukmls - Multi Level Security protection.
# ukmcs -ukmcs variants of the SELinux policy.
SELINUXTYPE=ukmcs
# SETLOCALDEFS= Check local definition changes
SETLOCALDEFS=0
```
### 3、安装包
如果是Kylin Server V10 SP1 0711系统,默认是安装了bind-libs、bind-utils、 bind的服务包,还需要手动安装下 bind-chroot 包。
如果不会安装包或者没有包,则需要咨询麒麟工程师。
`[root@localhost ~]# yum install bind-libs bind-utils bind-chroot bind -y`
`[root@localhost ~]# rpm -qa |grep bind`
```
bind-utils-9.11.4-13.ky10.x86_64
bind-9.11.4-13.ky10.x86_64
rpcbind-1.2.5-2.ky10.x86_64
python3-bind-9.11.4-13.ky10.noarch
keybinder3-0.3.2-8.ky10.x86_64
bind-export-libs-9.11.4-13.ky10.x86_64
bind-libs-9.11.4-13.ky10.x86_64
bind-libs-lite-9.11.4-13.ky10.x86_64
bind-chroot-9.11.4-13.ky10.x86_64
```
bind-libs :给bind与相关命令使用的函数库;
bind-utils :客户端查询主机名的相关命令;
bind : bind主程序所需软件;
bind-chroot : 将bind主程序锁定在家目录中,例如 /var/named/chroot 目录 。
### 4、测试用例
前期需要详细的规划好要创建的Zone,以及主机和IP地址的对应关系。本文中的例子,按照如下的主机与IP对应关系。
| 主机 | IP地址 |
| --- | --- |
| gov.cn 和 gov.org | 192.168.128.70 |
| oa.xjjt.gov.cn | 192.168.128.64 |
| oa2.xjjt.gov.org | 192.168.128.80 |
## 二、搭建
### 1、编辑主配置文件
`[root@localhost ~]# vim /etc/named.conf`
```
//
// named.conf
//
// Provided by Red Hat bind package to configure the ISC BIND named(8) DNS
// server as a caching only nameserver (as a localhost DNS resolver only).
//
// See /usr/share/doc/bind*/sample/ for example named configuration files.
//
options {
listen-on port 53 { `any;` };
listen-on-v6 port 53 { `any;` };
directory "/var/named";
dump-file "/var/named/data/cache_dump.db";
statistics-file "/var/named/data/named_stats.txt";
memstatistics-file "/var/named/data/named_mem_stats.txt";
secroots-file "/var/named/data/named.secroots";
recursing-file "/var/named/data/named.recursing";
allow-query { `any;` };
/*
- If you are building an AUTHORITATIVE DNS server, do NOT enable recursion.
- If you are building a RECURSIVE (caching) DNS server, you need to enable
recursion.
- If your recursive DNS server has a public IP address, you MUST enable access
control to limit queries to your legitimate users. Failing to do so will
cause your server to become part of large scale DNS amplification
attacks. Implementing BCP38 within your network would greatly
reduce such attack surface
*/
recursion yes;
dnssec-enable yes;
dnssec-validation `no;`
managed-keys-directory "/var/named/dynamic";
pid-file "/run/named/named.pid";
session-keyfile "/run/named/session.key";
/* https://fedoraproject.org/wiki/Changes/CryptoPolicy */
include "/etc/crypto-policies/back-ends/bind.config";
};
logging {
channel default_debug {
file "data/named.run";
severity dynamic;
};
};
zone "." IN {
type hint;
file "named.ca";
};
include "/etc/named.rfc1912.zones";
include "/etc/named.root.key";
```
注意上面的`单引号`字体,是修改后的内容,一共四处。
### 2、编辑named.rfc1912.zones文件
`[root@localhost ~]# vim /etc/named.rfc1912.zones`
```
// named.rfc1912.zones:
//
// Provided by Red Hat caching-nameserver package
//
// ISC BIND named zone configuration for zones recommended by
// RFC 1912 section 4.1 : localhost TLDs and address zones
// and http://www.ietf.org/internet-drafts/draft-ietf-dnsop-default-local-zones-02.txt
// (c)2007 R W Franks
//
// See /usr/share/doc/bind*/sample/ for example named configuration files.
//
zone "localhost.localdomain" IN {
type master;
file "named.localhost";
allow-update { none; };
};
zone "localhost" IN {
type master;
file "named.localhost";
allow-update { none; };
};
zone "1.0.0.0.0.0.0.0.0.0.0.0.0.0.0.0.0.0.0.0.0.0.0.0.0.0.0.0.0.0.0.0.ip6.arpa" IN {
type master;
file "named.loopback";
allow-update { none; };
};
zone "1.0.0.127.in-addr.arpa" IN {
type master;
file "named.loopback";
allow-update { none; };
};
zone "0.in-addr.arpa" IN {
type master;
file "named.empty";
allow-update { none; };
};
zone "gov.cn" IN {
type master;
file "named.gov.cn";
};
zone "gov.org" IN {
type master;
file "named.gov.org";
};
```
注意上面最后两个`zone "gov.org" IN`,是我们新写入的两个域名配置。千万注意分号。
### 3、验证配置文件
`[root@localhost ~]# named-checkconf /etc/named.conf `
`[root@localhost ~]#`
这个命令,验证 /etc/named.conf 文件即可,不用去验证 /var/named/ 下的配置。
### 4、创建解析文件
创建文件,并设置权限:
`[root@localhost ~]# cd /var/named/`
`[root@localhost ~]# cp named.localhost named.gov.cn`
`[root@localhost ~]# cp named.localhost named.gov.org`
`[root@localhost ~]#chown root:named named.gov.*`
`[root@localhost ~]#chmod 640 named.gov.*`
`[root@localhost ~]# ll`
```
总用量 24
drwxr-x--- 7 root named 61 12月 21 14:51 chroot
drwxrwx--- 2 named named 23 12月 21 15:43 data
drwxrwx--- 2 named named 60 12月 21 16:14 dynamic
-rw-r----- 1 root named 2253 4月 5 2018 named.ca
-rw-r----- 1 root named 152 12月 15 2009 named.empty
-rw-r----- 1 root named 254 12月 21 16:13 named.gov.cn
-rw-r----- 1 root named 259 12月 21 16:13 named.gov.org
-rw-r----- 1 root named 152 6月 21 2007 named.localhost
-rw-r----- 1 root named 168 12月 15 2009 named.loopback
drwxrwx--- 2 named named 6 4月 1 2020 slaves
```
修改这两个解析文件,成如下所示:
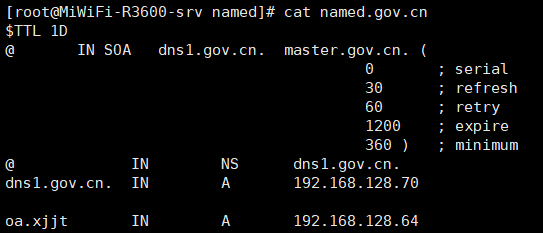
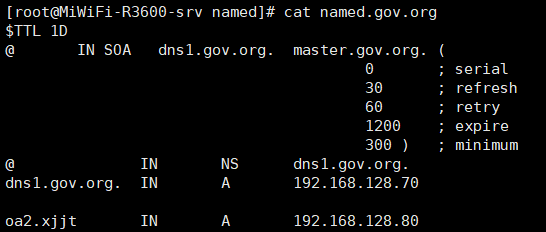
里面的时间等参数,请按照实际的需求进行修改。
### 5、启动服务
`[root@localhost ~]# systemctl restart named`
`[root@localhost ~]# systemctl enable named`
`[root@localhost ~]# systemctl status named`
服务启动后,查看状态,是否运行正常。
### 6、测试域名
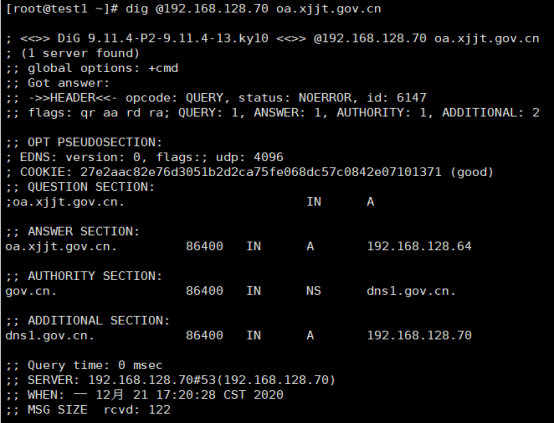
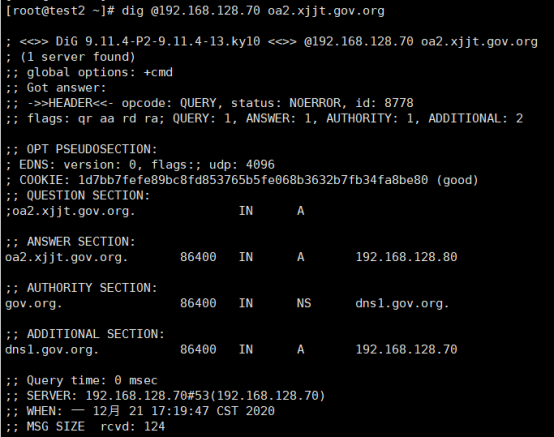
找其他机器,直接用dig命令,指定DNS的IP地址 192.168.128.70进行解析。如果把机器的DNS配置改成 192.168.128.70,则执行dig命令时,可以不用指定DNS的IP地址。
- 常见问题
- 进入救援模式
- 进入单用户模式
- grub引导修复
- V10SP1-biosdevname解析
- 外设挂载和卸载
- audit关闭解决方案
- 终端无法切换
- 救援模式取数据
- 网卡更名操作
- 问题复现解决类
- xgboost复现解决步骤
- 激活类
- 麒麟服务器激活常用命令
- 服务器故障激活问题--须知
- 激活权限获得方式
- V10-SP系列服务器激活
- 银河麒麟高级服务器操作系统V7&V10激活手册
- shell脚本类
- 多网卡队列绑定CPU脚本
- 服务器健康检查脚本
- 服务安装配置类
- 银河麒麟高级服务器操作系统V10(sp1)安装手册
- LVM创建
- Chrony时间同步配置
- 搭建网络yum源
- PXE部署实施
- Man手册安装
- 部署VNC服务
- Kylin-Server-V10-SP1-0711-DNS服务单机部署文档
- 麒麟ks文件定制-封装iso文件
- iptables端口配置
- V10-SP1-aarch64安装jdk1.7
- 工具使用类
- cyclictest测试工具
- e2fsprogs工具介绍
- Logrotate工具说明
- nmon工具安装与使用
- 升、降级类
- rsyslog升级报告
- 性能优化类
- 日志轮转
- 大页内存与透明大页详解
- 优化磁盘IO调度方式
- core文件设置
- 分析报告类
- bond模式4协商不通排查
- audit内存泄露问题分析报告
- mate-indicators内核占用过高问题分析报告
- ansible问题-hostname以及lvol报错
- 关于Linux内存计算的说明
- 磁盘IO调度算法
- 硬件相关类
- 串口
- 网络相关类
- bond创建
- 在已配置好网络情况下添加路由
- 网卡配合网桥实现内网互通KVM虚拟机
- Bond模式4协商不通排查过程
- HA高可用
- kylin HA shell实践
- kylin HA概念性及shell使用
- 虚拟化
- KVM创建虚拟机(图形化操作)
- KVM创建虚拟机(命令操作)
- 容器类
- docker-runc升级
- docker基础镜像制作-服务器版
- 麒麟云平台
- USB3.0设备穿透方法(针对win10云主机穿透)
- 麒麟云平台开关机操作说明
- 技术演练