
# :-: KVM创建虚拟机(命令操作)
| 适用范围 | 适用版本 | 人员 | 发布时间 | 文档版本 |备注 |
| --- | --- | --- | --- | --- |--- |
| 服务器操作系统 | V10、V10-SP1、V7 | 王承林 |2022.3.2| V1.0|发布|
| 服务器操作系统 | V10、V10-SP1、V7 | 张志勇 |2022.3.2| V1.1|模板调整|
### 经测试,该方案有效可行
*****
## :-: 目录
1. 环境准备
2. 安装
3. 服务配置
4. 具体操作
4.1 网桥配置
4.2 查看
4.3 创建虚拟机
4.4 主机部分操作
4.4.1 查看虚拟机列表
4.4.2 查看虚所有虚拟机状态
4.4.3 查看主机详细信息
4.4.4 虚拟机的vnc操作
4.4.5 新建虚拟机操作
4.4.6 删除虚拟机操作
4.4.7 虚拟机开机自启操作
4.4.8 虚拟机的启动关机重启操作
4.4.9 虚拟机挂起操作
4.4.10 虚拟机快照操作
4.4.11 克隆虚拟机
5. 网络部分操作
6. 存储部分操作
7. 内存部分操作
8. CPU部分操作
*****
## 1. 环境准备
一台尽量大内存,大存储,双网卡的主机.
## 2. 安装
```
#虚拟化核心包
yum groupinstall 'Virtualization Host' -y
#虚拟化页面等
yum install virt-install virt-viewer -y
#vnc界面包
yum install tigervnc-server -y
#virsh虚拟化操作自动补全
yum install libvirt-bash-completion -y
#所有命令自动补全
yum install bash-completion -y
```
## 3. 服务配置
```
#关闭防火墙
systemctl stop firewalld.service
#自启动libvirtd服务
systemctl enable libvirtd --now
#启动libvirtd服务
systemctl restart libvirtd --now
```
## 4. 具体操作
### 4.1 网桥配置
```
#配置bond
nmcli connection add type bond con-name bond1 ifname bond1 bond.options "mode=activebackup,miimon=100" ipv4.method disabled ipv6.method ignore autoconnect yes
#配置slave
nmcli connection add type ethernet con-name slave02 ifname ens34 master bond1 slavetype bond
nmcli connection add type ethernet con-name slave01 ifname ens35 master bond1 slavetype bond
#配置br
nmcli connection add type bridge ifname br2019 con-name br2019 ipv4.method disabled ipv6.method ignore autoconnect yes bridge.stp no
#配置br的vlan
nmcli connection add type vlan con-name bond1.2019 ifname bond1.2019 dev bond1 id 2019 master br2019 slave-type bridge autoconnect yes
```
### 4.2 查看
```
[root@localhost network-scripts]# nmcli connection show
NAME UUID TYPE DEVICE
ens33 45feb346-9698-4c48-88ab-f073c0449c11 ethernet ens33
br0 d2d68553-f97e-7549-7a26-b34a26f29318 bridge br0
br2019 6ab34686-9295-417f-b380-c9cb403446f1 bridge br2019
virbr0 c4c17aec-7be3-4b2d-a921-ce2c07a8b165 bridge virbr0
bond1 88602a61-dbc9-4e68-898c-7f64147fa677 bond bond1
bond1.2019 fcb4d7bd-1d50-4579-beb2-4df2a2d5738f vlan bond1.2019
slave02 8eed253b-d368-4964-a013-1086610870d6 ethernet ens34
```
### 4.3 创建虚拟机
```
#预分配创建一个磁盘文件
qemu-img create -f qcow2 /home/kylin.qcow2 50g -o preallocation=metadata
#创建虚拟机并桥接网卡,开启vnc用于远程操作
virt-install --name=vm3 --vcpus=4 --ram=8192 --location=/home/Kylin-Server-10-SP1-Release-Build20-20210518-x86_64.iso --disk path=/home/kylin3.qcow2,format=qcow2,bus=virtio --network bridge=br0,model=virtio --graphics vnc,listen= --extra-args "console=ttyS0" --controller type=virtio-serial --channel unix,target_type=virtio,name=org.qemu.guest_agent.0
#参数介绍
#硬盘virtio代表采用了virtio这个Linux上的设备驱动标准框架, 创建之后的盘符为vda, 这种磁盘
文件适合虚拟机,响应快,速度高. #网络virtio代表启用网卡的硬件虚拟化,速度更快. #设置直接从虚拟机磁盘文件启动,前提是,磁盘是直接拷贝已有虚拟机且没有创建其他虚拟机.
cp /home/kylin.qcow2 /home/kylin2.qcow2 #制作新磁盘
virt-install --name=vm2 --vcpus=4 --ram=8192 --import --disk path=/home/kylin.qcow2,format=qcow2,bus=virtio --network bridge=br0,model=virtio --graphics vnc,listen=0.0.0.0,port=-1 --controller type=virtio-serial --channel unix,target_type=virtio,name=org.qemu.guest_agent.0
```
注意如果安创建虚拟机后, 在vnc中设置操作安装完毕 , 如果长时间卡在以下这个界面,需要在连接到宿主机通过console连接,这里给出命令.
```
#宿主机中输入
virsh console --domain vm2
连接到域 vm2
Escape character is ^] (Ctrl + ])
#需要输入1进入界面, 再按下2选择协议, 接着连续输入2次c , 然后shell会卡住直接关闭,然后用vnc再连接就好了
#类似这种,过程可能有卡顿
请从上方进行选择 ['1' 进入 许可信息 会话, 'c' 继续, 'q' 退出, 'r' 刷新]: 1
================================================================================
================================================================================
许可信息
1)阅读许可协议
2)[ ] 我同意许可协议。
请从上方进行选择 ['c' 继续, 'q' 退出, 'r' 刷新]:
2
================================================================================
================================================================================
许可信息
1)阅读许可协议
2)[x] 我同意许可协议。
请从上方进行选择 ['c' 继续, 'q' 退出, 'r' 刷新]:
c
================================================================================
================================================================================
1) [x] 许可信息
(许可证已接受)
请从上方进行选择 ['1' 进入 许可信息 会话, 'c' 继续, 'q' 退出, 'r' 刷新]:
```
vnc卡住界面如下:
### 4.4 主机部分操作
#### 4.4.1 查看虚拟机列表
```
[root@localhost home]# virsh list
Id 名称 状态
----------------------------------------------------
2 vm1 running
4 vm2 running
```
#### 4.4.2 查看虚所有虚拟机状态
```
[root@localhost home]# virsh list --all
Id 名称 状态
----------------------------------------------------
2 vm1 running
```
#### 4.4.3 查看主机详细信息
```
[root@localhost home]# virsh dominfo --domain vm1
Id: 2
名称: vm1
UUID: 5c6508b6-398c-4dd7-a0da-24d9dd9d9679
OS 类型: hvm
状态: running
CPU: 4
CPU 时间: 112.7s
最大内存: 8388608 KiB
使用的内存: 8388608 KiB
持久: 是
自动启动: 启用
管理的保存: 否
安全性模式: none
安全性 DOI: 0
```
#### 4.4.4 虚拟机的vnc操作
```
#查看虚拟机的vnc
[root@localhost home]# virsh vncdisplay --domain vm1
:11 #表示宿主机对外端口是5911,直接在外部vnc连接kvm宿主机这个端口.
```
#### 4.4.5 新建虚拟机操作
```
#完全新增,新建.
virt-install --name=vm3 --vcpus=4 --ram=8192 --location=/home/Kylin-Server-10-SP1-Release-Build20-20210518-x86_64.iso --disk path=/home/kylin3.qcow2,format=qcow2,bus=virtio--network bridge=br0,model=virtio --graphics vnc,listen=0.0.0.0,port=-1 --extra-args "console=ttyS0"--controller type=virtio-serial --channel unix,target_type=virtio,name=org.qemu.guest_agent.0
#通过已有qcow文件启动虚拟机
cp kylin.qcow2 kylin2.qcow2
virt-install --name=vm2 --vcpus=4 --ram=8192 --import --disk path=/home/kylin.qcow2,format=qcow2,bus=virtio --network bridge=br0,model=virtio --graphics vnc,listen=0.0.0.0,port=-1 --controller type=virtio-serial --channel unix,target_type=virtio,name=org.qemu.guest_agent.0
```
#### 4.4.6 删除虚拟机操作
```
#仅删除虚拟机
[root@localhost home]# virsh destroy vm2
域 vm2 被删除
[root@localhost home]# virsh undefine vm2
域 vm2 已经被取消定义
#删除虚拟机以及删除虚拟机的qcow2文件
virsh undefine vm2 --remove-all-storage
```
#### 4.4.7 虚拟机开机自启操作
```
#设置开机自启
[root@localhost ~]# virsh autostart --domain vm1
域 vm1标记为自动开始
#关闭开机自启
[root@localhost ~]# virsh autostart --disable --domain vm1
域 vm1取消标记为自动开始
```
#### 4.4.8 虚拟机的启动关机重启操作
```
#重启虚拟机
[root@localhost ~]# virsh reboot --domain vm1
域 vm1 正在被重新启动
#关闭虚拟机
[root@localhost ~]# virsh shutdown --domain vm1
#强制关闭虚拟机
[root@localhost ~]# virsh destroy --domain vm1
#启动虚拟机
[root@localhost ~]# virsh start --domain vm1
```
#### 4.4.9 虚拟机挂起操作
```
#挂起
[root@localhost home]# virsh suspend vm1
域 vm1 被挂起
#恢复
[root@localhost home]# virsh resume vm1
域 vm1 被重新恢复
```
#### 4.4.10 虚拟机快照操作
```
#快照创建
[root@localhost ~]# virsh snapshot-create-as vm1 --name vm1_snap --description "this is a test snapshot"
已生成域快照 vm1_snap
#快照查看指定虚拟机快照列表
[root@localhost ~]# virsh snapshot-list --domain vm1
名称 生成时间 状态
------------------------------------------------------------
vm1_snap 2021-10-15 20:07:27 +0800 running
vm1_snap2 2021-10-15 20:08:32 +0800 running
#查看快照详细元数据信息
[root@localhost ~]# virsh snapshot-info --domain vm1 --snapshotname vm1_snap
名称: vm1_snap
域: vm1
当前: 否
状态: running
位置: 内部
上级: -
下级: 1
降序: 1
元数据: 是
#查看最近的快照信息
virsh snapshot-current --domain vm1
#删除快照
[root@localhost ~]# virsh snapshot-delete --domain vm1 --snapshotname vm1_snap
已删除域快照 vm1_snap
#再查看列表
[root@localhost ~]# virsh snapshot-list --domain vm1
名称 生成时间 状态
------------------------------------------------------------
vm1_snap2 2021-10-15 20:08:32 +0800 running
#恢复指定主机到指定快照
virsh snapshot-revert --domain vm1 --snapshotname vm1_snap2
```
#### 4.4.11 克隆虚拟机
```
#注意,必须处于挂起或者关闭状态才可以克隆虚拟机.
#克隆虚拟机(virt-clone -f指定的文件不要事先创建)
[root@localhost ~]# virt-clone -o vm1 -n vm2 -f /home/kylin2.qcow2
WARNING 设置图形设备端口为自动端口,以避免相互冲突。#o 源 n目的
正在分配 'kylin2.qcow2'
| 50 GB 00:00:32
成功克隆 'vm2'。
#查看虚拟机列表
[root@localhost ~]# virsh list --all
Id 名称 状态
----------------------------------------------------
- vm1 关闭
- vm2 关闭
```
## 5. 网络部分操作
```
#查看当前网桥状态
[root@localhost home]# brctl show
bridge name bridge id STP enabled interfaces
br0 8000.000c29df7760 no ens37 #ens37作为网桥的实际网卡
vnet0 #有一个虚拟机桥接到这张网桥,
virbr0 8000.525400d3c199 yes virbr0-nic
#查看虚拟机的网桥接口
[root@localhost home]# virsh domiflist --domain vm1
接口 类型 源 型号 MAC
-------------------------------------------------------
vnet0 bridge br0 rtl8139 52:54:00:31:8b:99
#热添加网络接口, 虚拟机也只能热添加
[root@localhost ~]# virsh attach-interface --domain vm1 --type bridge --source br0 --
model virtio --live --config
成功附加接口
#删除接口,指定的是上述查看中的mac地址
[root@localhost ~]# virsh detach-interface --type bridge --domain vm1 --mac 52:54:00:4f:4f:dd
成功分离接口
#将虚拟机网口桥接到网布网桥
brctl addif br0 vnet0 #br0:外部网桥 vnet0 虚拟机网口
```
## 6. 存储部分操作
```
#查看虚拟机磁盘信息
[root@localhost ~]# virsh domblklist --domain vm1
目标 源
------------------------------------------------
vda /home/kylin.qcow2
hda -
#查看虚拟机硬盘大小
[root@localhost ~]# virsh domblkinfo --domain vm1 --device vda
容量: 53687091200
分配: 4273373184
物理: 55844012098
#查看硬盘详细信息
[root@localhost ~]# virsh domblkstat vm1 rd_req 9031
rd_bytes 321545368
wr_req 661
wr_bytes 57973248
flush_operations 192
rd_total_times 4938116568
wr_total_times 3616909286
flush_total_times 151541474
#虚拟机硬盘扩容,注意必须在无快照, 关机状态下才可以扩容. #扩容10g
[root@localhost ~]# qemu-img resize /home/kylin.qcow2 +10G Image resized.
#热添加硬盘操作#先创建一块硬盘
qemu-img create -f qcow2 /home/resize_10g.qcow2 5G
#热添加到虚拟机
[root@localhost ~]# virsh attach-disk --domain vm1 /home/resize_10g.qcow2 vdb --
subdriver=qcow2 --live --config --bus=virtio
成功附加磁盘
#查看虚拟机磁盘
#重要参数介绍#重启生效
#–config 任何时候 下一次start虚拟机时生效
#–live 只有在虚拟机活动时可用 立即生效,但是虚拟机下一次start时,会失效
#–current 任何时候 当虚拟机处于shutoff时,同–config;当虚拟机处于running时,同–live
#--live --config 同时加上代表当前生效,重启生效.
#卷标
#vd* 指代创建virtio硬盘,这种硬盘兼容性较好,virtio作为磁盘驱动.
#sd* 传统的SCSI 磁盘,性能兼容性一般.
#hd* 老式的ide硬盘,兼容性较差有时候检测不到磁盘
[root@localhost ~]# virsh domblklist --domain vm1
目标 源
------------------------------------------------
vda /home/kylin.qcow2
vdb /home/resize_10g.qcow2
hda -
```
#查看虚拟机硬盘,已经存在处于未挂载状态

```
#分离磁盘
[root@localhost ~]# virsh detach-disk --domain vm1 /home/resize_10g.qcow2
成功分离磁盘
#查看状态
[root@localhost ~]# virsh domblklist vm1
目标 源
------------------------------------------------
vda /home/kylin.qcow2
hda -
```
## 7. 内存部分操作
```
#查看虚拟机详细内存状况
[root@localhost ~]# virsh dommemstat --domain vm1 actual 8388608
swap_in 0
swap_out 0
major_fault 246
minor_fault 139266
unused 6693488
available 6851120
usable 6464032
last_update 1634304758
disk_caches 43844
rss 974992
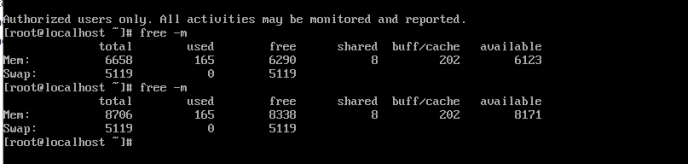
#热添加内存,使得内存到指定值, setmaxmem是最大内存允许虚拟机繁忙时候超过setmem设置接近setmaxmem设置的大小,只可以在关闭状态下测试.
[root@localhost ~]# virsh setmaxmem --domain vm1 --size 12G
#setmem是标准的虚拟机内存, 可以开机状态下设置,这里设置10g和虚拟机对不上是因为内存页,单位转化等因素所致.
[root@localhost ~]# virsh setmem --domain vm1 --size 10G
```
查看前后内存对比,内存不是10g是因为转化等方面影响.
```
#减少内存, 使得内存到指定值.
[root@localhost ~]# virsh setmem --domain vm1 --size 8G
```
查看减少前后内存对比

## 8. CPU部分操作
```
#查看指定虚拟机CPU详细状况/
[root@localhost ~]# virsh vcpuinfo --domain vm1
VCPU: 0
CPU: 3
状态: running
CPU 时间: 150.7s
CPU关系: yyyyyy
VCPU: 1
CPU: 4
状态: running
CPU 时间: 45.2s
CPU关系: yyyyyy
VCPU: 2
CPU: 5
状态: running
CPU 时间: 141.8s
CPU关系: yyyyyy
VCPU: 3
CPU: 1
状态: running
CPU 时间: 98.3s
CPU关系: yyyyyy
#虚拟机增加CPU至5颗,强烈建议虚拟机关闭状态下操作
#同时设置最大可支持cpu数,实际cpu不可以超过这个数,一定要使得maximum大于实际个数
virsh setvcpus --domain vm1 --maximum 5 --config
#设置实际cpu个数
virsh setvcpus --domain vm1 5 --config
#查看cpu状态
[root@localhost ~]# virsh vcpuinfo --domain vm1
VCPU: 0
CPU: 3
状态: running
CPU 时间: 18.4s
CPU关系: yyyyyy
VCPU: 1
CPU: 3
状态: running
CPU 时间: 9.1s
CPU关系: yyyyyy
VCPU: 2
CPU: 0
状态: running
CPU 时间: 10.6s
CPU关系: yyyyyy
VCPU: 3
CPU: 5
状态: running
CPU 时间: 9.3s
CPU关系: yyyyyy
VCPU: 4
CPU: 4
状态: running
CPU 时间: 9.9s
CPU关系: yyyyyy
#减少CPU到4颗,强烈建议在虚拟机关闭状态下操作
#同时设置最大可支持cpu数,实际cpu不可以超过这个数,减少CPU状况下可以设置也可以不设置这个值.
virsh setvcpus --domain vm1 --maximum 4 --config
#减少虚拟机实际cpu个数到4
virsh setvcpus --domain vm1 4 --config
#查看cpu状态
[root@localhost ~]# virsh vcpuinfo --domain vm1
VCPU: 0
CPU: 0
状态: running
CPU 时间: 5.4s
CPU关系: yyyyyy
VCPU: 1
CPU: 1
状态: running
CPU 时间: 0.1s
CPU关系: yyyyyy
VCPU: 2
CPU: 2
状态: running
CPU 时间: 0.1s
CPU关系: yyyyyy
VCPU: 3
CPU: 5
状态: running
CPU 时间: 0.1s
CPU关系: yyyyyy
```
- 常见问题
- 进入救援模式
- 进入单用户模式
- grub引导修复
- V10SP1-biosdevname解析
- 外设挂载和卸载
- audit关闭解决方案
- 终端无法切换
- 救援模式取数据
- 网卡更名操作
- 问题复现解决类
- xgboost复现解决步骤
- 激活类
- 麒麟服务器激活常用命令
- 服务器故障激活问题--须知
- 激活权限获得方式
- V10-SP系列服务器激活
- 银河麒麟高级服务器操作系统V7&V10激活手册
- shell脚本类
- 多网卡队列绑定CPU脚本
- 服务器健康检查脚本
- 服务安装配置类
- 银河麒麟高级服务器操作系统V10(sp1)安装手册
- LVM创建
- Chrony时间同步配置
- 搭建网络yum源
- PXE部署实施
- Man手册安装
- 部署VNC服务
- Kylin-Server-V10-SP1-0711-DNS服务单机部署文档
- 麒麟ks文件定制-封装iso文件
- iptables端口配置
- V10-SP1-aarch64安装jdk1.7
- 工具使用类
- cyclictest测试工具
- e2fsprogs工具介绍
- Logrotate工具说明
- nmon工具安装与使用
- 升、降级类
- rsyslog升级报告
- 性能优化类
- 日志轮转
- 大页内存与透明大页详解
- 优化磁盘IO调度方式
- core文件设置
- 分析报告类
- bond模式4协商不通排查
- audit内存泄露问题分析报告
- mate-indicators内核占用过高问题分析报告
- ansible问题-hostname以及lvol报错
- 关于Linux内存计算的说明
- 磁盘IO调度算法
- 硬件相关类
- 串口
- 网络相关类
- bond创建
- 在已配置好网络情况下添加路由
- 网卡配合网桥实现内网互通KVM虚拟机
- Bond模式4协商不通排查过程
- HA高可用
- kylin HA shell实践
- kylin HA概念性及shell使用
- 虚拟化
- KVM创建虚拟机(图形化操作)
- KVM创建虚拟机(命令操作)
- 容器类
- docker-runc升级
- docker基础镜像制作-服务器版
- 麒麟云平台
- USB3.0设备穿透方法(针对win10云主机穿透)
- 麒麟云平台开关机操作说明
- 技术演练