
# kylin HA概念性及shell使用
使用pcs shell配置corosync & pacemaker群集
# Pacemaker
Pacemaker,即Cluster Resource Manager(CRM),管理整个HA,客户端通过pacemaker管理监控整个集群。
CRM支持ocf和lsb两种资源类型:
ocf格式的启动脚本在/usr/lib/ocf/resource.d/下面。
lsb的脚本一般在/etc/rc.d/init.d/下面。
# 集群属性设置
~~~shell
#查看可配置属性列表
[root@node1 ~]# pcs property list
Cluster Properties:
cluster-infrastructure: corosync
cluster-name: hacluster
dc-version: 2.0.2-3.ky10.2.02.ky10-744a30d655
have-watchdog: false
maintenance-mode: False
no-quorum-policy: ignore
node-health-green: 0
node-health-red: 0
node-health-strategy: none
node-health-yellow: 0
start-failure-is-fatal: True
stonith-enabled: False
symmetric-cluster: True
#如开启隔离功能:
pcs property set stonith-enabled=true
#查看当前集群属性配置
[root@node1 ~]# pcs property show --all
Cluster Properties:
batch-limit: 0
cluster-delay: 60s
cluster-infrastructure: corosync
cluster-ipc-limit: 500
cluster-name: hacluster
cluster-recheck-interval: 15min
concurrent-fencing: true
dc-deadtime: 20s
dc-version: 2.0.2-3.ky10.2.02.ky10-744a30d655
election-timeout: 2min
enable-acl: false
enable-startup-probes: true
have-watchdog: false
join-finalization-timeout: 30min
join-integration-timeout: 3min
load-threshold: 80%
maintenance-mode: False
migration-limit: -1
no-quorum-policy: ignore
node-action-limit: 0
node-health-base: 0
node-health-green: 0
node-health-red: 0
node-health-strategy: none
node-health-yellow: 0
pe-error-series-max: -1
pe-input-series-max: 4000
pe-warn-series-max: 5000
placement-strategy: default
remove-after-stop: false
shutdown-escalation: 20min
start-failure-is-fatal: True
startup-fencing: true
stonith-action: reboot
stonith-enabled: false
stonith-max-attempts: 10
stonith-timeout: 60s
stonith-watchdog-timeout: (null)
stop-all-resources: false
stop-orphan-actions: true
stop-orphan-resources: true
symmetric-cluster: True
transition-delay: 0s
~~~
# shell案例:
## 集群启动停止
~~~shell
#启动完整集群
pcs cluster start --all
#停止完整集群
pcs cluster stop --all
#启动集群指定节点
pcs cluster start node1 node2
#停止集群指定节点
pcs cluster stop node1 node2
~~~
## 创建浮动IP资源
~~~shell
#IPaddr_6资源是一个浮动 IP 地址,它不能是一个已经与物理节点关联的 IP 地址。浮动 IP 必须位于与静态分配的 IP 地址相同的网络中。
#集群主机的网卡需要一致。
#ClusterIP为资源名称
[root@node1 ~]# pcs resource create ClusterIP ocf:heartbeat:IPaddr_6 ip=192.168.142.139 nic=ens33 cidr_netmask=32
[root@node1 ~]# pcs resource config ClusterIP
Resource: ClusterIP (class=ocf provider=heartbeat type=IPaddr_6)
Attributes: cidr_netmask=32 ip=192.168.142.139 nic=ens33
Operations: monitor interval=5s start-delay=1s timeout=20s OCF_CHECK_LEVEL=10 (ClusterIP-monitor-interval-5s)
start interval=0s timeout=90 (ClusterIP-start-interval-0s)
stop interval=0s timeout=100 (ClusterIP-stop-interval-0s)
~~~
页面查看:

## 创建nginx资源
~~~shell
#安装nginx服务
yum install -y nginx
#修改nginx.conf配置文件
[root@ha1 ~]# mv /usr/share/nginx/html/index.html /usr/share/nginx/html/index.html.bak
[root@ha1 ~]# echo "Hello,I'm node1.My address is 192.168.142.130" > /usr/share/nginx/html/index.html
[root@ha1 ~]# cat /usr/share/nginx/html/index.html
Hello,I'm node1.My address is 192.168.142.130
~~~
创建资源
~~~shell
[root@node1 ~]# pcs resource create WebSite ocf:heartbeat:nginx configfile=/etc/nginx/nginx.conf
~~~
页面查看:

清理监控(由于默认nginx的监控资源比较多,我们清理掉不需要的):
## 资源组配置
~~~shell
#创建资源组可确保在配置正常工作的多节点集群时让资源在同一节点中运行
#创建资源组,并添加当前集群ip和网页资源
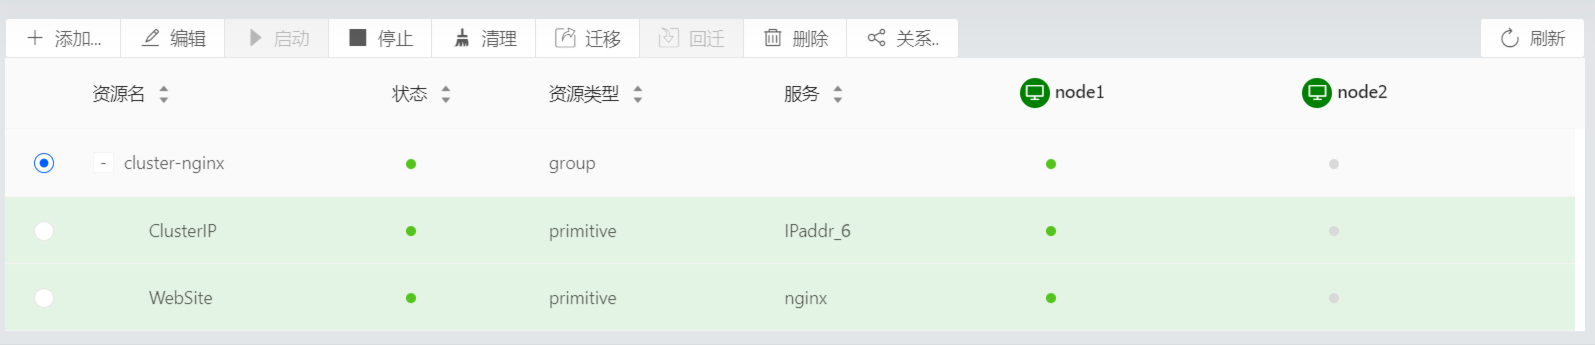
[root@node1 ~]# pcs resource group add cluster-nginx ClusterIP WebSite
#查看资源组配置
[root@node1 ~]# pcs resource config cluster-nginx
Group: cluster-nginx
Resource: ClusterIP (class=ocf provider=heartbeat type=IPaddr_6)
Attributes: cidr_netmask=32 ip=192.168.142.139 nic=ens33
Operations: monitor interval=5s start-delay=1s timeout=20s OCF_CHECK_LEVEL=10 (ClusterIP-monitor-interval-5s)
start interval=0s timeout=90 (ClusterIP-start-interval-0s)
stop interval=0s timeout=100 (ClusterIP-stop-interval-0s)
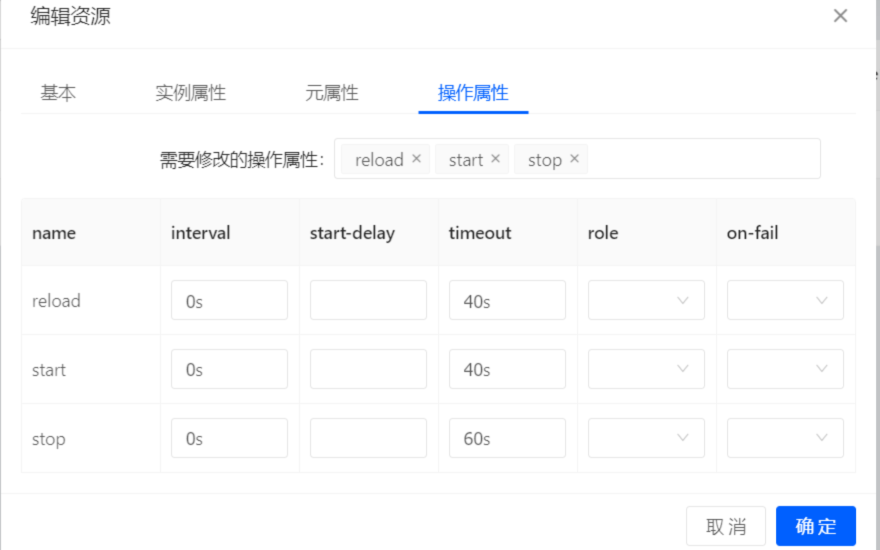
Resource: WebSite (class=ocf provider=heartbeat type=nginx)
Attributes: configfile=/etc/nginx/nginx.conf
Operations: reload interval=0s timeout=40s (WebSite-reload-interval-0s)
start interval=0s timeout=40s (WebSite-start-interval-0s)
stop interval=0s timeout=60s (WebSite-stop-interval-0s)
~~~
页面查看:
## 故障转移测试
~~~shell
#运行该服务的节点设置为待机模式。请注意,由于禁用了隔离功能,因此我们无法有效地模拟节点级别的故障(比如拔掉电源电缆)。需要隔离功能集群才可以在出现这类问题时被恢复。
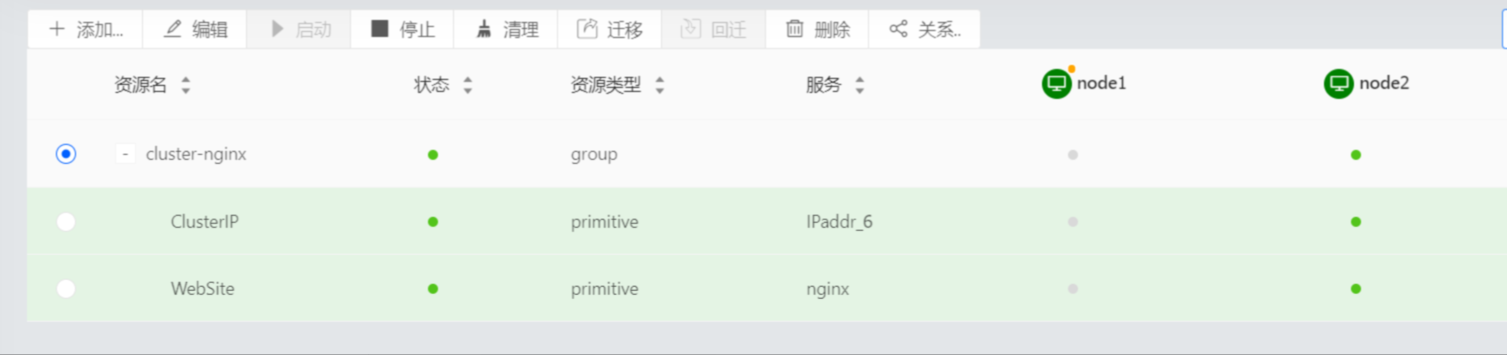
[root@node1 ~]# pcs node standby node1
#查看集群状态
[root@node1 ~]# pcs status
Cluster name: hacluster
Stack: corosync
Current DC: node1 (version 2.0.2-3.ky10.2.02.ky10-744a30d655) - partition with quorum
Last updated: Thu Aug 26 17:22:58 2021
Last change: Thu Aug 26 17:21:44 2021 by root via cibadmin on node1
2 nodes configured
2 resources configured
Node node1: standby
Online: [ node2 ]
Full list of resources:
Resource Group: cluster-nginx
ClusterIP (ocf::heartbeat:IPaddr_6): Started node2
WebSite (ocf::heartbeat:nginx): Started node2 (Monitoring)
#访问网站。服务应该仍然可用,显示信息应该指示服务正在运行的节点。
~~~
页面查看

恢复节点
~~~shell
#要将集群服务恢复到第一个节点,让节点离开待机模式。这不一定将该服务转换到第一个节点。
[root@node2 ~]# pcs node unstandby node1
[root@node2 ~]# pcs status
Cluster name: hacluster
Stack: corosync
Current DC: node1 (version 2.0.2-3.ky10.2.02.ky10-744a30d655) - partition with quorum
Last updated: Thu Aug 26 17:24:47 2021
Last change: Thu Aug 26 17:24:41 2021 by root via cibadmin on node2
2 nodes configured
2 resources configured
Online: [ node1 node2 ]
Full list of resources:
Resource Group: cluster-nginx
ClusterIP (ocf::heartbeat:IPaddr_6): Started node2
WebSite (ocf::heartbeat:nginx): Started node2 (Monitoring)
~~~
## PCS命令整理
~~~shell
#pcs resource 命令的参数。输出中仅显示一部分
pcs resource -h
#将原始集群配置保存到指定的文件中
pcs cluster cib testfile #将 CIB 中的原始 xml 保存到名为 testfile 的文件中。
#显示集群和集群资源的状态
pcs status
#可以使用 pcs status 命令的 command 参数来显示特定集群组件的状态,指定resources、cluster、nodes或 pcsd。
pcs status resources #显示集群资源的状态
pcs cluster status #显示集群的状态,但不显示集群资源
pcs status nodes #显示集群节点状态
pcs status pcsd #显示集群节点pcsd状态
pcs config #显示完整的集群配置
pcs cluster corosync #以人类可读格式打印corosync.conf 文件的内容
pcs resource cleanup #清理资源告警
~~~
# 其他:
相关的资源文件:
(1)/usr/lib/ocf/resource.d,pacemaker资源库文件位置,可安装资源包:resource-agents 获取更多ocf格式的资源。
(2)/usr/sbin/fence\_\*\*\*,Fencing设备的执行脚本名称,可安装资源包:fence-agents 获取更多Fencing设备资源。
查看使用说明:
\[shell\]# man ocf\_heartbeat\_\*\*\* ## 查看OCF资源说明,man ocf\_heartbeat\_apache
\[shell\]# man fence\_\*\*\* ## 查看Fencing设备说明,man fence\_vmware
- 常见问题
- 进入救援模式
- 进入单用户模式
- grub引导修复
- V10SP1-biosdevname解析
- 外设挂载和卸载
- audit关闭解决方案
- 终端无法切换
- 救援模式取数据
- 网卡更名操作
- 问题复现解决类
- xgboost复现解决步骤
- 激活类
- 麒麟服务器激活常用命令
- 服务器故障激活问题--须知
- 激活权限获得方式
- V10-SP系列服务器激活
- 银河麒麟高级服务器操作系统V7&V10激活手册
- shell脚本类
- 多网卡队列绑定CPU脚本
- 服务器健康检查脚本
- 服务安装配置类
- 银河麒麟高级服务器操作系统V10(sp1)安装手册
- LVM创建
- Chrony时间同步配置
- 搭建网络yum源
- PXE部署实施
- Man手册安装
- 部署VNC服务
- Kylin-Server-V10-SP1-0711-DNS服务单机部署文档
- 麒麟ks文件定制-封装iso文件
- iptables端口配置
- V10-SP1-aarch64安装jdk1.7
- 工具使用类
- cyclictest测试工具
- e2fsprogs工具介绍
- Logrotate工具说明
- nmon工具安装与使用
- 升、降级类
- rsyslog升级报告
- 性能优化类
- 日志轮转
- 大页内存与透明大页详解
- 优化磁盘IO调度方式
- core文件设置
- 分析报告类
- bond模式4协商不通排查
- audit内存泄露问题分析报告
- mate-indicators内核占用过高问题分析报告
- ansible问题-hostname以及lvol报错
- 关于Linux内存计算的说明
- 磁盘IO调度算法
- 硬件相关类
- 串口
- 网络相关类
- bond创建
- 在已配置好网络情况下添加路由
- 网卡配合网桥实现内网互通KVM虚拟机
- Bond模式4协商不通排查过程
- HA高可用
- kylin HA shell实践
- kylin HA概念性及shell使用
- 虚拟化
- KVM创建虚拟机(图形化操作)
- KVM创建虚拟机(命令操作)
- 容器类
- docker-runc升级
- docker基础镜像制作-服务器版
- 麒麟云平台
- USB3.0设备穿透方法(针对win10云主机穿透)
- 麒麟云平台开关机操作说明
- 技术演练