
# TestNG 教程:Selenium 中的注释,框架和示例
> 原文: [https://www.guru99.com/all-about-testng-and-selenium.html](https://www.guru99.com/all-about-testng-and-selenium.html)
## 什么是 TestNG?
**TestNG** 是一个自动化测试框架,其中 NG 代表“下一代”。 TestNG 的灵感来自使用注释(@)的 [JUnit](/junit-tutorial.html) 。 TestNG 克服了 JUnit 的缺点,旨在简化端到端测试。
使用 TestNG,您可以生成正确的报告,并且可以轻松了解通过,失败和跳过了多少个测试用例。 您可以单独执行失败的测试用例。
例如:
* 假设您有五个测试用例,则为每个测试用例编写一种方法(假定使用 main 方法编写程序而未使用 testNG)。 当您第一次运行该程序时,将成功执行三种方法,而第四种方法将失败。 然后更正第四个方法中存在的错误,现在您只想运行第四个方法,因为前三个方法始终可以成功执行。 不使用 TestNG,这是不可能的。
* TestNG 在 test-output 文件夹中提供了一个选项,即 testng-failed.xml 文件。 如果您只想运行失败的测试用例,则意味着您运行此 XML 文件。 它将仅执行失败的测试用例。
除了上述概念之外,您还将了解有关 TestNG 的更多信息,例如 TestNG 的优点,如何使用@test 批注创建测试方法,如何将这些类转换为测试套件文件并通过 eclipse 以及从命令行执行 。
在本教程中,您将学习
* [为什么将 TestNG 与硒一起使用?](#2)
* [TestNG 优于 JUnit](#3) 的优势
* [第一个使用注释的测试用例](#4)
* [创建一个新的 TestNG 测试文件](#5)
* [编码我们的第一个测试用例](#6)
* [运行测试](#7)
* [正在检查由 TestNG](#8) 创建的报告
* [NGT0]中使用的注解[](#9)
* [多个测试用例](#10)
* [参数](#11)
* [多个参数](#12)
* [TestNG 注释的摘要](#13)
### 为什么将 TestNG 与硒一起使用?
默认的硒测试不会为测试结果生成正确的格式。 使用 TestNG,我们可以生成测试结果。
由于其优势,大多数 Selenium 用户都比 [Junit](/junit-tutorial.html) 更多地使用它。 TestNG 有这么多的功能,但是我们仅关注可在 Selenium 中使用的最重要的功能。 以下是 TestNG 的主要功能
* 以适当的格式生成报告,包括运行的测试用例,通过的测试用例的数量,失败的测试用例的数量以及跳过的测试用例的数量。
* 通过将多个测试用例转换为 testng.xml 文件,可以更轻松地对其进行分组。 您可以在其中确定应首先执行哪个测试用例的优先级。
* 只需使用名为“调用计数”的关键字,就可以多次执行同一测试用例而无循环。
* 使用 testng,您可以在多个浏览器上执行多个测试用例,即跨浏览器测试。
* 该测试框架可以轻松地与 Maven,Jenkins 等工具集成。
* 例如,测试中使用的注释非常容易理解:@ BeforeMethod,@ AfterMethod,@ BeforeTest,@ AfterTest
* WebDriver 没有用于生成报告的本机机制。 TestNG 可以采用可读格式生成报告,如下所示。

* TestNG 简化了测试编码的方式。 在我们的测试中,不再需要静态的 main 方法。 操作顺序由易于理解的注释(不需要方法是静态的)进行调节。


* 未捕获的异常由 TestNG 自动处理,而不会过早终止测试。 这些异常在报告中被报告为失败的步骤。
## TestNG 比 JUnit 的优势
与 JUnit 相比,TestNG 具有三个主要优点:
* 注释更容易理解
* 测试用例可以更容易地分组
* 可以并行测试
**TestNG 中的注释是可以控制将如何执行其下方法的代码行**。 它们始终以@符号开头。 下面是一个非常早期和快速的示例。

批注将在后面的“ TestNG 中使用的批注”一节中讨论,因此如果您还不了解上述示例,那是完全可以的。 重要的是,现在要注意,TestNG 中的注释比 JUnit 中的代码更易于编码和理解。
可以并行运行测试的功能在 TestNG 中可用,但在 JUnit 中不可用,因此它是使用 Selenium Grid 的测试人员的首选框架。
## 使用注释的第一个测试用例
在创建测试用例之前,我们应该首先在 Eclipse 中设置一个新的 TestNG Project,并将其命名为“ FirstTestNGProject”。
### 设置一个新的 TestNG 项目
**步骤 1:**单击文件>新建> [Java](/java-tutorial.html) 项目
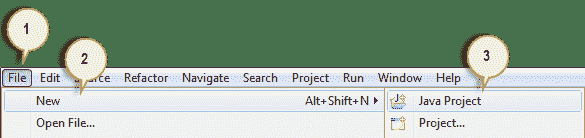
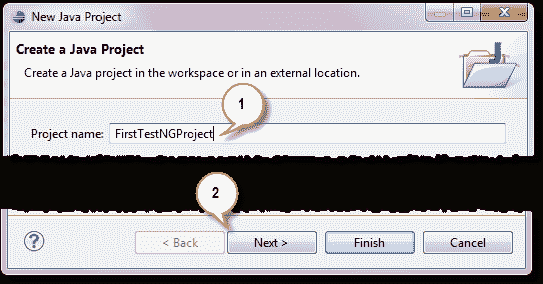
**步骤 2:**键入“ FirstTestNGProject”作为项目名称,然后单击“下一步”。
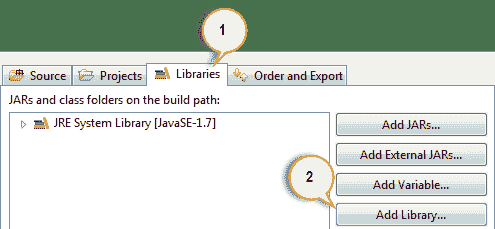
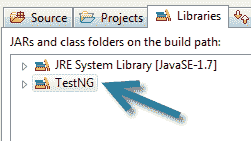
**步骤 3:**现在,我们将开始将 TestNG 库导入到我们的项目中。 单击“库”选项卡,然后单击“添加库…”。
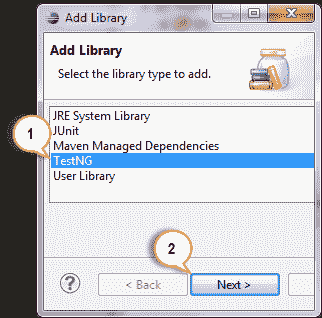
**步骤 4:**在“添加库”对话框中,选择“ TestNG”,然后单击“下一步”。
**步骤 5:**单击完成。

您应该注意到 TestNG 包含在“库”列表中。
**步骤 6:**现在,我们将添加包含 Selenium API 的 JAR 文件。 在上一章中安装 Selenium 和 Eclipse 时,可以从 [http://docs.seleniumhq.org/download/](https://www.selenium.dev/downloads/) 下载的 Java 客户端驱动程序中找到这些文件。
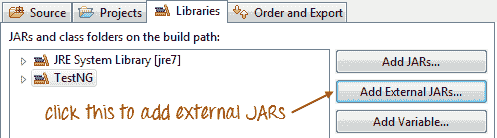
然后,导航到放置 Selenium JAR 文件的位置。
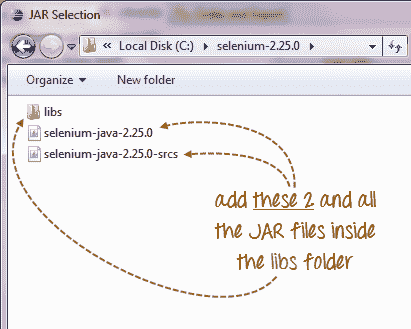
添加外部 JAR 之后,您的屏幕应如下所示。
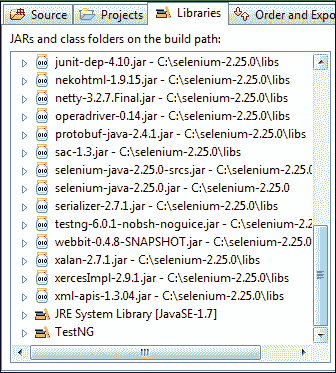
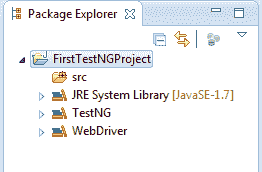
**步骤 7:**单击“完成”,并验证我们的 FirstTestNGProject 在 Eclipse 的 Package Explorer 窗口中可见。
## 创建一个新的 TestNG 测试文件
现在我们已经完成了设置项目的工作,让我们创建一个新的 TestNG 文件。
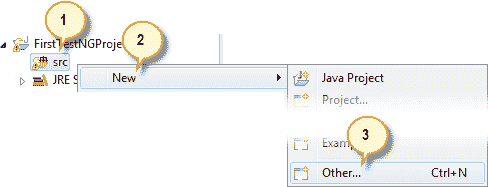
**步骤 1:**右键单击“ src”软件包文件夹,然后选择“新建”。>其他…
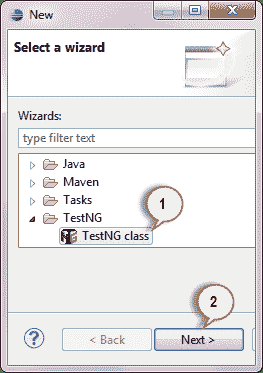
**步骤 2:**单击 TestNG 文件夹,然后选择“ TestNG 类”选项。 点击下一步。
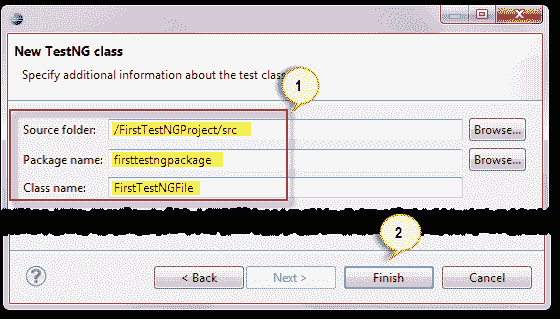
**步骤 3:**在相应的输入框中键入以下指示的值,然后单击“完成”。 请注意,我们已将 Java 文件命名为“ FirstTestNGFile”。
Eclipse 应该自动为我们的 TestNG 文件创建模板,如下所示。
### 编码我们的第一个测试用例
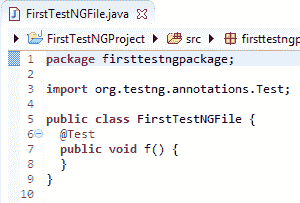
现在让我们创建第一个[测试用例](/test-case.html),该用例将检查 Mercury Tours 的主页是否正确。 如下所示键入您的代码。
```
package firsttestngpackage;
import org.openqa.selenium.*;
import org.openqa.selenium.firefox.FirefoxDriver;
import org.testng.Assert;
import org.testng.annotations.*;
public class firsttestngfile {
public String baseUrl = "http://demo.guru99.com/test/newtours/";
String driverPath = "C:\\geckodriver.exe";
public WebDriver driver ;
@Test
public void verifyHomepageTitle() {
System.out.println("launching firefox browser");
System.setProperty("webdriver.gecko.driver", driverPath);
driver = new FirefoxDriver();
driver.get(baseUrl);
String expectedTitle = "Welcome: Mercury Tours";
String actualTitle = driver.getTitle();
Assert.assertEquals(actualTitle, expectedTitle);
driver.close();
}
}
```
请注意以下内容。
* TestNG 不需要您具有 main()方法。
* 方法不必是静态的。
* 我们使用了@Test 批注。 **@Test 用于告诉它所使用的方法是一个测试案例**。 在这种情况下,我们将 verifyHomepageTitle()方法设置为测试用例,因此我们在其上方放置了一个'@Test'注释。
* 由于我们在 TestNG 中使用注释,因此需要导入包 org.testng.annotations。*。
* 我们使用了 Assert 类。 **Assert 类用于在 TestNG** 中进行验证操作。 要使用它,我们需要导入 org.testng.Assert 包。
一个 TestNG 文件中可能有多个测试用例(因此,有多个@Test 批注)。 稍后将在“ TestNG 中使用的批注”部分中对此进行详细处理。
### 运行测试
要运行测试,只需像往常一样在 Eclipse 中运行文件即可。 Eclipse 将提供两个输出-一个在“控制台”窗口中,另一个在“ TestNG 结果”窗口中。
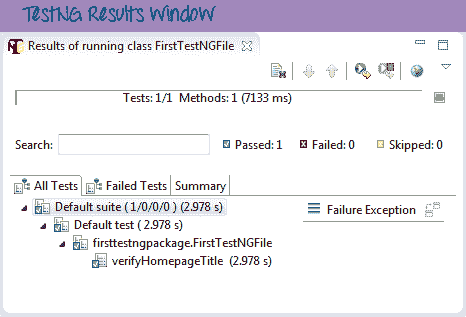
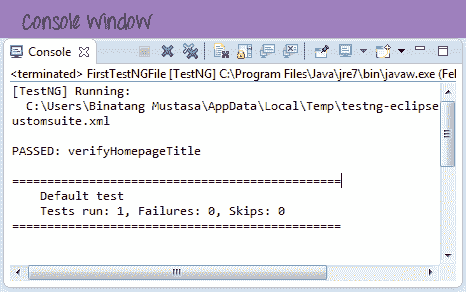
## 检查 TestNG 创建的报告
Eclipse 中的“控制台”窗口提供了测试案例结果的基于文本的报告,而“ TestNG 结果”窗口则为我们提供了图形化报告。
### 生成 HTML 报告
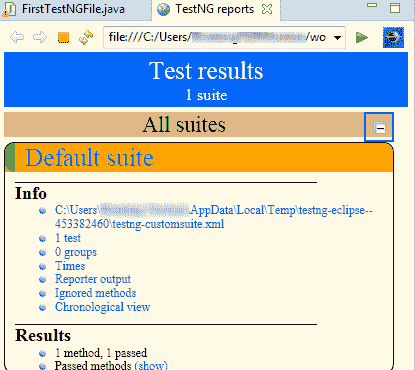
TestNG 能够生成 HTML 格式的报告。
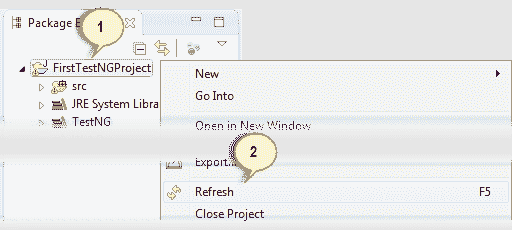
**步骤 1:**运行上一节中创建的 FirstTestNGFile 后,在“项目资源管理器”窗口中右键单击项目名称(FirstTestNGProject),然后单击“刷新”选项。
**步骤 2:**请注意,已创建“测试输出”文件夹。 展开并查找 index.html 文件。 该 HTML 文件是最新测试运行结果的报告。
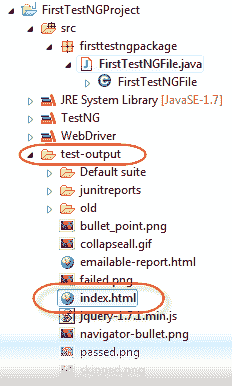
**步骤 3:**双击该 index.html 文件以在 Eclipse 的内置 Web 浏览器中将其打开。 就像在普通的 Web 浏览器中一样,只需重新按一下 F5,就可以在重新运行测试后随时刷新此页面。
## [NGG0] TestNG 中使用的注释
在上一节中,向您介绍了@Test 批注。 现在,我们将研究更高级的注释及其用法。
### 多个测试案例
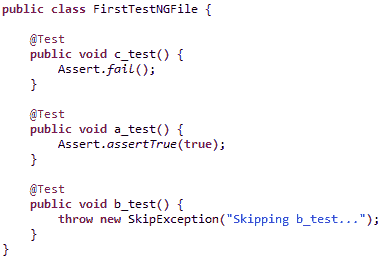
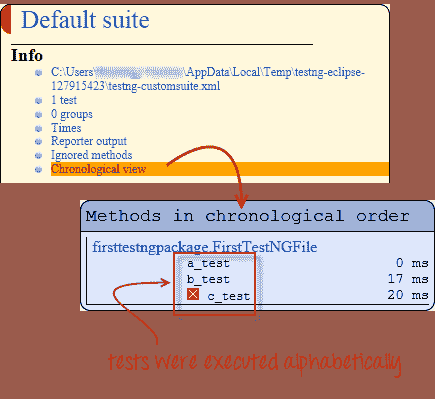
我们可以在一个 TestNG 文件中使用多个@Test 批注。 默认情况下,@ Test 注释的方法按字母顺序执行。 请参见下面的代码。 尽管方法 c_test,a_test 和 b_test 不在代码中按字母顺序排列,但它们将照此执行。
运行此代码,然后在生成的 index.html 页面上,单击“按时间顺序排列的视图”。
### 参数
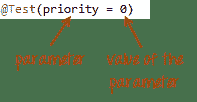
如果希望方法以不同的顺序执行,请使用参数“ priority”。 **参数是可修改注释功能**的关键字。
* 参数要求您为其分配一个值。 通过在它们旁边放置一个“ =”,然后在其后跟数值,可以做到这一点。
* 参数用一对括号括起来,它们放在注释的后面,如下面的代码片段所示。
TestNG 将以最低优先级值到最高优先级执行@Test 批注。 您的优先级值不必是连续的。
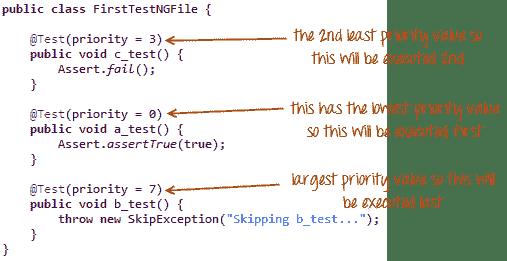
TestNG HTML 报告将确认方法是根据优先级的升序执行的。

### 多个参数
除了“优先级”外,@ Test 还有一个名为“ alwaysRun”的参数,只能将其设置为“ true”或“ false”。 **要在单个注释中使用两个或多个参数,请用逗号**将其分开,如下所示。
```
@Test(priority = 0, alwaysRun = true)
```

@BeforeTest 和@AfterTest
| **@BeforeTest** | 在 TestNG 文件中的第一个测试用例之前,将在**之前执行此注释下的方法。** |
| **@AfterTest** | 在 TestNG 文件中的所有测试用例都执行完之后,将执行此注释下的方法**。** |
考虑下面的代码。
```
package firsttestngpackage;
import org.openqa.selenium.*;
import org.openqa.selenium.firefox.FirefoxDriver;
import org.testng.Assert;
import org.testng.annotations.*;
public class firsttestngfile {
public String baseUrl = "http://demo.guru99.com/test/newtours/";
String driverPath = "C:\\geckodriver.exe";
public WebDriver driver ;
@BeforeTest
public void launchBrowser() {
System.out.println("launching firefox browser");
System.setProperty("webdriver.gecko.driver", driverPath);
driver = new FirefoxDriver();
driver.get(baseUrl);
}
@Test
public void verifyHomepageTitle() {
String expectedTitle = "Welcome: Mercury Tours";
String actualTitle = driver.getTitle();
Assert.assertEquals(actualTitle, expectedTitle);
}
@AfterTest
public void terminateBrowser(){
driver.close();
}
}
```
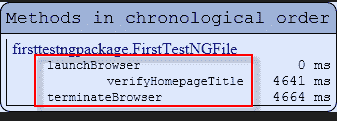
应用表和上面的代码提供的逻辑,我们可以预测执行方法的顺序为:
* 1 <sup>st</sup> -launchBrowser()
* 2 <sup>和</sup>-verifyHomepageTitle()
* 3 <sup>rd</sup> -TerminateBrowser()
**注释块的放置可以互换,而不会影响它们执行的时间顺序**。 例如,尝试重新排列注释块,以使您的代码与以下代码相似。
```
package firsttestngpackage;
import org.openqa.selenium.*;
import org.openqa.selenium.firefox.FirefoxDriver;
import org.testng.Assert;
import org.testng.annotations.*;
public class firsttestngfile {
public String baseUrl = "http://demo.guru99.com/test/newtours/";
String driverPath = "C:\\geckodriver.exe";
public WebDriver driver ;
@AfterTest //Jumbled
public void terminateBrowser(){
driver.close();
}
@BeforeTest //Jumbled
public void launchBrowser() {
System.out.println("launching firefox browser");
System.setProperty("webdriver.gecko.driver", driverPath);
driver = new FirefoxDriver();
driver.get(baseUrl);
}
@Test //Jumbled
public void verifyHomepageTitle() {
String expectedTitle = "Welcome: Mercury Tours";
String actualTitle = driver.getTitle();
Assert.assertEquals(actualTitle, expectedTitle);
}
}
```
运行上面的代码,请注意
@BeforeMethod 和@AfterMethod
| **@BeforeMethod** | 在每个测试用例中,将在此方法之前执行**。** |
| **@AfterMethod** | 在每个测试用例中,在每个方法之后将执行此注释下的方法**。** |
在 Mercury Tours 中,假设我们想验证下面两个链接的目标页面的标题。
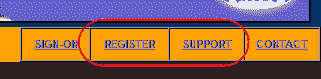
我们的测试流程为:
* 转到主页并验证其标题。
* 单击注册并验证其目标页面的标题。
* 返回首页并确认其标题是否正确。
* 单击支持,并验证其目标页面的标题。
* 返回首页并确认其标题是否正确。
下面的代码说明了如何使用@BeforeMethod 和@AfterMethod 有效执行上述方案。
```
package firsttestngpackage;
import org.openqa.selenium.*;
import org.openqa.selenium.firefox.FirefoxDriver;
import org.testng.Assert;
import org.testng.annotations.*;
@Test
public class firsttestngfile {
public String baseUrl = "http://demo.guru99.com/test/newtours/";
String driverPath = "C:\\geckodriver.exe";
public WebDriver driver;
public String expected = null;
public String actual = null;
@BeforeTest
public void launchBrowser() {
System.out.println("launching firefox browser");
System.setProperty("webdriver.gecko.driver", driverPath);
driver= new FirefoxDriver();
driver.get(baseUrl);
}
@BeforeMethod
public void verifyHomepageTitle() {
String expectedTitle = "Welcome: Mercury Tours";
String actualTitle = driver.getTitle();
Assert.assertEquals(actualTitle, expectedTitle);
}
@Test(priority = 0)
public void register(){
driver.findElement(By.linkText("REGISTER")).click() ;
expected = "Register: Mercury Tours";
actual = driver.getTitle();
Assert.assertEquals(actual, expected);
}
@Test(priority = 1)
public void support() {
driver.findElement(By.linkText("SUPPORT")).click() ;
expected = "Under Construction: Mercury Tours";
actual = driver.getTitle();
Assert.assertEquals(actual, expected);
}
@AfterMethod
public void goBackToHomepage ( ) {
driver.findElement(By.linkText("Home")).click() ;
}
@AfterTest
public void terminateBrowser(){
driver.close();
}
}
```
执行此测试后,您的 TestNG 应报告以下顺序。
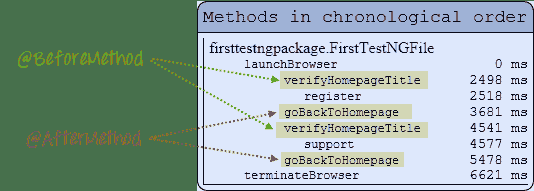
简而言之,@BeforeMethod 应该包含在每个测试用例之前需要在之前运行**的方法,而@AfterMethod 应该包含在每个测试用例之后**之后需要运行**的方法。**
## TestNG 注释的摘要
**@BeforeSuite** :带注释的方法将在该套件中的所有测试运行之前运行。
**@AfterSuite** :带注释的方法将在该套件中的所有测试运行后运行。
**@BeforeTest** :带注释的方法将在运行属于标记内部类的任何测试方法之前运行。
**@AfterTest** :注释方法将在标签内部所有属于类的测试方法运行后运行。
**@BeforeGroups** :此配置方法将在其之前运行的组的列表。 保证此方法可以在调用属于这些组中的任何一个的第一个测试方法之前不久运行。
**@AfterGroups** :此配置方法将在其后运行的组的列表。 保证在调用属于这些组中任何一个的最后一个测试方法后不久便可以运行该方法。
**@BeforeClass** :带注释的方法将在调用当前类中的第一个测试方法之前运行。
**@AfterClass** :带注释的方法将在当前类中的所有测试方法运行后运行。
**@BeforeMethod** :带注释的方法将在每种测试方法之前运行。
**@AfterMethod** :带注释的方法将在每种测试方法之后运行。
**@Test** :带注释的方法是测试用例的一部分
### 结论
* TestNG 是一个测试框架,能够使 Selenium 测试更容易理解,并能够生成易于理解的报告。
* 与 JUnit 相比,TestNG 的主要优点如下。
* 注释更易于使用和理解。
* 测试用例可以更容易地分组。
* TestNG 允许我们创建并行测试。
* Eclipse 中的 Console 窗口生成基于文本的结果,而 TestNG 窗口更有用,因为它为我们提供了测试结果的图形输出以及其他有意义的细节,例如:
* 每种方法的运行时。
* 执行方法的时间顺序
* TestNG 能够生成基于 HTML 的报告。
* 注释可以像通常的 Java 方法一样使用参数。
- Guru99 软件测试教程
- 软件测试教程:免费课程
- 现实生活
- 测试基础
- 什么是软件测试? 定义,基础&类型
- 软件测试作为职业道路(技能,薪水,成长)
- 软件测试的 7 条原则:通过实例学习
- 软件测试中的 V 模型
- STLC-软件测试生命周期阶段&进入,退出条件
- 测试类型
- 初学者手动测试教程:概念,类型,工具
- 自动化测试教程:什么是流程,收益&工具
- 自动化测试与 手动测试:有什么区别?
- 单元测试教程:什么是类型,工具,示例
- 集成测试:什么是类型,自上而下&自下而上的示例
- 什么是系统测试? 类型&的定义和示例
- 健康测试与烟雾测试:简介&差异
- 什么是回归测试? 定义,测试用例(示例)
- 什么是非功能测试? 带示例的类型
- TestCase 开发
- 软件测试中的测试文档
- 什么是测试方案? 带有示例的模板
- 如何编写测试用例:带有示例的示例模板
- QTP(UFT)中的环境变量与示例
- 什么是软件测试中的测试分析(测试基础)?
- 什么是需求可追溯性矩阵(RTM)? 示例模板
- 测试数据生成:什么是,如何做,示例,工具
- 下载示例测试案例模板:示例 Excel,Word 格式
- 测试技术
- 带有测试用例设计示例的软件测试技术
- 边界值分析&等价分割的例子
- 决策表测试:学习示例
- 什么是状态转换测试? 图表,技术,示例
- 什么是用例测试? 技术,范例
- 测试管理&放大器; 控制
- 软件测试评估技术:分步指南
- 如何创建测试计划(带有示例)
- 测试计划模板:带有 Web 应用程序示例的样本文档
- 瑕疵
- 软件测试的测试环境
- 软件测试中的缺陷管理流程(错误报告模板)
- 软件测试中的缺陷/缺陷生命周期
- 2020 年排名前 50 位的软件测试工具
- 敏捷
- 敏捷方法论&模型:软件开发指南&测试
- 什么是敏捷测试? 流程,策略,测试计划,生命周期示例
- Scrum 测试方法论教程:什么是流程,工件,冲刺
- 敏捷/ Scrum 方法论的自动化测试框架
- SAFe 方法论教程:什么是可扩展敏捷框架
- 测试不同的域
- Web 应用程序测试:网站测试的 8 个步骤指南
- Web 应用程序测试清单:网站的测试用例示例
- 银行领域应用测试:示例测试案例
- 电子商务测试:如何测试电子商务网站
- 带有示例测试案例的支付网关测试教程
- 大型机测试-完整教程
- 测试零售销售点(POS)系统:示例测试案例
- 使用样本测试用例进行 HealthCare 域测试
- 使用样本测试用例测试保险领域的应用程序
- 使用示例 OSS / BSS 测试用例测试电信域
- 商业智能(BI)测试:示例测试案例
- 白盒测试
- 什么是白盒测试? 技术,示例,类型&工具
- 什么是静态测试? 什么是测试审查?
- Mccabe 的环复杂性:使用流程图进行计算(示例)
- 代码覆盖率教程:分支,语句,决策,FSM
- 路径测试&包含示例的基础路径测试
- 性能测试
- 性能测试教程:什么是类型,度量&示例
- 负载测试教程:什么是? 如何? (带有示例)
- 什么是软件测试中的应力测试? 工具,类型,示例
- 什么是音量测试? 通过实例学习
- 什么是可伸缩性测试? 通过示例学习
- 什么是浸泡测试? 定义,含义,示例
- 软件测试中的稳定性测试
- 什么是峰值测试? 通过示例学习
- 负载测试,压力测试,性能测试:讨论差异
- 什么是响应时间测试?
- 什么是基准测试? 测试计划,工具,示例
- 什么是软件测试中的耐久性测试? (带有示例)
- 可靠性测试教程:什么是方法,工具,示例
- 13 个最佳性能测试工具| 负载测试工具(2020)
- 预先测试主题
- 软件测试指标:什么是类型&示例
- 如何创建测试策略文档(示例模板)
- 什么是测试即服务? TaaS 模型解释
- 什么是软件测试中的测试成熟度模型(TMM)?
- 常问问题
- 严重性&测试优先级:差异&示例
- 测试策略与测试计划:有什么区别?
- 静态测试与动态测试:有什么区别?
- 重新测试和回归测试之间的区别
- 质量保证与质量控制:有什么区别?
- 实例验证与验证之间的区别
- 正测试和负测试的例子
- 什么是测试线束? 工具&的例子
- 什么是缺陷密度? 用示例计算的公式
- 全球化测试和本地化测试之间的区别
- 测试条件与测试场景:有什么区别?
- 单元测试与集成测试:有什么区别?
- 功能测试与非功能测试:有什么区别?
- 黑匣子测试与 白盒测试:主要差异
- 前端测试与 后端测试:有什么区别?
- SDLC 与 STLC:有什么区别?
- 什么是 SDET? 完整的形式,含义,作用和职责
- 测试人员必须编写代码吗?
- 测试用例与测试方案:有什么区别?
- 测试类型-超级列表
- 软件测试类型:100 种不同测试类型的示例
- API 测试教程:10 分钟内学习!
- 什么是黑盒测试? 技术,示例&类型
- Alpha 测试与 Beta 测试:有什么区别?
- 什么是功能测试? 类型&示例(完整教程)
- 什么是用户验收测试(UAT)? 与例子
- REST API 测试教程:手动测试案例示例
- 使用 Restito 工具进行 REST 客户端测试
- REST 保证教程:如何使用示例测试 API
- 什么是安全测试? 带示例的类型
- GUI 测试教程:带有示例的用户界面(UI)测试案例
- 软件测试方法:了解质量检查模型
- 端到端测试教程:什么是 E2E 测试示例
- 什么是探索性测试? 实例技巧
- 软件测试中的变异测试:变异分数&分析示例
- 什么是临时测试? 带示例的类型
- 关键字驱动测试框架的示例
- 基于风险的测试:方法,矩阵,过程&示例
- 后端测试教程:什么是工具&示例
- 什么是烟雾测试? 如何使用示例
- 辅助功能测试教程:什么是工具&示例
- 什么是质量保证(QA)? 工艺,方法,实例
- 带有示例项目示例的质量管理计划模板
- 什么是 SOA 测试? 实例教程
- 渗透测试教程:什么是 PenTest?
- 什么是兼容性测试? 正向&向后测试(示例)
- 什么是带有示例的系统集成测试(SIT)
- 软件测试中的测试范围
- 什么是可用性测试? UX(用户体验)测试示例
- 协议测试教程:L2 & L3
- 什么是云测试? SaaS 测试教程
- Cookie 测试:网站的测试用例示例
- 什么是灰盒测试? 技术实例
- 基于模型的测试教程:工具&示例
- 什么是试点测试? 定义,含义,示例
- 什么是正交阵列测试(OATS)? 工具,技术&示例
- 什么是 Alpha 测试? 工艺,实例
- 模糊测试(模糊)教程:什么是类型,工具&示例
- 什么是本地化测试? 测试用例示例&清单
- 什么是接口测试? 类型&示例
- 什么是漏洞评估? 测试过程,VAPT 扫描工具
- 什么是配置测试? 示例测试用例
- 应用程序测试教程:什么是工具,如何使用
- 什么是阴性测试? 测试用例
- 什么是软件测试中的互操作性测试? (带有示例)
- 一致性测试(一致性测试)-完整指南
- 什么是循环测试? 方法论,例子
- 什么是组件测试? 技术,示例测试用例
- 什么是动态测试? 类型,技术&示例
- 什么是并行测试? 定义,方法,实例
- 什么是运营验收测试(OAT)? 示例测试用例
- 什么是模块测试? 定义,例子
- 什么是软件测试中的工作流测试? 与例子
- 存储测试教程:什么是类型,概念
- 什么是恢复测试? 与例子
- 什么是软件测试中的并发测试?
- 什么是软件测试中的线程测试?
- 什么是破坏性测试? 技术,方法,实例
- 什么是 DevOps 中的连续测试? 定义,好处,工具
- 软件测试中的测试级别
- IoT 测试教程:什么是流程,挑战&工具
- 什么是测试驱动开发(TDD)? 实例教程
- 什么是数据驱动测试? 学习创建框架
- 什么是猴子&大猩猩测试? 例子,差异
- 什么是前端测试? 工具&框架
- 什么是软件测试中的嵌入式测试?
- 什么是软件测试中的域测试? (带有示例)
- Salesforce 测试教程:什么,流程,工具,最佳实践
- 设计验证&验证过程
- 无损检测(NDT)
- 工具类
- 2020 年 10 种最佳跨浏览器兼容性测试工具
- 2020 年 20 种最佳 Bug /缺陷跟踪工具
- 2020 年 20 种最佳 Web 测试工具
- 20 个最佳自动化测试工具(2020 年 7 月更新)
- 2020 年 15 种最佳测试数据生成工具
- 2020 年 13 家最佳人群测试(Crowdsource)公司
- 2020 年 10 种最佳探索性测试工具
- 检查!
- 前 150 个软件测试面试问题&答案
- 前 15 个自动化测试面试问题&答案
- 前 40 个 QA 面试问题&答案
- 前 25 个数据库测试面试问题&答案
- 资质认证
- ISTQB 认证:完整的模拟学习考试材料
- CSTE 认证指南和学习资料
- 认证软件质量分析师(CSQA)认证指南
- ISTQB CTAL(高级)考试及学习资料
- UFT / QTP 初学者教程:7 天学习
- 介绍
- 什么是 QTP / UFT 自动化测试工具?
- 如何下载和安装 UFT 或 QTP [最新版本]
- HP UFT / QTP 中的航班预订应用程序
- 如何使用 QTP / UFT IDE
- 如何记录和播放 UFT / QTP 脚本
- 高级的东西
- 对象识别如何在 QTP / UFT 中工作?
- QTP / UFT 中的关键字和专家视图
- 了解 SystemUtil.Run,SetSecure,Set,类型:QTP / UFT 示例
- 如何使用示例重播 QTP / UFT 中的脚本
- 通过打印/导出示例了解 QTP / UFT 中的测试结果
- QTP / UFT 中的参数化示例
- QTP / UFT 中的检查点与示例
- 如何使用示例在 QTP / UFT 中打印输出值
- QTP / UFT 中包含 IF,Else,End IF 和示例
- QTP / UFT 中的 Reporter.ReportEvent 及其示例
- QTP / UFT 中的动作与示例
- QTP / UFT 中的智能识别示例
- QTP / UFT 中的顺序标识符:对象识别示例
- QTP / UFT 中的本地&共享对象存储库
- QTP / UFT 中的记录模式类型:模拟,低电平,上下文
- 如何通过 3 个简单的步骤在 QTP / UFT 中使用功能
- 如何在 QTP / UFT 中使用事务
- 如何通过示例使用 QTP / UFT 中的恢复方案
- QTP / UFT 中的可选步骤(带示例)
- QTP / UFT 中的对象间谍,GetRoProperty,GetToProperty 和示例
- QTP / UFT 中的描述性编程:动态&静态
- 测试自动化框架-您必须知道的东西!
- QTP / UFT 中的数据,关键字&混合自动化框架
- QTP / UFT 中的业务流程测试(BPT)框架
- 如何在 QTP / UFT 中从 EXCEL 导入,读取,更改数据
- QTP / UFT 移动应用测试教程
- 使用 QTP / UFT 进行 API 测试:完整的教程
- 检查!
- 前 100 个 QTP / UFT 面试问题&答案
- 测验
- 初学者硒教程:7 天学习 WebDriver
- 第一眼
- 什么是硒? 硒自动化测试简介
- 什么是 Selenium WebDriver? 与 RC 的区别
- WebDriver 教程
- 如何下载&安装 Selenium WebDriver
- 第一个 Selenium Webdriver 脚本:JAVA 代码示例
- Selenium IDE 中的定位器:CSS 选择器,DOM,XPath,链接文本,ID
- 在 Selenium WebDriver 中查找元素和 FindElements
- Selenium Form WebElement:文本框,提交按钮,sendkeys(),click()
- 如何在 Selenium WebDriver 中选择复选框和单选按钮
- 如何在 Selenium Webdriver 中单击图像
- 如何使用 Selenium Webdriver 从 DropDown 中选择值
- 在 Selenium Webdriver 中按链接文本&部分链接文本定位元素
- 鼠标单击&键盘事件:Selenium Webdriver 中的操作类
- 如何上传&使用 Selenium Webdriver 下载文件
- Selenium WebDriver 中的 XPath:完整教程
- Selenium WebDriver 中的警报&弹出窗口处理
- 如何在 Selenium WebDriver 中处理 Web 表
- 使用 Selenium WebDriver 处理动态 Web 表
- Selenium WebDriver 中所需的功能
- 如何使用 Selenium WebDriver 验证工具提示
- 如何使用 Selenium Webdriver 查找所有/断开的链接
- Gecko(Marionette)驱动程序 Selenium:下载,安装,与 Firefox 一起使用
- 测试 NG
- 如何下载&在 Eclipse 中为 Selenium WebDriver 安装 TestNG
- TestNG 教程:Selenium 中的注释,框架和示例
- TestNG 组:包含,排除示例-Selenium 教程
- 硒中的 TestNG @Test 优先级
- Selenium 中的并行执行:会话处理& TestNG 依赖性
- TestNG:如何在 Selenium 中运行多个测试套件
- Selenium 中的 TestNG 侦听器:ITestListener & ITestResult 示例
- 如何在 TestNG 中执行失败的测试用例:Selenium WebDriver
- Selenium WebDriver 中的 TestNG 报告生成
- 在 Selenium WebDriver 中自定义 PDF &电子邮件 TestNG 报告
- 构架
- 页面对象模型(POM)&页面工厂:Selenium WebDriver 教程
- Dataprovider & TestNG XML:Selenium 中的参数化(示例)
- 从 Selenium Webdriver 中的 Excel 文件中读取&写入数据:POI & JXL
- 如何从 Selenium Webdriver 中的 DatePicker /日历中选择日期
- 提前 Webdriver 的东西!
- Selenium Grid 教程:集线器&节点(带有示例)
- Maven & Jenkins 与 Selenium 集成:完整教程
- Selenium 自动化框架:数据驱动,关键字驱动&混合
- 使用 Selenium 进行数据库测试:分步指南
- 在 Selenium Webdriver 中处理 iFrame:switchTo()
- 使用 Selenium WebDriver 进行跨浏览器测试
- 如何在 Selenium WebDriver 中截屏
- 具有 Selenium 教程的 Log4j:下载,安装,使用&示例
- 硒无头浏览器测试:HTMLUnitDriver & PhantomJS
- Selenium Webdriver 中的机器人类
- 如何在 Selenium Webdriver 中使用 AutoIT:文件上传示例
- 如何在 Selenium WebDriver 中处理 SSL 证书
- 如何在 Selenium Webdriver 中处理 AJAX 呼叫
- Selenium WebDriver 中的 JavaScriptExecutor 示例
- 使用 Python 的 Selenium Webdriver:示例教程
- 如何使用 IntelliJ IDE & Selenium Webdriver
- 使用 Selenium WebDriver 进行闪存测试
- 带有 Selenium 的 Apache ANT:完整教程
- Selenium Webdriver 中的 XSLT 报告
- Github 与 Selenium 集成:完整教程
- Selenium WebDriver 中的 Cookie 处理
- 将 SoapUI 与 Selenium 一起用于 Web 服务测试
- 如何在 Selenium WebDriver 中创建 Firefox 配置文件
- 含硒硒(BDD 框架):带有示例的教程
- 如何在 Selenium WebDriver 中拖放(示例)
- Selenium C#Webdriver 教程:NUnit 示例
- 在 Selenium WebDriver 中创建对象存储库:XML &属性文件
- 如何在 Selenium Webdriver 中向下滚动或向上滚动页面
- Sikuli 教程:如何将 Sikuli 与硒一起使用(示例)
- XPath 在 Selenium Webdriver 中包含,同级,祖先,与或,父级,开头,轴
- Selenium WebDriver 中的隐式,显式&流利等待
- 双击并右键单击 Selenium 中的示例
- 使用带有示例的 Webdriver 的 Selenium 代理身份验证
- Selenium 异常处理(常见异常列表)
- Selenium IDE 教程
- 如何下载&为 Firefox 安装 Selenium IDE
- Selenium IDE 初学者教程
- 如何通过脚本&命令(声明,验证)使用 Selenium IDE
- 在 Selenium IDE 中验证 Element Present,waitFor 和 Wait
- 在 Selenium IDE 中存储变量,回显,警报,弹出窗口处理
- 硒核心扩展(User-Extensions.js)
- 如何在 Selenium IDE 中进行调试 断点&起点
- 最大化 Selenium 中的浏览器
- Chrome 选项&所需功能:AdBlocker,隐身,无头
- 使用 Selenium Webdriver 刷新页面
- 使用 Excel VBA 和 Selenium
- 必须检查!
- 前 100 个硒面试问题&答案
- 硒与 HP UFT(QTP):有什么区别?
- 2020 年排名前 15 位的硒替代品
- 2020 年 10 种最佳 iMacros 替代品
- 免费的移动应用测试教程
- 第一眼
- 移动应用程序测试:示例测试用例&测试方案
- 真实设备与模拟器与模拟器的测试:主要差异
- 鸦片
- 适用于 Android 的 APPIUM 教程& iOS 移动应用测试
- UIAutomatorViewer 教程:Android 测试检查器
- Android 仿真器的 Appium 所需功能[示例]
- 将具有 Android 调试桥(ADB)的移动设备连接到 USB,WiFi
- Appium Maven 依赖项:项目示例
- 前 18 个 Appium 面试问题&答案
- 提前进行移动测试!
- 带有自动化框架的 Android APP 测试教程
- Robotium 教程:您的第一个 Android 框架
- Selendroid 入门实例教程
- 移动应用程序性能测试:清单,工具(Andriod & iOS)
- 适用于 Android 测试的 Calabash 自动化工具教程
- iOS 应用测试教程:手册&自动化
- 使用 UIAutomation 框架的 iOS 自动化测试
- 热门 20 个移动测试面试问题&答案
- 游戏测试:如何测试移动/桌面应用程序
- 适用于 Android 的 14 种最佳移动测试工具& iOS App [免费/付费]
- 移动应用中的中断测试
- 2020 年 26 种最佳移动应用开发工具
- 初学者黄瓜测试教程
- 什么是黄瓜测试工具? 框架介绍
- 如何下载&在 Windows 中安装 CUCUMBER
- 什么是黄瓜特征文件&步骤定义? (带有示例)
- 什么是小黄瓜? 用黄瓜写小黄瓜测试
- 创建您的第一个黄瓜脚本(2 个示例)
- 黄瓜面试的前 20 个问题&答案
- SoapUI 初学者教程
- Web 服务测试:初学者教程
- 什么是 SoapUI? SoapUI 测试简介
- 在 Windows 上进行 SOAPUI 下载,安装和&配置
- SoapUI:如何创建测试套件&测试用例
- SoapUI 中的断言:完整教程
- SoapUI 面试的前 15 个问题&答案
- 行为驱动开发(BDD)通过行为测试 REST API
- 15 Rest API 面试问题&答案
- 2020 年 19 种最佳 SoapUI 替代品
- JUnit 初学者教程:3 天学习
- 如何在 Eclipse 中下载和安装 JUnit
- JUnit 测试用例@Before @BeforeClass 注释
- 带有示例的 JUnit 注释教程
- Junit 断言&断言与示例
- 使用示例创建 JUnit 测试套件:@RunWith @SuiteClasses
- JUnit @Ignore 测试注释与示例
- JUnit 预期的异常测试:@Test(预期)
- JUnit ErrorCollector @Rule 与示例
- 使用@Parameters 的示例进行 JUnit 参数化测试
- TestNG 与 JUnit:有什么区别?
- 机械手流程自动化(RPA)教程:什么是工具&示例
- Bugzilla 入门指南:缺陷跟踪工具
- JIRA 教程:初学者完整指南
- MANTIS Bug Tracker 入门教程
- ETL 测试或数据仓库测试教程
- 学习 SAP 测试:创建您的第一个 SAP 测试用例
- 带有示例测试案例的数据库(数据)测试教程
- HP ALM /质量中心教程
- 介绍
- 什么是 HP ALM? 质量中心工具
- 如何下载&安装 HP ALM(质量中心)
- HP ALM 管理:创建域,项目&用户
- 高级的东西
- 管理选项卡:在 HP ALM(质量中心)中创建版本&周期
- HP ALM(质量中心)教程中的需求模块
- HP ALM(质量中心)教程中的测试计划模块
- HP ALM(质量中心)中的测试实验室
- 如何将 UFT(QTP)与 ALM(质量中心)集成
- HP ALM(质量中心)中的缺陷管理生命周期
- 仪表板,报告 HP ALM(Quality Center)中的&分析
- HP ALM:过滤条件,查找,替换,标志,历史记录&发送邮件
- 如何在 HP ALM(质量中心)中自定义项目
- 检查!
- HP ALM / QC 认证:绝对指南
- 30 个最佳 ALM 工具[2020 年 7 月列表]
- HP ALM(质量中心)面试的前 35 个问题&答案
- 测试管理教程:完整的培训课程
- 介绍
- 角色&测试经理/测试负责人的职责
- 测试管理过程:测试项目的完整指南
- 测试管理中的项目风险分析&解决方案
- 软件测试评估技术:分步指南
- 高级的东西
- 项目团队:开发,构建&管理:逐步过程
- 如何创建测试计划(带有示例)
- 测试执行期间的测试监控&测试控制:完整教程
- 测试项目中的问题管理
- 测试摘要报告教程:通过示例&模板学习
- 软件质量保证(SQA):计划,审核&审核
- 软件测试中的缺陷管理流程(错误报告模板)
- 使用 PDCA 模型的测试过程改进(TPI)
- 如何选择最佳自动化测试工具
- 掌握团队管理技能的 5 个步骤
- 必须知道!
- 最佳 25 种测试管理工具(2020 年 7 月更新)
- 前 20 名测试经理/领导面试问题
- TestLink 教程:完整指南
- Guru99 SAP 教程
- SAP 初学者课程
- 介绍
- 什么是 SAP? SAP ERP 软件的定义
- SAP 业务套件
- SAP ERP 功能&技术模块
- 如何为您的职业选择最佳 SAP 模块
- 如何成为 SAP 顾问
- 如何获得 SAP 认证
- 高级的东西
- SAP 登录:GUI &导航教程
- 如何安装 SAP IDES for Practice
- 什么是 mySAP?
- SAP NetWeaver:10 分钟学习
- 如何在 SAP 中显示技术名称
- 适用于所有国家/地区的 SAP Molga 列表
- 如何执行 SAP 报表
- 如何在 SAP 中创建变式
- SAP 面试的前 50 个问题
- SAP 业务蓝图:BBP 文档&模板
- ERP 的完整形式和含义是什么?
- 完整格式的 SAP:首字母缩写| 缩写
- 必须知道!
- 2020 年面向初学者的 6 本最佳 SAP 书籍
- 2020 年 10 种最佳 SAP ERP 替代方案
- SAP 测试面试的前 18 个问题&答案
- SAP ABAP 编程教程
- ABAP 基础知识
- 什么是 ABAP? 完整的形式,含义,历史
- ABAP 简介:数据类型,运算符&编辑器-教程
- ABAP 数据字典教程 SE11:表,锁对象,视图&结构
- ABAP 中的模块化:宏,子例程&功能模块
- 让我们深入数据库
- 在 SAP ABAP 中打开 SQL &本机 SQL
- SAP ABAP 内部表:创建,读取,填充,复制&删除
- SAP ABAP 表控件示例
- 让 CODE!
- 关于 ABAP 报告编程的全部信息
- 对话框编程教程:SAP ABAP 中的模块池
- ABAP 子屏幕教程:SAP 中的呼叫子屏幕
- SAP 按价值处理&按帮助处理
- SAP 教程-ABAP 列表查看器中的 ALV 报告
- 形式和脚本
- SAP 脚本教程:SE71,SE78,SCC1,VF03,SO10
- SAP ABAP 中的智能表单
- 一些出口的时间
- 什么是 SAP ABAP 中的用户出口和客户出口
- 什么是 BADI? SAP ABAP 教程
- 让我们传输一些数据!
- SAP 中的 ABAP 查询教程:SQ01,SQ02,SQ03
- SAP ABAP BDC(批处理数据通信)教程
- ALE,EDI & IDocs 简介&差异:SAP 教程
- SAP IDOC 教程:定义,结构,类型,格式&表
- SAP BAPI 教程-在 ABAP 中创建 BAPI 的分步指南
- SAP 教程中的远程功能调用(RFC)
- SAP ABAP 面试的前 35 个问题&答案
- SAP 人力资源| SAP HCM 模块培训教程
- 行政人员(PA)
- 什么是 SAP HR? SAP HCM 简介
- 什么是信息类型?
- SAP 信息类型:使用 PA30,PA20 创建,更改,复制,删除,概览
- SAP 快速入门教程:PA70,PA71
- 您必须知道的重要信息类型 T 代码
- 如何在 SAP 中查看为员工 PA10 保存的所有信息类型
- SAP 中有关 Infotype 0003 薪资状态的所有信息
- 什么是时间限制? SAP HR 教程
- 人事行动
- SAP PA40:人员操作教程
- 如何删除人员编号:SAP RPUDELPN
- SAP 中的组织,企业,人员结构
- 了解 SAP HR 中的组织管理(OM)
- SAP PP01:如何维护 OM 信息类型
- SAP PPOCE:如何创建组织单位
- 职位
- 如何创建,复制&界定职位:SAP PPOME
- 在 SAP 中将职位定义为组织单位负责人
- 如何将作业&成本中心分配给 SAP 中的职位
- 如何显示职位的组织结构
- SAP HR 时间管理:PA51,PA53,PA61,PA62,PA63
- 如何进行运行时评估:SAP PT60
- SAP PT66:如何检查时间评估结果 RPTIME
- SAP 中的工资核算流程概述
- SAP PA03:薪资控制记录教程
- 如何在 SAP 中执行工资核算
- 如何在 SAP 中使用 PC_PAYRESULT 检查工资结果
- 如何在 SAP 中删除工资核算结果:PU01
- 必须知道工资信息
- 什么是非周期工资? SAP IT267
- 如何在 SAP 中审核工资单:RPUAUD00
- SAP HR 中的 Matchcode W 是什么?
- SAP Wage Types 教程:主要,辅助,对话,时间
- SAP 工资类型报表器:PC00_MXX_CWTR
- 过帐工资核算活动
- 使用 SAP DME 文件进行银行转帐
- SAP FI01:如何创建银行密钥
- SAP 中的总分类帐(G / L)过帐:PCP0 & PC00_M99_CIPE
- SAP AD HOC 查询教程(S_PH0_48000513)
- 检查!
- SAP HR 面试主要问题
- SAP FICO 培训教程:了解 SAP FI & SAP CO 模块
- SAP FI
- SAP FICO 简介
- 如何在 SAP 中创建公司
- 如何在 SAP &中创建公司分配公司代码
- 总帐
- 如何在 SAP 中创建会计科目表
- 如何在 SAP 中定义保留收益帐户
- SAP 教程中的总帐科目:创建,显示,冻结&删除 FS00
- SAP 中的总分类帐(G / L)过帐:PCP0 & PC00_M99_CIPE
- 如何在 SAP 中创建财务报表版本(FSV)
- 如何在 SAP 中执行日记帐分录 FB50
- 在 SAP 中创建会计年度变式&分配给公司代码:完整教程
- 如何在 SAP 中定义过帐期间变式
- 如何在 SAP 中过帐期间变式中打开和关闭期间
- 如何在 SAP 中定义字段状态变式&字段状态组
- 如何在 SAP FICO 中定义文档类型和编号范围
- 总帐凭证教程:在 SAP 中暂留,暂存,过帐过帐
- 应收账款
- SAP FI 中的应收帐款
- 客户主数据教程:在 SAP 中创建,显示,阻止,删除
- SAP 中的 FB02:更改客户文档教程
- 如何在 SAP 中创建客户帐户组
- 如何在 SAP 中创建一次性客户 FD01
- 如何在 SAP FICO 中创建客户销售发票 FB70
- SAP 中的凭证冲销 FB08:分步指南
- SAP 中的 FB75:过帐销售退货指南–贷项凭证
- 如何在 SAP 中过帐客户收款 F-28
- 如何在 SAP 中过帐外币发票 FB70
- 剩余方法:将&收款转入 SAP 中的部分付款
- 部分方式:SAP 中收款&的部分付款过帐
- FBRA:如何在 SAP 中重置已清除的项目
- SAP 中的 FD32:信用控制范围教程
- 应付账款
- SAP FI 中的应付帐款
- 如何在 SAP FICO 中创建供应商帐户组
- 如何在 SAP FICO 中阻止或删除供应商
- 在 SAP 中创建供应商主数据的分步指南
- 如何在 SAP 中创建一次性供应商 FK01
- SAP 中的 FB60:如何过帐采购发票
- 如何在 SAP FI 中过帐采购退货 FB65
- 如何在 SAP 中过帐外向供应商付款 F-53
- 供应商发票&付款过帐期间 SAP 中的预扣税
- 自动付款程序运行 F110:SAP 教程
- 如何在 SAP 中将符号科目映射到总账科目
- 在 SAP 教程中发布舍入差异
- 报告书
- SAP FI 中的重要报告
- 必须知道!
- SAP 中的外币重估:月末结算
- SAP FI 重要表:必须知道!
- 如何执行催款:SAP F150
- 如何在 SAP 中维护汇率
- SAP 通讯教程:配置,生成,打印&电子邮件
- SAP FICO 面试的前 50 个问题&答案
- 成本中心
- 如何创建一个新的成本中心:SAP KS01
- 内部订单
- 有关 SAP 内部订单的全部信息
- 内部订单的结算教程:SAP 中的 KO02 & KO88
- 利润中心
- SAP Profit Center 教程:创建,分组,过帐&计划
- 在 SAP 中使用标准层次结构创建利润中心
- 如何在 SAP 中将成本中心分配到利润中心
- 如何将物料分配给 SAP 中的利润中心
- 必须知道!
- SAP CO 表:控制模块中的重要表
- 比较 SAP 中的成本中心,利润中心和内部订单
- SAP 基础培训教程
- 基础介绍
- 什么是 SAP BASIS? 完整的教程
- 如何下载&为 Windows 安装 SAP GUI(FrontEnd)
- 什么是 SAP 实例& SAP SID?
- SAP R / 3 体系结构教程
- 客户群
- 什么是客户? 如何在 SAP SCC4 中创建新客户端
- SAP 客户端副本:本地,远程,导入/导出
- 如何在 SAP SM50 中删除客户端
- 用户授权
- SU01:如何在 SAP 中创建新用户
- 如何锁定(SU01)&解锁(SU10)SAP 用户
- SAP RZ11:参数(login / fails_to_session_end)限制登录尝试
- SAP USR40:如何设置密码限制
- 后台工作
- SAP 后台作业处理 SM36:创建,计划,重新计划
- SAP SM37:如何监视后台作业
- SAP RSBTCDEL2:如何删除后台作业
- 运输管理系统
- SAP TMS(运输管理系统)教程
- 如何配置 STMS(SAP 传输管理系统)
- SAP 路由&层:逐步配置
- 什么是 SAP 传输请求? 如何导入/导出 TR
- 补丁管理
- 支持软件包&堆栈升级:SAP SPS
- 下载&升级 SAP 内核:分步教程
- SAP 监视&性能检查:完整的 Tcode 教程
- 什么是 OSS 注释? SAP SNOTE 教程
- RFC
- SAP 教程中的远程功能调用(RFC)
- 如何在 SAP 中配置&测试 RFC 连接-SM59
- 数据迁移
- SAP IDOC 教程:定义,结构,类型,格式&表
- 什么是 SAP LSMW? 使用 LSMW 迁移数据的步骤
- 检查!
- 60 个 SAP 基础面试问题&答案
- SAP SD(销售&分发)培训教程
- 客户主数据和物料主数据
- 什么是 SAP SD? SAP Sales &分发模块简介
- 创建客户主数据:SAP XD01
- SAP SD:创建编号范围&分配到帐户组 XDN1
- 如何创建合作伙伴功能&合作伙伴确定:SAP VOPAN
- MB1C:如何在 SAP 中创建物料库存
- 如何在 SAP 中创建客户物料信息记录 VD51
- MMBE:如何获取 SAP 库存概览
- SAP SD:创建物料主数据
- 营业额
- SAP SD 中的售前活动
- 如何在 SAP 中创建查询:VA11
- 如何创建报价:SAP VA21
- 如何创建销售订单:SAP VA01
- 如何在 SAP 中创建借项凭单
- 如何在 SAP 中创建贷项凭证
- 如何在 SAP 中创建销售单据类型
- SAP 销售文档教程:VA01,VA02,VA03
- 销售凭证的文本确定:SAP VOTXN
- 计划行类别确定教程:SAP VOV6
- 如何在 SAP 中创建项目建议 VA51
- 物料清单&排除:SAP VB01
- 交货
- 如何确定装运点:SAP OVL2
- 创建拣配,包装& PGI(发货后):SAP LT03,VL02N
- 免费创建退货订单&后续交货:SAP VL01N
- SAP SD 中的所有关于寄售流程
- 使用 Tcode V / 30 在 SAP SD 中进行输出确定
- SAP 中 OVRQ 替代原因
- 开票
- CS01:如何在 SAP SD 中创建物料清单(BoM)
- 如何在 SAP SD 中创建发票更正请求
- SAP 项目类别确定:VOV7,VOV4
- 在 SAP 中定义&分配阻塞原因(OVV4,S_ALR_87007670)
- 价钱
- 在 SAP 中按物料类别确定定价:OVKO
- SAP SD 税收确定程序教程:VK12,OX10,OVK4,OVK1
- 如何在 SAP 中创建文本类型:VOTXN
- SAP 项目类别确定:VOV7,VOV4
- 使用 Tcode OV31 的 SAP 中的条件排除组
- 如何在 SAP 中创建记帐密钥:OV34
- 信用管理
- SAP 信用管理教程:OVA8
- SAP SD 面试的前 20 个问题&答案
- 2020 年 100 项最佳销售培训课程
- SAP CRM 培训教程
- 介绍
- SAP CRM 模块:概述,体系结构
- SAP CRM 销售流程,管理,报价&产品确定
- SAP CRM SERVICEPRO:服务协议,合同,计划,订单管理
- SAP CRM Marketing:计划,活动管理&自动化细分
- 高级的东西
- SAP 合作伙伴渠道管理(PCM)
- SAP CRM 互动中心
- SAP CRM 业务合作伙伴:分组,角色,关系
- SAP CRM 组织管理
- SAP CRM Product Master:层次结构,类别,集合类型&属性
- SAP CRM 业务交易流程
- SAP CRM 合作伙伴处理:类别,功能,顺序,确定
- SAP CRM 操作配置文件:完整教程
- SAP CRM 定价&计费:元素,过程,类型,Web UI
- SAP CRM WebUI 教程
- SAP CRM Web UI:配置,应用程序&增强工具
- 必须知道!
- 26 个最佳 Salesforce 竞争对手&替代品[免费/付费]
- SAP CRM 面试的前 25 个问题&答案
- SAP MM(材料管理)培训教程
- 简介&放大器; 主要的数据
- SAP MM 模块概述
- SAP 主数据简介
- 如何在 SAP 中创建物料主数据 MM01
- 如何在 SAP 中更改物料主数据(MM02,MM03)
- 如何在 SAP 中复制物料主数据:MM01
- MM17:SAP 中物料主数据的批量维护
- SAP 中的物料主视图:最终指南
- 购买
- SAP 中的采购&采购申请简介
- ME11:如何在 SAP 中创建购买信息记录
- 如何更改采购信息记录:SAP 中的 ME12
- 如何在 SAP 中创建采购申请:ME51N
- 如何在 SAP 中将采购申请转换为采购订单
- ME41:如何在 SAP 中创建 RFQ(报价请求)
- ME47:如何在 SAP MM 中创建报价
- 如何比较不同报价的价格:SAP ME49
- 如何选择或拒绝报价:SAP ME47
- 如何创建来源清单确定:SAP ME05
- 如何在 SAP 中创建采购订单 ME21N
- 如何使用参考 ME58 创建采购订单 SAP 中的 ME21N
- ME22N:如何在 SAP 中更改采购订单
- 如何过帐收货:SAP MIGO
- MIRO:如何在 SAP 中执行发票验证
- MRBR:在 SAP 中发布冻结的发票
- SAP 中的服务采购订单:ME23N
- SAP 中的大纲协议:合同&计划协议 ME31
- 下达策略,SAP 中的采购订单流程:CT04,ME28,CL02
- 价钱
- SAP 中的定价过程总览
- 如何在 SAP V / 05,M / 03 中定义访问顺序&条件表
- 如何在 SAP 中定义条件类型
- 如何在 SAP 中定义计算架构
- 如何在 SAP 中定义架构组&确定
- 库存管理
- SAP 库存管理教程:移动类型{OMJJ}
- 如何在 SAP 中创建收货:MIGO,MB1C,MB03
- 如何在 SAP 中冲销(取消)收货 MMBE
- SAP MB21,MB1A,MBST,MB22 中的库存预留
- 如何在 SAP MM VL02N,VL09 中过帐发货
- SAP MB1B 中的货物转移过帐
- SAP 库存盘点教程:MI01,MI02,MI04,MI07
- SAP 中的特殊库存&特殊采购
- SAP MM 面试的前 21 个问题&答案
- SAP CO(控制)模块培训教程
- 如何创建一个新的成本中心:SAP KS01
- 如何创建新的成本要素
- 有关 SAP 内部订单的全部信息
- 内部订单的结算教程:SAP 中的 KO02 & KO88
- SAP Profit Center 教程:创建,分组,过帐&计划
- 在 SAP 中使用标准层次结构创建利润中心
- 如何在 SAP 中将成本中心分配到利润中心
- 如何将物料分配给 SAP 中的利润中心
- SAP CO 表:控制模块中的重要表
- 比较 SAP 中的成本中心,利润中心和内部订单
- SAP 薪资培训课程
- 初学者重要的薪资概念
- SAP 中的工资核算流程概述
- SAP 中的工资核算流程概述
- SAP PA03:薪资控制记录教程
- 如何在 SAP 中执行工资核算
- 如何在 SAP 中使用 PC_PAYRESULT 检查工资结果
- 如何在 SAP 中删除工资核算结果:PU01
- 必须知道工资信息
- 如何在 SAP 中执行工资核算
- 什么是非周期工资? SAP IT267
- 如何在 SAP 中审核工资单:RPUAUD00
- SAP HR 中的 Matchcode W 是什么?
- SAP Wage Types 教程:主要,辅助,对话,时间
- SAP 工资类型报表器:PC00_MXX_CWTR
- 薪水面试的前 17 个问题&答案
- 过帐工资核算活动
- 使用 SAP DME 文件进行银行转帐
- SAP 中的总分类帐(G / L)过帐:PCP0 & PC00_M99_CIPE
- SAP BI / BW 教程:初学者培训
- 介绍
- 简介 SAP BI
- SAP BI 体系结构概述
- SAP Infoobject,Infoarea,Infoobject 目录教程
- 高级的东西
- 如何在 SAP BI / BW 中创建信息区域
- 如何在 SAP BI / BW 中创建 InfoObject 目录
- 如何在 SAP BI / BW 中创建具有特征的 InfoObject
- 如何在 SAP BI / BW 中使用关键指标创建 InfoObjects
- SAP BW 中的 DSO 是什么? 为什么要使用它?
- SAP 中的标准 DSO 是什么? 如何创建一个?
- 什么是 SAP 中的写入优化 DSO? 如何创建一个?
- 什么是 SAP 中的直接更新 DSO? 如何创建一个?
- SAP InfoSet 教程:什么是创建,联接
- 什么是 SAP BI / BW 中的 Infocube? 如何创建一个?
- 如何从 SAP BI / BW 中的平面文件加载主数据
- 如何从 SAP BI / BW 中的平面文件加载事务数据
- 如何从 SAP BI / BW 中的 ECC 加载主数据
- 如何从 ECC 加载事务数据:SAP RSA5
- 有关 SAP BI / BW 中星型架构&扩展星型架构的全部信息
- SAP BI 流程链:创建,检查,激活,分配,监视
- SAP BI 内容:安装,激活
- SAP BEx 查询设计器教程&查询元素
- SAP BEx:特征&关键指标设置(RKF,CKF &公式)
- 必须知道!
- SAP BW / BI 面试的前 40 个问题&答案
- SAP PP(生产计划)培训教程
- 介绍
- SAP PP 简介(生产计划)
- SAP PP 中的物料清单(BoM):创建,更改,显示
- SAP PP 中的工作中心:创建,更改,显示
- 高级的东西
- 如何在 SAP PP 中创建/更改/显示工艺路线
- 如何在 SAP PP C223 中创建生产版本
- SAP 需求管理教程:MD61,MD62,MD04,MD74,MD75
- SAP MRP(物料需求计划)教程:MD01,MD02,MD04
- SAP PP 中的长期计划(LTP)教程:MS31,MS02,MD61
- SAP PP 容量计划:CM01,CM21
- SAP PP 中针对生产订单的货物移动:MIGO
- SAP 中的生产订单:CO01,MD16,CO02,CO15
- SAP PP 报告教程:COOIS,MB52,CS15,CS12
- 必须知道!
- SAP PP 面试最常见的 26 个问题&答案
- SAP QM(质量管理)教程
- SAP QM 简介
- SAP 中的主数据是什么? QS21,QP01,QS31,QDV1,QI01
- SAP QM 进/原材料检查程序:MIGO,QA32
- 流程中检查 SAP QM:CO01 & QA32
- SQP QM:最终检验 CO01 & QA32
- SAP QM 中的质量通知:QM02
- SAP HANA 初学者培训教程
- SAP HANA 体系结构,LandScape,规模调整:完整教程
- 如何下载&安装 SAP HANA Studio
- SAP HANA SQL:10 分钟学习
- SAP HANA 数据类型&标识符
- SAP HANA 操作员:联盟&联盟全部
- SAP HANA SQL 功能教程
- SAP HANA SQL 表达式教程
- SAP HANA SQL 存储过程教程
- SAP HANA 教程:创建序列
- SAP HANA 教程:创建触发器
- SAP HANA SQL DATA 性能分析:5 分钟学习
- SAP HANA 教程:SQL 脚本
- SAP HANA 计算视图教程
- SAP HANA 中的 DATA Provisioning &复制
- SAP HANA 中的 SLT(SAP Landscape Transformation Replication 服务器)
- HANA 中的 SAP DS(数据服务)
- SAP HANA 直接提取器连接(DXC)教程
- SAP HANA 平面文件上传教程:CSV,XLS & XLSX
- SAP HANA 建模:完整教程
- SAP HANA 入门教程
- SAP HANA 属性视图教程
- SAP HANA Analytic View:完整教程
- SAP HANA 分析特权教程
- SAP HANA 信息编辑器
- SAP HANA 导入和导出教程
- SAP HANA 安全性:完整教程
- SAP HANA 报表
- SAP HANA 面试的前 15 个问题&答案
- Guru99 必须学习的教程
- Microsoft Excel 培训教程:7 天学习
- 介绍
- Microsoft Excel 101 简介
- 如何在 Excel 中进行加,减,乘,除
- Excel 数据验证,过滤器,分组
- Excel 公式&函数:学习基本示例
- IF,AND,OR 或嵌套 IF &在 Excel 中不是逻辑函数
- 如何在 Excel 中创建图表:类型&示例
- 如何在 Excel 中进行预算:个人理财教程
- 进阶的东西
- 如何将 XML 数据导入 Excel [示例]
- 如何将 CSV 数据(文本)导入 Excel [示例]
- 如何将 MS Access 数据导入 Excel [示例]
- 如何将 SQL 数据库数据导入 Excel [示例]
- 如何在 Excel 中创建数据透视表:初学者教程
- Excel 中的高级图表&图形
- 什么是 Microsoft Office 365? Excel on Cloud 的好处
- CSV 与 Excel(.xls)-有什么区别?
- Excel VLOOKUP 初学者教程:通过示例学习
- Excel ISBLANK 功能:通过示例学习
- Excel 中的迷你图和示例
- Excel 中的 SUMIF 函数:通过示例学习
- 前 40 个 Microsoft Excel 面试问题&答案
- 面试中提出的十大 Excel 公式&答案
- 2020 年 20 种最佳 Excel 课程
- 2020 年的 17 种最佳 Excel 替代品(免费/付费)
- 15 本最佳 Excel 书籍(2020 年更新)
- 2020 年 85 种最佳 Microsoft Office 类课程
- 宏&放大器; Excel 中的 VBA
- 如何在 Excel 中编写宏:分步入门指南
- 如何使用示例在 Excel 中创建 Visual Basic for Applications(VBA)
- Excel VBA 变量,数据类型&常量
- Excel VBA 数组:带示例的动态多维类型
- VBA Excel 表单控件& ActiveX 控件
- VBA 算术运算符:乘法,除法,加法,模量
- VBA 字符串运算符
- VBA 比较运算符:不等于,小于或等于,大于
- VBA 逻辑运算符:AND,OR,NOT
- Excel VBA 子例程:如何使用示例调用 Sub
- Excel VBA 函数教程:返回,调用,示例
- Excel VBA 范围对象
- 初学者会计教程:7 天学习簿记
- 介绍
- 什么是会计? 重要性,目的&需要
- 会计中的资产&负债是什么? 定义&示例
- 什么是会计等式? 示例问题
- 什么是会计中的收入,费用&提款? [例子]
- 高级的东西
- 带有实例的扩展会计方程
- 基本会计交易示例
- 如何在会计中创建日记帐分录[示例]
- 如何创建分类帐帐户[示例]
- 如何计算折旧:直线,递减值示例
- 如何通过示例准备试算表
- 如何用示例制作损益表
- 如何用示例制作资产负债表
- 现金流量表的重要性及示例
- 如何使用示例分析财务报表
- 印度 7 种最佳在线税务软件[2020 更新]
- 必须知道!
- 2020 年 22 种面向小型企业的最佳会计软件
- 2020 年 22 种最佳 QuickBooks 替代品[免费/付费]
- 2020 年 65 个最佳会计课程
- 2020 年 90 项最佳金融建模认证课程
- 11 本最佳会计书籍(2020 年更新)
- 134 个最热门的会计面试问题&答案
- 前 30 个理货面试问题&答案
- 免费道德黑客教程:初学者课程
- 介绍
- 什么是骇客? 简介&类型
- 对计算机系统的潜在安全威胁
- 成为道德黑客所需的技能
- 2020 年排名前 20 位的道德黑客工具
- 高级的东西
- 什么是社会工程学? 攻击,技巧&预防
- 密码学教程:密码分析,RC4,CrypTool
- 如何破解密码
- 蠕虫病毒&特洛伊木马:道德黑客教程
- 通过示例了解 ARP 中毒
- Wireshark 教程:网络&密码嗅探器
- 如何破解 WiFi(无线)网络
- DoS(拒绝服务)攻击教程:Ping of Death,DDOS
- 2020 年 10 种最佳 DDoS 攻击工具[免费/付费]
- 如何破解 Web 服务器
- 如何破解网站:在线示例
- SQL 注入教程:学习示例
- 黑客 Linux 操作系统:完整的 Ubuntu 示例教程
- CISSP 认证指南:什么是必备条件,成本,CISSP 薪水
- 什么是数字取证? 历史,过程,类型,挑战
- 什么是网络犯罪? 类型,工具,示例
- 必须知道!
- 10 个最常见的 Web 安全漏洞
- 2020 年排名前 30 的 Bug 赏金计划
- 2020 年 40 种最佳渗透测试(笔测试)Vapt 工具
- Kali Linux 教程:什么是安装,利用 Metasploit 和 Nmap
- 2020 年 13 种最佳黑客操作系统
- 2020 年 11 种最佳 Wireshark 替代品
- 网站,网络的 13 种最佳漏洞评估扫描仪
- 最佳 16 无日志 VPN(2020 更新)
- 20 个最佳手机间谍应用程序[Android / iPhone]
- 2020 年 15 种最佳数字取证工具[免费/付费]
- 2020 年 17 种最佳 IP &网络扫描工具(免费/付费)
- Windows 的 11 种最佳免费防火墙软件[2020 更新]
- 前 25 个道德黑客面试问题&答案
- 热门的 110 个网络安全面试问题&答案
- CompTIA 认证指南:职业道路&学习资料
- 16 本最佳道德黑客书籍(2020 更新)
- 初学者云计算教程
- 面向初学者的 Adobe Photoshop CC 教程:7 天学习
- 介绍
- 什么是 Photoshop CC? 完整的介绍
- 如何在 PhotoShop CC 中使用工作区
- Photoshop LAYERS 教程
- Photoshop 图层蒙版教程和示例
- 高级的东西
- 如何使用 Photoshop 图层样式&效果[示例]
- 如何使用形状工具在 Photoshop 中绘制形状
- 什么是智能对象? 如何在 Photoshop 中使用智能对象?
- Photoshop 中的混合模式
- 如何在 Photoshop 中使用钢笔工具? 完整的教程
- 如何在 Photoshop 中删除背景?
- 如何在 PhotoShop 中使用画笔工具?
- 如何使用 Photoshop 文字工具添加文字
- 如何在 Photoshop 中使用滤镜&效果
- 必须知道!
- 2020 年 30 种最佳屏幕捕获软件工具,可提供更好的屏幕截图
- 2020 年 15 种最佳 Snagit 替代品
- 2020 年 11 种最佳 After Effects 替代品(免费&付费)
- 2020 年 14 种最佳 2D 动画软件[免费/付费]
- 2020 年 20 种最佳 3D 动画软件[免费/付费]
- 2020 年 16 种最佳 InDesign 替代方案[免费/付费]
- 2020 年 26 种最佳 Adobe Premiere Alternative [免费/付费]
- 2020 年 16 种最佳 Photoshop 替代品[免费/付费]
- 2020 年 16 种最佳屏幕录像机[免费/付费]
- 15 用于 MAC 的最佳屏幕录像软件[免费/付费]
- 2020 年 17 个最佳股票视频网站[有偿/免版税素材]
- 2020 年 22 种最佳 Sketchup 替代品
- 2020 年 36 种最佳视频编辑软件
- 30 最佳免费图片库在 2020 年
- 2020 年 18 个最佳免费股票视频网站
- GIMP 与 Photoshop:主要区别
- Adobe Photoshop 面试的前 45 个问题&答案
- 2020 年 90 种最佳 Adobe Illustrator 课程
- 2020 年 90 种最佳绘画课程
- 2020 年 80 项最佳 AutoCAD 课程
- 2020 年 95 个最佳平面设计认证课程
- 2020 年 80 项最佳 UI / UX 设计课程
- 2020 年 50 最佳 Web 设计课程
- 数字营销教程:在线课程
- 面向初学者的业务分析师培训教程
- 介绍
- 什么是业务分析? 工艺&技术
- 什么是业务分析师? 角色,责任,技能,认证
- 利益相关者分析&与模板映射的示例
- 生命周期
- 软件测试中的 V 模型
- 需求生命周期管理
- 软件工程方法
- SDLC 中的瀑布模型是什么? 优点&缺点
- 什么是 RAD 模型? 优点&缺点
- SDLC 中的增量模型:使用优势&劣势
- 什么是螺旋模型? 什么时候使用? 优点&缺点
- 敏捷方法论&模型:软件开发指南&测试
- 需求流程
- 示例软件需求分析
- 需求分析技术及示例:完整教程
- 什么是功能需求? 规格,类型,示例
- 什么是非功能性要求? 类型和例子
- 功能需求与非功能需求:主要区别
- 最终确定要求
- 如何将需求组织为业务分析师
- 管理需求资产
- 分步进行软件工程变更控制流程
- 文献资料
- BRS 与 SRS:了解差异
- 质量保证
- 什么是软件测试? 定义,基础&类型
- 初学者手动测试教程:概念,类型,工具
- 软件测试中的缺陷/缺陷生命周期
- 什么是用户验收测试(UAT)? 与例子
- 软件测试中的影响分析
- 完整的过程
- 业务分析过程:分步教程
- 必须阅读主题
- 什么是 ER 建模? 通过示例学习
- 决策表测试:学习示例
- 什么是静态测试? 什么是测试审查?
- 100 多个业务分析师面试问题&答案
- 软件工程中的软件配置管理
- Microsoft VISIO 教程:历史记录,文件类型,如何使用示例
- 十大 Microsoft Visio 面试问题&答案
- Drools 教程:体系结构,规则引擎示例
- 16 个最佳软件配置管理工具(2020 年将成为 SCM 工具)
- 2020 年十大最佳决策工具
- 16 种最佳甘特图软件[免费在线应用]
- 2020 年 30 种最佳需求管理工具
- 2020 年的 19 种最佳思维导图软件(免费&付费)
- 适用于 BA 分析师的 21 种最佳业务分析工具(2020 年更新)
- 38 个用于 UI 和 UX 设计器的最佳原型开发工具[2020 更新]
- 2020 年 30 种最佳 Adobe Acrobat 替代品
- 2020 年 14 种最佳 SharePoint 替代品(免费&付费)
- 2020 年 22 种最佳 OCR 软件[免费/付费]
- 2020 年 17 种最佳 Outlook 替代方案[免费/付费]
- 2020 年 21 种最佳 Google 语音替代品
- 21 项最佳免费电话会议服务(2020)
- 2020 年 20 种最佳 Evernote 替代品
- 2020 年的 17 种最佳 IVR 系统
- 13 最佳听写和语音合成软件[2020 更新]
- 2020 年 18 种最佳 PowerPoint 替代品
- 2020 年 100 最佳商业分析课程
- INFORMATICA 教程:完整的在线培训
- 介绍
- 什么是 Informatica? 完整的介绍
- Informatica 体系结构教程
- 如何下载&安装 Informatica PowerCenter
- 如何在 Informatica 中配置客户端和存储库
- 高级的东西
- Informatica 中的源分析器和目标设计器
- Informatica 中的映射:创建,组件,参数,变量
- Informatica 中的工作流程:创建,任务,参数,可重用,管理器
- Informatica 中的工作流监视器:任务&甘特图视图示例
- Informatica 中的调试器:会话,断点,详细数据&映射
- Informatica 中的会话属性:完整教程
- INFORMATICA 转换教程&过滤器转换
- Informatica 中的源限定符转换(带有示例)
- Informatica 中的聚合器转换示例
- Informatica 中的路由器转换:多个条件示例
- 示例中 Informatica 中的 Joiner 转换
- Informatica 中的排名转换(带有示例)
- Informatica 中的序列转换示例
- Informatica 中的事务控制转换:TCL 命令
- Informatica &可重用转换示例中的查找转换
- Informatica 中的规范化器转换(带有示例)
- Informatica 中的性能调优:完整的教程
- 必须知道!
- Informatica 面试的前 50 个问题&答案
- 面向初学者的项目管理教程
- 什么是项目管理? 目标,方法
- 什么是 PMP? 认证成本,收益
- 项目管理生命周期的各个阶段
- 项目成本估算&预算管理技术
- 项目管理中的风险分析&风险管理
- 项目管理方法论教程
- 六西格码认证指南:绿色,黄色,黑色皮带详细信息
- 40 个最佳项目管理工具[2020 年 7 月列表]
- PMP 教程:在线培训材料
- 介绍
- 什么是项目管理? 目标,方法
- 项目管理生命周期的各个阶段
- 高级的东西
- 项目集成管理教程:定义,流程&计划
- 项目范围管理:PMP 教程
- 项目成本估算&预算管理技术
- 利益相关者分析&与模板映射的示例
- 项目管理中的风险分析&风险管理
- 必须知道!
- 2020 年 30 种最佳 Trello 替代品
- 2020 年 20 种最佳 Microsoft Project 替代方案
- 2020 年最佳 8 个 Wrike 替代品
- MIS(管理信息系统)教程
- 什么是 MIS? 简介&定义
- 组件& MIS(管理信息系统)的作用
- MIS(管理信息系统)的目标&
- 信息系统类型:TPS,DSS &金字塔图
- SDLC &敏捷的 MIS 开发流程
- 信息系统中的道德&安全问题
- Microsoft MCSA 认证考试指南
- 决策支持系统(DSS):零售商店的演示 PoS
- Excel VBA 初学者教程:3 天学习
- 介绍
- 如何在 Excel 中编写宏:分步入门指南
- 如何使用示例在 Excel 中创建 Visual Basic for Applications(VBA)
- Excel VBA 变量,数据类型&常量
- Excel VBA 数组:带示例的动态多维类型
- 高级的东西
- VBA Excel 表单控件& ActiveX 控件
- VBA 算术运算符:乘法,除法,加法,模量
- VBA 字符串运算符
- VBA 比较运算符:不等于,小于或等于,大于
- VBA 逻辑运算符:AND,OR,NOT
- Excel VBA 子例程:如何使用示例调用 Sub
- Excel VBA 函数教程:返回,调用,示例
- Excel VBA 范围对象
- 必须知道!
- 使用 VBA 进行网页搜刮
- VBA 面试的前 22 个问题&答案
- CCNA 认证教程:简介&基础
- Jenkins 初学者教程:3 天学习
- 介绍
- 什么是持续集成?
- 詹金斯是什么? 持续集成(CI)工具
- 如何下载&在 Windows 上安装 Jenkins
- 高级的东西
- Jenkins GitHub 集成:安装 Git 插件
- 如何创建用户&管理权限:角色策略插件
- 如何使用 Jenkins Freestyle 项目创建构建
- Jenkins 管道教程:JenkinsFile 示例
- Jenkins vs Travis-CI:有什么区别?
- 必须知道!
- 2020 年 15 种最佳詹金斯替代品
- 十大 JENKINS 面试问题&答案
- 初学者软件工程教程:3 天学习
- 介绍
- 什么是软件工程? 定义,基础,特征
- 成为软件工程师/开发人员的 9 个步骤
- 软件工程师与软件开发人员:有什么区别?
- SDLC(软件开发生命周期)教程:什么是阶段,模型
- SDLC 中的瀑布模型是什么? 优点&缺点
- 高级的东西
- SDLC 中的增量模型:使用优势&劣势
- 什么是螺旋模型? 什么时候使用? 优点&缺点
- 什么是 RAD 模型? 优点&缺点
- 软件工程中的原型模型:方法论,过程,方法
- 瀑布模型,增量模型,螺旋模型与辐射模型:主要区别
- 能力成熟度模型(CMM)&是软件工程中的各个级别
- N 层(多层),3 层,2 层架构(带示例)
- 什么是全栈开发人员? 成为 Web 开发人员的技能
- 什么是函数式编程? 实例教程
- MVC 初学者教程:什么是架构&示例
- MVC 面试的前 31 个问题&答案
- 背包问题:动态编程示例
- 小背包问题:带有示例的贪婪算法
- 2020 年 21 种最佳软件开发工具
- 程序与程序之间的区别
- 主存储器和辅助存储器之间的区别
- 局部变量和全局变量之间的差异
- 抽象与封装之间的区别
- XML 和 HTML 之间的区别
- 网站和 Web 应用程序之间的区别
- URL 与 URI:您必须知道的最重要的区别
- AR vs VR:有什么区别?
- 加密与解密:有什么区别?
- Web 开发人员与软件开发人员:有什么区别?
- 必须知道!
- HTML 和 HTML5 之间的区别
- 按值致电与按引用致电之间的区别
- 类和对象之间的区别
- 堆叠与堆:了解差异
- 32 位和 64 位:主要区别
- 系统软件和应用程序软件之间的区别
- 软件工程与计算机科学:简介&的差异
- CISC 与 RISC:体系结构,指令集之间的差异
- SSD 与 HDD:选择哪一个?
- SRAM 与 DRAM:了解差异
- MVC 与 MVVM:示例的主要区别
- CPU 核心,多核心,线程,核心与线程,超线程
- 2020 年面向 Java,C,C ++,C#,Python 的 13 种最佳代码覆盖工具
- 2020 年 14 种最佳代码审查工具[静态代码分析]
- 15 个适用于 Windows 的最佳免费代码编辑器& Mac [2020 更新]
- 2020 年学习的 10 种最佳编程语言
- 什么是后端开发人员? 成为 Web 开发人员的技能
- 什么是平均堆栈开发人员? 技能,薪水,成长
- 初学者竞争性编程:Topcoder 挑战
- 什么是计算机编程? 学习编码的基础
- 14 本 BEST 算法&数据结构书籍(2020 清单)
- 2020 年面向初学者的 50 多个 BEST Freelance 网站
- 2020 年的 11 种最佳 Fiverr 替代品
- 2020 年 20 种最佳前端 Web 开发工具
- 2020 年 10 种最佳 Notepad ++替代品
- 2020 年 10 种最佳 Sublime Text 替代品
- 2020 年 13 种最佳 Github 替代方案
- 2020 年 21 种最佳 CCleaner 替代品
- 12 最佳免费 PC 清洁器| TuneUp | 优化器实用程序
- 2020 年 20 种最佳免费注册表清洁工具
- 2020 年 21 种最佳打字导师软件
- 前 50 名软件工程面试问答
- SDLC 面试的前 27 个问题与解答
- 前 40 名计算机科学面试问答