
# 鼠标单击&键盘事件:Selenium Webdriver 中的操作类
> 原文: [https://www.guru99.com/keyboard-mouse-events-files-webdriver.html](https://www.guru99.com/keyboard-mouse-events-files-webdriver.html)
在本教程中,我们将学习在 Selenium Webdriver 中处理键盘和鼠标事件
## 处理键盘&鼠标事件
使用**高级用户交互 API** 处理特殊的键盘和鼠标事件。 它包含执行这些事件时所需的**操作**和**操作**类。 以下是 Actions 类提供的最常用的键盘和鼠标事件。
| **方法** | **说明** |
| **clickAndHold()** | 在当前鼠标位置单击(不释放)。 |
| **contextClick()** | 在当前鼠标位置执行上下文单击。 (右键单击鼠标动作) |
| **doubleClick()** | 在当前鼠标位置上双击。 |
| **dragAndDrop(源,目标)** | 在源元素的位置单击并按住,移至目标元素的位置,然后释放鼠标。
**参数:**
源元素,用于模拟按下按钮的位置。
目标元素,可移动至并释放鼠标。 |
| **dragAndDropBy(source,x-offset,y-offset)** | 在源元素的位置单击并按住,移动给定的偏移量,然后释放鼠标。
**参数**:
源元素,用于模拟按下按钮的位置。
xOffset-水平移动偏移。
yOffset-垂直移动偏移。 |
| **keyDown(modifier_key)** | 执行修改键。 不释放修饰键-后续的交互可能会假定它一直处于按下状态。
**参数**:
修饰符键-任何修饰键(Keys.ALT,Keys.SHIFT 或 Keys.CONTROL) |
| **keyUp(修饰符 _key)** | 执行密钥释放。
**参数**:
修饰符键-任何修饰键(Keys.ALT,Keys.SHIFT 或 Keys.CONTROL) |
| **moveByOffset(x-offset,y-offset)** | 将鼠标从其当前位置(或 0,0)移动给定的偏移量。
**参数**:
x-offset-水平偏移。 负值表示将鼠标左移。
y-offset-垂直偏移。 负值表示向下移动鼠标。 |
| **moveToElement(toElement)** | 将鼠标移到元素的中间。
**参数**:
要移动到的 Element 元素。 |
| **release()** | 在当前鼠标位置释放按下的鼠标左键 |
| **sendKeys(onElement,charsequence)** | 向元素发送一系列击键。
**参数**:
onElement-将接收击键的元素,通常是文本字段
charsequence-表示击键序列的任何字符串值 被发送 |
在下面的示例中,我们将使用 moveToElement()方法将鼠标悬停在一个 Mercury Tours 的表行上。 请参见下面的示例。
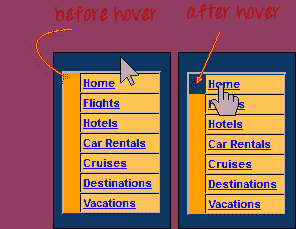
上面显示的单元格是< TR >元素的一部分。 如果未悬停,则其颜色为#FFC455(橙色)。 悬停后,单元格的颜色变为透明。 它变成与整个橙色表的蓝色背景相同的颜色。
**步骤 1:**导入**动作**和**动作**类。

**步骤 2:**实例化一个新的 Actions 对象。

**步骤 3:**在步骤 2 中使用 Actions 对象实例化一个 Action。
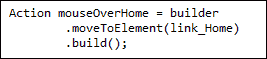
在这种情况下,我们将使用 moveToElement()方法,因为我们只是将鼠标悬停在“ Home”链接上。 build()方法始终是最终使用的方法,因此所有列出的动作将被编译为一个步骤。
**步骤 4:**在执行我们在步骤 3 中设计的 Action 对象时,请使用 perform()方法。

以下是整个 WebDriver 代码,用于在鼠标悬停之前和之后检查< TR >元素的背景颜色。
```
package newproject;
import org.openqa.selenium.*;
import org.openqa.selenium.firefox.FirefoxDriver;
import org.openqa.selenium.interactions.Action;
import org.openqa.selenium.interactions.Actions;
public class PG7 {
public static void main(String[] args) {
String baseUrl = "http://demo.guru99.com/test/newtours/";
System.setProperty("webdriver.gecko.driver","C:\\geckodriver.exe");
WebDriver driver = new FirefoxDriver();
driver.get(baseUrl);
WebElement link_Home = driver.findElement(By.linkText("Home"));
WebElement td_Home = driver
.findElement(By
.xpath("//html/body/div"
+ "/table/tbody/tr/td"
+ "/table/tbody/tr/td"
+ "/table/tbody/tr/td"
+ "/table/tbody/tr"));
Actions builder = new Actions(driver);
Action mouseOverHome = builder
.moveToElement(link_Home)
.build();
String bgColor = td_Home.getCssValue("background-color");
System.out.println("Before hover: " + bgColor);
mouseOverHome.perform();
bgColor = td_Home.getCssValue("background-color");
System.out.println("After hover: " + bgColor);
driver.close();
}
}
```
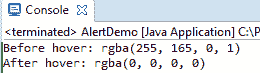
下面的输出清楚地表明,将鼠标悬停后背景颜色变为透明。
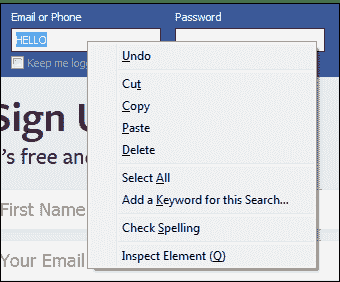
## 建立一系列多重动作
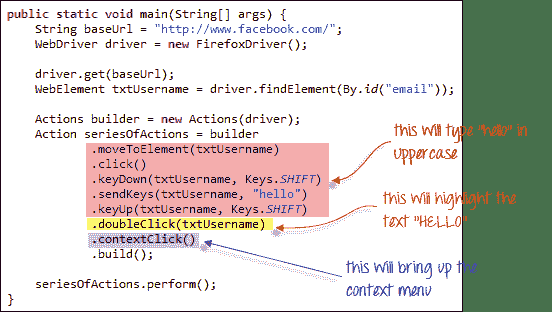
**您可以使用 Action 和 Actions 类**来构建一系列操作。 只需记住使用 build()方法关闭该系列。 考虑下面的示例代码。
```
public static void main(String[] args) {
String baseUrl = "http://www.facebook.com/";
WebDriver driver = new FirefoxDriver();
driver.get(baseUrl);
WebElement txtUsername = driver.findElement(By.id("email"));
Actions builder = new Actions(driver);
Action seriesOfActions = builder
.moveToElement(txtUsername)
.click()
.keyDown(txtUsername, Keys.SHIFT)
.sendKeys(txtUsername, "hello")
.keyUp(txtUsername, Keys.SHIFT)
.doubleClick(txtUsername)
.contextClick()
.build();
seriesOfActions.perform() ;
}
```
**摘要**
* 使用 AdvancedUserInteractions API 处理特殊的键盘和鼠标事件。
* 常用的关键字和鼠标事件是 doubleClick(),keyUp,dragAndDropBy,contextClick & sendKeys。
- Guru99 软件测试教程
- 软件测试教程:免费课程
- 现实生活
- 测试基础
- 什么是软件测试? 定义,基础&类型
- 软件测试作为职业道路(技能,薪水,成长)
- 软件测试的 7 条原则:通过实例学习
- 软件测试中的 V 模型
- STLC-软件测试生命周期阶段&进入,退出条件
- 测试类型
- 初学者手动测试教程:概念,类型,工具
- 自动化测试教程:什么是流程,收益&工具
- 自动化测试与 手动测试:有什么区别?
- 单元测试教程:什么是类型,工具,示例
- 集成测试:什么是类型,自上而下&自下而上的示例
- 什么是系统测试? 类型&的定义和示例
- 健康测试与烟雾测试:简介&差异
- 什么是回归测试? 定义,测试用例(示例)
- 什么是非功能测试? 带示例的类型
- TestCase 开发
- 软件测试中的测试文档
- 什么是测试方案? 带有示例的模板
- 如何编写测试用例:带有示例的示例模板
- QTP(UFT)中的环境变量与示例
- 什么是软件测试中的测试分析(测试基础)?
- 什么是需求可追溯性矩阵(RTM)? 示例模板
- 测试数据生成:什么是,如何做,示例,工具
- 下载示例测试案例模板:示例 Excel,Word 格式
- 测试技术
- 带有测试用例设计示例的软件测试技术
- 边界值分析&等价分割的例子
- 决策表测试:学习示例
- 什么是状态转换测试? 图表,技术,示例
- 什么是用例测试? 技术,范例
- 测试管理&放大器; 控制
- 软件测试评估技术:分步指南
- 如何创建测试计划(带有示例)
- 测试计划模板:带有 Web 应用程序示例的样本文档
- 瑕疵
- 软件测试的测试环境
- 软件测试中的缺陷管理流程(错误报告模板)
- 软件测试中的缺陷/缺陷生命周期
- 2020 年排名前 50 位的软件测试工具
- 敏捷
- 敏捷方法论&模型:软件开发指南&测试
- 什么是敏捷测试? 流程,策略,测试计划,生命周期示例
- Scrum 测试方法论教程:什么是流程,工件,冲刺
- 敏捷/ Scrum 方法论的自动化测试框架
- SAFe 方法论教程:什么是可扩展敏捷框架
- 测试不同的域
- Web 应用程序测试:网站测试的 8 个步骤指南
- Web 应用程序测试清单:网站的测试用例示例
- 银行领域应用测试:示例测试案例
- 电子商务测试:如何测试电子商务网站
- 带有示例测试案例的支付网关测试教程
- 大型机测试-完整教程
- 测试零售销售点(POS)系统:示例测试案例
- 使用样本测试用例进行 HealthCare 域测试
- 使用样本测试用例测试保险领域的应用程序
- 使用示例 OSS / BSS 测试用例测试电信域
- 商业智能(BI)测试:示例测试案例
- 白盒测试
- 什么是白盒测试? 技术,示例,类型&工具
- 什么是静态测试? 什么是测试审查?
- Mccabe 的环复杂性:使用流程图进行计算(示例)
- 代码覆盖率教程:分支,语句,决策,FSM
- 路径测试&包含示例的基础路径测试
- 性能测试
- 性能测试教程:什么是类型,度量&示例
- 负载测试教程:什么是? 如何? (带有示例)
- 什么是软件测试中的应力测试? 工具,类型,示例
- 什么是音量测试? 通过实例学习
- 什么是可伸缩性测试? 通过示例学习
- 什么是浸泡测试? 定义,含义,示例
- 软件测试中的稳定性测试
- 什么是峰值测试? 通过示例学习
- 负载测试,压力测试,性能测试:讨论差异
- 什么是响应时间测试?
- 什么是基准测试? 测试计划,工具,示例
- 什么是软件测试中的耐久性测试? (带有示例)
- 可靠性测试教程:什么是方法,工具,示例
- 13 个最佳性能测试工具| 负载测试工具(2020)
- 预先测试主题
- 软件测试指标:什么是类型&示例
- 如何创建测试策略文档(示例模板)
- 什么是测试即服务? TaaS 模型解释
- 什么是软件测试中的测试成熟度模型(TMM)?
- 常问问题
- 严重性&测试优先级:差异&示例
- 测试策略与测试计划:有什么区别?
- 静态测试与动态测试:有什么区别?
- 重新测试和回归测试之间的区别
- 质量保证与质量控制:有什么区别?
- 实例验证与验证之间的区别
- 正测试和负测试的例子
- 什么是测试线束? 工具&的例子
- 什么是缺陷密度? 用示例计算的公式
- 全球化测试和本地化测试之间的区别
- 测试条件与测试场景:有什么区别?
- 单元测试与集成测试:有什么区别?
- 功能测试与非功能测试:有什么区别?
- 黑匣子测试与 白盒测试:主要差异
- 前端测试与 后端测试:有什么区别?
- SDLC 与 STLC:有什么区别?
- 什么是 SDET? 完整的形式,含义,作用和职责
- 测试人员必须编写代码吗?
- 测试用例与测试方案:有什么区别?
- 测试类型-超级列表
- 软件测试类型:100 种不同测试类型的示例
- API 测试教程:10 分钟内学习!
- 什么是黑盒测试? 技术,示例&类型
- Alpha 测试与 Beta 测试:有什么区别?
- 什么是功能测试? 类型&示例(完整教程)
- 什么是用户验收测试(UAT)? 与例子
- REST API 测试教程:手动测试案例示例
- 使用 Restito 工具进行 REST 客户端测试
- REST 保证教程:如何使用示例测试 API
- 什么是安全测试? 带示例的类型
- GUI 测试教程:带有示例的用户界面(UI)测试案例
- 软件测试方法:了解质量检查模型
- 端到端测试教程:什么是 E2E 测试示例
- 什么是探索性测试? 实例技巧
- 软件测试中的变异测试:变异分数&分析示例
- 什么是临时测试? 带示例的类型
- 关键字驱动测试框架的示例
- 基于风险的测试:方法,矩阵,过程&示例
- 后端测试教程:什么是工具&示例
- 什么是烟雾测试? 如何使用示例
- 辅助功能测试教程:什么是工具&示例
- 什么是质量保证(QA)? 工艺,方法,实例
- 带有示例项目示例的质量管理计划模板
- 什么是 SOA 测试? 实例教程
- 渗透测试教程:什么是 PenTest?
- 什么是兼容性测试? 正向&向后测试(示例)
- 什么是带有示例的系统集成测试(SIT)
- 软件测试中的测试范围
- 什么是可用性测试? UX(用户体验)测试示例
- 协议测试教程:L2 & L3
- 什么是云测试? SaaS 测试教程
- Cookie 测试:网站的测试用例示例
- 什么是灰盒测试? 技术实例
- 基于模型的测试教程:工具&示例
- 什么是试点测试? 定义,含义,示例
- 什么是正交阵列测试(OATS)? 工具,技术&示例
- 什么是 Alpha 测试? 工艺,实例
- 模糊测试(模糊)教程:什么是类型,工具&示例
- 什么是本地化测试? 测试用例示例&清单
- 什么是接口测试? 类型&示例
- 什么是漏洞评估? 测试过程,VAPT 扫描工具
- 什么是配置测试? 示例测试用例
- 应用程序测试教程:什么是工具,如何使用
- 什么是阴性测试? 测试用例
- 什么是软件测试中的互操作性测试? (带有示例)
- 一致性测试(一致性测试)-完整指南
- 什么是循环测试? 方法论,例子
- 什么是组件测试? 技术,示例测试用例
- 什么是动态测试? 类型,技术&示例
- 什么是并行测试? 定义,方法,实例
- 什么是运营验收测试(OAT)? 示例测试用例
- 什么是模块测试? 定义,例子
- 什么是软件测试中的工作流测试? 与例子
- 存储测试教程:什么是类型,概念
- 什么是恢复测试? 与例子
- 什么是软件测试中的并发测试?
- 什么是软件测试中的线程测试?
- 什么是破坏性测试? 技术,方法,实例
- 什么是 DevOps 中的连续测试? 定义,好处,工具
- 软件测试中的测试级别
- IoT 测试教程:什么是流程,挑战&工具
- 什么是测试驱动开发(TDD)? 实例教程
- 什么是数据驱动测试? 学习创建框架
- 什么是猴子&大猩猩测试? 例子,差异
- 什么是前端测试? 工具&框架
- 什么是软件测试中的嵌入式测试?
- 什么是软件测试中的域测试? (带有示例)
- Salesforce 测试教程:什么,流程,工具,最佳实践
- 设计验证&验证过程
- 无损检测(NDT)
- 工具类
- 2020 年 10 种最佳跨浏览器兼容性测试工具
- 2020 年 20 种最佳 Bug /缺陷跟踪工具
- 2020 年 20 种最佳 Web 测试工具
- 20 个最佳自动化测试工具(2020 年 7 月更新)
- 2020 年 15 种最佳测试数据生成工具
- 2020 年 13 家最佳人群测试(Crowdsource)公司
- 2020 年 10 种最佳探索性测试工具
- 检查!
- 前 150 个软件测试面试问题&答案
- 前 15 个自动化测试面试问题&答案
- 前 40 个 QA 面试问题&答案
- 前 25 个数据库测试面试问题&答案
- 资质认证
- ISTQB 认证:完整的模拟学习考试材料
- CSTE 认证指南和学习资料
- 认证软件质量分析师(CSQA)认证指南
- ISTQB CTAL(高级)考试及学习资料
- UFT / QTP 初学者教程:7 天学习
- 介绍
- 什么是 QTP / UFT 自动化测试工具?
- 如何下载和安装 UFT 或 QTP [最新版本]
- HP UFT / QTP 中的航班预订应用程序
- 如何使用 QTP / UFT IDE
- 如何记录和播放 UFT / QTP 脚本
- 高级的东西
- 对象识别如何在 QTP / UFT 中工作?
- QTP / UFT 中的关键字和专家视图
- 了解 SystemUtil.Run,SetSecure,Set,类型:QTP / UFT 示例
- 如何使用示例重播 QTP / UFT 中的脚本
- 通过打印/导出示例了解 QTP / UFT 中的测试结果
- QTP / UFT 中的参数化示例
- QTP / UFT 中的检查点与示例
- 如何使用示例在 QTP / UFT 中打印输出值
- QTP / UFT 中包含 IF,Else,End IF 和示例
- QTP / UFT 中的 Reporter.ReportEvent 及其示例
- QTP / UFT 中的动作与示例
- QTP / UFT 中的智能识别示例
- QTP / UFT 中的顺序标识符:对象识别示例
- QTP / UFT 中的本地&共享对象存储库
- QTP / UFT 中的记录模式类型:模拟,低电平,上下文
- 如何通过 3 个简单的步骤在 QTP / UFT 中使用功能
- 如何在 QTP / UFT 中使用事务
- 如何通过示例使用 QTP / UFT 中的恢复方案
- QTP / UFT 中的可选步骤(带示例)
- QTP / UFT 中的对象间谍,GetRoProperty,GetToProperty 和示例
- QTP / UFT 中的描述性编程:动态&静态
- 测试自动化框架-您必须知道的东西!
- QTP / UFT 中的数据,关键字&混合自动化框架
- QTP / UFT 中的业务流程测试(BPT)框架
- 如何在 QTP / UFT 中从 EXCEL 导入,读取,更改数据
- QTP / UFT 移动应用测试教程
- 使用 QTP / UFT 进行 API 测试:完整的教程
- 检查!
- 前 100 个 QTP / UFT 面试问题&答案
- 测验
- 初学者硒教程:7 天学习 WebDriver
- 第一眼
- 什么是硒? 硒自动化测试简介
- 什么是 Selenium WebDriver? 与 RC 的区别
- WebDriver 教程
- 如何下载&安装 Selenium WebDriver
- 第一个 Selenium Webdriver 脚本:JAVA 代码示例
- Selenium IDE 中的定位器:CSS 选择器,DOM,XPath,链接文本,ID
- 在 Selenium WebDriver 中查找元素和 FindElements
- Selenium Form WebElement:文本框,提交按钮,sendkeys(),click()
- 如何在 Selenium WebDriver 中选择复选框和单选按钮
- 如何在 Selenium Webdriver 中单击图像
- 如何使用 Selenium Webdriver 从 DropDown 中选择值
- 在 Selenium Webdriver 中按链接文本&部分链接文本定位元素
- 鼠标单击&键盘事件:Selenium Webdriver 中的操作类
- 如何上传&使用 Selenium Webdriver 下载文件
- Selenium WebDriver 中的 XPath:完整教程
- Selenium WebDriver 中的警报&弹出窗口处理
- 如何在 Selenium WebDriver 中处理 Web 表
- 使用 Selenium WebDriver 处理动态 Web 表
- Selenium WebDriver 中所需的功能
- 如何使用 Selenium WebDriver 验证工具提示
- 如何使用 Selenium Webdriver 查找所有/断开的链接
- Gecko(Marionette)驱动程序 Selenium:下载,安装,与 Firefox 一起使用
- 测试 NG
- 如何下载&在 Eclipse 中为 Selenium WebDriver 安装 TestNG
- TestNG 教程:Selenium 中的注释,框架和示例
- TestNG 组:包含,排除示例-Selenium 教程
- 硒中的 TestNG @Test 优先级
- Selenium 中的并行执行:会话处理& TestNG 依赖性
- TestNG:如何在 Selenium 中运行多个测试套件
- Selenium 中的 TestNG 侦听器:ITestListener & ITestResult 示例
- 如何在 TestNG 中执行失败的测试用例:Selenium WebDriver
- Selenium WebDriver 中的 TestNG 报告生成
- 在 Selenium WebDriver 中自定义 PDF &电子邮件 TestNG 报告
- 构架
- 页面对象模型(POM)&页面工厂:Selenium WebDriver 教程
- Dataprovider & TestNG XML:Selenium 中的参数化(示例)
- 从 Selenium Webdriver 中的 Excel 文件中读取&写入数据:POI & JXL
- 如何从 Selenium Webdriver 中的 DatePicker /日历中选择日期
- 提前 Webdriver 的东西!
- Selenium Grid 教程:集线器&节点(带有示例)
- Maven & Jenkins 与 Selenium 集成:完整教程
- Selenium 自动化框架:数据驱动,关键字驱动&混合
- 使用 Selenium 进行数据库测试:分步指南
- 在 Selenium Webdriver 中处理 iFrame:switchTo()
- 使用 Selenium WebDriver 进行跨浏览器测试
- 如何在 Selenium WebDriver 中截屏
- 具有 Selenium 教程的 Log4j:下载,安装,使用&示例
- 硒无头浏览器测试:HTMLUnitDriver & PhantomJS
- Selenium Webdriver 中的机器人类
- 如何在 Selenium Webdriver 中使用 AutoIT:文件上传示例
- 如何在 Selenium WebDriver 中处理 SSL 证书
- 如何在 Selenium Webdriver 中处理 AJAX 呼叫
- Selenium WebDriver 中的 JavaScriptExecutor 示例
- 使用 Python 的 Selenium Webdriver:示例教程
- 如何使用 IntelliJ IDE & Selenium Webdriver
- 使用 Selenium WebDriver 进行闪存测试
- 带有 Selenium 的 Apache ANT:完整教程
- Selenium Webdriver 中的 XSLT 报告
- Github 与 Selenium 集成:完整教程
- Selenium WebDriver 中的 Cookie 处理
- 将 SoapUI 与 Selenium 一起用于 Web 服务测试
- 如何在 Selenium WebDriver 中创建 Firefox 配置文件
- 含硒硒(BDD 框架):带有示例的教程
- 如何在 Selenium WebDriver 中拖放(示例)
- Selenium C#Webdriver 教程:NUnit 示例
- 在 Selenium WebDriver 中创建对象存储库:XML &属性文件
- 如何在 Selenium Webdriver 中向下滚动或向上滚动页面
- Sikuli 教程:如何将 Sikuli 与硒一起使用(示例)
- XPath 在 Selenium Webdriver 中包含,同级,祖先,与或,父级,开头,轴
- Selenium WebDriver 中的隐式,显式&流利等待
- 双击并右键单击 Selenium 中的示例
- 使用带有示例的 Webdriver 的 Selenium 代理身份验证
- Selenium 异常处理(常见异常列表)
- Selenium IDE 教程
- 如何下载&为 Firefox 安装 Selenium IDE
- Selenium IDE 初学者教程
- 如何通过脚本&命令(声明,验证)使用 Selenium IDE
- 在 Selenium IDE 中验证 Element Present,waitFor 和 Wait
- 在 Selenium IDE 中存储变量,回显,警报,弹出窗口处理
- 硒核心扩展(User-Extensions.js)
- 如何在 Selenium IDE 中进行调试 断点&起点
- 最大化 Selenium 中的浏览器
- Chrome 选项&所需功能:AdBlocker,隐身,无头
- 使用 Selenium Webdriver 刷新页面
- 使用 Excel VBA 和 Selenium
- 必须检查!
- 前 100 个硒面试问题&答案
- 硒与 HP UFT(QTP):有什么区别?
- 2020 年排名前 15 位的硒替代品
- 2020 年 10 种最佳 iMacros 替代品
- 免费的移动应用测试教程
- 第一眼
- 移动应用程序测试:示例测试用例&测试方案
- 真实设备与模拟器与模拟器的测试:主要差异
- 鸦片
- 适用于 Android 的 APPIUM 教程& iOS 移动应用测试
- UIAutomatorViewer 教程:Android 测试检查器
- Android 仿真器的 Appium 所需功能[示例]
- 将具有 Android 调试桥(ADB)的移动设备连接到 USB,WiFi
- Appium Maven 依赖项:项目示例
- 前 18 个 Appium 面试问题&答案
- 提前进行移动测试!
- 带有自动化框架的 Android APP 测试教程
- Robotium 教程:您的第一个 Android 框架
- Selendroid 入门实例教程
- 移动应用程序性能测试:清单,工具(Andriod & iOS)
- 适用于 Android 测试的 Calabash 自动化工具教程
- iOS 应用测试教程:手册&自动化
- 使用 UIAutomation 框架的 iOS 自动化测试
- 热门 20 个移动测试面试问题&答案
- 游戏测试:如何测试移动/桌面应用程序
- 适用于 Android 的 14 种最佳移动测试工具& iOS App [免费/付费]
- 移动应用中的中断测试
- 2020 年 26 种最佳移动应用开发工具
- 初学者黄瓜测试教程
- 什么是黄瓜测试工具? 框架介绍
- 如何下载&在 Windows 中安装 CUCUMBER
- 什么是黄瓜特征文件&步骤定义? (带有示例)
- 什么是小黄瓜? 用黄瓜写小黄瓜测试
- 创建您的第一个黄瓜脚本(2 个示例)
- 黄瓜面试的前 20 个问题&答案
- SoapUI 初学者教程
- Web 服务测试:初学者教程
- 什么是 SoapUI? SoapUI 测试简介
- 在 Windows 上进行 SOAPUI 下载,安装和&配置
- SoapUI:如何创建测试套件&测试用例
- SoapUI 中的断言:完整教程
- SoapUI 面试的前 15 个问题&答案
- 行为驱动开发(BDD)通过行为测试 REST API
- 15 Rest API 面试问题&答案
- 2020 年 19 种最佳 SoapUI 替代品
- JUnit 初学者教程:3 天学习
- 如何在 Eclipse 中下载和安装 JUnit
- JUnit 测试用例@Before @BeforeClass 注释
- 带有示例的 JUnit 注释教程
- Junit 断言&断言与示例
- 使用示例创建 JUnit 测试套件:@RunWith @SuiteClasses
- JUnit @Ignore 测试注释与示例
- JUnit 预期的异常测试:@Test(预期)
- JUnit ErrorCollector @Rule 与示例
- 使用@Parameters 的示例进行 JUnit 参数化测试
- TestNG 与 JUnit:有什么区别?
- 机械手流程自动化(RPA)教程:什么是工具&示例
- Bugzilla 入门指南:缺陷跟踪工具
- JIRA 教程:初学者完整指南
- MANTIS Bug Tracker 入门教程
- ETL 测试或数据仓库测试教程
- 学习 SAP 测试:创建您的第一个 SAP 测试用例
- 带有示例测试案例的数据库(数据)测试教程
- HP ALM /质量中心教程
- 介绍
- 什么是 HP ALM? 质量中心工具
- 如何下载&安装 HP ALM(质量中心)
- HP ALM 管理:创建域,项目&用户
- 高级的东西
- 管理选项卡:在 HP ALM(质量中心)中创建版本&周期
- HP ALM(质量中心)教程中的需求模块
- HP ALM(质量中心)教程中的测试计划模块
- HP ALM(质量中心)中的测试实验室
- 如何将 UFT(QTP)与 ALM(质量中心)集成
- HP ALM(质量中心)中的缺陷管理生命周期
- 仪表板,报告 HP ALM(Quality Center)中的&分析
- HP ALM:过滤条件,查找,替换,标志,历史记录&发送邮件
- 如何在 HP ALM(质量中心)中自定义项目
- 检查!
- HP ALM / QC 认证:绝对指南
- 30 个最佳 ALM 工具[2020 年 7 月列表]
- HP ALM(质量中心)面试的前 35 个问题&答案
- 测试管理教程:完整的培训课程
- 介绍
- 角色&测试经理/测试负责人的职责
- 测试管理过程:测试项目的完整指南
- 测试管理中的项目风险分析&解决方案
- 软件测试评估技术:分步指南
- 高级的东西
- 项目团队:开发,构建&管理:逐步过程
- 如何创建测试计划(带有示例)
- 测试执行期间的测试监控&测试控制:完整教程
- 测试项目中的问题管理
- 测试摘要报告教程:通过示例&模板学习
- 软件质量保证(SQA):计划,审核&审核
- 软件测试中的缺陷管理流程(错误报告模板)
- 使用 PDCA 模型的测试过程改进(TPI)
- 如何选择最佳自动化测试工具
- 掌握团队管理技能的 5 个步骤
- 必须知道!
- 最佳 25 种测试管理工具(2020 年 7 月更新)
- 前 20 名测试经理/领导面试问题
- TestLink 教程:完整指南
- Guru99 SAP 教程
- SAP 初学者课程
- 介绍
- 什么是 SAP? SAP ERP 软件的定义
- SAP 业务套件
- SAP ERP 功能&技术模块
- 如何为您的职业选择最佳 SAP 模块
- 如何成为 SAP 顾问
- 如何获得 SAP 认证
- 高级的东西
- SAP 登录:GUI &导航教程
- 如何安装 SAP IDES for Practice
- 什么是 mySAP?
- SAP NetWeaver:10 分钟学习
- 如何在 SAP 中显示技术名称
- 适用于所有国家/地区的 SAP Molga 列表
- 如何执行 SAP 报表
- 如何在 SAP 中创建变式
- SAP 面试的前 50 个问题
- SAP 业务蓝图:BBP 文档&模板
- ERP 的完整形式和含义是什么?
- 完整格式的 SAP:首字母缩写| 缩写
- 必须知道!
- 2020 年面向初学者的 6 本最佳 SAP 书籍
- 2020 年 10 种最佳 SAP ERP 替代方案
- SAP 测试面试的前 18 个问题&答案
- SAP ABAP 编程教程
- ABAP 基础知识
- 什么是 ABAP? 完整的形式,含义,历史
- ABAP 简介:数据类型,运算符&编辑器-教程
- ABAP 数据字典教程 SE11:表,锁对象,视图&结构
- ABAP 中的模块化:宏,子例程&功能模块
- 让我们深入数据库
- 在 SAP ABAP 中打开 SQL &本机 SQL
- SAP ABAP 内部表:创建,读取,填充,复制&删除
- SAP ABAP 表控件示例
- 让 CODE!
- 关于 ABAP 报告编程的全部信息
- 对话框编程教程:SAP ABAP 中的模块池
- ABAP 子屏幕教程:SAP 中的呼叫子屏幕
- SAP 按价值处理&按帮助处理
- SAP 教程-ABAP 列表查看器中的 ALV 报告
- 形式和脚本
- SAP 脚本教程:SE71,SE78,SCC1,VF03,SO10
- SAP ABAP 中的智能表单
- 一些出口的时间
- 什么是 SAP ABAP 中的用户出口和客户出口
- 什么是 BADI? SAP ABAP 教程
- 让我们传输一些数据!
- SAP 中的 ABAP 查询教程:SQ01,SQ02,SQ03
- SAP ABAP BDC(批处理数据通信)教程
- ALE,EDI & IDocs 简介&差异:SAP 教程
- SAP IDOC 教程:定义,结构,类型,格式&表
- SAP BAPI 教程-在 ABAP 中创建 BAPI 的分步指南
- SAP 教程中的远程功能调用(RFC)
- SAP ABAP 面试的前 35 个问题&答案
- SAP 人力资源| SAP HCM 模块培训教程
- 行政人员(PA)
- 什么是 SAP HR? SAP HCM 简介
- 什么是信息类型?
- SAP 信息类型:使用 PA30,PA20 创建,更改,复制,删除,概览
- SAP 快速入门教程:PA70,PA71
- 您必须知道的重要信息类型 T 代码
- 如何在 SAP 中查看为员工 PA10 保存的所有信息类型
- SAP 中有关 Infotype 0003 薪资状态的所有信息
- 什么是时间限制? SAP HR 教程
- 人事行动
- SAP PA40:人员操作教程
- 如何删除人员编号:SAP RPUDELPN
- SAP 中的组织,企业,人员结构
- 了解 SAP HR 中的组织管理(OM)
- SAP PP01:如何维护 OM 信息类型
- SAP PPOCE:如何创建组织单位
- 职位
- 如何创建,复制&界定职位:SAP PPOME
- 在 SAP 中将职位定义为组织单位负责人
- 如何将作业&成本中心分配给 SAP 中的职位
- 如何显示职位的组织结构
- SAP HR 时间管理:PA51,PA53,PA61,PA62,PA63
- 如何进行运行时评估:SAP PT60
- SAP PT66:如何检查时间评估结果 RPTIME
- SAP 中的工资核算流程概述
- SAP PA03:薪资控制记录教程
- 如何在 SAP 中执行工资核算
- 如何在 SAP 中使用 PC_PAYRESULT 检查工资结果
- 如何在 SAP 中删除工资核算结果:PU01
- 必须知道工资信息
- 什么是非周期工资? SAP IT267
- 如何在 SAP 中审核工资单:RPUAUD00
- SAP HR 中的 Matchcode W 是什么?
- SAP Wage Types 教程:主要,辅助,对话,时间
- SAP 工资类型报表器:PC00_MXX_CWTR
- 过帐工资核算活动
- 使用 SAP DME 文件进行银行转帐
- SAP FI01:如何创建银行密钥
- SAP 中的总分类帐(G / L)过帐:PCP0 & PC00_M99_CIPE
- SAP AD HOC 查询教程(S_PH0_48000513)
- 检查!
- SAP HR 面试主要问题
- SAP FICO 培训教程:了解 SAP FI & SAP CO 模块
- SAP FI
- SAP FICO 简介
- 如何在 SAP 中创建公司
- 如何在 SAP &中创建公司分配公司代码
- 总帐
- 如何在 SAP 中创建会计科目表
- 如何在 SAP 中定义保留收益帐户
- SAP 教程中的总帐科目:创建,显示,冻结&删除 FS00
- SAP 中的总分类帐(G / L)过帐:PCP0 & PC00_M99_CIPE
- 如何在 SAP 中创建财务报表版本(FSV)
- 如何在 SAP 中执行日记帐分录 FB50
- 在 SAP 中创建会计年度变式&分配给公司代码:完整教程
- 如何在 SAP 中定义过帐期间变式
- 如何在 SAP 中过帐期间变式中打开和关闭期间
- 如何在 SAP 中定义字段状态变式&字段状态组
- 如何在 SAP FICO 中定义文档类型和编号范围
- 总帐凭证教程:在 SAP 中暂留,暂存,过帐过帐
- 应收账款
- SAP FI 中的应收帐款
- 客户主数据教程:在 SAP 中创建,显示,阻止,删除
- SAP 中的 FB02:更改客户文档教程
- 如何在 SAP 中创建客户帐户组
- 如何在 SAP 中创建一次性客户 FD01
- 如何在 SAP FICO 中创建客户销售发票 FB70
- SAP 中的凭证冲销 FB08:分步指南
- SAP 中的 FB75:过帐销售退货指南–贷项凭证
- 如何在 SAP 中过帐客户收款 F-28
- 如何在 SAP 中过帐外币发票 FB70
- 剩余方法:将&收款转入 SAP 中的部分付款
- 部分方式:SAP 中收款&的部分付款过帐
- FBRA:如何在 SAP 中重置已清除的项目
- SAP 中的 FD32:信用控制范围教程
- 应付账款
- SAP FI 中的应付帐款
- 如何在 SAP FICO 中创建供应商帐户组
- 如何在 SAP FICO 中阻止或删除供应商
- 在 SAP 中创建供应商主数据的分步指南
- 如何在 SAP 中创建一次性供应商 FK01
- SAP 中的 FB60:如何过帐采购发票
- 如何在 SAP FI 中过帐采购退货 FB65
- 如何在 SAP 中过帐外向供应商付款 F-53
- 供应商发票&付款过帐期间 SAP 中的预扣税
- 自动付款程序运行 F110:SAP 教程
- 如何在 SAP 中将符号科目映射到总账科目
- 在 SAP 教程中发布舍入差异
- 报告书
- SAP FI 中的重要报告
- 必须知道!
- SAP 中的外币重估:月末结算
- SAP FI 重要表:必须知道!
- 如何执行催款:SAP F150
- 如何在 SAP 中维护汇率
- SAP 通讯教程:配置,生成,打印&电子邮件
- SAP FICO 面试的前 50 个问题&答案
- 成本中心
- 如何创建一个新的成本中心:SAP KS01
- 内部订单
- 有关 SAP 内部订单的全部信息
- 内部订单的结算教程:SAP 中的 KO02 & KO88
- 利润中心
- SAP Profit Center 教程:创建,分组,过帐&计划
- 在 SAP 中使用标准层次结构创建利润中心
- 如何在 SAP 中将成本中心分配到利润中心
- 如何将物料分配给 SAP 中的利润中心
- 必须知道!
- SAP CO 表:控制模块中的重要表
- 比较 SAP 中的成本中心,利润中心和内部订单
- SAP 基础培训教程
- 基础介绍
- 什么是 SAP BASIS? 完整的教程
- 如何下载&为 Windows 安装 SAP GUI(FrontEnd)
- 什么是 SAP 实例& SAP SID?
- SAP R / 3 体系结构教程
- 客户群
- 什么是客户? 如何在 SAP SCC4 中创建新客户端
- SAP 客户端副本:本地,远程,导入/导出
- 如何在 SAP SM50 中删除客户端
- 用户授权
- SU01:如何在 SAP 中创建新用户
- 如何锁定(SU01)&解锁(SU10)SAP 用户
- SAP RZ11:参数(login / fails_to_session_end)限制登录尝试
- SAP USR40:如何设置密码限制
- 后台工作
- SAP 后台作业处理 SM36:创建,计划,重新计划
- SAP SM37:如何监视后台作业
- SAP RSBTCDEL2:如何删除后台作业
- 运输管理系统
- SAP TMS(运输管理系统)教程
- 如何配置 STMS(SAP 传输管理系统)
- SAP 路由&层:逐步配置
- 什么是 SAP 传输请求? 如何导入/导出 TR
- 补丁管理
- 支持软件包&堆栈升级:SAP SPS
- 下载&升级 SAP 内核:分步教程
- SAP 监视&性能检查:完整的 Tcode 教程
- 什么是 OSS 注释? SAP SNOTE 教程
- RFC
- SAP 教程中的远程功能调用(RFC)
- 如何在 SAP 中配置&测试 RFC 连接-SM59
- 数据迁移
- SAP IDOC 教程:定义,结构,类型,格式&表
- 什么是 SAP LSMW? 使用 LSMW 迁移数据的步骤
- 检查!
- 60 个 SAP 基础面试问题&答案
- SAP SD(销售&分发)培训教程
- 客户主数据和物料主数据
- 什么是 SAP SD? SAP Sales &分发模块简介
- 创建客户主数据:SAP XD01
- SAP SD:创建编号范围&分配到帐户组 XDN1
- 如何创建合作伙伴功能&合作伙伴确定:SAP VOPAN
- MB1C:如何在 SAP 中创建物料库存
- 如何在 SAP 中创建客户物料信息记录 VD51
- MMBE:如何获取 SAP 库存概览
- SAP SD:创建物料主数据
- 营业额
- SAP SD 中的售前活动
- 如何在 SAP 中创建查询:VA11
- 如何创建报价:SAP VA21
- 如何创建销售订单:SAP VA01
- 如何在 SAP 中创建借项凭单
- 如何在 SAP 中创建贷项凭证
- 如何在 SAP 中创建销售单据类型
- SAP 销售文档教程:VA01,VA02,VA03
- 销售凭证的文本确定:SAP VOTXN
- 计划行类别确定教程:SAP VOV6
- 如何在 SAP 中创建项目建议 VA51
- 物料清单&排除:SAP VB01
- 交货
- 如何确定装运点:SAP OVL2
- 创建拣配,包装& PGI(发货后):SAP LT03,VL02N
- 免费创建退货订单&后续交货:SAP VL01N
- SAP SD 中的所有关于寄售流程
- 使用 Tcode V / 30 在 SAP SD 中进行输出确定
- SAP 中 OVRQ 替代原因
- 开票
- CS01:如何在 SAP SD 中创建物料清单(BoM)
- 如何在 SAP SD 中创建发票更正请求
- SAP 项目类别确定:VOV7,VOV4
- 在 SAP 中定义&分配阻塞原因(OVV4,S_ALR_87007670)
- 价钱
- 在 SAP 中按物料类别确定定价:OVKO
- SAP SD 税收确定程序教程:VK12,OX10,OVK4,OVK1
- 如何在 SAP 中创建文本类型:VOTXN
- SAP 项目类别确定:VOV7,VOV4
- 使用 Tcode OV31 的 SAP 中的条件排除组
- 如何在 SAP 中创建记帐密钥:OV34
- 信用管理
- SAP 信用管理教程:OVA8
- SAP SD 面试的前 20 个问题&答案
- 2020 年 100 项最佳销售培训课程
- SAP CRM 培训教程
- 介绍
- SAP CRM 模块:概述,体系结构
- SAP CRM 销售流程,管理,报价&产品确定
- SAP CRM SERVICEPRO:服务协议,合同,计划,订单管理
- SAP CRM Marketing:计划,活动管理&自动化细分
- 高级的东西
- SAP 合作伙伴渠道管理(PCM)
- SAP CRM 互动中心
- SAP CRM 业务合作伙伴:分组,角色,关系
- SAP CRM 组织管理
- SAP CRM Product Master:层次结构,类别,集合类型&属性
- SAP CRM 业务交易流程
- SAP CRM 合作伙伴处理:类别,功能,顺序,确定
- SAP CRM 操作配置文件:完整教程
- SAP CRM 定价&计费:元素,过程,类型,Web UI
- SAP CRM WebUI 教程
- SAP CRM Web UI:配置,应用程序&增强工具
- 必须知道!
- 26 个最佳 Salesforce 竞争对手&替代品[免费/付费]
- SAP CRM 面试的前 25 个问题&答案
- SAP MM(材料管理)培训教程
- 简介&放大器; 主要的数据
- SAP MM 模块概述
- SAP 主数据简介
- 如何在 SAP 中创建物料主数据 MM01
- 如何在 SAP 中更改物料主数据(MM02,MM03)
- 如何在 SAP 中复制物料主数据:MM01
- MM17:SAP 中物料主数据的批量维护
- SAP 中的物料主视图:最终指南
- 购买
- SAP 中的采购&采购申请简介
- ME11:如何在 SAP 中创建购买信息记录
- 如何更改采购信息记录:SAP 中的 ME12
- 如何在 SAP 中创建采购申请:ME51N
- 如何在 SAP 中将采购申请转换为采购订单
- ME41:如何在 SAP 中创建 RFQ(报价请求)
- ME47:如何在 SAP MM 中创建报价
- 如何比较不同报价的价格:SAP ME49
- 如何选择或拒绝报价:SAP ME47
- 如何创建来源清单确定:SAP ME05
- 如何在 SAP 中创建采购订单 ME21N
- 如何使用参考 ME58 创建采购订单 SAP 中的 ME21N
- ME22N:如何在 SAP 中更改采购订单
- 如何过帐收货:SAP MIGO
- MIRO:如何在 SAP 中执行发票验证
- MRBR:在 SAP 中发布冻结的发票
- SAP 中的服务采购订单:ME23N
- SAP 中的大纲协议:合同&计划协议 ME31
- 下达策略,SAP 中的采购订单流程:CT04,ME28,CL02
- 价钱
- SAP 中的定价过程总览
- 如何在 SAP V / 05,M / 03 中定义访问顺序&条件表
- 如何在 SAP 中定义条件类型
- 如何在 SAP 中定义计算架构
- 如何在 SAP 中定义架构组&确定
- 库存管理
- SAP 库存管理教程:移动类型{OMJJ}
- 如何在 SAP 中创建收货:MIGO,MB1C,MB03
- 如何在 SAP 中冲销(取消)收货 MMBE
- SAP MB21,MB1A,MBST,MB22 中的库存预留
- 如何在 SAP MM VL02N,VL09 中过帐发货
- SAP MB1B 中的货物转移过帐
- SAP 库存盘点教程:MI01,MI02,MI04,MI07
- SAP 中的特殊库存&特殊采购
- SAP MM 面试的前 21 个问题&答案
- SAP CO(控制)模块培训教程
- 如何创建一个新的成本中心:SAP KS01
- 如何创建新的成本要素
- 有关 SAP 内部订单的全部信息
- 内部订单的结算教程:SAP 中的 KO02 & KO88
- SAP Profit Center 教程:创建,分组,过帐&计划
- 在 SAP 中使用标准层次结构创建利润中心
- 如何在 SAP 中将成本中心分配到利润中心
- 如何将物料分配给 SAP 中的利润中心
- SAP CO 表:控制模块中的重要表
- 比较 SAP 中的成本中心,利润中心和内部订单
- SAP 薪资培训课程
- 初学者重要的薪资概念
- SAP 中的工资核算流程概述
- SAP 中的工资核算流程概述
- SAP PA03:薪资控制记录教程
- 如何在 SAP 中执行工资核算
- 如何在 SAP 中使用 PC_PAYRESULT 检查工资结果
- 如何在 SAP 中删除工资核算结果:PU01
- 必须知道工资信息
- 如何在 SAP 中执行工资核算
- 什么是非周期工资? SAP IT267
- 如何在 SAP 中审核工资单:RPUAUD00
- SAP HR 中的 Matchcode W 是什么?
- SAP Wage Types 教程:主要,辅助,对话,时间
- SAP 工资类型报表器:PC00_MXX_CWTR
- 薪水面试的前 17 个问题&答案
- 过帐工资核算活动
- 使用 SAP DME 文件进行银行转帐
- SAP 中的总分类帐(G / L)过帐:PCP0 & PC00_M99_CIPE
- SAP BI / BW 教程:初学者培训
- 介绍
- 简介 SAP BI
- SAP BI 体系结构概述
- SAP Infoobject,Infoarea,Infoobject 目录教程
- 高级的东西
- 如何在 SAP BI / BW 中创建信息区域
- 如何在 SAP BI / BW 中创建 InfoObject 目录
- 如何在 SAP BI / BW 中创建具有特征的 InfoObject
- 如何在 SAP BI / BW 中使用关键指标创建 InfoObjects
- SAP BW 中的 DSO 是什么? 为什么要使用它?
- SAP 中的标准 DSO 是什么? 如何创建一个?
- 什么是 SAP 中的写入优化 DSO? 如何创建一个?
- 什么是 SAP 中的直接更新 DSO? 如何创建一个?
- SAP InfoSet 教程:什么是创建,联接
- 什么是 SAP BI / BW 中的 Infocube? 如何创建一个?
- 如何从 SAP BI / BW 中的平面文件加载主数据
- 如何从 SAP BI / BW 中的平面文件加载事务数据
- 如何从 SAP BI / BW 中的 ECC 加载主数据
- 如何从 ECC 加载事务数据:SAP RSA5
- 有关 SAP BI / BW 中星型架构&扩展星型架构的全部信息
- SAP BI 流程链:创建,检查,激活,分配,监视
- SAP BI 内容:安装,激活
- SAP BEx 查询设计器教程&查询元素
- SAP BEx:特征&关键指标设置(RKF,CKF &公式)
- 必须知道!
- SAP BW / BI 面试的前 40 个问题&答案
- SAP PP(生产计划)培训教程
- 介绍
- SAP PP 简介(生产计划)
- SAP PP 中的物料清单(BoM):创建,更改,显示
- SAP PP 中的工作中心:创建,更改,显示
- 高级的东西
- 如何在 SAP PP 中创建/更改/显示工艺路线
- 如何在 SAP PP C223 中创建生产版本
- SAP 需求管理教程:MD61,MD62,MD04,MD74,MD75
- SAP MRP(物料需求计划)教程:MD01,MD02,MD04
- SAP PP 中的长期计划(LTP)教程:MS31,MS02,MD61
- SAP PP 容量计划:CM01,CM21
- SAP PP 中针对生产订单的货物移动:MIGO
- SAP 中的生产订单:CO01,MD16,CO02,CO15
- SAP PP 报告教程:COOIS,MB52,CS15,CS12
- 必须知道!
- SAP PP 面试最常见的 26 个问题&答案
- SAP QM(质量管理)教程
- SAP QM 简介
- SAP 中的主数据是什么? QS21,QP01,QS31,QDV1,QI01
- SAP QM 进/原材料检查程序:MIGO,QA32
- 流程中检查 SAP QM:CO01 & QA32
- SQP QM:最终检验 CO01 & QA32
- SAP QM 中的质量通知:QM02
- SAP HANA 初学者培训教程
- SAP HANA 体系结构,LandScape,规模调整:完整教程
- 如何下载&安装 SAP HANA Studio
- SAP HANA SQL:10 分钟学习
- SAP HANA 数据类型&标识符
- SAP HANA 操作员:联盟&联盟全部
- SAP HANA SQL 功能教程
- SAP HANA SQL 表达式教程
- SAP HANA SQL 存储过程教程
- SAP HANA 教程:创建序列
- SAP HANA 教程:创建触发器
- SAP HANA SQL DATA 性能分析:5 分钟学习
- SAP HANA 教程:SQL 脚本
- SAP HANA 计算视图教程
- SAP HANA 中的 DATA Provisioning &复制
- SAP HANA 中的 SLT(SAP Landscape Transformation Replication 服务器)
- HANA 中的 SAP DS(数据服务)
- SAP HANA 直接提取器连接(DXC)教程
- SAP HANA 平面文件上传教程:CSV,XLS & XLSX
- SAP HANA 建模:完整教程
- SAP HANA 入门教程
- SAP HANA 属性视图教程
- SAP HANA Analytic View:完整教程
- SAP HANA 分析特权教程
- SAP HANA 信息编辑器
- SAP HANA 导入和导出教程
- SAP HANA 安全性:完整教程
- SAP HANA 报表
- SAP HANA 面试的前 15 个问题&答案
- Guru99 必须学习的教程
- Microsoft Excel 培训教程:7 天学习
- 介绍
- Microsoft Excel 101 简介
- 如何在 Excel 中进行加,减,乘,除
- Excel 数据验证,过滤器,分组
- Excel 公式&函数:学习基本示例
- IF,AND,OR 或嵌套 IF &在 Excel 中不是逻辑函数
- 如何在 Excel 中创建图表:类型&示例
- 如何在 Excel 中进行预算:个人理财教程
- 进阶的东西
- 如何将 XML 数据导入 Excel [示例]
- 如何将 CSV 数据(文本)导入 Excel [示例]
- 如何将 MS Access 数据导入 Excel [示例]
- 如何将 SQL 数据库数据导入 Excel [示例]
- 如何在 Excel 中创建数据透视表:初学者教程
- Excel 中的高级图表&图形
- 什么是 Microsoft Office 365? Excel on Cloud 的好处
- CSV 与 Excel(.xls)-有什么区别?
- Excel VLOOKUP 初学者教程:通过示例学习
- Excel ISBLANK 功能:通过示例学习
- Excel 中的迷你图和示例
- Excel 中的 SUMIF 函数:通过示例学习
- 前 40 个 Microsoft Excel 面试问题&答案
- 面试中提出的十大 Excel 公式&答案
- 2020 年 20 种最佳 Excel 课程
- 2020 年的 17 种最佳 Excel 替代品(免费/付费)
- 15 本最佳 Excel 书籍(2020 年更新)
- 2020 年 85 种最佳 Microsoft Office 类课程
- 宏&放大器; Excel 中的 VBA
- 如何在 Excel 中编写宏:分步入门指南
- 如何使用示例在 Excel 中创建 Visual Basic for Applications(VBA)
- Excel VBA 变量,数据类型&常量
- Excel VBA 数组:带示例的动态多维类型
- VBA Excel 表单控件& ActiveX 控件
- VBA 算术运算符:乘法,除法,加法,模量
- VBA 字符串运算符
- VBA 比较运算符:不等于,小于或等于,大于
- VBA 逻辑运算符:AND,OR,NOT
- Excel VBA 子例程:如何使用示例调用 Sub
- Excel VBA 函数教程:返回,调用,示例
- Excel VBA 范围对象
- 初学者会计教程:7 天学习簿记
- 介绍
- 什么是会计? 重要性,目的&需要
- 会计中的资产&负债是什么? 定义&示例
- 什么是会计等式? 示例问题
- 什么是会计中的收入,费用&提款? [例子]
- 高级的东西
- 带有实例的扩展会计方程
- 基本会计交易示例
- 如何在会计中创建日记帐分录[示例]
- 如何创建分类帐帐户[示例]
- 如何计算折旧:直线,递减值示例
- 如何通过示例准备试算表
- 如何用示例制作损益表
- 如何用示例制作资产负债表
- 现金流量表的重要性及示例
- 如何使用示例分析财务报表
- 印度 7 种最佳在线税务软件[2020 更新]
- 必须知道!
- 2020 年 22 种面向小型企业的最佳会计软件
- 2020 年 22 种最佳 QuickBooks 替代品[免费/付费]
- 2020 年 65 个最佳会计课程
- 2020 年 90 项最佳金融建模认证课程
- 11 本最佳会计书籍(2020 年更新)
- 134 个最热门的会计面试问题&答案
- 前 30 个理货面试问题&答案
- 免费道德黑客教程:初学者课程
- 介绍
- 什么是骇客? 简介&类型
- 对计算机系统的潜在安全威胁
- 成为道德黑客所需的技能
- 2020 年排名前 20 位的道德黑客工具
- 高级的东西
- 什么是社会工程学? 攻击,技巧&预防
- 密码学教程:密码分析,RC4,CrypTool
- 如何破解密码
- 蠕虫病毒&特洛伊木马:道德黑客教程
- 通过示例了解 ARP 中毒
- Wireshark 教程:网络&密码嗅探器
- 如何破解 WiFi(无线)网络
- DoS(拒绝服务)攻击教程:Ping of Death,DDOS
- 2020 年 10 种最佳 DDoS 攻击工具[免费/付费]
- 如何破解 Web 服务器
- 如何破解网站:在线示例
- SQL 注入教程:学习示例
- 黑客 Linux 操作系统:完整的 Ubuntu 示例教程
- CISSP 认证指南:什么是必备条件,成本,CISSP 薪水
- 什么是数字取证? 历史,过程,类型,挑战
- 什么是网络犯罪? 类型,工具,示例
- 必须知道!
- 10 个最常见的 Web 安全漏洞
- 2020 年排名前 30 的 Bug 赏金计划
- 2020 年 40 种最佳渗透测试(笔测试)Vapt 工具
- Kali Linux 教程:什么是安装,利用 Metasploit 和 Nmap
- 2020 年 13 种最佳黑客操作系统
- 2020 年 11 种最佳 Wireshark 替代品
- 网站,网络的 13 种最佳漏洞评估扫描仪
- 最佳 16 无日志 VPN(2020 更新)
- 20 个最佳手机间谍应用程序[Android / iPhone]
- 2020 年 15 种最佳数字取证工具[免费/付费]
- 2020 年 17 种最佳 IP &网络扫描工具(免费/付费)
- Windows 的 11 种最佳免费防火墙软件[2020 更新]
- 前 25 个道德黑客面试问题&答案
- 热门的 110 个网络安全面试问题&答案
- CompTIA 认证指南:职业道路&学习资料
- 16 本最佳道德黑客书籍(2020 更新)
- 初学者云计算教程
- 面向初学者的 Adobe Photoshop CC 教程:7 天学习
- 介绍
- 什么是 Photoshop CC? 完整的介绍
- 如何在 PhotoShop CC 中使用工作区
- Photoshop LAYERS 教程
- Photoshop 图层蒙版教程和示例
- 高级的东西
- 如何使用 Photoshop 图层样式&效果[示例]
- 如何使用形状工具在 Photoshop 中绘制形状
- 什么是智能对象? 如何在 Photoshop 中使用智能对象?
- Photoshop 中的混合模式
- 如何在 Photoshop 中使用钢笔工具? 完整的教程
- 如何在 Photoshop 中删除背景?
- 如何在 PhotoShop 中使用画笔工具?
- 如何使用 Photoshop 文字工具添加文字
- 如何在 Photoshop 中使用滤镜&效果
- 必须知道!
- 2020 年 30 种最佳屏幕捕获软件工具,可提供更好的屏幕截图
- 2020 年 15 种最佳 Snagit 替代品
- 2020 年 11 种最佳 After Effects 替代品(免费&付费)
- 2020 年 14 种最佳 2D 动画软件[免费/付费]
- 2020 年 20 种最佳 3D 动画软件[免费/付费]
- 2020 年 16 种最佳 InDesign 替代方案[免费/付费]
- 2020 年 26 种最佳 Adobe Premiere Alternative [免费/付费]
- 2020 年 16 种最佳 Photoshop 替代品[免费/付费]
- 2020 年 16 种最佳屏幕录像机[免费/付费]
- 15 用于 MAC 的最佳屏幕录像软件[免费/付费]
- 2020 年 17 个最佳股票视频网站[有偿/免版税素材]
- 2020 年 22 种最佳 Sketchup 替代品
- 2020 年 36 种最佳视频编辑软件
- 30 最佳免费图片库在 2020 年
- 2020 年 18 个最佳免费股票视频网站
- GIMP 与 Photoshop:主要区别
- Adobe Photoshop 面试的前 45 个问题&答案
- 2020 年 90 种最佳 Adobe Illustrator 课程
- 2020 年 90 种最佳绘画课程
- 2020 年 80 项最佳 AutoCAD 课程
- 2020 年 95 个最佳平面设计认证课程
- 2020 年 80 项最佳 UI / UX 设计课程
- 2020 年 50 最佳 Web 设计课程
- 数字营销教程:在线课程
- 面向初学者的业务分析师培训教程
- 介绍
- 什么是业务分析? 工艺&技术
- 什么是业务分析师? 角色,责任,技能,认证
- 利益相关者分析&与模板映射的示例
- 生命周期
- 软件测试中的 V 模型
- 需求生命周期管理
- 软件工程方法
- SDLC 中的瀑布模型是什么? 优点&缺点
- 什么是 RAD 模型? 优点&缺点
- SDLC 中的增量模型:使用优势&劣势
- 什么是螺旋模型? 什么时候使用? 优点&缺点
- 敏捷方法论&模型:软件开发指南&测试
- 需求流程
- 示例软件需求分析
- 需求分析技术及示例:完整教程
- 什么是功能需求? 规格,类型,示例
- 什么是非功能性要求? 类型和例子
- 功能需求与非功能需求:主要区别
- 最终确定要求
- 如何将需求组织为业务分析师
- 管理需求资产
- 分步进行软件工程变更控制流程
- 文献资料
- BRS 与 SRS:了解差异
- 质量保证
- 什么是软件测试? 定义,基础&类型
- 初学者手动测试教程:概念,类型,工具
- 软件测试中的缺陷/缺陷生命周期
- 什么是用户验收测试(UAT)? 与例子
- 软件测试中的影响分析
- 完整的过程
- 业务分析过程:分步教程
- 必须阅读主题
- 什么是 ER 建模? 通过示例学习
- 决策表测试:学习示例
- 什么是静态测试? 什么是测试审查?
- 100 多个业务分析师面试问题&答案
- 软件工程中的软件配置管理
- Microsoft VISIO 教程:历史记录,文件类型,如何使用示例
- 十大 Microsoft Visio 面试问题&答案
- Drools 教程:体系结构,规则引擎示例
- 16 个最佳软件配置管理工具(2020 年将成为 SCM 工具)
- 2020 年十大最佳决策工具
- 16 种最佳甘特图软件[免费在线应用]
- 2020 年 30 种最佳需求管理工具
- 2020 年的 19 种最佳思维导图软件(免费&付费)
- 适用于 BA 分析师的 21 种最佳业务分析工具(2020 年更新)
- 38 个用于 UI 和 UX 设计器的最佳原型开发工具[2020 更新]
- 2020 年 30 种最佳 Adobe Acrobat 替代品
- 2020 年 14 种最佳 SharePoint 替代品(免费&付费)
- 2020 年 22 种最佳 OCR 软件[免费/付费]
- 2020 年 17 种最佳 Outlook 替代方案[免费/付费]
- 2020 年 21 种最佳 Google 语音替代品
- 21 项最佳免费电话会议服务(2020)
- 2020 年 20 种最佳 Evernote 替代品
- 2020 年的 17 种最佳 IVR 系统
- 13 最佳听写和语音合成软件[2020 更新]
- 2020 年 18 种最佳 PowerPoint 替代品
- 2020 年 100 最佳商业分析课程
- INFORMATICA 教程:完整的在线培训
- 介绍
- 什么是 Informatica? 完整的介绍
- Informatica 体系结构教程
- 如何下载&安装 Informatica PowerCenter
- 如何在 Informatica 中配置客户端和存储库
- 高级的东西
- Informatica 中的源分析器和目标设计器
- Informatica 中的映射:创建,组件,参数,变量
- Informatica 中的工作流程:创建,任务,参数,可重用,管理器
- Informatica 中的工作流监视器:任务&甘特图视图示例
- Informatica 中的调试器:会话,断点,详细数据&映射
- Informatica 中的会话属性:完整教程
- INFORMATICA 转换教程&过滤器转换
- Informatica 中的源限定符转换(带有示例)
- Informatica 中的聚合器转换示例
- Informatica 中的路由器转换:多个条件示例
- 示例中 Informatica 中的 Joiner 转换
- Informatica 中的排名转换(带有示例)
- Informatica 中的序列转换示例
- Informatica 中的事务控制转换:TCL 命令
- Informatica &可重用转换示例中的查找转换
- Informatica 中的规范化器转换(带有示例)
- Informatica 中的性能调优:完整的教程
- 必须知道!
- Informatica 面试的前 50 个问题&答案
- 面向初学者的项目管理教程
- 什么是项目管理? 目标,方法
- 什么是 PMP? 认证成本,收益
- 项目管理生命周期的各个阶段
- 项目成本估算&预算管理技术
- 项目管理中的风险分析&风险管理
- 项目管理方法论教程
- 六西格码认证指南:绿色,黄色,黑色皮带详细信息
- 40 个最佳项目管理工具[2020 年 7 月列表]
- PMP 教程:在线培训材料
- 介绍
- 什么是项目管理? 目标,方法
- 项目管理生命周期的各个阶段
- 高级的东西
- 项目集成管理教程:定义,流程&计划
- 项目范围管理:PMP 教程
- 项目成本估算&预算管理技术
- 利益相关者分析&与模板映射的示例
- 项目管理中的风险分析&风险管理
- 必须知道!
- 2020 年 30 种最佳 Trello 替代品
- 2020 年 20 种最佳 Microsoft Project 替代方案
- 2020 年最佳 8 个 Wrike 替代品
- MIS(管理信息系统)教程
- 什么是 MIS? 简介&定义
- 组件& MIS(管理信息系统)的作用
- MIS(管理信息系统)的目标&
- 信息系统类型:TPS,DSS &金字塔图
- SDLC &敏捷的 MIS 开发流程
- 信息系统中的道德&安全问题
- Microsoft MCSA 认证考试指南
- 决策支持系统(DSS):零售商店的演示 PoS
- Excel VBA 初学者教程:3 天学习
- 介绍
- 如何在 Excel 中编写宏:分步入门指南
- 如何使用示例在 Excel 中创建 Visual Basic for Applications(VBA)
- Excel VBA 变量,数据类型&常量
- Excel VBA 数组:带示例的动态多维类型
- 高级的东西
- VBA Excel 表单控件& ActiveX 控件
- VBA 算术运算符:乘法,除法,加法,模量
- VBA 字符串运算符
- VBA 比较运算符:不等于,小于或等于,大于
- VBA 逻辑运算符:AND,OR,NOT
- Excel VBA 子例程:如何使用示例调用 Sub
- Excel VBA 函数教程:返回,调用,示例
- Excel VBA 范围对象
- 必须知道!
- 使用 VBA 进行网页搜刮
- VBA 面试的前 22 个问题&答案
- CCNA 认证教程:简介&基础
- Jenkins 初学者教程:3 天学习
- 介绍
- 什么是持续集成?
- 詹金斯是什么? 持续集成(CI)工具
- 如何下载&在 Windows 上安装 Jenkins
- 高级的东西
- Jenkins GitHub 集成:安装 Git 插件
- 如何创建用户&管理权限:角色策略插件
- 如何使用 Jenkins Freestyle 项目创建构建
- Jenkins 管道教程:JenkinsFile 示例
- Jenkins vs Travis-CI:有什么区别?
- 必须知道!
- 2020 年 15 种最佳詹金斯替代品
- 十大 JENKINS 面试问题&答案
- 初学者软件工程教程:3 天学习
- 介绍
- 什么是软件工程? 定义,基础,特征
- 成为软件工程师/开发人员的 9 个步骤
- 软件工程师与软件开发人员:有什么区别?
- SDLC(软件开发生命周期)教程:什么是阶段,模型
- SDLC 中的瀑布模型是什么? 优点&缺点
- 高级的东西
- SDLC 中的增量模型:使用优势&劣势
- 什么是螺旋模型? 什么时候使用? 优点&缺点
- 什么是 RAD 模型? 优点&缺点
- 软件工程中的原型模型:方法论,过程,方法
- 瀑布模型,增量模型,螺旋模型与辐射模型:主要区别
- 能力成熟度模型(CMM)&是软件工程中的各个级别
- N 层(多层),3 层,2 层架构(带示例)
- 什么是全栈开发人员? 成为 Web 开发人员的技能
- 什么是函数式编程? 实例教程
- MVC 初学者教程:什么是架构&示例
- MVC 面试的前 31 个问题&答案
- 背包问题:动态编程示例
- 小背包问题:带有示例的贪婪算法
- 2020 年 21 种最佳软件开发工具
- 程序与程序之间的区别
- 主存储器和辅助存储器之间的区别
- 局部变量和全局变量之间的差异
- 抽象与封装之间的区别
- XML 和 HTML 之间的区别
- 网站和 Web 应用程序之间的区别
- URL 与 URI:您必须知道的最重要的区别
- AR vs VR:有什么区别?
- 加密与解密:有什么区别?
- Web 开发人员与软件开发人员:有什么区别?
- 必须知道!
- HTML 和 HTML5 之间的区别
- 按值致电与按引用致电之间的区别
- 类和对象之间的区别
- 堆叠与堆:了解差异
- 32 位和 64 位:主要区别
- 系统软件和应用程序软件之间的区别
- 软件工程与计算机科学:简介&的差异
- CISC 与 RISC:体系结构,指令集之间的差异
- SSD 与 HDD:选择哪一个?
- SRAM 与 DRAM:了解差异
- MVC 与 MVVM:示例的主要区别
- CPU 核心,多核心,线程,核心与线程,超线程
- 2020 年面向 Java,C,C ++,C#,Python 的 13 种最佳代码覆盖工具
- 2020 年 14 种最佳代码审查工具[静态代码分析]
- 15 个适用于 Windows 的最佳免费代码编辑器& Mac [2020 更新]
- 2020 年学习的 10 种最佳编程语言
- 什么是后端开发人员? 成为 Web 开发人员的技能
- 什么是平均堆栈开发人员? 技能,薪水,成长
- 初学者竞争性编程:Topcoder 挑战
- 什么是计算机编程? 学习编码的基础
- 14 本 BEST 算法&数据结构书籍(2020 清单)
- 2020 年面向初学者的 50 多个 BEST Freelance 网站
- 2020 年的 11 种最佳 Fiverr 替代品
- 2020 年 20 种最佳前端 Web 开发工具
- 2020 年 10 种最佳 Notepad ++替代品
- 2020 年 10 种最佳 Sublime Text 替代品
- 2020 年 13 种最佳 Github 替代方案
- 2020 年 21 种最佳 CCleaner 替代品
- 12 最佳免费 PC 清洁器| TuneUp | 优化器实用程序
- 2020 年 20 种最佳免费注册表清洁工具
- 2020 年 21 种最佳打字导师软件
- 前 50 名软件工程面试问答
- SDLC 面试的前 27 个问题与解答
- 前 40 名计算机科学面试问答