
[TOC]
## 键盘事件
在 Canvas 中,常用的键盘事件有两种
(1)键盘按下:keydown
(2)键盘松开:keyup
键盘事件中一般都是根据按键的 keyCode 来判断用户按下的是键盘中的哪个键,常见的按键及其对应的 keyCode 如下表:
| 按键 | keyCode |
| --- | --- |
| W | 87 |
| S | 83 |
| A | 65 |
| D | 68 |
| ↑ | 38 |
| ↓ | 40 |
| ← | 37 |
| → | 39 |
我们先写一个 tool.js 做一些封装
```js
// 获取键盘控制方向
window.tools.getKey = function () {
var key = {}
window.addEventListener('keydown', function (e) {
if (e.keyCode === 38 || e.keyCode === 87) {
key.direction = 'up'
} else if (e.keyCode === 39 || e.keyCode === 68) {
key.direction = 'right'
} else if (e.keyCode === 40 || e.keyCode === 83) {
key.direction = 'down'
} else if (e.keyCode === 37 || e.keyCode === 65) {
key.direction = 'left'
} else {
key.direction = ''
}
}, false)
return key
}
```
getKey() 方法返回一个对象 key,这个对象有一个 direction 属性,表示用户控制物体移动的方向。使用时只需要判断 direction 属性值是什么即可。
```html
<!DOCTYPE html>
<html lang="en">
<head>
<meta charset="UTF-8">
<meta name="viewport" content="width=device-width, initial-scale=1.0">
<meta http-equiv="X-UA-Compatible" content="ie=edge">
<title>键盘控制小球移动</title>
<script src="./tool.js"></script>
</head>
<body>
<canvas id="canvas" width="480" height="300" style="border: 1px solid gray; display: block; margin: 0 auto;"></canvas>
<script>
window.onload = function () {
let cnv = document.getElementById('canvas')
let cxt = cnv.getContext('2d')
// 初始化一个圆形
drawBall(cnv.width / 2, cnv.height / 2)
// 初始化变量
let x = 100
let y = 75
// 获取按键方向
let key = tools.getKey()
// 添加鼠标按下事件
window.addEventListener('keydown', function (e) {
// 清除整个 Canvas,以重绘图形
cxt.clearRect(0, 0, cnv.width, cnv.height)
// 根据 key.direction 的值,判断小球移动方向
switch (key.direction) {
case 'up':
y -= 2
drawBall(x, y)
break
case 'down':
y += 2
drawBall(x, y)
break
case 'left':
x -= 2
drawBall(x, y)
break
case 'right':
x += 2
drawBall(x, y)
break
default: // 如果不加 default 按下其他按键小球就会消失了!
drawBall(x, y)
}
}, false)
// 定义绘制小球的函数
function drawBall (x, y) {
cxt.beginPath()
cxt.arc(x, y, 20, 0, 360 * Math.PI / 180, true)
cxt.closePath()
cxt.fillStyle = '#6699FF'
cxt.fill()
}
}
</script>
</body>
</html>
```
这里先引入了 tool.js 文件,以便使用 getKey() 方法来获取用户控制小球的方向,然后使用 window.addEventListener() 来监听键盘事件,根据 key.direction 的值来判断小球移动的方向以实现控制小球的移动。
## requestAnimationFrame() 的使用
Canvas 中一般都使用 requestAnimationFrame() 来实现循环,从而达到动画效果,常见的语法如下,详细解释见 [MDN](https://developer.mozilla.org/zh-CN/docs/Web/API/Window/requestAnimationFrame)
```js
(function frame () {
window.requestAnimationFrame(frame)
context.clearRect(0, 0, canvas.width, canvas.height)
// ...
})()
```
这里定义了一个自执行函数 frame(),然后在函数内部使用 window.requestAnimationFrame() 不断调用 frame()。对于 Canvas 动画效果,每次必须清空画布然后重绘才行,所以需要使用 clearRect() 方法清空画布。
requestAnimationFrame() 方法的兼容代码如下:
```js
window.requestAnimationFrame = (
window.webkitRequestAnimationFrame ||
window.mozRequestAnimationFrame ||
window.msRequestAnimationFrame ||
window.oRequestAnimationFrame ||
function (callback) {
return window.setTimeout(callback, 1000 / 60)
}
)
```
```html
<!DOCTYPE html>
<html lang="en">
<head>
<meta charset="UTF-8">
<meta name="viewport" content="width=device-width, initial-scale=1.0">
<meta http-equiv="X-UA-Compatible" content="ie=edge">
<title>循环动画</title>
</head>
<body>
<canvas id="canvas" width="480" height="300" style="border: 1px solid gray; display: block; margin: 0 auto;"></canvas>
<script>
window.onload = function () {
let cnv = document.getElementById('canvas')
let cxt = cnv.getContext('2d')
// 初始化圆的 x 轴坐标为 0
let x = 0;
// 动画循环
(function frame () {
window.requestAnimationFrame(frame)
cxt.clearRect(0, 0, cnv.width, cnv.height)
// 绘制圆
cxt.beginPath()
cxt.arc(x, 70, 20, 0, 360 * Math.PI / 180, true)
cxt.closePath()
cxt.fillStyle = 'skyblue'
cxt.fill()
// 变量递增
x += 2
})()
}
</script>
</body>
</html>
```
## 物理动画
物理动画,简单来说,就是模拟现实世界的一种动画效果。在物理动画中,物体会遵循牛顿运动定律。
### 三角函数

对应 JavaScript 中的函数如下:
- sin(θ):Math.sin(θ * Math.PI / 180)
- cos(θ):Math.cos(θ * Math.PI / 180)
- tan(θ):Math.tan(θ * Math.PI / 180)
- arcsin(x / R):Math.asin(x / R) * (180 / Math.PI)
- arccos(x / R): Math.acos(x / R) * (180 / Math.PI)
- arctan(x / R): Math.atan(x / R) * (180 / Math.PI)
在 Canvas 中,凡是涉及角度都是用 “弧度制” 表示,例如 180° 写成 Math.PI,360° 写成 Math.PI * 2,所以角度都推荐下面这种写法
```js
度数 * Math.PI / 180
```
<span style="font-size: 15px; font-weight: 600; color: #409EFF;">Math.atan() 与 Math.atan2()</span>
使用 Math.atan() 函数可能会出现有一个度数对应两个夹角的情况,如图(注意 canvas 中的坐标系):

对于上图中的四个内角,将有以下正切值:
tan(A) = tan(C) = -0.5
tan(B) = tan(D) = 0.5
为了解决这个问题,可以使用反正切函数 Math.atan2() 来求出两条边之间夹角的度数,并且能够准确判断度数对应哪一个夹角。

`Math.atan2(y, x)`接收两个参数,y 表示对边的变长,x 表示邻边的边长
Math.atan(1 / 2) 和 Math.atan((-1) / (-2)) 的结果是一样的,但是对于 Math.atan2() 函数而言,其结果是不同的。
```js
console.log(Math.atan2(1, 2), Math.atan2(-1, -2))
// 0.4636476090008061 -2.677945044588987
console.log(`Math.atan2(1, 2) 对应的角度为: ${Math.atan2(1, 2) * 180 / Math.PI}
Math.atan2(-1, -2) 对应的角度为: ${Math.atan2(-1, -2) * 180 / Math.PI}
`)
// Math.atan2(1, 2) 对应的角度为: 26.56505117707799
// Math.atan2(-1, -2) 对应的角度为: -153.43494882292202
```

可以看到 Math.atan2(1, 2) 对应的是角 B,而 Math.atan2(-1, -2) 对应的是角 D,-153。43° 这个角度是从 x 轴正方向开始以逆时针方向计算的,这样就把两个角区分开来了。

下面的示例是 Math.atan2() 的一个经典效果:追随鼠标旋转
首先写一个箭头类 arrow.js 用于绘制箭头
```js
Arrow.prototype = {
stroke: function (cxt) {
cxt.save()
cxt.translate(this.x, this.y)
cxt.rotate(this.angle)
cxt.strokeStyle = this.color
cxt.beginPath()
cxt.moveTo(-20, -10)
cxt.lineTo(0, -10)
cxt.lineTo(0, -20)
cxt.lineTo(20, 0)
cxt.lineTo(0, 20)
cxt.lineTo(0, 10)
cxt.lineTo(-20, 10)
cxt.closePath()
cxt.stroke()
cxt.restore()
},
fill: function (cxt) {
cxt.save()
cxt.translate(this.x, this.y)
cxt.rotate(this.angle)
cxt.fillStyle = this.color
cxt.beginPath()
cxt.moveTo(-20, -10)
cxt.lineTo(0, -10)
cxt.lineTo(0, -20)
cxt.lineTo(20, 0)
cxt.lineTo(0, 20)
cxt.lineTo(0, 10)
cxt.lineTo(-20, 10)
cxt.closePath()
cxt.fill()
cxt.restore()
}
}
```
```html
<!DOCTYPE html>
<html lang="en">
<head>
<meta charset="UTF-8">
<meta name="viewport" content="width=device-width, initial-scale=1.0">
<meta http-equiv="X-UA-Compatible" content="ie=edge">
<title>追随鼠标旋转</title>
<script src="./arrow.js"></script>
<script src="./tool.js"></script>
</head>
<body>
<canvas id="canvas" width="480" height="300" style="border: 1px solid gray; display: block; margin: 0 auto;"></canvas>
<script>
window.onload = function () {
let cnv = document.getElementById('canvas')
let cxt = cnv.getContext('2d')
// 实例化一个箭头,中心坐标为画布中心坐标
let arrow = new Arrow(cnv.width / 2, cnv.height / 2)
// 获取鼠标坐标
let mouse = tools.getMouse(cnv); // 这里记得加分号,封装见 tools.js
(function drawFrame () {
window.requestAnimationFrame(drawFrame, cnv)
cxt.clearRect(0, 0, cnv.width, cnv.height)
let dx = mouse.x - cnv.width / 2
let dy = mouse.y - cnv.height / 2
// 使用 Math.atan2() 方法计算出鼠标与建投中心的夹角
arrow.angle = Math.atan2(dy, dx)
arrow.fill(cxt)
})()
}
</script>
</body>
</html>
```

效果:当鼠标在画布上移动时,箭头会跟着鼠标移动的方向进行旋转。其原理很简单,在动画循环过程中,每次鼠标移动的时候,都会计算鼠标当前位置与箭头中心的夹角,然后把这个夹角作为箭头旋转的角度,重绘箭头即可。

<span style="font-size: 15px; font-weight: 600; color: #409EFF;">圆周运动</span>
Canvas 中的圆周运动一般有两种,即正圆运动和椭圆运动。
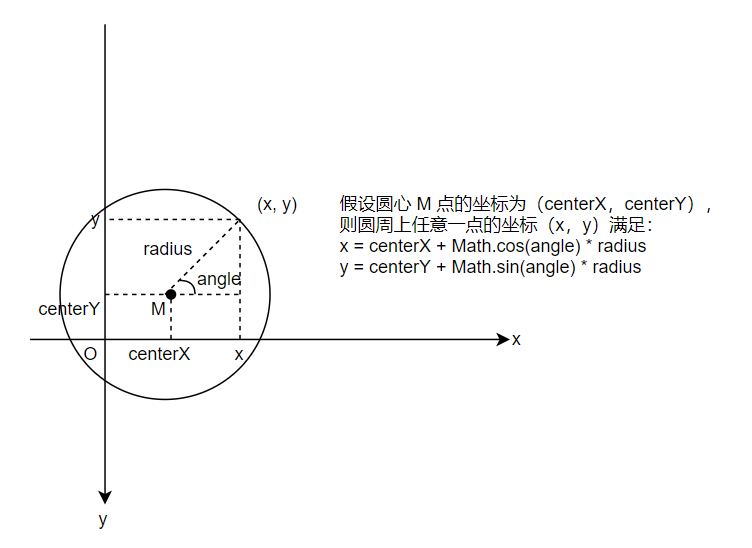
正圆运动就是利用上图中的数学公式,下面做一个小球做正圆运动的例子:
首先建立一个 ball.js 文件用于存放小球类:
```js
function Ball (x, y, radius, color) {
this.x = x || 0
this.y = y || 0
this.radius = radius || 12
this.color = color || '#6699FF'
this.scaleX = 1
this.scaleY = 1
}
Ball.prototype = {
// 绘制 "描边" 小球
stroke: function (cxt) {
cxt.save()
cxt.scale(this.scaleX, this.scaleY)
cxt.strokeStyle = this.color
cxt.beginPath()
cxt.arc(this.x, this.y, this.radius, 0, 360 * Math.PI / 180, false)
cxt.closePath()
cxt.stroke()
cxt.restore()
},
// 绘制 "填充" 小球
fill: function (cxt) {
cxt.save()
cxt.translate(this.x, this.y)
cxt.rotate(this.rotation)
cxt.scale(this.scaleX, this.scaleY)
cxt.fillStyle = this.color
cxt.beginPath()
cxt.arc(0, 0, this.radius, 0, 360 * Math.PI / 180, false)
cxt.closePath()
cxt.fill()
cxt.restore()
}
}
```
把圆的坐标公式套进去就能完成动画了。
```html
<!DOCTYPE html>
<html lang="en">
<head>
<meta charset="UTF-8">
<meta name="viewport" content="width=device-width, initial-scale=1.0">
<meta http-equiv="X-UA-Compatible" content="ie=edge">
<title>正圆运动</title>
<script src="./ball.js"></script>
<script src="./tool.js"></script>
</head>
<body>
<canvas id="canvas" width="480" height="300" style="border: 1px solid gray; display: block; margin: 0 auto;"></canvas>
<script>
window.onload = function () {
let cnv = document.getElementById('canvas')
let cxt = cnv.getContext('2d')
// 实例化一个小球,中心坐标为 (100, 25),半径、颜色都取默认值
let ball = new Ball(100, 25)
let centerX = cnv.width / 2
let centerY = cnv.height / 2
let radius = 50
let angle = 0;
(function frame () {
window.requestAnimationFrame(frame)
cxt.clearRect(0, 0, cnv.width, cnv.height)
// 绘制圆形
cxt.beginPath()
cxt.arc(centerX, centerY, 50, 0, 360 * Math.PI / 180, false)
cxt.closePath()
cxt.stroke()
// 计算小球坐标
ball.x = centerX + Math.cos(angle) * radius
ball.y = centerY + Math.sin(angle) * radius
ball.fill(cxt)
// 角度递增
angle += 0.05
})()
}
</script>
</body>
</html>
```

<span style="font-size: 15px; font-weight: 600; color: #409EFF;">椭圆运动</span>
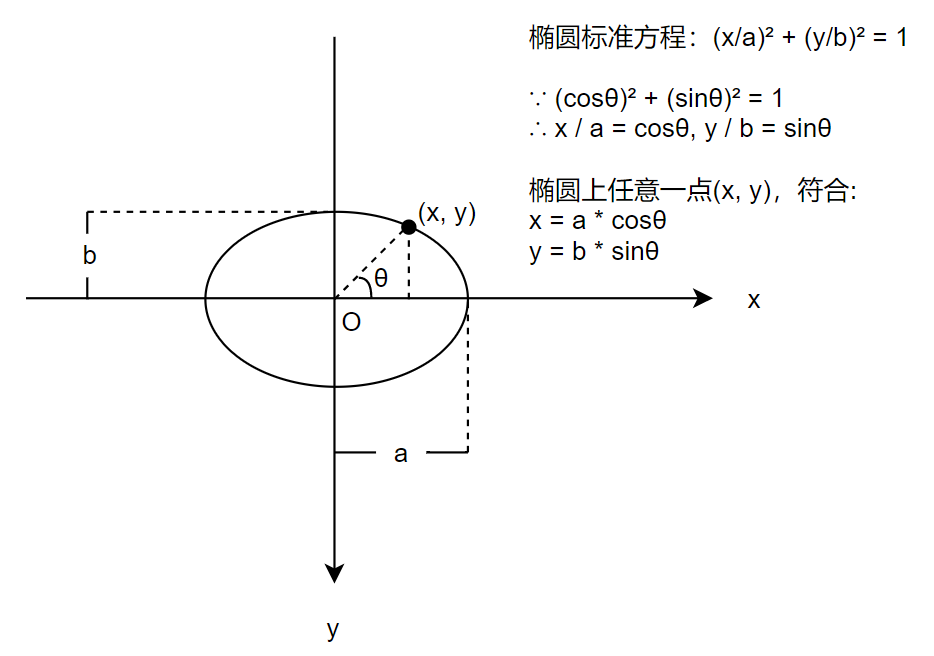
总之就是把上面的公式套进去即可,代码略作修改:
```js
ball.x = centerX + Math.cos(angle) * radiusX
ball.y = centerY + Math.sin(angle) * radiusY
```

<span style="font-size: 15px; font-weight: 600; color: #409EFF;">波形运动</span>
正弦函数 sin 和余弦函数 cos 都有属于它们自身的波形,由于它俩是相似的,这里仅以 sin 函数为例介绍。
在 Canvas 中,根据 sin 函数作用对象的不同,常见的波形运动可以分为三种
(1)作用于 x 轴坐标
(2)作用于 y 轴坐标
(3)作用于缩放属性(scaleX 或 scaleY)
1、作用于 x 轴坐标
当正弦函数作用于物体中心的 x 轴坐标时,物体会进行左右摇摆,类似于水草在水流中左右摇摆
语法:
```js
x = centerX + Math.sin(angle) * range
angel += speed
```
其中,(centerX,centerY)表示物体中心坐标,angle 表示角度(弧度制),range 表示振幅,speed 表示角度改变的大小。
```html
<!DOCTYPE html>
<html lang="en">
<head>
<meta charset="UTF-8">
<meta name="viewport" content="width=device-width, initial-scale=1.0">
<meta http-equiv="X-UA-Compatible" content="ie=edge">
<title>正圆运动</title>
<script src="./ball.js"></script>
<script src="./tool.js"></script>
</head>
<body>
<canvas id="canvas" width="480" height="300" style="border: 1px solid gray; display: block; margin: 0 auto;"></canvas>
<script>
window.onload = function () {
let cnv = document.getElementById('canvas')
let cxt = cnv.getContext('2d')
let ball = new Ball(cnv.width / 2, cnv.height / 2)
let angle = 0
let range = 80;
(function frame () {
window.requestAnimationFrame(frame)
cxt.clearRect(0, 0, cnv.width, cnv.height)
// 计算小球坐标
ball.x = cnv.width / 2 + Math.sin(angle) * range
ball.fill(cxt)
// 角度递增
angle += 0.05
})()
}
</script>
</body>
</html>
```

当正弦函数 sin 只作用于物体的 x 轴坐标时,就可以实现类似水草摆动的平滑运动效果。如果想使摆动的幅度看起来更明显一些,可以乘以一个较大的值(振幅)。
2、作用于 y 轴坐标
当正弦函数 sin 作用于物体中心的 y 轴坐标时,物体运动的轨迹刚好就是 sin 函数的波形
语法:
```js
y = centerY + Math.sin(angle) * rangel
angle += speed
```
```js
ball.x += 1
ball.y = cnv.height / 2 + Math.sin(angle) * range
ball.fill(cxt)
```

3、作用于缩放属性(scaleX 或 scaleY)
当正弦函数 sin 作用于物体的缩放属性时,物体会不断地放大然后缩小,从而产生一种脉冲动画的效果。
语法:
```js
scaleX = 1 + Math.sin(angle) * range
scaleY = 1 + Math.sin(angle) * range
angle += speed
```
```html
<!DOCTYPE html>
<html lang="en">
<head>
<meta charset="UTF-8">
<meta name="viewport" content="width=device-width, initial-scale=1.0">
<meta http-equiv="X-UA-Compatible" content="ie=edge">
<title>sin 函数作用于缩放属性</title>
<script src="./ball.js"></script>
<script src="./tool.js"></script>
</head>
<body>
<canvas id="canvas" width="480" height="300" style="border: 1px solid gray; display: block; margin: 0 auto;"></canvas>
<script>
window.onload = function () {
let cnv = document.getElementById('canvas')
let cxt = cnv.getContext('2d')
let ball = new Ball(cnv.width / 2, cnv.height / 2, 25)
let range = 0.5
let angle = 0;
(function frame () {
window.requestAnimationFrame(frame)
cxt.clearRect(0, 0, cnv.width, cnv.height)
ball.scaleX = 1 + Math.sin(angle) * range
ball.scaleY = 1 + Math.sin(angle) * range
ball.fill(cxt)
// 角度递增
angle += 0.05
})()
}
</script>
</body>
</html>
```

### 匀速运动
匀速运动是一种加速度为 0 的运动,比较简单,语法如下:
```js
object.x += vx
object.y += vy
```
其中,object.x 表示物体 x 轴坐标,object.y 表示物体 y 轴坐标。vx 表示 x 轴方向的速度大小,vy 表示 y 轴方向的速度大小。
如果我们想在任意方向上做匀速运动该怎么做呢?这就需要用到速度的合成与分解。

语法:
```js
vx = speed * Math.cos(angle * Math.PI / 180)
vy = speed * Math.sin(angle * Math.PI / 180)
object.x += vx
object.y += vy
```
下面是一个箭头追随鼠标匀速移动的例子:
```html
<!DOCTYPE html>
<html lang="en">
<head>
<meta charset="UTF-8">
<meta name="viewport" content="width=device-width, initial-scale=1.0">
<meta http-equiv="X-UA-Compatible" content="ie=edge">
<title>箭头追随鼠标移动</title>
<script src="./arrow.js"></script>
<script src="./tool.js"></script>
</head>
<body>
<canvas id="canvas" width="480" height="300" style="border: 1px solid gray; display: block; margin: 0 auto;"></canvas>
<script>
window.onload = function () {
let cnv = document.getElementById('canvas')
let cxt = cnv.getContext('2d')
// 实例化一个箭头,中心坐标为画布中心坐标
let arrow = new Arrow(cnv.width / 2, cnv.height / 2)
// 获取鼠标坐标
let mouse = tools.getMouse(cnv)
let speed = 1.5
let angle = 0;
(function drawFrame () {
window.requestAnimationFrame(drawFrame, cnv)
cxt.clearRect(0, 0, cnv.width, cnv.height)
let dx = mouse.x - cnv.width / 2
let dy = mouse.y - cnv.height / 2
// 使用 Math.atan2() 方法计算出鼠标与箭头中心的夹角
angle = Math.atan2(dy, dx)
let vx = Math.cos(angle) * speed
let vy = Math.sin(angle) * speed
arrow.x += vx
arrow.y += vy
arrow.angle = angle
arrow.fill(cxt)
})()
}
</script>
</body>
</html>
```

### 加速运动
匀速运动的速度大小是一直保持不变的,而加速运动的速度大小是会随着时间变化而变化的。语法:
```js
vx += ax // ax 表示 x 轴方向加速度
vy += ay
object.x += vx
object.y += vy
```
同样的,想做任意方向上的加速度就需要用到加速度的合成与分解。

语法:
```js
ax = a * Math.cos(angle * Math.PI / 180)
ay = a * Math.sin(angle * Math.PI / 180)
vx += ax
vy += ay
object.x += vx
object.y += vy
```
### 重力
语法:
```js
vy += gravity
object.y += vy
```
对于重力引起的运动,可以看成是沿着 y 轴正方向的加速运动。
利用重力的一个常见的效果就是自由落体反弹的效果,例子如下:
```html
<!DOCTYPE html>
<html lang="en">
<head>
<meta charset="UTF-8">
<meta name="viewport" content="width=device-width, initial-scale=1.0">
<meta http-equiv="X-UA-Compatible" content="ie=edge">
<title>重力应用</title>
<script src="./ball.js"></script>
<script src="./tool.js"></script>
</head>
<body>
<canvas id="canvas" width="480" height="300" style="border: 1px solid gray; display: block; margin: 0 auto;"></canvas>
<script>
window.onload = function () {
let cnv = document.getElementById('canvas')
let cxt = cnv.getContext('2d')
let ball = new Ball(cnv.width / 2, 0)
// y 轴初始速度为 0,重力加速度为 0.2,反弹系数为 -0.8
let vy = 0
const gravity = 0.2
const bounce = -0.8;
(function drawFrame () {
window.requestAnimationFrame(drawFrame)
cxt.clearRect(0, 0, cnv.width, cnv.height)
ball.y += vy
// 边界检测
if (ball.y > cnv.height - ball.radius) {
ball.y = cnv.height - ball.radius
// 速度反向并且减小
vy = vy * bounce
}
ball.fill(cxt)
// 变量递增,注意放在图形绘制之后
vy += gravity
})()
}
</script>
</body>
</html>
```

小球碰到地面一般都会反弹,由于反弹会有速度损耗,并且小球 y 轴速度方向会变为反方向,因此需要乘以一个反弹系数 bounce,其取值一般为 -1.0 ~ 0 之间的任意数。
### 摩擦力
摩擦力指的是阻碍物体相对运动的力,其方向与物体运动的方向相反。摩擦力只会改变速度的大小而不会改变它的方向,即摩擦力只能将物体的速度降为 0,但它无法让物体掉头往相反的方向移动。
语法:
```js
vx *= friction // 摩擦系数
vy *= friction
object.x += vx
object.y += vy
```
需要注意的是,当物体沿任意方向运动时,如果加入摩擦力因素,那么每次都应该先把该方向的速度分解为 x 轴和 y 轴两个方向的分速度,然后再用分速度乘以摩擦系数,而不是分解摩擦力。
- 序言 & 更新日志
- H5
- Canvas
- 序言
- Part1-直线、矩形、多边形
- Part2-曲线图形
- Part3-线条操作
- Part4-文本操作
- Part5-图像操作
- Part6-变形操作
- Part7-像素操作
- Part8-渐变与阴影
- Part9-路径与状态
- Part10-物理动画
- Part11-边界检测
- Part12-碰撞检测
- Part13-用户交互
- Part14-高级动画
- CSS
- SCSS
- codePen
- 速查表
- 面试题
- 《CSS Secrets》
- SVG
- 移动端适配
- 滤镜(filter)的使用
- JS
- 基础概念
- 作用域、作用域链、闭包
- this
- 原型与继承
- 数组、字符串、Map、Set方法整理
- 垃圾回收机制
- DOM
- BOM
- 事件循环
- 严格模式
- 正则表达式
- ES6部分
- 设计模式
- AJAX
- 模块化
- 读冴羽博客笔记
- 第一部分总结-深入JS系列
- 第二部分总结-专题系列
- 第三部分总结-ES6系列
- 网络请求中的数据类型
- 事件
- 表单
- 函数式编程
- Tips
- JS-Coding
- Framework
- Vue
- 书写规范
- 基础
- vue-router & vuex
- 深入浅出 Vue
- 响应式原理及其他
- new Vue 发生了什么
- 组件化
- 编译流程
- Vue Router
- Vuex
- 前端路由的简单实现
- React
- 基础
- 书写规范
- Redux & react-router
- immutable.js
- CSS 管理
- React 16新特性-Fiber 与 Hook
- 《深入浅出React和Redux》笔记
- 前半部分
- 后半部分
- react-transition-group
- Vue 与 React 的对比
- 工程化与架构
- Hybird
- React Native
- 新手上路
- 内置组件
- 常用插件
- 问题记录
- Echarts
- 基础
- Electron
- 序言
- 配置 Electron 开发环境 & 基础概念
- React + TypeScript 仿 Antd
- TypeScript 基础
- React + ts
- 样式设计
- 组件测试
- 图标解决方案
- Storybook 的使用
- Input 组件
- 在线 mock server
- 打包与发布
- Algorithm
- 排序算法及常见问题
- 剑指 offer
- 动态规划
- DataStruct
- 概述
- 树
- 链表
- Network
- Performance
- Webpack
- PWA
- Browser
- Safety
- 微信小程序
- mpvue 课程实战记录
- 服务器
- 操作系统基础知识
- Linux
- Nginx
- redis
- node.js
- 基础及原生模块
- express框架
- node.js操作数据库
- 《深入浅出 node.js》笔记
- 前半部分
- 后半部分
- 数据库
- SQL
- 面试题收集
- 智力题
- 面试题精选1
- 面试题精选2
- 问答篇
- 2025面试题收集
- Other
- markdown 书写
- Git
- LaTex 常用命令
- Bugs