
[TOC]
# 相关链接
课程:[https://coding.imooc.com/learn/list/376.html](https://coding.imooc.com/learn/list/376.html)
课程文档:[http://www.youbaobao.xyz/mpvue-docs/guide/base.html](http://www.youbaobao.xyz/mpvue-docs/guide/base.html)
mpvue:[http://mpvue.com/](http://mpvue.com/)
课程设计稿:[http://www.youbaobao.xyz/mpvue-design/preview/#artboard0](http://www.youbaobao.xyz/mpvue-design/preview/#artboard0)
微信小程序 UI 库:[https://github.com/youzan/vant-weapp](https://github.com/youzan/vant-weapp)
微信开发官网文档:[https://developers.weixin.qq.com/miniprogram/dev/framework/](https://developers.weixin.qq.com/miniprogram/dev/framework/)
微信公众平台入口:[https://mp.weixin.qq.com](https://mp.weixin.qq.com/)
# 小程序基础
## 代码结构

* 小程序本质是一个渲染容器,可以把它想象成浏览器
* 小程序由 App 和 Page 两部分构成
* App 需要依赖 2 个文件:app.js 和 app.json,其中 app.json 不可改名,且必须配置pages 属性
* Page 需要依赖 4 个文件:js、json、wxml 和 wxss
## 授权流程
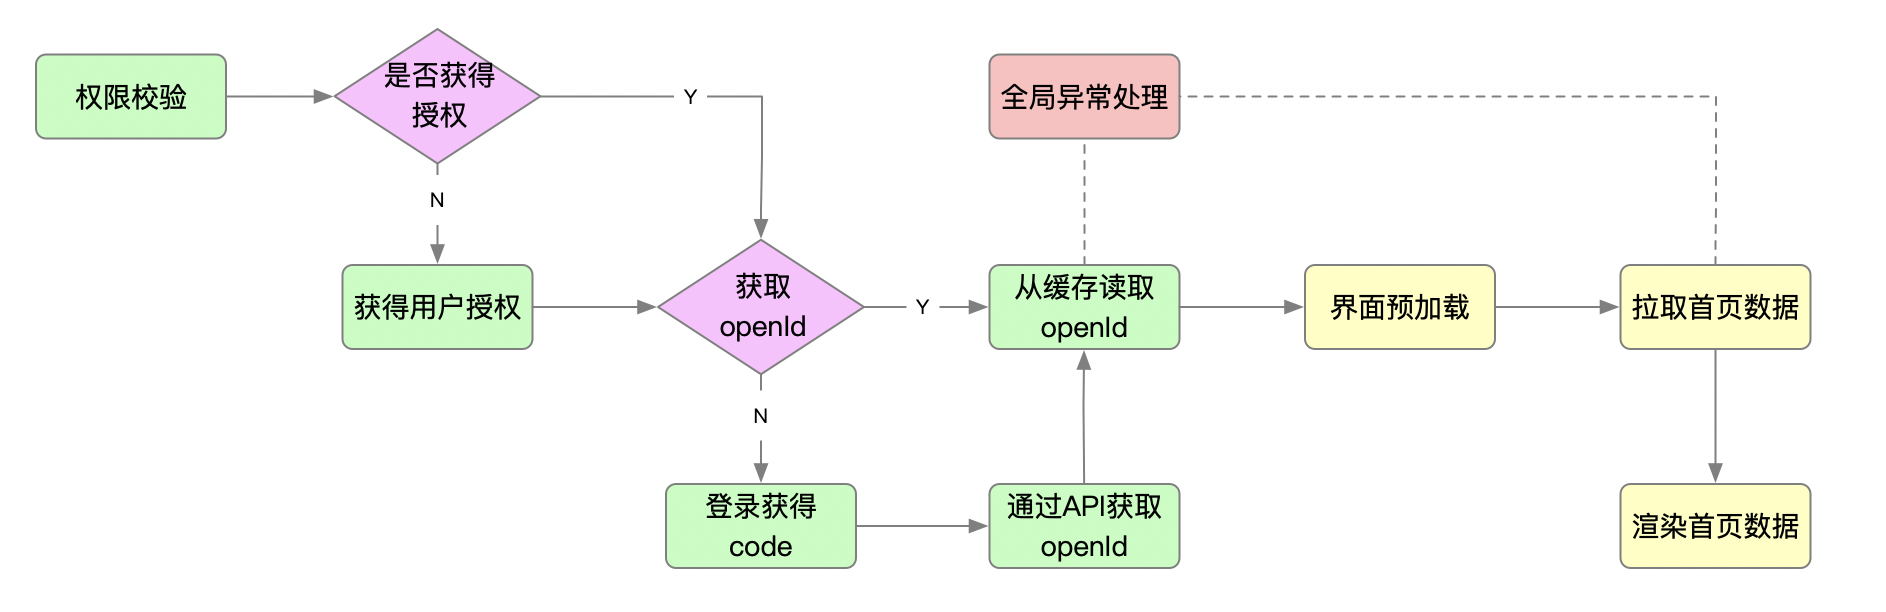
⑴ 权限校验:通过`mpvue.getSetting`判断小程序是否获得权限
>[success]查看[官方文档](https://developers.weixin.qq.com/miniprogram/dev/api/open-api/setting/wx.getSetting.html)
⑵ 用户申请授权:如果小程序未获得授权,我们需要提供用户主动申请授权的功能,微信规定获取用户信息,必须用户主动触发,此时我们需要借助`button`组件完成用户授权事件绑定,关键步骤:
```html
<button
@getuserinfo="getUserInfo"
open-type="getUserInfo"
>
授权登录
</button>
```
关于`getuserinfo`和`open-type`的 [官方说明](https://developers.weixin.qq.com/miniprogram/dev/framework/open-ability/authorize.html) 如下:
| 属性 | 说明 |
| --- | --- |
| open-type | 微信开放能力 |
| bindgetuserinfo | 用户点击该按钮时,会返回获取到的用户信息,回调的 detail 数据与 wx.getUserInfo 返回的一致,open-type="getUserInfo" 时有效 |
⑶ 获取用户信息:通过`mpvue.getUserInfo`获取用户信息
>[success]查看 [官方文档](https://developers.weixin.qq.com/miniprogram/dev/api/open-api/user-info/wx.getUserInfo.html)
⑷ 获取 openid:由于每个用户在每个小程序都会获得唯一的`openId`,所以`openId`非常适合用作用户的唯一标识,获取`openId`我们需要通过官方提供的`auth.code2Session`来获取。
>[success]查看 [官方文档](https://developers.weixin.qq.com/miniprogram/dev/api-backend/open-api/login/auth.code2Session.html)
⑸ 用户登录:通过`mpvue.login`进行用户登录,登录后会获得`code`,该`code`可用于获取`openId`,但要注意`code`只能使用一次,用完即作废
>[success]查看 [官方文档](https://developers.weixin.qq.com/miniprogram/dev/api/open-api/login/wx.login.html)
⑹ 用户注册:获得`openId`后,我们可以通过该`openId`和用户信息在小慕读书中进行注册
## Tips
1、配置`app.json`的 pages 路由后会自动生成相应的文件(如 test.js / json / wxss / wxml)
# mpVue
* 2018 年 3 月 14 日 Release 1.0.2 版本,正式开源
* 2019 年 2 月 18 日 Release 2.0.2 版本,正式支持多端小程序
* mpvue 与原生小程序开发对比:
| 对比项 | 原生小程序 | mpvue |
| --- | --- | --- |
| 学习成本 | 高 | 低 |
| IDE | 不友好 | 友好 |
| 多端开发 | 工作量大 | 一套代码 |
| 可复用性 | 低 | 高 |
mpVue 原理概述:
- `mpvue`保留了`vue.runtime`核心方法,无缝继承了`Vue.js`的基础能力
- `mpvue-template-compiler`提供了将`vue`的模板语法转换到小程序的`wxml`语法的能力
- 修改了`vue`的建构配置,使之构建出符合小程序项目结构的代码格式:`json/wxml/wxss/js`文件
## 项目初始化及集成常用配置
**第一步,基于 mpvue-quickstart 模板创建新项目**
```txt
vue init mpvue/mpvue-quickstart my-project
```
**第二步,安装依赖和运行**
```txt
cd my-project
npm install
npm run dev
```
运行`npm run dev`后会在 dist 目录下生成 wx 目录,用微信开发者工具导入该目录即可调试。
**第三步,集成 scss**
`npm i -D sass-loader node-sass`
这里有个小坑,因为 mpvue 脚手架的 webpack 版本不是 4.0,使用最新版的 sass-loader 会报错,因此需要下载 7.x 版本,如`npm i -D sass-loader@7.1.0`
使用:
```html
<style lang="scss" scoped>
.img {
width: 100%;
}
</style>
```
**第四步,集成`vant-webapp`组件库**
[Vant Webapp - 小程序 UI 组件库](https://youzan.github.io/vant-weapp/#/intro)
`npm i vant-weapp -S --production`
引入组件:
```js
{
"usingComponents": {
"van-button": "/path/to/vant-weapp/dist/button/index"
}
}
```
需要手动在 app.json 中引入需要使用的组件,其实就是引入`node_modules/vant-weapp/dist`目录下的组件
```json
{
"pages": [
"pages/index/main"
],
"window": {
...
},
"usingComponents": {
"van-button": "vant-weapp/dist/button/index"
}
}
```
修改构建配置:修改`webpack.base.config.js`,否则报错(webpack 打包后小程序访问不到第三方类库的问题)
```js
if (/^wx$/.test(PLATFORM)) { // 判断当前平台是否为微信平台
baseWebpackConfig = merge(baseWebpackConfig, {
plugins: [
// 将 node_modules 目录下该目录文件全部拷贝到目标目录
new CopyWebpackPlugin([{
from: resolve('node_modules/vant-weapp/dist'),
to: resolve('dist/wx/vant-weapp/dist'),
ignore: ['.*']
}])
]
})
}
```
使用组件:
```html
<van-button type="primary">按钮</van-button>
```
**第五步:集成`mpvue-router-patch`插件**
`github`地址:[https://github.com/F-loat/mpvue-router-patch](https://github.com/F-loat/mpvue-router-patch)
原生小程序使用官方提供的 API 进行路由跳转,如果想使用 vue-router 的语法,需要这个插件。
安装依赖:`npm i -S mpvue-router-patch`
安装插件:
```js
// src/main.js
import MpvueRouterPatch from 'mpvue-router-patch'
Vue.use(MpvueRouterPatch)
```
使用:
```js
this.$router.push('/pages/categoryList/main')
```
### 集成其他插件
**集成`flyio`**:统一 http 请求 API,不同平台一套代码
`github`地址:[https://github.com/wendux/fly](https://github.com/wendux/fly)
```txt
npm i -S flyio
```
使用,初始化 Flyio 对象
```js
function createFly() {
if (mpvuePlatform === 'wx') {
const Fly = require('flyio/dist/npm/wx')
return new Fly()
} else {
return null
}
}
```
处理 get 请求
```js
export function get(url, params = {}) {
const fly = createFly()
if (fly) {
return new Promise((resolve, reject) => {
fly.get(url, params).then(response => {
console.log(response)
resolve(response)
}).catch(err => {
console.log(err)
handleError(err)
reject(err)
})
})
}
}
```
处理 post 请求
```js
export function post(url, params = {}) {
const fly = createFly()
if (fly) {
return new Promise((resolve, reject) => {
fly.post(url, params).then(response => {
console.log(response)
resolve(response)
}).catch(err => {
console.log(err)
handleError(err)
reject(err)
})
})
}
}
```
这里的`handleError`我们可以根据实际业务场景进行定制
- 序言 & 更新日志
- H5
- Canvas
- 序言
- Part1-直线、矩形、多边形
- Part2-曲线图形
- Part3-线条操作
- Part4-文本操作
- Part5-图像操作
- Part6-变形操作
- Part7-像素操作
- Part8-渐变与阴影
- Part9-路径与状态
- Part10-物理动画
- Part11-边界检测
- Part12-碰撞检测
- Part13-用户交互
- Part14-高级动画
- CSS
- SCSS
- codePen
- 速查表
- 面试题
- 《CSS Secrets》
- SVG
- 移动端适配
- 滤镜(filter)的使用
- JS
- 基础概念
- 作用域、作用域链、闭包
- this
- 原型与继承
- 数组、字符串、Map、Set方法整理
- 垃圾回收机制
- DOM
- BOM
- 事件循环
- 严格模式
- 正则表达式
- ES6部分
- 设计模式
- AJAX
- 模块化
- 读冴羽博客笔记
- 第一部分总结-深入JS系列
- 第二部分总结-专题系列
- 第三部分总结-ES6系列
- 网络请求中的数据类型
- 事件
- 表单
- 函数式编程
- Tips
- JS-Coding
- Framework
- Vue
- 书写规范
- 基础
- vue-router & vuex
- 深入浅出 Vue
- 响应式原理及其他
- new Vue 发生了什么
- 组件化
- 编译流程
- Vue Router
- Vuex
- 前端路由的简单实现
- React
- 基础
- 书写规范
- Redux & react-router
- immutable.js
- CSS 管理
- React 16新特性-Fiber 与 Hook
- 《深入浅出React和Redux》笔记
- 前半部分
- 后半部分
- react-transition-group
- Vue 与 React 的对比
- 工程化与架构
- Hybird
- React Native
- 新手上路
- 内置组件
- 常用插件
- 问题记录
- Echarts
- 基础
- Electron
- 序言
- 配置 Electron 开发环境 & 基础概念
- React + TypeScript 仿 Antd
- TypeScript 基础
- React + ts
- 样式设计
- 组件测试
- 图标解决方案
- Storybook 的使用
- Input 组件
- 在线 mock server
- 打包与发布
- Algorithm
- 排序算法及常见问题
- 剑指 offer
- 动态规划
- DataStruct
- 概述
- 树
- 链表
- Network
- Performance
- Webpack
- PWA
- Browser
- Safety
- 微信小程序
- mpvue 课程实战记录
- 服务器
- 操作系统基础知识
- Linux
- Nginx
- redis
- node.js
- 基础及原生模块
- express框架
- node.js操作数据库
- 《深入浅出 node.js》笔记
- 前半部分
- 后半部分
- 数据库
- SQL
- 面试题收集
- 智力题
- 面试题精选1
- 面试题精选2
- 问答篇
- 2025面试题收集
- Other
- markdown 书写
- Git
- LaTex 常用命令
- Bugs