
[TOC]
## **部署NodeExporter**
创建文件`node-exporter.yaml`,内容如下:
```
apiVersion: apps/v1
kind: DaemonSet
metadata:
name: node-exporter
namespace: kube-system
spec:
selector:
matchLabels:
app: node-exporter
template:
metadata:
labels:
app: node-exporter
spec:
containers:
- name: node-exporter
image: prom/node-exporter
imagePullPolicy: IfNotPresent
args:
- --path.procfs=/host/proc
- --path.sysfs=/host/sys
volumeMounts:
- mountPath: /host/proc
name: proc
readOnly: true
- mountPath: /host/sys
name: sys
readOnly: true
volumes:
- name: proc
hostPath:
path: /proc
- name: sys
hostPath:
path: /sys
hostNetwork: true
hostPID: true
```
这里,我们设置让node-exporter容器使用主机网络,这样就可以监控到主机的网卡流量指标。然后把宿主机的`/proc`与`/sys`目录挂载到容器,这样就可以监控主机的磁盘。
## **更改Prometheus配置**
#### **方法一:通过Pod服务发现**
编辑`prometheus-config.yaml`文件,添加如下内容:
```
- job_name: node-exporter
kubernetes_sd_configs:
- role: pod
relabel_configs:
- action: keep
source_labels: [__meta_kubernetes_pod_label_app]
regex: node-exporter
- action: replace
source_labels: [__meta_kubernetes_pod_ip]
regex: (.*)
target_label: __address__
replacement: ${1}:9100
```
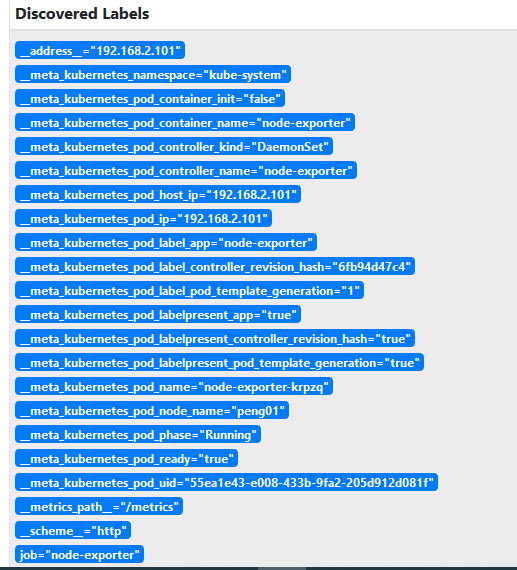
这里我们使用到Kubernetes的Pod服务发现,由于它会发现所有的Pod,所以我们使用`keep`操作,只保留标签中带有`app=node-exporter`的Pod。另外,`__address__`也设置为了`PodIP:9100`。
下面是Pod服务发现的Target的初始标签:
#### **方法二:通过Node服务发现**
```
- job_name: node-exporter
kubernetes_sd_configs:
- role: node
relabel_configs:
- action: replace
source_labels: [__meta_kubernetes_node_address_InternalIP]
regex: (.*)
target_label: __address__
replacement: ${1}:9100
```
这种方法的一个好处就是,如果k8s的主机上已经物理部署了node-exporter,那么我们就不需要再部署上面的node-exporter-daemonset,这样就可以避免9100端口的冲突。
- (一)快速开始
- 安装Prometheus
- 使用NodeExporter采集数据
- AlertManager进行告警
- Grafana数据可视化
- (二)探索PromQL
- 理解时间序列
- Metrics类型
- 初识PromQL
- PromQL操作符
- PromQL内置函数
- rate和irate
- 常见指标的PromQL
- 主机CPU使用率
- 主机内存使用率
- 主机磁盘使用率
- 主机磁盘IO
- 主机网络IO
- API的响应时间
- (三)Promtheus告警处理
- 自定义告警规则
- 示例-对主机进行监控告警
- 部署AlertManager
- 告警的路由与分组
- 使用Receiver接收告警信息
- 集成邮件系统
- 屏蔽告警通知
- 扩展阅读
- AlertManager的API
- Prometheus发送告警机制
- 实践:接收Prometheus的告警
- 实践:AlertManager
- (四)监控Kubernetes集群
- 部署Prometheus
- Kubernetes下的服务发现
- 监控Kubernetes集群
- 监控Kubelet的运行状态
- 监控Pod的资源(cadvisor)
- 监控K8s主机的资源
- KubeStateMetrics
- K8S及ETCD常见监控指标
- ETCD监控指标
- Kube-apiserver监控指标
- (五)其他
- Prometheus的relabel-config
- Target的Endpoint
- Prometheus的其他配置
- (六)BlackboxExporter
- 安装
- BlackboxExporter的应用场景
- 在Promtheus中使用BlackboxExporter
- 参考