
### 9.5 ContentProvider的工作过程
ContentProvider的使用方法在第2章已经做了介绍,这里再简单说明一下。ContentProvider是一种内容共享型组件,它通过Binder向其他组件乃至其他应用提供数据。当ContentProvider所在的进程启动时,ContentProvider会同时启动并被发布到AMS中。需要注意的是,这个时候ContentProvider的onCreate要先于Application的onCreate而执行,这在四大组件中是一个少有的现象。
当一个应用启动时,入口方法为ActivityThread的main方法,main方法是一个静态方法,在main方法中会创建ActivityThread的实例并创建主线程的消息队列,然后在ActivityThread的attach方法中会远程调用AMS的attachApplication方法并将ApplicationThread对象提供给AMS。ApplicationThread是一个Binder对象,它的Binder接口是IApplicationThread,它主要用于ActivityThread和AMS之间的通信,这一点在前面多次提到。在AMS的attachApplication方法中,会调用ApplicationThread的bindApplication方法,注意这个过程同样是跨进程完成的,bindApplication的逻辑会经过ActivityThread中的mH Handler切换到ActivityThread中去执行,具体的方法是handleBindApplication。在handleBindApplication方法中,ActivityThread会创建Application对象并加载ContentProvider。需要注意的是,ActivityThread会先加载ContentProvider,然后再调用Application的onCreate方法,整个流程可以参看图9-2。
:-: 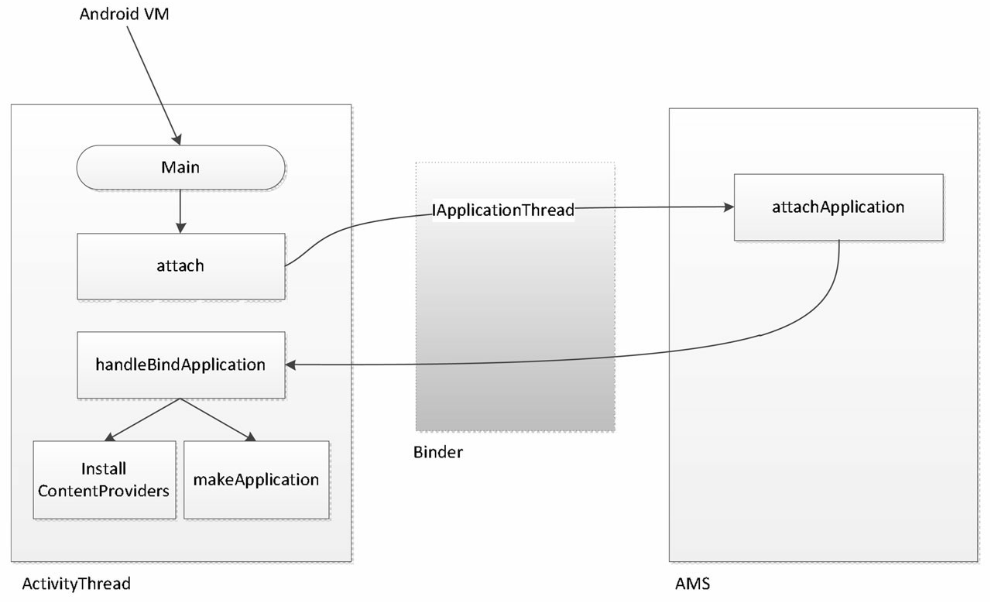
图9-2 ContentProvider的启动过程
这就是ContentProvider的启动过程,ContentProvider启动后,外界就可以通过它所提供的增删改查这四个接口来操作ContentProvider中的数据源,即insert、delete、update和query四个方法。这四个方法都是通过Binder来调用的,外界无法直接访问ContentProvider,它只能通过AMS根据Uri来获取对应的ContentProvider的Binder接口IConentProvider,然后再通过IConentProvider来访问ContentProvider中的数据源。
一般来说,ContentProvider都应该是单实例的。ContentProvider到底是不是单实例,这是由它的android:multiprocess属性来决定的,当android:multiprocess为false时,ContentProvider是单实例,这也是默认值;当android:multiprocess为true时,ContentProvider为多实例,这个时候在每个调用者的进程中都存在一个ContentProvider对象。由于在实际的开发中,并未发现多实例的ContentProvider的具体使用场景,官方文档中的解释是这样可以避免进程间通信的开销,但是这在实际开发中仍然缺少使用价值。因此,我们可以简单认为ContentProvider都是单实例的。下面分析单实例的ContentProvider的启动过程。
访问ContentProvider需要通过ContentResolver, ContentResolver是一个抽象类,通过Context的getContentResolver方法获取的实际上是ApplicationContentResolver对象,ApplicationContentResolver类继承了ContentResolver并实现了ContentResolver中的抽象方法。当ContentProvider所在的进程未启动时,第一次访问它时就会触发ContentProvider的创建,当然这也伴随着ContentProvider所在进程的启动。通过ContentProvider的四个方法的任何一个都可以触发ContentProvider的启动过程,这里选择query方法。
ContentProvider的query方法中,首先会获取IContentProvider对象,不管是通过acquireUnstableProvider方法还是直接通过acquireProvider方法,它们的本质都是一样的,最终都是通过acquireProvider方法来获取ContentProvider。下面是ApplicationContent-Resolver的acquireProvider方法的具体实现:
protected IContentProvider acquireProvider(Context context, String auth) {
return mMainThread.acquireProvider(context,
ContentProvider.getAuthorityWithoutUserId(auth),
resolveUserIdFromAuthority(auth), true);
}
ApplicationContentResolver的acquireProvider方法并没有处理任何逻辑,它直接调用了ActivityThread的acquireProvider方法,ActivityThread的acquireProvider方法的源码如下所示。
public final IContentProvider acquireProvider(
Context c, String auth, int userId, boolean stable) {
final IContentProvider provider = acquireExistingProvider(c, auth,
userId, stable);
if (provider ! = null) {
return provider;
}
// There is a possible race here. Another thread may try to acquire
// the same provider at the same time. When this happens, we want to
ensure
// that the first one wins.
// Note that we cannot hold the lock while acquiring and installing the
// provider since it might take a long time to run and it could also
potentially
// be re-entrant in the case where the provider is in the same process.
IActivityManager.ContentProviderHolder holder = null;
try {
holder = ActivityManagerNative.getDefault().getContentProvider(
getApplicationThread(), auth, userId, stable);
} catch (RemoteException ex) {
}
if (holder == null) {
Slog.e(TAG, "Failed to find provider info for " + auth);
return null;
}
// Install provider will increment the reference count for us, and break
// any ties in the race.
holder = installProvider(c, holder, holder.info,
true /*noisy*/, holder.noReleaseNeeded, stable);
return holder.provider;
}
上面的代码首先会从ActivityThread中查找是否已经存在目标ContentProvider了,如果存在就直接返回。ActivityThread中通过mProviderMap来存储已经启动的ContentProvider对象,mProviderMap的声明如下所示。
final ArrayMap<ProviderKey, ProviderClientRecord> mProviderMap
= new ArrayMap<ProviderKey, ProviderClientRecord>();
如果目前ContentProvider没有启动,那么就发送一个进程间请求给AMS让其启动目标ContentProvider,最后再通过installProvider方法来修改引用计数。那么AMS是如何启动ContentProvider的呢?我们知道,ContentProvider被启动时会伴随着进程的启动,在AMS中,首先会启动ContentProvider所在的进程,然后再启动ContentProvider。启动进程是由AMS的startProcessLocked方法来完成的,其内部主要是通过Process的start方法来完成一个新进程的启动,新进程启动后其入口方法为ActivityThread的main方法,如下所示。
public static void main(String[] args) {
SamplingProfilerIntegration.start();
// CloseGuard defaults to true and can be quite spammy. We
// disable it here, but selectively enable it later (via
// StrictMode) on debug builds, but using DropBox, not logs.
CloseGuard.setEnabled(false);
Environment.initForCurrentUser();
// Set the reporter for event logging in libcore
EventLogger.setReporter(new EventLoggingReporter());
Security.addProvider(new AndroidKeyStoreProvider());
// Make sure TrustedCertificateStore looks in the right place for CA
certificates
final File configDir = Environment.getUserConfigDirectory(User-
Handle.myUserId());
TrustedCertificateStore.setDefaultUserDirectory(configDir);
Process.setArgV0("<pre-initialized>");
Looper.prepareMainLooper();
ActivityThread thread = new ActivityThread();
thread.attach(false);
if (sMainThreadHandler == null) {
sMainThreadHandler = thread.getHandler();
}
AsyncTask.init();
if (false) {
Looper.myLooper().setMessageLogging(new
LogPrinter(Log.DEBUG, "ActivityThread"));
}
Looper.loop();
throw new RuntimeException("Main thread loop unexpectedly exited");
}
可以看到,ActivityThread的main方法是一个静态方法,在它内部首先会创建Activity-Thread的实例并调用attach方法来进行一系列初始化,接着就开始进行消息循环了。ActivityThread的attach方法会将ApplicationThread对象通过AMS的attachApplication方法跨进程传递给AMS,最终AMS会完成ContentProvider的创建过程,源码如下所示。
try {
mgr.attachApplication(mAppThread);
} catch (RemoteException ex) {
// Ignore
}
AMS的attachApplication方法调用了attachApplicationLocked方法,attachApplication-Locked中又调用了ApplicationThread的bindApplication,注意这个过程也是进程间调用,如下所示。
thread.bindApplication(processName, appInfo, providers, app.instrumen-
tationClass,
profilerInfo, app.instrumentationArguments, app.instrumentation-
Watcher,
app.instrumentationUiAutomationConnection, testMode, enableOpen-
GlTrace,
isRestrictedBackupMode || ! normalMode, app.persistent,
new Configuration(mConfiguration), app.compat, getCommonServices-
Locked(),
mCoreSettingsObserver.getCoreSettingsLocked());
ActivityThread的bindApplication会发送一个BIND_APPLICATION类型的消息给mH, mH是一个Handler,它收到消息后会调用ActivityThread的handleBindApplication方法,bindApplication发送消息的过程如下所示。
AppBindData data = new AppBindData();
data.processName = processName;
data.appInfo = appInfo;
data.providers = providers;
data.instrumentationName = instrumentationName;
data.instrumentationArgs = instrumentationArgs;
data.instrumentationWatcher = instrumentationWatcher;
data.instrumentationUiAutomationConnection = instrumentationUiConnection;
data.debugMode = debugMode;
data.enableOpenGlTrace = enableOpenGlTrace;
data.restrictedBackupMode = isRestrictedBackupMode;
data.persistent = persistent;
data.config = config;
data.compatInfo = compatInfo;
data.initProfilerInfo = profilerInfo;
sendMessage(H.BIND_APPLICATION, data);
ActivityThread的handleBindApplication则完成了Application的创建以及Content-Provider的创建,可以分为如下四个步骤。
1.创建ContextImpI和Instrumentation
ContextImpl instrContext = ContextImpl.createAppContext(this, pi);
try {
java.lang.ClassLoader cl = instrContext.getClassLoader();
mInstrumentation = (Instrumentation)
cl.loadClass(data.instrumentationName.getClassName()).newInstance();
} catch (Exception e) {
throw new RuntimeException(
"Unable to instantiate instrumentation "
+ data.instrumentationName + ": " + e.toString(), e);
}
mInstrumentation.init(this, instrContext, appContext,
new ComponentName(ii.packageName, ii.name), data.instrumentation-
Watcher,
data.instrumentationUiAutomationConnection);
2.创建AppIication对象
Application app = data.info.makeApplication(data.restrictedBackupMode, null);
mInitialApplication = app;
3.启动当前进程的ContentProvider并调用其onCreate方法
List<ProviderInfo> providers = data.providers;
if (providers ! = null) {
installContentProviders(app, providers);
// For process that contains content providers, we want to
// ensure that the JIT is enabled "at some point".
mH.sendEmptyMessageDelayed(H.ENABLE_JIT, 10*1000);
}
installContentProviders完成了ContentProvider的启动工作,它的实现如下所示。首先会遍历当前进程的ProviderInfo的列表并一一调用调用installProvider方法来启动它们,接着将已经启动的ContentProvider发布到AMS中,AMS会把它们存储在ProviderMap中,这样一来外部调用者就可以直接从AMS中获取ContentProvider了。
private void installContentProviders(
Context context, List<ProviderInfo> providers) {
final ArrayList<IActivityManager.ContentProviderHolder> results =
new ArrayList<IActivityManager.ContentProviderHolder>();
for (ProviderInfo cpi : providers) {
if (DEBUG_PROVIDER) {
StringBuilder buf = new StringBuilder(128);
buf.append("Pub ");
buf.append(cpi.authority);
buf.append(": ");
buf.append(cpi.name);
Log.i(TAG, buf.toString());
}
IActivityManager.ContentProviderHolder cph = installProvider
(context, null, cpi,
false /*noisy*/, true /*noReleaseNeeded*/, true /*stable*/);
if (cph ! = null) {
cph.noReleaseNeeded = true;
results.add(cph);
}
}
try {
ActivityManagerNative.getDefault().publishContentProviders(
getApplicationThread(), results);
} catch (RemoteException ex) {
}
}
下面看一下ContentProvider对象的创建过程,在installProvider方法中有下面一段代码,其通过类加载器完成了ContentProvider对象的创建:
final java.lang.ClassLoader cl = c.getClassLoader();
localProvider = (ContentProvider)cl.
loadClass(info.name).newInstance();
provider = localProvider.getIContentProvider();
if (provider == null) {
Slog.e(TAG, "Failed to instantiate class " +
info.name + " from sourceDir " +
info.applicationInfo.sourceDir);
return null;
}
if (DEBUG_PROVIDER) Slog.v(
TAG, "Instantiating local provider " + info.name);
// XXX Need to create the correct context for this provider.
localProvider.attachInfo(c, info);
在上述代码中,除了完成ContentProvider对象的创建,还会通过ContentProvider的attachInfo方法来调用它的onCreate方法,如下所示。
private void attachInfo(Context context, ProviderInfo info, boolean testing) {
...
if (mContext == null) {
mContext = context;
if (context ! = null) {
mTransport.mAppOpsManager = (AppOpsManager) context.getSystem-
Service(
Context.APP_OPS_SERVICE);
}
mMyUid = Process.myUid();
...
ContentProvider.this.onCreate();
}
}
到此为止,ContentProvider已经被创建并且其onCreate方法也已经被调用,这意味着ContentProvider已经启动完成了。
4.调用AppIication的onCreate方法
try {
mInstrumentation.callApplicationOnCreate(app);
} catch (Exception e) {
if (! mInstrumentation.onException(app, e)) {
throw new RuntimeException(
"Unable to create application " + app.getClass().getName()
+ ": " + e.toString(), e);
}
}
经过上面的四个步骤,ContentProvider已经成功启动,并且其所在进程的Application也已经启动,这意味着ContentProvider所在的进程已经完成了整个的启动过程,然后其他应用就可以通过AMS来访问这个ContentProvider了。拿到了ContentProvider以后,就可以通过它所提供的接口方法来访问它了。需要注意的是,这里的ContentProvider并不是原始的ContentProvider,而是ContentProvider的Binder类型的对象IContentProvider, IContentProvider的具体实现是ContentProviderNative和ContentProvider.Transport,其中ContentProvider.Transport继承了ContentProviderNative。这里仍然选择query方法,首先其他应用会通过AMS获取到ContentProvider的Binder对象即IContentProvider,而IContentProvider的实现者实际上是ContentProvider.Transport。因此其他应用调用IContentProvider的query方法时最终会以进程间通信的方式调用到ContentProvider. Transport的query方法,它的实现如下所示。
public Cursor query(String callingPkg, Uri uri, String[] projection,
String selection, String[] selectionArgs, String sortOrder,
ICancellationSignal cancellationSignal) {
validateIncomingUri(uri);
uri = getUriWithoutUserId(uri);
if (enforceReadPermission(callingPkg, uri) ! = AppOpsManager.MODE_
ALLOWED) {
return rejectQuery(uri, projection, selection, selectionArgs,
sortOrder,
CancellationSignal.fromTransport(cancellationSignal));
}
final String original = setCallingPackage(callingPkg);
try {
return ContentProvider.this.query(
uri, projection, selection, selectionArgs, sortOrder,
CancellationSignal.fromTransport(cancellationSignal));
} finally {
setCallingPackage(original);
}
}
很显然,ContentProvider.Transport的query方法调用了ContentProvider的query方法,query方法的执行结果再通过Binder返回给调用者,这样一来整个调用过程就完成了。除了query方法,insert、delete和update方法也是类似的,这里就不再分析了。
- 前言
- 第1章 Activity的生命周期和启动模式
- 1.1 Activity的生命周期全面分析
- 1.1.1 典型情况下的生命周期分析
- 1.1.2 异常情况下的生命周期分析
- 1.2 Activity的启动模式
- 1.2.1 Activity的LaunchMode
- 1.2.2 Activity的Flags
- 1.3 IntentFilter的匹配规则
- 第2章 IPC机制
- 2.1 Android IPC简介
- 2.2 Android中的多进程模式
- 2.2.1 开启多进程模式
- 2.2.2 多进程模式的运行机制
- 2.3 IPC基础概念介绍
- 2.3.1 Serializable接口
- 2.3.2 Parcelable接口
- 2.3.3 Binder
- 2.4 Android中的IPC方式
- 2.4.1 使用Bundle
- 2.4.2 使用文件共享
- 2.4.3 使用Messenger
- 2.4.4 使用AIDL
- 2.4.5 使用ContentProvider
- 2.4.6 使用Socket
- 2.5 Binder连接池
- 2.6 选用合适的IPC方式
- 第3章 View的事件体系
- 3.1 View基础知识
- 3.1.1 什么是View
- 3.1.2 View的位置参数
- 3.1.3 MotionEvent和TouchSlop
- 3.1.4 VelocityTracker、GestureDetector和Scroller
- 3.2 View的滑动
- 3.2.1 使用scrollTo/scrollBy
- 3.2.2 使用动画
- 3.2.3 改变布局参数
- 3.2.4 各种滑动方式的对比
- 3.3 弹性滑动
- 3.3.1 使用Scroller7
- 3.3.2 通过动画
- 3.3.3 使用延时策略
- 3.4 View的事件分发机制
- 3.4.1 点击事件的传递规则
- 3.4.2 事件分发的源码解析
- 3.5 View的滑动冲突
- 3.5.1 常见的滑动冲突场景
- 3.5.2 滑动冲突的处理规则
- 3.5.3 滑动冲突的解决方式
- 第4章 View的工作原理
- 4.1 初识ViewRoot和DecorView
- 4.2 理解MeasureSpec
- 4.2.1 MeasureSpec
- 4.2.2 MeasureSpec和LayoutParams的对应关系
- 4.3 View的工作流程
- 4.3.1 measure过程
- 4.3.2 layout过程
- 4.3.3 draw过程
- 4.4 自定义View
- 4.4.1 自定义View的分类
- 4.4.2 自定义View须知
- 4.4.3 自定义View示例
- 4.4.4 自定义View的思想
- 第5章 理解RemoteViews
- 5.1 RemoteViews的应用
- 5.1.1 RemoteViews在通知栏上的应用
- 5.1.2 RemoteViews在桌面小部件上的应用
- 5.1.3 PendingIntent概述
- 5.2 RemoteViews的内部机制
- 5.3 RemoteViews的意义
- 第6章 Android的Drawable
- 6.1 Drawable简介
- 6.2 Drawable的分类
- 6.2.1 BitmapDrawable2
- 6.2.2 ShapeDrawable
- 6.2.3 LayerDrawable
- 6.2.4 StateListDrawable
- 6.2.5 LevelListDrawable
- 6.2.6 TransitionDrawable
- 6.2.7 InsetDrawable
- 6.2.8 ScaleDrawable
- 6.2.9 ClipDrawable
- 6.3 自定义Drawable
- 第7章 Android动画深入分析
- 7.1 View动画
- 7.1.1 View动画的种类
- 7.1.2 自定义View动画
- 7.1.3 帧动画
- 7.2 View动画的特殊使用场景
- 7.2.1 LayoutAnimation
- 7.2.2 Activity的切换效果
- 7.3 属性动画
- 7.3.1 使用属性动画
- 7.3.2 理解插值器和估值器 /
- 7.3.3 属性动画的监听器
- 7.3.4 对任意属性做动画
- 7.3.5 属性动画的工作原理
- 7.4 使用动画的注意事项
- 第8章 理解Window和WindowManager
- 8.1 Window和WindowManager
- 8.2 Window的内部机制
- 8.2.1 Window的添加过程
- 8.2.2 Window的删除过程
- 8.2.3 Window的更新过程
- 8.3 Window的创建过程
- 8.3.1 Activity的Window创建过程
- 8.3.2 Dialog的Window创建过程
- 8.3.3 Toast的Window创建过程
- 第9章 四大组件的工作过程
- 9.1 四大组件的运行状态
- 9.2 Activity的工作过程
- 9.3 Service的工作过程
- 9.3.1 Service的启动过程
- 9.3.2 Service的绑定过程
- 9.4 BroadcastReceiver的工作过程
- 9.4.1 广播的注册过程
- 9.4.2 广播的发送和接收过程
- 9.5 ContentProvider的工作过程
- 第10章 Android的消息机制
- 10.1 Android的消息机制概述
- 10.2 Android的消息机制分析
- 10.2.1 ThreadLocal的工作原理
- 10.2.2 消息队列的工作原理
- 10.2.3 Looper的工作原理
- 10.2.4 Handler的工作原理
- 10.3 主线程的消息循环
- 第11章 Android的线程和线程池
- 11.1 主线程和子线程
- 11.2 Android中的线程形态
- 11.2.1 AsyncTask
- 11.2.2 AsyncTask的工作原理
- 11.2.3 HandlerThread
- 11.2.4 IntentService
- 11.3 Android中的线程池
- 11.3.1 ThreadPoolExecutor
- 11.3.2 线程池的分类
- 第12章 Bitmap的加载和Cache
- 12.1 Bitmap的高效加载
- 12.2 Android中的缓存策略
- 12.2.1 LruCache
- 12.2.2 DiskLruCache
- 12.2.3 ImageLoader的实现446
- 12.3 ImageLoader的使用
- 12.3.1 照片墙效果
- 12.3.2 优化列表的卡顿现象
- 第13章 综合技术
- 13.1 使用CrashHandler来获取应用的crash信息
- 13.2 使用multidex来解决方法数越界
- 13.3 Android的动态加载技术
- 13.4 反编译初步
- 13.4.1 使用dex2jar和jd-gui反编译apk
- 13.4.2 使用apktool对apk进行二次打包
- 第14章 JNI和NDK编程
- 14.1 JNI的开发流程
- 14.2 NDK的开发流程
- 14.3 JNI的数据类型和类型签名
- 14.4 JNI调用Java方法的流程
- 第15章 Android性能优化
- 15.1 Android的性能优化方法
- 15.1.1 布局优化
- 15.1.2 绘制优化
- 15.1.3 内存泄露优化
- 15.1.4 响应速度优化和ANR日志分析
- 15.1.5 ListView和Bitmap优化
- 15.1.6 线程优化
- 15.1.7 一些性能优化建议
- 15.2 内存泄露分析之MAT工具
- 15.3 提高程序的可维护性