
### 9.2 Activity的工作过程
本节讲述的内容是Activity的工作过程。为了方便日常的开发工作,系统对四大组件的工作过程进行了很大程度的封装,这使得开发者无须关注实现细节即可快速地使用四大组件。Activity作为很重要的一个组件,其内部工作过程系统当然也是做了很多的封装,这种封装使得启动一个Activity变得异常简单。在显式调用的情形下,只需要通过如下代码即可完成:
Intent intent = new Intent(this, TestActivity.class);
startActivity(intent);
通过上面的代码即可启动一个具体的Activity,然后新Activity就会被系统启动并展示在用户的眼前。这个过程对于Android开发者来说最普通不过了,这也是很理所应当的事,但是有没有想过系统内部到底是如何启动一个Activity的呢?比如新Activity的对象是在何时创建的?Activity的onCreate方法又是在何时被系统回调的呢?读者可能会有疑问:在日常开发中并不需要了解Activity底层到底是怎么工作的,那么了解它们又有什么意义呢?没错,在日常开发中是不需要了解系统的底层工作原理,但是如果想要在技术上有进一步的提高,那么就必须了解一些系统的工作原理,这是一个开发人员日后成长为高级工程师乃至架构师所必须具备的技术能力。从另外一个角度来说,Android作为一个优秀的基于Linux的移动操作系统,其内部一定有很多值得我们学习和借鉴的地方,因此了解系统的工作过程就是学习Android操作系统。通过对Android操作系统的学习可以提高我们对操作系统在技术实现上的理解,这对于加强开发人员的内功是很有帮助的。但是有一点,由于Android的内部实现多数都比较复杂,在研究内部实现上应该更加侧重于对整体流程的把握,而不能深入代码细节不能自拔,太深入代码细节往往会导致“只见树木不见森林”的状态。处于这种状态下,无法对整体流程建立足够的认识,取而代之的是烦琐的代码细节,但是代码细节本身并不具有太多的指导意义,因此这种学习状态是要极力避免的。鉴于这一点,本章对Activity以及其他三个组件的工作过程的分析将会侧重于整体流程的讲解,目的是为了让读者对四大组件的工作过程有一个感性的认识并能够给予上层开发一些指导意义。但凡事不是绝对的,如果开发者从事的工作是Android Rom开发,那底层代码细节还是要有所涉猎的。
本节主要分析Activity的启动过程,通过本节读者可以对Activity的启动过程有一个感性的认识,至于启动模式以及任务栈等概念本节中并未涉及,读者感兴趣的话可以查看相应的代码细节即可。
我们从Activity的startActivity方法开始分析,startActivity方法有好几种重载方式,但它们最终都会调用startActivityForResult方法,它的实现如下所示。
public void startActivityForResult(Intent intent, int requestCode,
@Nullable Bundle options) {
if (mParent == null) {
Instrumentation.ActivityResult ar =
mInstrumentation.execStartActivity(
this, mMainThread.getApplicationThread(), mToken, this,
intent, requestCode, options);
if (ar ! = null) {
mMainThread.sendActivityResult(
mToken, mEmbeddedID, requestCode, ar.getResultCode(),
ar.getResultData());
}
if (requestCode >= 0) {
// If this start is requesting a result, we can avoid making
// the activity visible until the result is received. Setting
// this code during onCreate(Bundle savedInstanceState) or
onResume() will keep the
// activity hidden during this time, to avoid flickering.
// This can only be done when a result is requested because
// that guarantees we will get information back when the
// activity is finished, no matter what happens to it.
mStartedActivity = true;
}
final View decor = mWindow ! = null ? mWindow.peekDecorView() : null;
if (decor ! = null) {
decor.cancelPendingInputEvents();
}
// TODO Consider clearing/flushing other event sources and events
for child windows.
} else {
if (options ! = null) {
mParent.startActivityFromChild(this, intent, requestCode, options);
} else {
// Note we want to go through this method for compatibility with
// existing applications that may have overridden it.
mParent.startActivityFromChild(this, intent, requestCode);
}
}
if (options ! = null && ! isTopOfTask()) {
mActivityTransitionState.startExitOutTransition(this, options);
}
}
在上面的代码中,我们只需要关注mParent == null这部分逻辑即可。mParent代表的是ActivityGroup, ActivityGroup最开始被用来在一个界面中嵌入多个子Activity,但是其在API 13中已经被废弃了,系统推荐采用Fragment来代替ActivityGroup, Fragment的好处就不用多说了。在上面的代码中需要注意mMainThread.getApplicationThread()这个参数,它的类型是ApplicationThread, ApplicationThread是ActivityThread的一个内部类,通过后面的分析可以发现,ApplicationThread和ActivityThread在Activity的启动过程中发挥着很重要的作用。接着看一下Instrumentation的execStartActivity方法,如下所示。
public ActivityResult execStartActivity(
Context who, IBinder contextThread, IBinder token, Activity target,
Intent intent, int requestCode, Bundle options) {
IApplicationThread whoThread = (IApplicationThread) contextThread;
if (mActivityMonitors ! = null) {
synchronized (mSync) {
final int N = mActivityMonitors.size();
for (int i=0; i<N; i++) {
final ActivityMonitor am = mActivityMonitors.get(i);
if (am.match(who, null, intent)) {
am.mHits++;
if (am.isBlocking()) {
return requestCode >= 0 ? am.getResult() : null;
}
break;
}
}
}
}
try {
intent.migrateExtraStreamToClipData();
intent.prepareToLeaveProcess();
int result = ActivityManagerNative.getDefault()
.startActivity(whoThread, who.getBasePackageName(), intent,
intent.resolveTypeIfNeeded(who.getContentResolver()),
token, target ! = null ? target.mEmbeddedID : null,
requestCode, 0, null, options);
checkStartActivityResult(result, intent);
} catch (RemoteException e) {
}
return null;
}
从上面的代码可以看出,启动Activity真正的实现由ActivityManagerNative.getDefault()的startActivity方法来完成。ActivityManagerService(下面简称为AMS)继承自ActivityManagerNative,而ActivityManagerNative继承自Binder并实现了IActivityManager这个Binder接口,因此AMS也是一个Binder,它是IActivityManager的具体实现。由于ActivityManagerNative.getDefault()其实是一个IActivityManager类型的Binder对象,因此它的具体实现是AMS。可以发现,在ActivityManagerNative中,AMS这个Binder对象采用单例模式对外提供,Singleton是一个单例的封装类,第一次调用它的get方法时它会通过create方法来初始化AMS这个Binder对象,在后续的调用中则直接返回之前创建的对象,这个过程的源码如下所示。
static public IActivityManager getDefault() {
return gDefault.get();
}
private static final Singleton<IActivityManager> gDefault = new Singleton
<IActivityManager>() {
protected IActivityManager create() {
IBinder b = ServiceManager.getService("activity");
if (false) {
Log.v("ActivityManager", "default service binder = " + b);
}
IActivityManager am = asInterface(b);
if (false) {
Log.v("ActivityManager", "default service = " + am);
}
return am;
}
};
从上面的分析可以知道,Activity由ActivityManagerNative.getDefault()来启动,而ActivityManagerNative.getDefault()实际上是AMS,因此Activity的启动过程又转移到了AMS中,为了继续分析这个过程,只需要查看AMS的startActivity方法即可。在分析AMS的的startActivity方法之前,我们先回过头来看一下Instrumentation的execStartActivity方法,其中有一行代码:checkStartActivityResult(result, intent),直观上看起来这个方法的作用像是在检查启动Activity的结果,它的具体实现如下所示。
/** @hide */
public static void checkStartActivityResult(int res, Object intent) {
if (res >= ActivityManager.START_SUCCESS) {
return;
}
switch (res) {
case ActivityManager.START_INTENT_NOT_RESOLVED:
case ActivityManager.START_CLASS_NOT_FOUND:
if(intent instanceof Intent&&((Intent)intent).getComponent() ! =
null)
throw new ActivityNotFoundException(
"Unable to find explicit activity class "
+ ((Intent)intent).getComponent().toShortString()
+ "; have you declared this activity in your
AndroidManifest.xml? ");
throw new ActivityNotFoundException(
"No Activity found to handle " + intent);
case ActivityManager.START_PERMISSION_DENIED:
throw new SecurityException("Not allowed to start activity "
+ intent);
case ActivityManager.START_FORWARD_AND_REQUEST_CONFLICT:
throw new AndroidRuntimeException(
"FORWARD_RESULT_FLAG used while also requesting a
result");
case ActivityManager.START_NOT_ACTIVITY:
throw new IllegalArgumentException(
"PendingIntent is not an activity");
case ActivityManager.START_NOT_VOICE_COMPATIBLE:
throw new SecurityException(
"Starting under voice control not allowed for: " +
intent);
default:
throw new AndroidRuntimeException("Unknown error code "
+ res + " when starting " + intent);
}
}
从上面的代码可以看出,checkStartActivityResult的作用很明显,就是检查启动Activity的结果。当无法正确地启动一个Activity时,这个方法会抛出异常信息,其中最熟悉不过的就是“Unable to find explicit activity class; have you declared this activity in your AndroidManifest.xml? ”这个异常了,当待启动的Activity没有在AndroidManifest中注册时,就会抛出这个异常。
接着我们继续分析AMS的startActivity方法,如下所示。
public final int startActivity(IApplicationThread caller, String callingPackage,
Intent intent, String resolvedType, IBinder resultTo, String
resultWho, int requestCode,
int startFlags, ProfilerInfo profilerInfo, Bundle options) {
return startActivityAsUser(caller, callingPackage, intent, resolved-
Type, resultTo,
resultWho, requestCode, startFlags, profilerInfo, options,
UserHandle.getCallingUserId());
}
public final int startActivityAsUser(IApplicationThread caller, String
callingPackage,
Intent intent, String resolvedType, IBinder resultTo, String
resultWho, int requestCode,
int startFlags, ProfilerInfo profilerInfo, Bundle options, int userId) {
enforceNotIsolatedCaller("startActivity");
userId = handleIncomingUser(Binder.getCallingPid(), Binder.getCalling-
Uid(), userId,
false, ALLOW_FULL_ONLY, "startActivity", null);
// TODO: Switch to user app stacks here.
return mStackSupervisor.startActivityMayWait(caller, -1, calling
Package, intent,
resolvedType, null, null, resultTo, resultWho, requestCode,
startFlags,
profilerInfo, null, null, options, userId, null, null);
}
可以看出,Activity的启动过程又转移到了ActivityStackSupervisor的startActivity-MayWait方法中了,在startActivityMayWait中又调用了startActivityLocked方法,然后startActivityLocked方法又调用了startActivityUncheckedLocked方法,接着startActivityUncheckedLocked又调用了ActivityStack的resumeTopActivitiesLocked方法,这个时候启动过程已经从ActivityStackSupervisor转移到了ActivityStack。
ActivityStack的resumeTopActivitiesLocked方法的实现如下所示。
final boolean resumeTopActivityLocked(ActivityRecord prev, Bundle options) {
if (inResumeTopActivity) {
// Don't even start recursing.
return false;
}
boolean result = false;
try {
// Protect against recursion.
inResumeTopActivity = true;
result = resumeTopActivityInnerLocked(prev, options);
} finally {
inResumeTopActivity = false;
}
return result;
}
从上面的代码可以看出,resumeTopActivityLocked调用了resumeTopActivityInnerLocked方法,resumeTopActivityInnerLocked方法又调用了ActivityStackSupervisor的startSpecificActivityLocked方法,startSpecificActivityLocked的源码如下所示。
void startSpecificActivityLocked(ActivityRecord r,
boolean andResume, boolean checkConfig) {
// Is this activity's application already running?
ProcessRecord app = mService.getProcessRecordLocked(r.processName,
r.info.applicationInfo.uid, true);
r.task.stack.setLaunchTime(r);
if (app ! = null && app.thread ! = null) {
try {
if ((r.info.flags&ActivityInfo.FLAG_MULTIPROCESS) == 0
|| ! "android".equals(r.info.packageName)) {
// Don't add this if it is a platform component that is marked
// to run in multiple processes, because this is actually
// part of the framework so doesn't make sense to track as a
// separate apk in the process.
app.addPackage(r.info.packageName, r.info.applicationInfo.
versionCode,
mService.mProcessStats);
}
realStartActivityLocked(r, app, andResume, checkConfig);
return;
} catch (RemoteException e) {
Slog.w(TAG, "Exception when starting activity "
+ r.intent.getComponent().flattenToShortString(), e);
}
// If a dead object exception was thrown -- fall through to
// restart the application.
}
mService.startProcessLocked(r.processName, r.info.applicationInfo, true,0,
"activity", r.intent.getComponent(), false, false, true);
}
从上面代码可以看出,startSpecificActivityLocked方法调用了realStartActivityLocked方法。为了更清晰地说明Activity的启动过程在ActivityStackSupervisor和ActivityStack之间的传递顺序,这里给出了一张流程图,如图9-1所示。
:-: 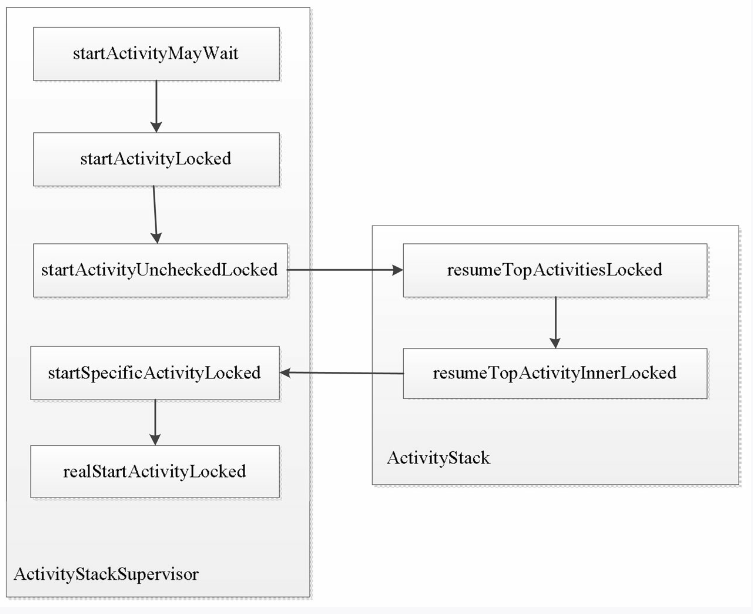
图9-1 Activity的启动过程在ActivityStackSupervisor和ActivityStack之间的传递顺序
在ActivityStackSupervisor的realStartActivityLocked方法中有如下一段代码:
app.thread.scheduleLaunchActivity(new Intent(r.intent), r.appToken,
System.identityHashCode(r), r.info, new Configuration(mService.
mConfiguration),
r.compat, r.task.voiceInteractor, app.repProcState, r.icicle,
r.persistentState,
results, newIntents, ! andResume, mService.isNextTransitionForward(),
profilerInfo);
上面的这段代码很重要,其中app.thread的类型为IApplicationThread, IApplicationThread的声明如下:
public interface IApplicationThread extends IInterface {
void schedulePauseActivity(IBinder token, boolean finished, boolean userLeaving,
int configChanges, boolean dontReport) throws RemoteException;
void scheduleStopActivity(IBinder token, boolean showWindow,
int configChanges) throws RemoteException;
void scheduleWindowVisibility(IBinder token, boolean showWindow) throws
RemoteException;
void scheduleSleeping(IBinder token, boolean sleeping) throws RemoteException;
void scheduleResumeActivity(IBinder token, int procState, boolean
isForward, Bundle resumeArgs)
throws RemoteException;
void scheduleSendResult(IBinder token, List<ResultInfo> results) throws
RemoteException;
void scheduleLaunchActivity(Intent intent, IBinder token, int ident,
ActivityInfo info, Configuration curConfig, CompatibilityInfo
compatInfo,
IVoiceInteractor voiceInteractor, int procState, Bundle state,
PersistableBundle persistentState, List<ResultInfo> pendingResults,
List<Intent> pendingNewIntents, boolean notResumed, boolean
isForward,
ProfilerInfo profilerInfo) throws RemoteException;
void scheduleRelaunchActivity(IBinder token, List<ResultInfo> pending-
Results,
List<Intent> pendingNewIntents, int configChanges,
boolean notResumed, Configuration config) throws RemoteException;
void scheduleNewIntent(List<Intent> intent, IBinder token) throws
RemoteException;
void scheduleDestroyActivity(IBinder token, boolean finished,
int configChanges) throws RemoteException;
void scheduleReceiver(Intent intent, ActivityInfo info, Compatibility-
Info compatInfo,
int resultCode, String data, Bundle extras, boolean sync,
int sendingUser, int processState) throws RemoteException;
static final int BACKUP_MODE_INCREMENTAL = 0;
static final int BACKUP_MODE_FULL = 1;
static final int BACKUP_MODE_RESTORE = 2;
static final int BACKUP_MODE_RESTORE_FULL = 3;
void scheduleCreateBackupAgent(ApplicationInfo app, CompatibilityInfo
compatInfo,
int backupMode) throws RemoteException;
void scheduleDestroyBackupAgent(ApplicationInfo app, CompatibilityInfo
compatInfo)
throws RemoteException;
void scheduleCreateService(IBinder token, ServiceInfo info,
CompatibilityInfo compatInfo, int processState) throws
RemoteException;
void scheduleBindService(IBinder token,
Intent intent, boolean rebind, int processState) throws
RemoteException;
void scheduleUnbindService(IBinder token,
Intent intent) throws RemoteException;
void scheduleServiceArgs(IBinder token, boolean taskRemoved, int
startId,
int flags, Intent args) throws RemoteException;
void scheduleStopService(IBinder token) throws RemoteException;
...
}
因为它继承了IInterface接口,所以它是一个Binder类型的接口。从IApplicationThread声明的接口方法可以看出,其内部包含了大量启动、停止Activity的接口,此外还包含了启动和停止服务的接口。从接口方法的命名可以猜测,IApplicationThread这个Binder接口的实现者完成了大量和Activity以及Service启动/停止相关的功能,事实证明的确是这样的。
那么IApplicationThread的实现者到底是什么呢?答案就是ActivityThread中的内部类ApplicationThread,下面来看一下ApplicationThread的定义,如下所示。
private class ApplicationThread extends ApplicationThreadNative
public abstract class ApplicationThreadNative extends Binder
implements IApplicationThread
可以看出,ApplicationThread继承了ApplicationThreadNative,而ApplicationThreadNative则继承了Binder并实现了IApplicationThread接口。如果读者还记得系统为AIDL文件自动生成的代码,就会发现ApplicationThreadNative的作用其实和系统为AIDL文件生成的类是一样的,这方面的知识在第2章已经做了介绍,读者可以查看第2章的相关内容。
在ApplicationThreadNative的内部,还有一个ApplicationThreadProxy类,这个类的实现如下所示。相信读者有一种似曾相识的感觉,其实这个内部类也是系统为AIDL文件自动生成的代理类。种种迹象表明,ApplicationThreadNative就是IApplicationThread的实现者,由于ApplicationThreadNative被系统定义为抽象类,所以ApplicationThread就成了IApplicationThread最终的实现者。
class ApplicationThreadProxy implements IApplicationThread {
private final IBinder mRemote;
public ApplicationThreadProxy(IBinder remote) {
mRemote = remote;
}
public final IBinder asBinder() {
return mRemote;
}
public final void schedulePauseActivity(IBinder token, boolean finished,
boolean userLeaving, int configChanges, boolean dontReport)
throws RemoteException {
Parcel data = Parcel.obtain();
data.writeInterfaceToken(IApplicationThread.descriptor);
data.writeStrongBinder(token);
data.writeInt(finished ? 1 : 0);
data.writeInt(userLeaving ? 1 :0);
data.writeInt(configChanges);
data.writeInt(dontReport ? 1 : 0);
mRemote.transact(SCHEDULE_PAUSE_ACTIVITY_TRANSACTION, data, null,
IBinder.FLAG_ONEWAY);
data.recycle();
}
public final void scheduleStopActivity(IBinder token, boolean showWindow,
int configChanges) throws RemoteException {
Parcel data = Parcel.obtain();
data.writeInterfaceToken(IApplicationThread.descriptor);
data.writeStrongBinder(token);
data.writeInt(showWindow ? 1 : 0);
data.writeInt(configChanges);
mRemote.transact(SCHEDULE_STOP_ACTIVITY_TRANSACTION, data, null,
IBinder.FLAG_ONEWAY);
data.recycle();
}
...
}
绕了一大圈,Activity的启动过程最终回到了ApplicationThread中,ApplicationThread通过scheduleLaunchActivity方法来启动Activity,代码如下所示。
// we use token to identify this activity without having to send the
// activity itself back to the activity manager. (matters more with ipc)
public final void scheduleLaunchActivity(Intent intent, IBinder token, int ident,
ActivityInfo info, Configuration curConfig, CompatibilityInfo
compatInfo,
IVoiceInteractor voiceInteractor, int procState, Bundle state,
PersistableBundle persistentState, List<ResultInfo> pendingResults,
List<Intent> pendingNewIntents, boolean notResumed, boolean isForward,
ProfilerInfo profilerInfo) {
updateProcessState(procState, false);
ActivityClientRecord r = new ActivityClientRecord();
r.token = token;
r.ident = ident;
r.intent = intent;
r.voiceInteractor = voiceInteractor;
r.activityInfo = info;
r.compatInfo = compatInfo;
r.state = state;
r.persistentState = persistentState;
r.pendingResults = pendingResults;
r.pendingIntents = pendingNewIntents;
r.startsNotResumed = notResumed;
r.isForward = isForward;
r.profilerInfo = profilerInfo;
updatePendingConfiguration(curConfig);
sendMessage(H.LAUNCH_ACTIVITY, r);
}
在ApplicationThread中,scheduleLaunchActivity的实现很简单,就是发送一个启动Activity的消息交由Handler处理,这个Handler有着一个很简洁的名字:H。sendMessage的作用是发送一个消息给H处理,它的实现如下所示。
private void sendMessage(int what, Object obj, int arg1, int arg2, boolean
async) {
if (DEBUG_MESSAGES) Slog.v(
TAG, "SCHEDULE " + what + " " + mH.codeToString(what)
+ ": " + arg1 + " / " + obj);
Message msg = Message.obtain();
msg.what = what;
msg.obj = obj;
msg.arg1 = arg1;
msg.arg2 = arg2;
if (async) {
msg.setAsynchronous(true);
}
mH.sendMessage(msg);
}
接着来看一下Handler H对消息的处理,如下所示。
private class H extends Handler {
public static final int LAUNCH_ACTIVITY = 100;
public static final int PAUSE_ACTIVITY = 101;
public static final int PAUSE_ACTIVITY_FINISHING = 102;
public static final int STOP_ACTIVITY_SHOW = 103;
public static final int STOP_ACTIVITY_HIDE = 104;
public static final int SHOW_WINDOW = 105;
public static final int HIDE_WINDOW = 106;
public static final int RESUME_ACTIVITY = 107;
...
public void handleMessage(Message msg) {
if (DEBUG_MESSAGES) Slog.v(TAG, ">>> handling: " + codeToString
(msg.what));
switch (msg.what) {
case LAUNCH_ACTIVITY: {
Trace.traceBegin(Trace.TRACE_TAG_ACTIVITY_MANAGER,
"activityStart");
final ActivityClientRecord r = (ActivityClientRecord) msg.obj;
r.packageInfo = getPackageInfoNoCheck(
r.activityInfo.applicationInfo, r.compatInfo);
handleLaunchActivity(r, null);
Trace.traceEnd(Trace.TRACE_TAG_ACTIVITY_MANAGER);
} break;
case RELAUNCH_ACTIVITY: {
Trace.traceBegin(Trace.TRACE_TAG_ACTIVITY_MANAGER,
"activityRestart");
ActivityClientRecord r = (ActivityClientRecord)msg.obj;
handleRelaunchActivity(r);
Trace.traceEnd(Trace.TRACE_TAG_ACTIVITY_MANAGER);
} break;
case PAUSE_ACTIVITY:
Trace.traceBegin(Trace.TRACE_TAG_ACTIVITY_MANAGER,
"activityPause");
handlePauseActivity((IBinder)msg.obj, false, (msg.arg1&1) ! =
0, msg.arg2,
(msg.arg1&2) ! = 0);
maybeSnapshot();
Trace.traceEnd(Trace.TRACE_TAG_ACTIVITY_MANAGER);
break;
...
}
if (DEBUG_MESSAGES) Slog.v(TAG, "<<< done: " + codeToString(msg.what));
}
}
从Handler H对“LAUNCH_ACTIVITY”这个消息的处理可以知道,Activity的启动过程由ActivityThread的handleLaunchActivity方法来实现,它的源码如下所示。
private void handleLaunchActivity(ActivityClientRecord r, Intent customIntent){
...
if (localLOGV) Slog.v(
TAG, "Handling launch of " + r);
Activity a = performLaunchActivity(r, customIntent);
if (a ! = null) {
r.createdConfig = new Configuration(mConfiguration);
Bundle oldState = r.state;
handleResumeActivity(r.token, false, r.isForward,
!r.activity.mFinished && ! r.startsNotResumed);
...
}
...
}
从上面的源码可以看出,performLaunchActivity方法最终完成了Activity对象的创建和启动过程,并且ActivityThread通过handleResumeActivity方法来调用被启动Activity的onResume这一生命周期方法。
performLaunchActivity这个方法主要完成了如下几件事。
* 1.从ActivityCIientRecord中获取待启动的Activity的组件信息
ActivityInfo aInfo = r.activityInfo;
if (r.packageInfo == null) {
r.packageInfo = getPackageInfo(aInfo.applicationInfo, r.compatInfo,
Context.CONTEXT_INCLUDE_CODE);
}
ComponentName component = r.intent.getComponent();
if (component == null) {
component = r.intent.resolveActivity(
mInitialApplication.getPackageManager());
r.intent.setComponent(component);
}
if (r.activityInfo.targetActivity ! = null) {
component = new ComponentName(r.activityInfo.packageName,
r.activityInfo.targetActivity);
}
* 2.通过Instrumentation的newActivity方法使用类加载器创建Activity对象
Activity activity = null;
try {
java.lang.ClassLoader cl = r.packageInfo.getClassLoader();
activity = mInstrumentation.newActivity(
cl, component.getClassName(), r.intent);
StrictMode.incrementExpectedActivityCount(activity.getClass());
r.intent.setExtrasClassLoader(cl);
r.intent.prepareToEnterProcess();
if (r.state ! = null) {
r.state.setClassLoader(cl);
}
} catch (Exception e) {
if (! mInstrumentation.onException(activity, e)) {
throw new RuntimeException(
"Unable to instantiate activity " + component
+ ": " + e.toString(), e);
}
}
至于Instrumentation的newActivity,它的实现比较简单,就是通过类加载器来创建Activity对象:
public Activity newActivity(ClassLoader cl, String className,
Intent intent)
throws InstantiationException, IllegalAccessException,
ClassNotFoundException {
return (Activity)cl.loadClass(className).newInstance();
}
3.通过LoadedApk的makeAppIication方法来尝试创建AppIication对象
public Application makeApplication(boolean forceDefaultAppClass,
Instrumentation instrumentation) {
if (mApplication ! = null) {
return mApplication;
}
Application app = null;
String appClass = mApplicationInfo.className;
if (forceDefaultAppClass || (appClass == null)) {
appClass = "android.app.Application";
}
try {
java.lang.ClassLoader cl = getClassLoader();
if (! mPackageName.equals("android")) {
initializeJavaContextClassLoader();
}
ContextImpl appContext = ContextImpl.createAppContext(mActivity-
Thread, this);
app = mActivityThread.mInstrumentation.newApplication(
cl, appClass, appContext);
appContext.setOuterContext(app);
} catch (Exception e) {
if (! mActivityThread.mInstrumentation.onException(app, e)) {
throw new RuntimeException(
"Unable to instantiate application " + appClass
+ ": " + e.toString(), e);
}
}
mActivityThread.mAllApplications.add(app);
mApplication = app;
if (instrumentation ! = null) {
try {
instrumentation.callApplicationOnCreate(app);
} catch (Exception e) {
if (! instrumentation.onException(app, e)) {
throw new RuntimeException(
"Unable to create application " + app.getClass().getName()
+ ": " + e.toString(), e);
}
}
}
...
return app;
}
从makeApplication的实现可以看出,如果Application已经被创建过了,那么就不会再重复创建了,这也意味着一个应用只有一个Application对象。Application对象的创建也是通过Instrumentation来完成的,这个过程和Activity对象的创建一样,都是通过类加载器来实现的。Application创建完毕后,系统会通过Instrumentation的callApplicationOnCreate来调用Application的onCreate方法。
* 4.创建ContextImpI对象并通过Activity的attach方法来完成一些重要数据的初始化
Context appContext = createBaseContextForActivity(r, activity);
CharSequence title = r.activityInfo.loadLabel(appContext.getPackage-
Manager());
Configuration config = new Configuration(mCompatConfiguration);
if (DEBUG_CONFIGURATION) Slog.v(TAG, "Launching activity "
+ r.activityInfo.name + " with config " + config);
activity.attach(appContext, this, getInstrumentation(), r.token,
r.ident, app, r.intent, r.activityInfo, title, r.parent,
r.embeddedID, r.lastNonConfigurationInstances, config,
r.voiceInteractor);
ContextImpl是一个很重要的数据结构,它是Context的具体实现,Context中的大部分逻辑都是由ContextImpl来完成的。ContextImpl是通过Activity的attach方法来和Activity建立关联的,除此以外,在attach方法中Activity还会完成Window的创建并建立自己和Window的关联,这样当Window接收到外部输入事件后就可以将事件传递给Activity。
* 5.调用Activity的onCreate方法
mInstrumentation.callActivityOnCreate(activity, r.state),由于Activity的onCreate已经被调用,这也意味着Activity已经完成了整个启动过程。
- 前言
- 第1章 Activity的生命周期和启动模式
- 1.1 Activity的生命周期全面分析
- 1.1.1 典型情况下的生命周期分析
- 1.1.2 异常情况下的生命周期分析
- 1.2 Activity的启动模式
- 1.2.1 Activity的LaunchMode
- 1.2.2 Activity的Flags
- 1.3 IntentFilter的匹配规则
- 第2章 IPC机制
- 2.1 Android IPC简介
- 2.2 Android中的多进程模式
- 2.2.1 开启多进程模式
- 2.2.2 多进程模式的运行机制
- 2.3 IPC基础概念介绍
- 2.3.1 Serializable接口
- 2.3.2 Parcelable接口
- 2.3.3 Binder
- 2.4 Android中的IPC方式
- 2.4.1 使用Bundle
- 2.4.2 使用文件共享
- 2.4.3 使用Messenger
- 2.4.4 使用AIDL
- 2.4.5 使用ContentProvider
- 2.4.6 使用Socket
- 2.5 Binder连接池
- 2.6 选用合适的IPC方式
- 第3章 View的事件体系
- 3.1 View基础知识
- 3.1.1 什么是View
- 3.1.2 View的位置参数
- 3.1.3 MotionEvent和TouchSlop
- 3.1.4 VelocityTracker、GestureDetector和Scroller
- 3.2 View的滑动
- 3.2.1 使用scrollTo/scrollBy
- 3.2.2 使用动画
- 3.2.3 改变布局参数
- 3.2.4 各种滑动方式的对比
- 3.3 弹性滑动
- 3.3.1 使用Scroller7
- 3.3.2 通过动画
- 3.3.3 使用延时策略
- 3.4 View的事件分发机制
- 3.4.1 点击事件的传递规则
- 3.4.2 事件分发的源码解析
- 3.5 View的滑动冲突
- 3.5.1 常见的滑动冲突场景
- 3.5.2 滑动冲突的处理规则
- 3.5.3 滑动冲突的解决方式
- 第4章 View的工作原理
- 4.1 初识ViewRoot和DecorView
- 4.2 理解MeasureSpec
- 4.2.1 MeasureSpec
- 4.2.2 MeasureSpec和LayoutParams的对应关系
- 4.3 View的工作流程
- 4.3.1 measure过程
- 4.3.2 layout过程
- 4.3.3 draw过程
- 4.4 自定义View
- 4.4.1 自定义View的分类
- 4.4.2 自定义View须知
- 4.4.3 自定义View示例
- 4.4.4 自定义View的思想
- 第5章 理解RemoteViews
- 5.1 RemoteViews的应用
- 5.1.1 RemoteViews在通知栏上的应用
- 5.1.2 RemoteViews在桌面小部件上的应用
- 5.1.3 PendingIntent概述
- 5.2 RemoteViews的内部机制
- 5.3 RemoteViews的意义
- 第6章 Android的Drawable
- 6.1 Drawable简介
- 6.2 Drawable的分类
- 6.2.1 BitmapDrawable2
- 6.2.2 ShapeDrawable
- 6.2.3 LayerDrawable
- 6.2.4 StateListDrawable
- 6.2.5 LevelListDrawable
- 6.2.6 TransitionDrawable
- 6.2.7 InsetDrawable
- 6.2.8 ScaleDrawable
- 6.2.9 ClipDrawable
- 6.3 自定义Drawable
- 第7章 Android动画深入分析
- 7.1 View动画
- 7.1.1 View动画的种类
- 7.1.2 自定义View动画
- 7.1.3 帧动画
- 7.2 View动画的特殊使用场景
- 7.2.1 LayoutAnimation
- 7.2.2 Activity的切换效果
- 7.3 属性动画
- 7.3.1 使用属性动画
- 7.3.2 理解插值器和估值器 /
- 7.3.3 属性动画的监听器
- 7.3.4 对任意属性做动画
- 7.3.5 属性动画的工作原理
- 7.4 使用动画的注意事项
- 第8章 理解Window和WindowManager
- 8.1 Window和WindowManager
- 8.2 Window的内部机制
- 8.2.1 Window的添加过程
- 8.2.2 Window的删除过程
- 8.2.3 Window的更新过程
- 8.3 Window的创建过程
- 8.3.1 Activity的Window创建过程
- 8.3.2 Dialog的Window创建过程
- 8.3.3 Toast的Window创建过程
- 第9章 四大组件的工作过程
- 9.1 四大组件的运行状态
- 9.2 Activity的工作过程
- 9.3 Service的工作过程
- 9.3.1 Service的启动过程
- 9.3.2 Service的绑定过程
- 9.4 BroadcastReceiver的工作过程
- 9.4.1 广播的注册过程
- 9.4.2 广播的发送和接收过程
- 9.5 ContentProvider的工作过程
- 第10章 Android的消息机制
- 10.1 Android的消息机制概述
- 10.2 Android的消息机制分析
- 10.2.1 ThreadLocal的工作原理
- 10.2.2 消息队列的工作原理
- 10.2.3 Looper的工作原理
- 10.2.4 Handler的工作原理
- 10.3 主线程的消息循环
- 第11章 Android的线程和线程池
- 11.1 主线程和子线程
- 11.2 Android中的线程形态
- 11.2.1 AsyncTask
- 11.2.2 AsyncTask的工作原理
- 11.2.3 HandlerThread
- 11.2.4 IntentService
- 11.3 Android中的线程池
- 11.3.1 ThreadPoolExecutor
- 11.3.2 线程池的分类
- 第12章 Bitmap的加载和Cache
- 12.1 Bitmap的高效加载
- 12.2 Android中的缓存策略
- 12.2.1 LruCache
- 12.2.2 DiskLruCache
- 12.2.3 ImageLoader的实现446
- 12.3 ImageLoader的使用
- 12.3.1 照片墙效果
- 12.3.2 优化列表的卡顿现象
- 第13章 综合技术
- 13.1 使用CrashHandler来获取应用的crash信息
- 13.2 使用multidex来解决方法数越界
- 13.3 Android的动态加载技术
- 13.4 反编译初步
- 13.4.1 使用dex2jar和jd-gui反编译apk
- 13.4.2 使用apktool对apk进行二次打包
- 第14章 JNI和NDK编程
- 14.1 JNI的开发流程
- 14.2 NDK的开发流程
- 14.3 JNI的数据类型和类型签名
- 14.4 JNI调用Java方法的流程
- 第15章 Android性能优化
- 15.1 Android的性能优化方法
- 15.1.1 布局优化
- 15.1.2 绘制优化
- 15.1.3 内存泄露优化
- 15.1.4 响应速度优化和ANR日志分析
- 15.1.5 ListView和Bitmap优化
- 15.1.6 线程优化
- 15.1.7 一些性能优化建议
- 15.2 内存泄露分析之MAT工具
- 15.3 提高程序的可维护性