
[TOC]
# **pygame.draw**
Pygame 中绘制图形的模块。
## **函数**
* pygame.draw.rect() — 绘制矩形
* pygame.draw.polygon() — 绘制多边形
* pygame.draw.circle() — 根据圆心和半径绘制圆形
* pygame.draw.ellipse() — 根据限定矩形绘制一个椭圆形
* pygame.draw.arc() — 绘制弧线
* pygame.draw.line() — 绘制线段
* pygame.draw.lines() — 绘制多条连续的线段
* pygame.draw.aaline() — 绘制抗锯齿的线段
* pygame.draw.aalines() — 绘制多条连续的线段(抗锯齿)
该模块用于在 Surface 对象上绘制一些简单的形状。这些函数将渲染到任何格式的 Surface 对象上。硬件渲染会比普通的软件渲染更耗时。
大部分函数用 width 参数指定图形边框的大小,如果 width = 0 则表示填充整个图形。
所有的绘图函数仅能在 Surface 对象的剪切区域生效。这些函数返回一个 Rect,表示包含实际绘制图形的矩形区域。
大部分函数都有一个 color 参数,传入一个表示 RGB 颜色值的三元组,当然也支持 RGBA 四元组。其中的 A 是 Alpha 的意思,用于控制透明度。不过该模块的函数并不会绘制透明度,而是直接传入到对应 Surface 对象的 pixel alphas 中。color 参数也可以是已经映射到 Surface 对象的像素格式中的整型像素值。
当这些函数在绘制时,必须暂时锁定 Surface 对象。许多连续绘制的函数可以通过一次性锁定直到画完再解锁来提高效率。
## **函数详解**
### **pygame.draw.rect()**
绘制矩形。
rect(Surface, color, Rect, width=0) -> Rect
在 Surface 对象上绘制一个矩形。Rect 参数指定矩形的位置和尺寸。width 参数指定边框的宽度,如果设置为 0 则表示填充该矩形。
### **pygame.draw.polygon()**
绘制多边形。
### **polygon(Surface, color, pointlist, width=0) -> Rect**
在 Surface 对象上绘制一个多边形。pointlist 参数指定多边形的各个顶点。width 参数指定边框的宽度,如果设置为 0 则表示填充该矩形。
绘制一个抗锯齿的多边形,只需要将 aalines() 的 closed 参数设置为 True 即可。
### **pygame.draw.circle()**
根据圆心和半径绘制圆形。
circle(Surface, color, pos, radius, width=0) -> Rect
在 Surface 对象上绘制一个圆形。pos 参数指定圆心的位置,radius 参数指定圆的半径。width 参数指定边框的宽度,如果设置为 0 则表示填充该矩形。
### **pygame.draw.ellipse()**
根据限定矩形绘制一个椭圆形。
ellipse(Surface, color, Rect, width=0) -> Rect
在 Surface 对象上绘制一个椭圆形。Rect 参数指定椭圆外围的限定矩形。width 参数指定边框的宽度,如果设置为 0 则表示填充该矩形。
### **pygame.draw.arc()**
绘制弧线。
arc(Surface, color, Rect, start\_angle, stop\_angle, width=1) -> Rect
在 Surface 对象上绘制一条弧线。Rect 参数指定弧线所在的椭圆外围的限定矩形。两个 angle 参数指定弧线的开始和结束位置。width 参数指定边框的宽度。
### **pygame.draw.line()**
绘制线段。
line(Surface, color, start\_pos, end\_pos, width=1) -> Rect
在 Surface 对象上绘制一条线段。两端以方形结束。
### **pygame.draw.lines()**
绘制多条连续的线段。
lines(Surface, color, closed, pointlist, width=1) -> Rect
在 Surface 对象上绘制一系列连续的线段。pointlist 参数是一系列短点。如果 closed 参数设置为 True,则绘制首尾相连。
### **pygame.draw.aaline()**
绘制抗锯齿的线段。
aaline(Surface, color, startpos, endpos, blend=1) -> Rect
在 Surface 对象上绘制一条抗锯齿的线段。blend 参数指定是否通过绘制混合背景的阴影来实现抗锯齿功能。该函数的结束位置允许使用浮点数。
### **pygame.draw.aalines()**
绘制多条连续的线段(抗锯齿)。
aalines(Surface, color, closed, pointlist, blend=1) -> Rect
在 Surface 对象上绘制一系列连续的线段(抗锯齿)。如果 closed 参数为 True,则首尾相连。blend 参数指定是否通过绘制混合背景的阴影来实现抗锯齿功能。该函数的结束位置允许使用浮点数。
下边是部分例子,仅供参考:
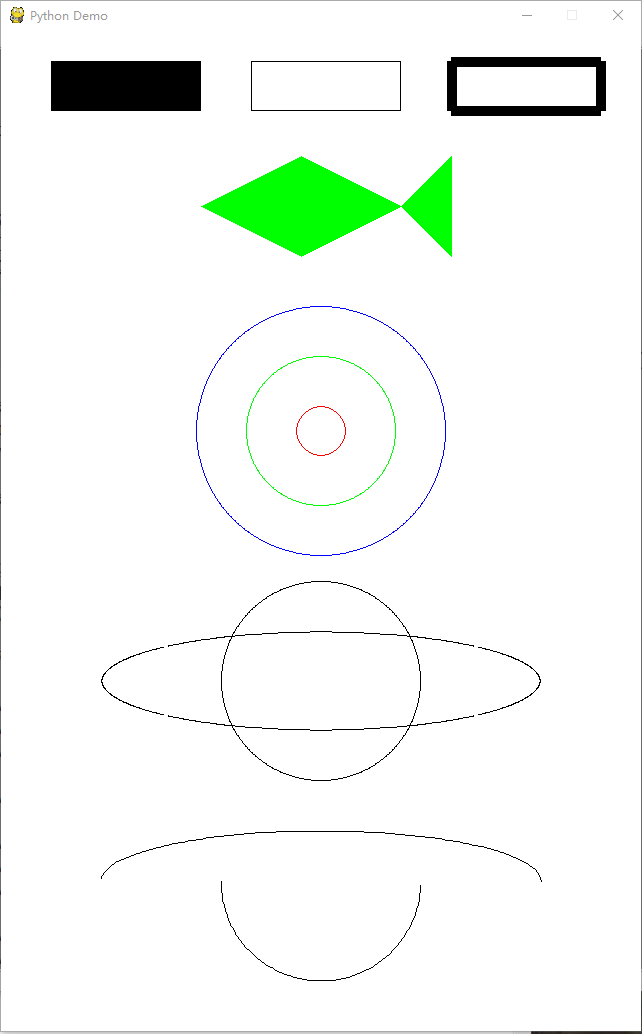
代码如下:
```
import pygame
import sys
import math
from pygame.locals import *
pygame.init()
WHITE = (255, 255, 255)
BLACK = (0, 0, 0)
GREEN = (0, 255, 0)
RED = (255, 0, 0)
BLUE = (0, 0, 255)
points = [(200, 175), (300, 125), (400, 175), (450, 125), (450, 225), (400, 175), (300, 225)]
size = width, height = 640, 1000
screen = pygame.display.set_mode(size)
pygame.display.set_caption("Python Demo")
clock = pygame.time.Clock()
while True:
for event in pygame.event.get():
if event.type == QUIT:
sys.exit()
screen.fill(WHITE)
pygame.draw.rect(screen, BLACK, (50, 30, 150, 50), 0)
pygame.draw.rect(screen, BLACK, (250, 30, 150, 50), 1)
pygame.draw.rect(screen, BLACK, (450, 30, 150, 50), 10)
pygame.draw.polygon(screen, GREEN, points, 0)
pygame.draw.circle(screen, RED, (320, 400), 25, 1)
pygame.draw.circle(screen, GREEN, (320, 400), 75, 1)
pygame.draw.circle(screen, BLUE, (320, 400), 125, 1)
pygame.draw.ellipse(screen, BLACK, (100, 600, 440, 100), 1)
pygame.draw.ellipse(screen, BLACK, (220, 550, 200, 200), 1)
pygame.draw.arc(screen, BLACK, (100, 800, 440, 100), 0, math.pi, 1)
pygame.draw.arc(screen, BLACK, (220, 750, 200, 200), math.pi, math.pi * 2, 1)
pygame.display.flip()
clock.tick(10)
```
- 一、Python基础
- 1. 序言
- 1.1 Python简介
- 1.2 安装和使用IDE
- 1.3 语言特性和基础概念
- 2. 基本数据类型
- 2.2 字符串型
- 2.2.2 ASCII简介
- 2.2.4 字符串常用函数
- 3. 条件分支
- 3.3 闲聊条件判断和运算符优先级
- 10.正则表达式
- 【降龙十八章】Python小技巧
- 18.1 学习网址
- 18.2 PIP切换源
- 18.3 使用whl来安装
- 【工具优化】IDE优化技巧
- Anaconda
- Jupyter Notebook 的 Markdown 添加大纲
- Jupyter Notebook中图片缩放和居左
- Anaconda设置环境变量
- Pycharm
- PyCharm新建文档配置
- 设置字体和字号
- 设置主题和字体配色
- 保存和导入配置
- 设置对选择内容自动添加引号
- 推荐安装的插件
- Markdown
- 表格格式
- 二、Python进阶
- copy和deepcopy
- 《零基础入门学习 Python 》【小甲鱼版】
- 001.和Python的第一次接触+习题复习
- 002.用Python设计的第一个游戏 +习题复习
- Pygame详解
- Pygame详解:前言
- Pygame详解(一):Color类
- Pygame详解(二):display 模块
- Pygame详解(三):draw 模块
- Pygame详解(四):event 模块
- Pygame详解(五):font 模块
- Pygame详解(六):image 模块
- Pygame详解(七):key 模块
- Pygame详解(八):locals 模块
- Pygame详解(九):mixer 模块
- Pygame详解(十):mouse 模块
- Pygame详解(十一):Rect 对象
- Pygame详解(十二):Surface 对象
- Pygame详解(十三):time 模块
- Pygame详解(十四):music 模块
- Pygame详解(十五):pygame 模块
- Pygame详解(十六):cursors 模块
- Pygame详解(十七):joystick 模块
- Pygame详解(十八):mask 模块
- Pygame详解(二十一):BufferProxy 对象
- Pygame详解(二十三):gfxdraw 模块
- Pygame详解(二十五):Overlay 对象
- Pygame详解(二十八):sndarray 模块
- Pygame详解(三十一):camera 模块
- Pygame详解(三十二):cdrom 模块
- Pygame详解(三十六):version 模块
- pygame rect相关知识
- Tkinter详解
- Tkinter 组件详解(一):Label
- Tkinter 组件详解(二):Button