
[TOC]
# ConfigMap
ConfigMap 和 Secrets 类似,但是 ConfigMap 不包含敏感信息, 可以理解为 linux 系统中的`/etc/`,专门用来存储配置文件的目录。
ConfigMaps可以被用来:
* 设置环境变量的值
* 在容器里设置命令行参数
* 在数据卷里面创建config文件
## ConfigMap的更新
* 通过`env`方式使用的`ConfigMap`:
当`ConfigMap`更新之后,Pod不会自动更新,因为环境变量是在Pod创建的时候就被注入到了容器内,所以ConfigMap更新后,容器内的env是不会自动更新
* 通过`volume`方式使用`Configmap`:
数据需要一段时间(20秒左右)才能同步更新。
### 强制更新ConfigMap
更新ConfigMap后,如果没有触发Pod的更新,可以通过修改`pod annotations`的方式强制触发滚动更新。 (其实就是手动 patch 一次,触发Pod的强制更新)
~~~
$ kubectl patch deployment my-nginx --patch '{"spec": {"template": {"metadata": {"annotations": {"version/config": "20180411" }}}}}'
~~~
通过`help`命令,查看`ConfigMap`的使用提示:
~~~
kubectl create configmap -h
# 通过 bar 文件夹创建一个 ConfigMap 的映射,文件名为 key ,文件内容为 value
$ kubectl create configmap my-config --from-file=path/to/bar
# 使用指定的 /bar/file1.txt 和 /path/to/bar/file2.txt 文件映射ConfigMap
$ kubectl create configmap my-config --from-file=key1=/path/to/bar/file1.txt --from-file=key2=/path/to/bar/file2.txt
# 通过直接赋值的方式 key1=config1 和 key2=config2 创建 ConfigMap
$ kubectl create configmap my-config --from-literal=key1=config1 --from-literal=key2=config2
# 通过环境变量文件创建 ConfigMap
$ kubectl create configmap my-config --from-env-file=path/to/bar.env
~~~
## 示例
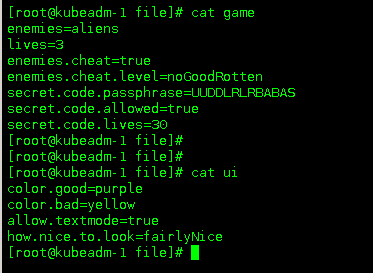
### 创建测试用的目录数据
在`file/`目录下创建 game 和 ui 两个文件
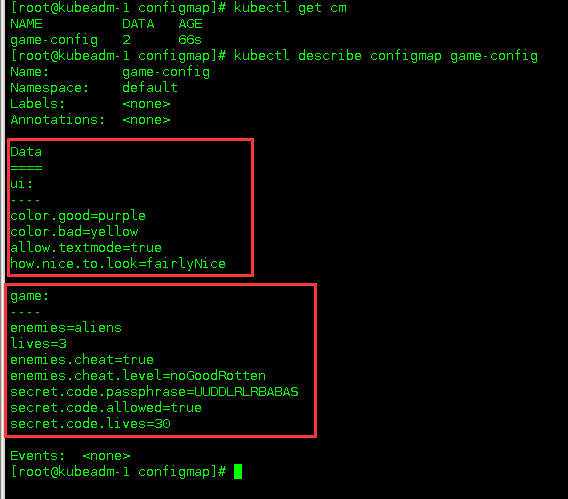
### 使用文件夹创建ConfigMap
~~~
$ kubectl create configmap game-config --from-file=file/
~~~

##### 检验
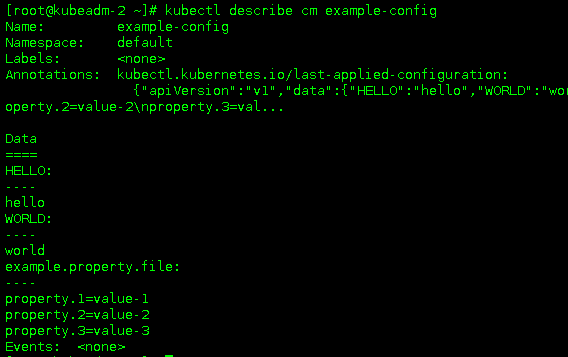
### 环境变量方式
~~~
kind: ConfigMap
apiVersion: v1
metadata:
creationTimestamp: 2016-02-18T19:14:38Z
name: example-config
namespace: default
data:
example.property.1: hello
example.property.2: world
example.property.file: |-
property.1=value-1
property.2=value-2
property.3=value-3
~~~
##### 检验
### 直接赋值创建ConfigMap
使用直接赋值创建ConfigMap,利用`—from-literal`参数传递配置信息,该参数可以使用多次,格式如下;
~~~
$ kubectl create configmap special-config --from-literal=special.how=very --from-literal=special.type=charm
~~~
##### 验证
## Pod中使用ConfigMap
### 通过环境变量方式运用
~~~
apiVersion: v1
kind: Pod
metadata:
name: dapi-test-pod
spec:
containers:
- name: configmap
image: registry.cn-shenzhen.aliyuncs.com/zwh-kubea/http:v1
env:
- name: GAME
valueFrom:
configMapKeyRef:
name: game-config
key: game
- name: UI
valueFrom:
configMapKeyRef:
name: game-config
key: ui
envFrom:
- configMapRef:
name: example-config
~~~
##### 验证

> 像这里,其中的变量名都是小写,在linux系统里面都没有办法 echo 出来,所以在写configmap的时候,尽量key都用大写

### 命令行参数方式使用
(这个示例是抄过来的,其实也是一种环境变量的使用方式)
~~~
apiVersion: v1
kind: Pod
metadata:
name: dapi-test-pod
spec:
containers:
- name: test-container
image: gcr.io/google_containers/busybox
command: [ "/bin/sh", "-c", "echo $(SPECIAL_LEVEL_KEY) $(SPECIAL_TYPE_KEY)" ]
env:
- name: SPECIAL_LEVEL_KEY
valueFrom:
configMapKeyRef:
name: special-config
key: special.how
- name: SPECIAL_TYPE_KEY
valueFrom:
configMapKeyRef:
name: special-config
key: special.type
restartPolicy: Never
~~~
运行这个Pod后会输出:
~~~
very charm
~~~
### 通过数据卷插件使用ConfigMap
依旧还是使用这个ConfigMap
ConfigMap :
~~~
apiVersion: v1
kind: ConfigMap
metadata:
name: special-config
namespace: default
data:
special.how: very
special.type: charm
~~~
Pod:
> 通过`volumes`挂载`ConfigMap`,将`special-config`通过卷的方式,挂载到`/etc/config`目录下,`key`为文件名,`vlaue`为文件内容
~~~
apiVersion: v1
kind: Pod
metadata:
name: dapi-test-pod
spec:
containers:
- name: test-container
image: gcr.io/google_containers/busybox
command: [ "/bin/sh", "-c", "cat /etc/config/special.how" ]
volumeMounts:
- name: config-volume
mountPath: /etc/config
volumes:
- name: config-volume
configMap:
name: special-config
~~~
运行这个Pod的输出是`very`。
也可以在`ConfigMap`被数据卷映射时,自定义映射路径。
> 这里自定义映射的路径为`/etc/config/path/to/special-key`
~~~
apiVersion: v1
kind: Pod
metadata:
name: dapi-test-pod
spec:
containers:
- name: test-container
image: gcr.io/google_containers/busybox
command: [ "/bin/sh","-c","cat /etc/config/path/to/special-key" ]
volumeMounts:
- name: config-volume
mountPath: /etc/config
volumes:
- name: config-volume
configMap:
name: special-config
items:
- key: special.how
path: path/to/special-key
~~~
运行这个Pod后的结果是`very`。
- 一、K8S的安装
- 1.1 安装环境
- 1.2 问题汇总
- 1.3 事前准备
- 1.4 安装配置负载均衡
- 1.5 安装K8S软件
- 1.6 初始化kubeadm
- 1.7 添加控制节点
- 1.8 添加计算节点
- 1.9 安装故障问题处理
- 1.10 安装管理dashboard
- 1.11 编写测试Pod
- 1.12 从外部访问集群中的Pod
- 1.13 部署metrics-server指标采集
- 二、Pod管理
- 2.1 Pod 资源需求和限制
- 2.2 Init 容器
- 2.3 Pod 健康检查(探针)和重启策略
- 2.4 Pod 生命周期(钩子Hook)
- 2.5 静态Pod
- 2.6 初始化容器(init container)
- 2.7 资源限制
- 三、资源控制器
- 3.1 Deployment
- 3.2 StatefulSet
- 3.3 DaemonSet
- 3.4 Job
- 3.5 定时任务
- 3.6 准入控制器
- 3.7 自动伸缩
- 3.8 ReplicaSet
- 四、存储
- 4.1 Secret 管理敏感信息
- 4.2 ConfigMap 存储配置
- 4.3 Volume
- 4.4 PV
- 4.5 PVC
- 4.6 StorageClass
- 4.7 暴露宿主机信息给Pod
- 五、服务Service
- 5.1 Service 资源
- 5.2 服务发现
- 5.3 服务暴露
- 5.4 Ingress 资源
- 5.5 Ingress 专题
- 5.6 traefik 2.X版本使用
- 六、认证、授权、准入控制
- 6.1 服务账户
- 6.2 LimitRange资源与准入控制器
- 6.3 ResourceQuota 资源与准入控制器
- 七、Helm
- 7.1 Helm 安装
- 八、 istio
- 8.1 istio 介绍
- 8.2 iotis 安装
- 九、calico
- 9.1 两种网络模式
- 9.2 全互联模式 与 路由反射模式
- 9.3 BGP跨网段(大型网络)
- 十、Ingress
- 10.1 安装 LoadBalancer
- 10.2 部署 ingress-nginx
- 10.3 Ingress-nginx 的使用
- 10.4 开启TCP和UDP
- 使用中的问题
- CSI Node问题