spring中的拦截器与前面学习过的过滤器大同小异。它们都可以在数据被转发到控制器前获取数据。不同的是过滤器的功能是改变得到的数据从而完成一定的功能,而拦截器的功能体现在监视数据上,一旦发被被监视的数据不合规,拦截器可以直接终止数据的转发并自定义返回的数据格式。在spring中,过滤器与拦截器都是支持多个的。在配置了多个过滤器与拦截器的项目中,数据首先依次通过过滤器,然后在依次通过拦截器。
>[info] 某些功能即可以使用拦截器来实现又可以使用过滤器来实现,这并没有一定的界线。比如对将前台的请求依次写入日志,无论是拦截器还是过滤器都能够满足功能需求。但往往在对数据进行变更时使用过滤器,在对数据进行监视时使用拦截器。
# 初始化
拦截器的使用方法与过滤器基本一致。新建过滤器时直接继承了HttpFilter,新建拦截器时直接继承HandlerInterceptorAdapter就好。
interceptor/AuthInterceptor.java
```java
package com.mengyunzhi.springbootstudy.interceptor;
import org.springframework.web.servlet.handler.HandlerInterceptorAdapter;
/**
* 认证拦截器
* @author panjie
*/
public class AuthInterceptor extends HandlerInterceptorAdapter {
}
```
Spring的拦截器提供了4种方法,4种方法执行在各个阶段。比较常用的是preHandle方法及postHandler方法,它们一个运行在控制器被执行前,另一个运行在控制器被执行后。
interceptor/AuthInterceptor.java
```java
@Component ➊
public class AuthInterceptor extends HandlerInterceptorAdapter {
private static final Logger logger = LoggerFactory.getLogger(AuthInterceptor.class);
@Override
public boolean preHandle(HttpServletRequest request, HttpServletResponse response, Object handler)
throws Exception {
logger.info("执行拦截器preHandle");
return true;
}
@Override
public void postHandle(HttpServletRequest request, HttpServletResponse response, Object handler,
@Nullable ModelAndView modelAndView) throws Exception {
logger.info("执行拦截器postHandle");
}
}
```
* ➊ 使用Component进行注解,以便在项目中可以使用@Autowired注入
## 添加拦截器
与添加过滤器的方法有所不同,添加拦截器的方法稍微的复杂一些。使拦截器生效的方法是打开`config/WebConfig.java`去覆写`addInterceptors`方法:
config/WebConfig.java
```java
public class WebConfig implements WebMvcConfigurer {
@Autowired
AuthInterceptor authInterceptor; ➊
@Override
public void addInterceptors(InterceptorRegistry registry) {
registry.addInterceptor(this.authInterceptor➋);
}
```
* ➊ 由于AuthInterceptor使用了@Component,所以此时可以使用@Autowired进行注入。
* ➋ 将自定义的拦截器使用registry.addInterceptor方法添加到系统中,spring启动的过程中会自动的执行该方法以完成向项目中添加拦截器的目标。
## 测试
启动后台并尝试访问/Teacher/me接口,得到日志如下:
```
2020-02-19 17:38:42.926 INFO 27620 --- [nio-8080-exec-1] c.m.springbootstudy.filter.TokenFilter : 获取到的token为8f03f582-4284-4b4e-85f2-258f30f016c0 ➊
2020-02-19 17:38:42.926 INFO 27620 --- [nio-8080-exec-1] c.m.springbootstudy.filter.TokenFilter : 原token无效,发布的新的token为8e79419b-f632-4e4a-966b-6353f5647458 ➊
2020-02-19 17:38:42.929 INFO 27620 --- [nio-8080-exec-1] c.m.springbootstudy.filter.TokenFilter : 在控制器被调用以前执行 ➊
2020-02-19 17:38:42.933 DEBUG 27620 --- [nio-8080-exec-1] o.s.web.servlet.DispatcherServlet : GET "/Teacher/me", parameters={} ➋
2020-02-19 17:38:42.937 DEBUG 27620 --- [nio-8080-exec-1] s.w.s.m.m.a.RequestMappingHandlerMapping : Mapped to public com.mengyunzhi.springbootstudy.entity.Teacher com.mengyunzhi.springbootstudy.controller.TeacherController.me() ➋
2020-02-19 17:38:42.938 INFO 27620 --- [nio-8080-exec-1] c.m.s.interceptor.AuthInterceptor : 执行拦截器preHandle ➌
2020-02-19 17:38:42.991 DEBUG 27620 --- [nio-8080-exec-1] m.m.a.RequestResponseBodyMethodProcessor : Using 'application/json', given [*/*] and supported [application/json, application/*+json] ➍
2020-02-19 17:38:42.992 DEBUG 27620 --- [nio-8080-exec-1] m.m.a.RequestResponseBodyMethodProcessor : Nothing to write: null body ➍
2020-02-19 17:38:42.992 INFO 27620 --- [nio-8080-exec-1] c.m.s.interceptor.AuthInterceptor : 执行拦截器postHandle ➎
2020-02-19 17:38:42.992 DEBUG 27620 --- [nio-8080-exec-1] o.s.web.servlet.DispatcherServlet : Completed 200 OK ➏
2020-02-19 17:38:42.994 INFO 27620 --- [nio-8080-exec-1] c.m.springbootstudy.filter.TokenFilter : 在控制器被调用以后执行 ➐
```
* ➊ 执行过滤器的前置部分
* ➋ 执行spring内部路由
* ➌ 执行拦截器的preHandle方法
* ➍ spring处理控制器的返回值
* ➎ 执行拦截器的postHandle
* ➏ 完成响应,此后对响应的变更已经于事无补
* ➐ 执行过滤器的后置部分
所以大胆的猜测带有多拦截器与过滤器的spring项目大概长这个样子:
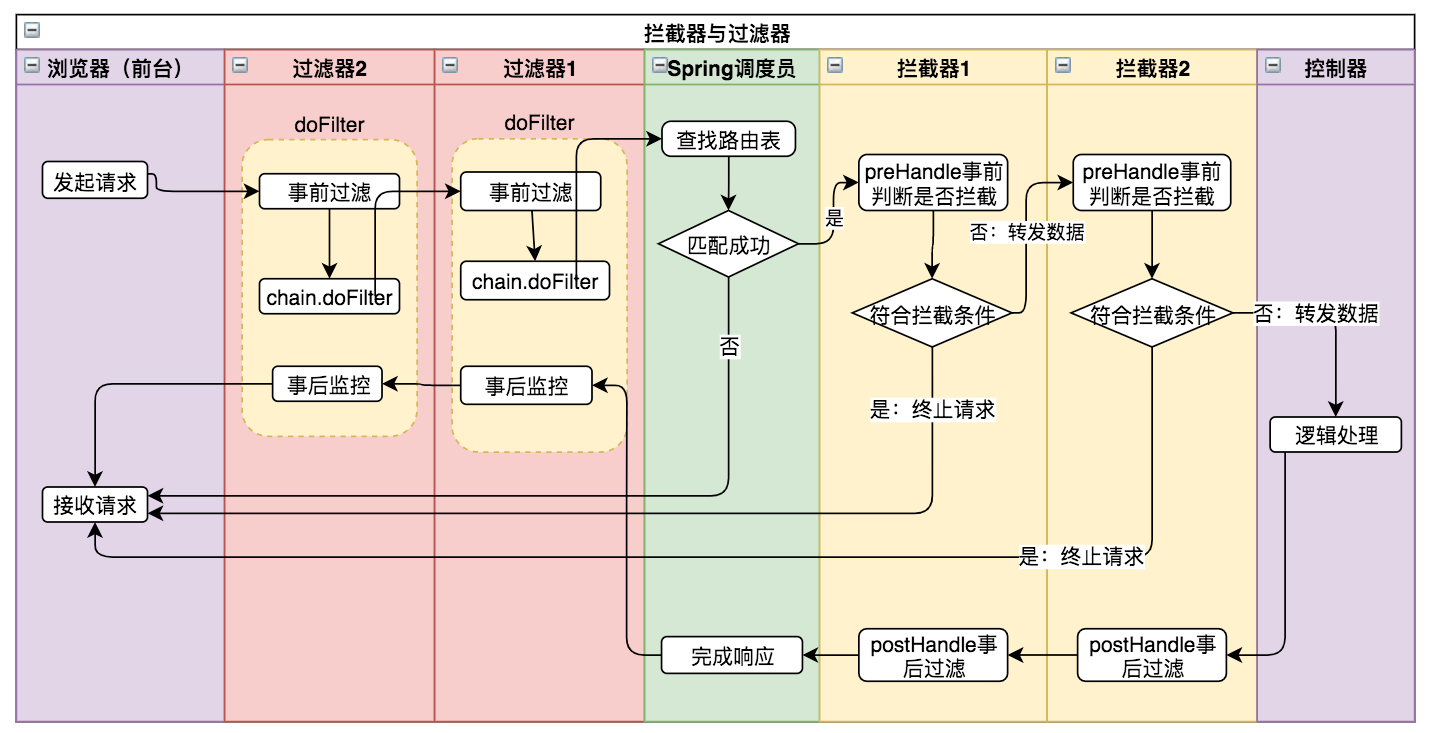
>[info] 此图也解释了在学习过滤器小节时遇到的于chain.doFilter之后改变reponse的值未生效的问题。
# 拦截请求
实现对用户进行认证的功能适用于preHandle方法。
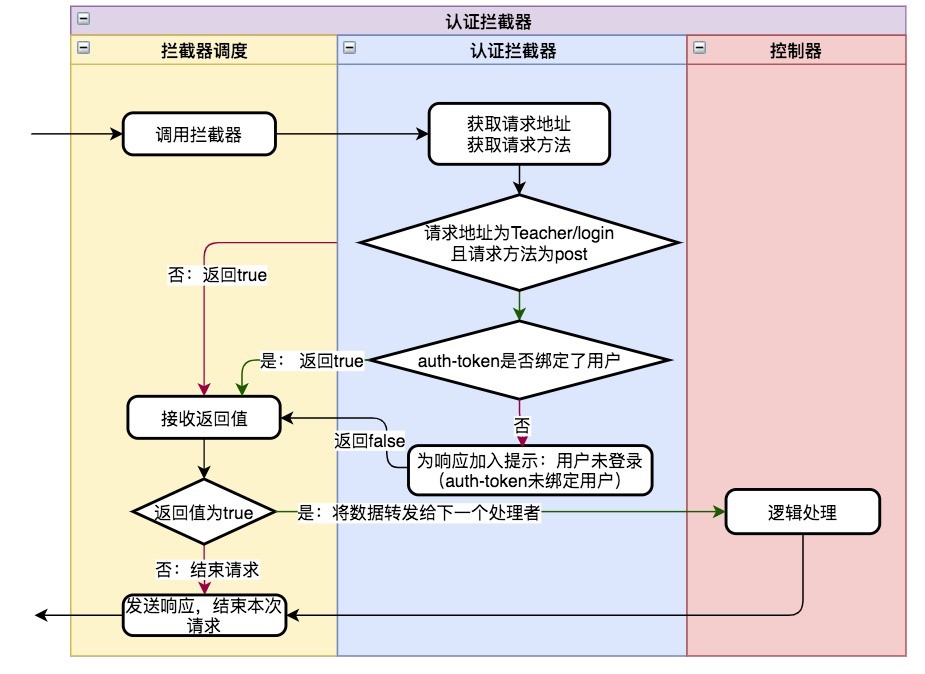
如图所示:在preHandle方法中判断用户的每次请求是否是被允许,如果允许则不拦截,如果不允许则进行拦截。
interceptor/AuthInterceptor.java
```java
@Override
public boolean preHandle(HttpServletRequest request, HttpServletResponse response, Object handler)
throws Exception {
// 获取请求地址及请求方法
// 判断请求地址、方法是否与用户登录相同
// auth-token是否绑定了用户
// 为响应加入提示:用户未登录
return true;
}
```
## 获取请求地址及方法
获取请求地址调用HttpServletRequest的getRequestURI方法,获取请求方法调用HttpServletRequest的getMethod方法。
interceptor/AuthInterceptor.java
```java
public boolean preHandle(HttpServletRequest request, HttpServletResponse response, Object handler)
throws Exception {
// 获取请求地址及请求方法
String url = request.getRequestURI();
String method = request.getMethod();
// 判断请求地址、方法是否与用户登录相同
if ("/Teacher/login".equals(url) && "POST".equals(method)) {
return true;
}
```
## 判断用户是否登录
在TeacherServiceImpl的me方法中已经处理过用户是否登录的逻辑:即判断`TeacherServiceImpl`中的`authTokenTeacherIdHashMap`中是否存在以`authToken`为`key`的`teacherId`。如果存在则说此`authToken`已经与相应的`teacherId`进行绑定,从而得出携带有`authToken`的请求是经过用户认证的。`authTokenTeacherIdHashMap`做为私有属性存在于基于`TeacherServiceImpl`类实现的对象中:
service/TeacherServiceImpl.java
```java
public class TeacherServiceImpl implements TeacherService {
...
private HashMap<String, Long> authTokenTeacherIdHashMap = new HashMap<>();
}
```
实现读取该authTokenTeacherIdHashMap的方法不止一种。
第一种方法:使用`public static`将`authTokenTeacherIdHashMap`声明为静态公有属性,从而使其由对方的属性上升到类的属性。此后便可以在其它的方法中调用:`TeacherServiceImpl.authTokenTeacherIdHashMap.get(authToken)`来判断某个`authToken`是否绑定了`teacherId`。但此方法违背了面向接口编程的思想。如果在拦截器中直接使用`TeacherServiceImpl`,则拦截器直接对`TeacherServiceImpl`这个实现类产生依赖,而非`TeacherService`接口。
第二种方法:在TeacherService中建立`boolean isLogin(String authToken);`方法,然后在实现类`TeacherServiceImpl`中实现这个方法。最后在拦截器中注入`TeacherService`。这与教程中的其它实现保持了统一。同时由于拦截器中声明的依赖为`TeacherService`,从而符合了面向接口开发的思想。
>[info] 面向接口开发是一种思想,一种编程的规范。在此不必在意为什么要这么做,以及实际是怎么做的。简简单单有个了解就好。
service/TeacherService.java
```java
/**
* 判断用户是否登录
* @param authToken 认证令牌
* @return
*/
boolean isLogin(String authToken);
```
service/TeacherServiceImpl.java
```java
@Override
public boolean isLogin(String authToken) {
// 获取authToken映射的teacherId
Long teacherId = this.authTokenTeacherIdHashMap.get(authToken);
return teacherId != null;
}
```
在拦截器中注入相应的TeacherService服务并调isLogin方法完成用户是否登录的校验。
interceptor/AuthInterceptor.java
```java
private TeacherService teacherService;
@Autowired
public AuthInterceptor(TeacherService teacherService) {
this.teacherService = teacherService;
}
...
// 判断请求地址、方法是否与用户登录相同
if ("/Teacher/login".equals(url) && "POST".equals(method)) {
return true;
}
// auth-token是否绑定了用户
String authToken = request.getHeader(TokenFilter.TOKEN_KEY);
if (this.teacherService.isLogin(authToken)) {
return true;
}
```
## 在响应中加入提示:用户未登录
用户未登录的提醒通常使用设置http状态码的方法来通知请求者。前面已经接触了几个常见的状态码,比如查询信息成功时对应的状态码为200;创建数据成功时返回的状态为201;更新或删除数据成功时对应的状态为204;请求的映射未找到的时对应的状态码为404;请求映射找到了但请求方法不匹配时对应的状态码为405;在进行参数绑定发生错误时对应的状态码为400。用户未登录时应向请求者发送401状态码。
interceptor/AuthInterceptor.java
```java
// auth-token是否绑定了用户
String authToken = request.getHeader(TokenFilter.TOKEN_KEY);
if (this.teacherService.isLogin(authToken)) {
return true;
}
// 为响应加入提示:用户未登录
response.setStatus(401); ➊
return false; ➋
}
```
* ➊ 返回状态码401,表示当前请求只对认证用户开放。但当前接收到的authToken未找到对应的认证用户。
* ➋ 返回false,程序至此中断不再向下进行转发,将设置了状态码的response发送给请求者。
# 测试
在使用http request进行测试中,加入以下日志信息以更好的观察者其它过程:
interceptor/AuthInterceptor.java
```java
public boolean preHandle(HttpServletRequest request, HttpServletResponse response, Object handler)
throws Exception {
// 获取请求地址及请求方法
String url = request.getRequestURI();
String method = request.getMethod();
System.out.println(("请求的地址为" + url + "请求的方法为:" + method);
// 判断请求地址、方法是否与用户登录相同
if ("/Teacher/login".equals(url) && "POST".equals(method)) {
System.out.println(("请求地址方法匹配到登录地址,不拦截");
return true;
}
// auth-token是否绑定了用户
String authToken = request.getHeader(TokenFilter.TOKEN_KEY);
if (this.teacherService.isLogin(authToken)) {
System.out.println(("当前token已绑定登录用户,不拦截");
return true;
}
System.out.println(("当前token未绑定登录用户,返回401");
// 为响应加入提示:用户未登录
response.setStatus(401);
return false;
}
```
controller/TeacherController.java
```java
@GetMapping("me")
public Teacher me() {
System.out.println("用户成功的请求了me方法");
return this.teacherService.me();
}
```
## 未登录请求ME
未登录请求非login方法时,应该返回401.
```
GET http://localhost:8080/Teacher/me
HTTP/1.1 401
auth-token: 832787ed-597e-4f35-8702-562e7a83bf68
Content-Length: 0
Date: Thu, 20 Feb 2020 03:07:29 GMT
<Response body is empty>
Response code: 401➊; Time: 122ms; Content length: 0 bytes
```
* ➊ 状态码为401,说明拦截成功
日志信息如下:
```
请求的地址为/Teacher/me请求的方法为:GET
当前token未绑定登录用户,返回401
```
未触发TeacherController中的me方法,近一步说明拦截成功。
## 用户登录
有效用户登录
```
POST http://localhost:8080/Teacher/login
Content-type: application/json;
{"username": "zhaokaiqiang", "password":"yunzhi"}
```
响应:
```
POST http://localhost:8080/Teacher/login
HTTP/1.1 200
auth-token: d3bf3d7f-0663-4258-9c82-025073602181 ★
Content-Type: application/json;charset=UTF-8
Transfer-Encoding: chunked
Date: Thu, 20 Feb 2020 03:15:25 GMT
true ➊
Response code: 200➋; Time: 29ms; Content length: 4 bytes
```
* ➊ 返回了true,说明正常执行了login方法。拦截器未拦截
* ➋ 返回状态码200
* ★ 记录该成功认证的token,备用
日志信息进一步说明拦截工作成功
```
请求的地址为/Teacher/login请求的方法为:POST
请求地址方法匹配到登录地址,不拦截
```
无效用户登录
```
POST http://localhost:8080/Teacher/login
Content-type: application/json;
{"username": "test", "password":"yunzhi"}
```
响应信息:
```
POST http://localhost:8080/Teacher/login
HTTP/1.1 200
auth-token: 819943cb-b34a-4bfa-bf74-1ca18c95585c
Content-Type: application/json;charset=UTF-8
Transfer-Encoding: chunked
Date: Thu, 20 Feb 2020 03:18:43 GMT
false
Response code: 200; Time: 19ms; Content length: 5 bytes
```
## 使用成功登录的authToken访问me
使用登录成功后台返回的authToken★加入header信息。
```
GET http://localhost:8080/Teacher/me
auth-token: d3bf3d7f-0663-4258-9c82-025073602181
```
响应信息:
```
GET http://localhost:8080/Teacher/me
HTTP/1.1 200
auth-token: d3bf3d7f-0663-4258-9c82-025073602181
Content-Type: application/json;charset=UTF-8
Transfer-Encoding: chunked
Date: Thu, 20 Feb 2020 03:22:08 GMT
{
"id": 1,
"name": null,
"sex": true,
"username": "zhaokaiqiang",
"email": null,
"createTime": null,
"updateTime": null,
"password": "yunzhi"
}
Response code: 200; Time: 193ms; Content length: 126 bytes
```
使用已认证的authToken访问后台,成功的访问了me方法并返回了正常信息。日志如下:
```
请求的地址为/Teacher/me请求的方法为:GET
当前token已绑定登录用户,不拦截
用户成功的请求了me方法
```
近一步得到了验证。
至此,有一个拥有认证功能的拦截器便成功的被完成了。
# 参考文档
| 名称 | 链接 | 预计学习时长(分) |
| --- | --- | --- |
| 源码地址 | [https://github.com/mengyunzhi/spring-boot-and-angular-guild/releases/tag/step5.2.8](https://github.com/mengyunzhi/spring-boot-and-angular-guild/releases/tag/step5.2.8) | - |
| spring-mvc-handlerinterceptor | [https://www.baeldung.com/spring-mvc-handlerinterceptor](https://www.baeldung.com/spring-mvc-handlerinterceptor) | - |
| HttpServletRequest | [https://docs.oracle.com/javaee/6/api/javax/servlet/http/HttpServletRequest.html](https://docs.oracle.com/javaee/6/api/javax/servlet/http/HttpServletRequest.html) | - |
- 序言
- 第一章:Hello World
- 第一节:Angular准备工作
- 1 Node.js
- 2 npm
- 3 WebStorm
- 第二节:Hello Angular
- 第三节:Spring Boot准备工作
- 1 JDK
- 2 MAVEN
- 3 IDEA
- 第四节:Hello Spring Boot
- 1 Spring Initializr
- 2 Hello Spring Boot!
- 3 maven国内源配置
- 4 package与import
- 第五节:Hello Spring Boot + Angular
- 1 依赖注入【前】
- 2 HttpClient获取数据【前】
- 3 数据绑定【前】
- 4 回调函数【选学】
- 第二章 教师管理
- 第一节 数据库初始化
- 第二节 CRUD之R查数据
- 1 原型初始化【前】
- 2 连接数据库【后】
- 3 使用JDBC读取数据【后】
- 4 前后台对接
- 5 ng-if【前】
- 6 日期管道【前】
- 第三节 CRUD之C增数据
- 1 新建组件并映射路由【前】
- 2 模板驱动表单【前】
- 3 httpClient post请求【前】
- 4 保存数据【后】
- 5 组件间调用【前】
- 第四节 CRUD之U改数据
- 1 路由参数【前】
- 2 请求映射【后】
- 3 前后台对接【前】
- 4 更新数据【前】
- 5 更新某个教师【后】
- 6 路由器链接【前】
- 7 观察者模式【前】
- 第五节 CRUD之D删数据
- 1 绑定到用户输入事件【前】
- 2 删除某个教师【后】
- 第六节 代码重构
- 1 文件夹化【前】
- 2 优化交互体验【前】
- 3 相对与绝对地址【前】
- 第三章 班级管理
- 第一节 JPA初始化数据表
- 第二节 班级列表
- 1 新建模块【前】
- 2 初识单元测试【前】
- 3 初始化原型【前】
- 4 面向对象【前】
- 5 测试HTTP请求【前】
- 6 测试INPUT【前】
- 7 测试BUTTON【前】
- 8 @RequestParam【后】
- 9 Repository【后】
- 10 前后台对接【前】
- 第三节 新增班级
- 1 初始化【前】
- 2 响应式表单【前】
- 3 测试POST请求【前】
- 4 JPA插入数据【后】
- 5 单元测试【后】
- 6 惰性加载【前】
- 7 对接【前】
- 第四节 编辑班级
- 1 FormGroup【前】
- 2 x、[x]、{{x}}与(x)【前】
- 3 模拟路由服务【前】
- 4 测试间谍spy【前】
- 5 使用JPA更新数据【后】
- 6 分层开发【后】
- 7 前后台对接
- 8 深入imports【前】
- 9 深入exports【前】
- 第五节 选择教师组件
- 1 初始化【前】
- 2 动态数据绑定【前】
- 3 初识泛型
- 4 @Output()【前】
- 5 @Input()【前】
- 6 再识单元测试【前】
- 7 其它问题
- 第六节 删除班级
- 1 TDD【前】
- 2 TDD【后】
- 3 前后台对接
- 第四章 学生管理
- 第一节 引入Bootstrap【前】
- 第二节 NAV导航组件【前】
- 1 初始化
- 2 Bootstrap格式化
- 3 RouterLinkActive
- 第三节 footer组件【前】
- 第四节 欢迎界面【前】
- 第五节 新增学生
- 1 初始化【前】
- 2 选择班级组件【前】
- 3 复用选择组件【前】
- 4 完善功能【前】
- 5 MVC【前】
- 6 非NULL校验【后】
- 7 唯一性校验【后】
- 8 @PrePersist【后】
- 9 CM层开发【后】
- 10 集成测试
- 第六节 学生列表
- 1 分页【后】
- 2 HashMap与LinkedHashMap
- 3 初识综合查询【后】
- 4 综合查询进阶【后】
- 5 小试综合查询【后】
- 6 初始化【前】
- 7 M层【前】
- 8 单元测试与分页【前】
- 9 单选与多选【前】
- 10 集成测试
- 第七节 编辑学生
- 1 初始化【前】
- 2 嵌套组件测试【前】
- 3 功能开发【前】
- 4 JsonPath【后】
- 5 spyOn【后】
- 6 集成测试
- 7 @Input 异步传值【前】
- 8 值传递与引入传递
- 9 @PreUpdate【后】
- 10 表单验证【前】
- 第八节 删除学生
- 1 CSS选择器【前】
- 2 confirm【前】
- 3 功能开发与测试【后】
- 4 集成测试
- 5 定制提示框【前】
- 6 引入图标库【前】
- 第九节 集成测试
- 第五章 登录与注销
- 第一节:普通登录
- 1 原型【前】
- 2 功能设计【前】
- 3 功能设计【后】
- 4 应用登录组件【前】
- 5 注销【前】
- 6 保留登录状态【前】
- 第二节:你是谁
- 1 过滤器【后】
- 2 令牌机制【后】
- 3 装饰器模式【后】
- 4 拦截器【前】
- 5 RxJS操作符【前】
- 6 用户登录与注销【后】
- 7 个人中心【前】
- 8 拦截器【后】
- 9 集成测试
- 10 单例模式
- 第六章 课程管理
- 第一节 新增课程
- 1 初始化【前】
- 2 嵌套组件测试【前】
- 3 async管道【前】
- 4 优雅的测试【前】
- 5 功能开发【前】
- 6 实体监听器【后】
- 7 @ManyToMany【后】
- 8 集成测试【前】
- 9 异步验证器【前】
- 10 详解CORS【前】
- 第二节 课程列表
- 第三节 果断
- 1 初始化【前】
- 2 分页组件【前】
- 2 分页组件【前】
- 3 综合查询【前】
- 4 综合查询【后】
- 4 综合查询【后】
- 第节 班级列表
- 第节 教师列表
- 第节 编辑课程
- TODO返回机制【前】
- 4 弹出框组件【前】
- 5 多路由出口【前】
- 第节 删除课程
- 第七章 权限管理
- 第一节 AOP
- 总结
- 开发规范
- 备用