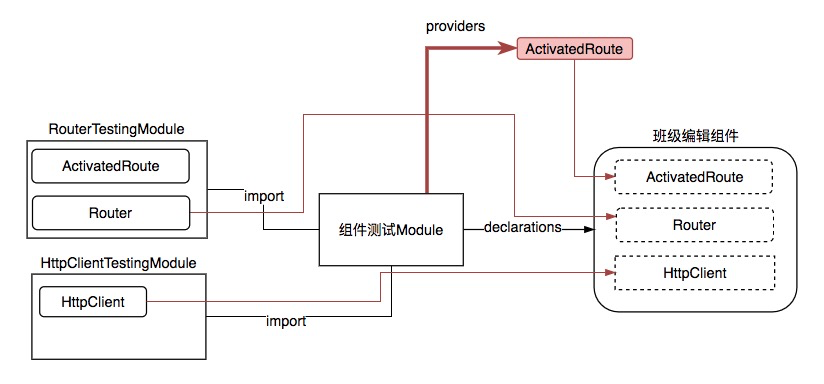
数据编辑前需要获取路由的中参数id。但由于在非测试环境中:只有将组件应用到具体的模块中并定义相应的路由规则时,才可能使用url来触发这个组件并获取相关的路由值。而测试环境的URL是类似于:[http://localhost:9876/?id=99225629](http://localhost:9876/?id=99225629)这样的一串值,所以想按传统的使用URL来触发此操作就力不从心了。此时,我们就需要借助模块的配置项`providers`来提供一个模拟路由的`服务`来协助进行模拟测试了。
# providers
我们再次来到项目的根模块:AppMoudle
app.module.ts
```
import {BrowserModule} from '@angular/platform-browser';
import {NgModule} from '@angular/core';
import {AppRoutingModule} from './app-routing.module';
import {AppComponent} from './app.component';
import {HttpClientModule} from '@angular/common/http';
import {TeacherAddComponent} from './teacher/teacher-add.component';
import {FormsModule} from '@angular/forms';
import {TeacherEditComponent} from './teacher/teacher-edit.component';
import {TeacherIndexComponent} from './teacher/teacher-index.component';
import {KlassModule} from './klass/klass.module';
@NgModule({
declarations: [
AppComponent,
TeacherAddComponent,
TeacherEditComponent,
TeacherIndexComponent
],
imports: [
BrowserModule,
AppRoutingModule,
HttpClientModule,
FormsModule,
KlassModule
],
providers: [],
bootstrap: [AppComponent]
})
export class AppModule {
}
```
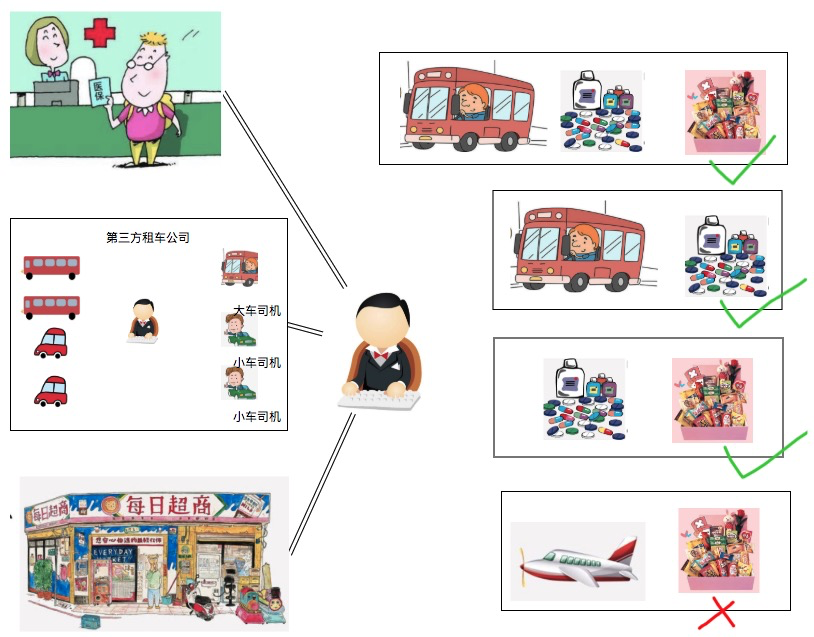
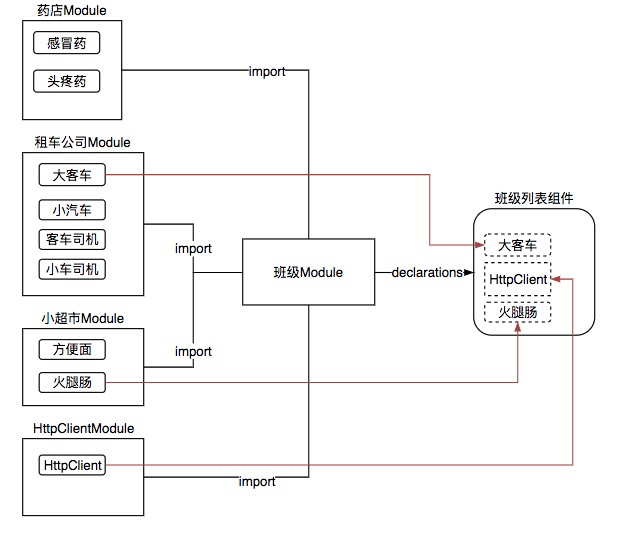
在前面的章节中,我们已经学习了`declarations`、`imports`以及`bootstrap`的作用,下面我们共同学习下`providers` 的作用。在正式开始学习之前,我们回想一下1.5.1小节中对依赖注入的描述:

在我们当前的项目,就像这样:

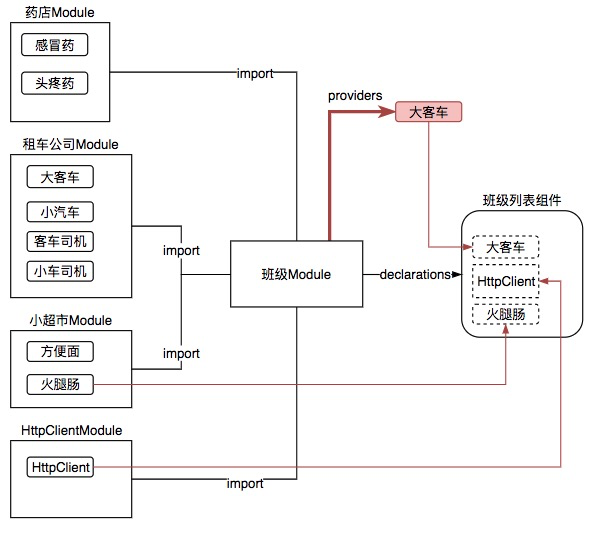
如果有了providers那么将是如下情景:

由上图我们看到:在班级Module中,我们可以使用`providers`来为其指定一个`大客车`,此时当班级列表组件表示自己需要一个大客车时,便优先使用`providers`中的`大客车`了。
在进行路由模拟的时候,其实也是用的这个原理:

假设我们使用新的大客车来替换租车公司的大客车,那么具体使用语法为:
```
providers: [
{provide: 大客车, useClass: 大客车}
]
```
这样使用会有一个小问题,由于两个名字都是大客车,所以angular不知道哪个大客车是哪个大客车。所以在进行这种替换时,我们一般这样命名(这并不是唯一的解决方法,但却是最佳实践):
```
providers: [
{provide: 大客车, useClass: 大客车Stub}
]
```
此代码表示当需要`大客车`时,把`大客车Stub`拿过去使用就好了。
## Coding
按上述的思路,我们新建一个`ActivatedRouteStub`,并在测试模块中使用providers来设置其替换`ActivatedRoute`。
klass/edit/edit.component.ts
```
import {async, ComponentFixture, TestBed} from '@angular/core/testing';
import {EditComponent} from './edit.component';
import {ReactiveFormsModule} from '@angular/forms';
import {RouterTestingModule} from '@angular/router/testing';
import {ActivatedRoute, Router} from '@angular/router';
import {HttpClientTestingModule} from '@angular/common/http/testing';
import {By} from '@angular/platform-browser';
import {DebugElement} from '@angular/core';
describe('klass EditComponent', () => {
let component: EditComponent;
let fixture: ComponentFixture<EditComponent>;
beforeEach(async(() => {
TestBed.configureTestingModule({
declarations: [EditComponent],
imports: [
ReactiveFormsModule,
HttpClientTestingModule,
RouterTestingModule
],
providers: [ ➋
{provide: ActivatedRoute➌, useClass: ActivatedRouteStub➍}
]
})
.compileComponents();
}));
beforeEach(() => {
fixture = TestBed.createComponent(EditComponent);
component = fixture.componentInstance;
fixture.detectChanges();
});
fit('should create', () => {
expect(component).toBeTruthy();
});
});
class ActivatedRouteStub { ➊
}
```
* ➊ 自定义一个ActivatedRouteStub(推荐如此命名,但不必须)
* ➋ 使用providers自定义供应商
* 当组件需要➌时,new一个➍出来提供给该组件
### 测试
使用`ng test`测试得到如下错误:

它说在klass/edit/edit.component.ts中的42行发生了:不能够在undefined上面读取`subscribe`属性。
```
this.route.params.subscribe((param: { id: number }) => {
```
也就是说this.route.params为undefined。
产生此错语的原因是这样:我们在测试模块中使用了自定义的ActivatedRouteStub来替换原ActivatedRoute。也就是说第42行代码中的this.route对象的为我们的ActivatedRouteStub,但我们当前的ActivatedRouteStub中没有任何属性,所以在获取params当然为undefined。我们的思想在回到依赖注入上,既然我们指定的特定的对象来做为本模块的协作者,那么此协作者原则上就必须提供与原对象一模一样的功能才不会发生调用错误。否则某组件声明需要一辆汽车,但我们提供的汽车没有行驶的功能,那么组件在使用该汽车时当然就会出错了。不过虽然组件声明需要一辆汽车,但其未并使用该汽车的所有功能,比如汽车除了有行驶功能以外,还有救援的功能。那么我们在构建一个专门用来测试的汽车时,只需要把行驶功能模拟出来就可以满足该组件的功能需求了,而救援功能即使不模拟,也不会影响组件的正常运行。
## 剥离ActivatedRouteStub
为了更加清晰的来描述该在测试中模拟路由的类,我们删除klass/edit/edit.component.spec.ts中的ActivatedRouteStub并在同级目录新建activated-route-stub.ts
klass/edit/activated-route-stub.ts
```
import {ReplaySubject} from 'rxjs';
import {ParamMap} from '@angular/router';
export class ActivatedRouteStub {
}
```
然后在klass/edit/edit.component.spec.ts中来引用它:
```
import {ActivatedRouteStub} from './activated-route-stub';
```
## 模拟属性及功能
以模拟ActivatedRoute为例,我们在ActivatedRouteStub中模拟其属性与功能有两种方法:第一种是观察组件调用的代码,观察其调用了ActivatedRoute的什么属性或是功能,然后在ActivatedRouteStub中添加对应的属性或功能;第二种是借助于单元测试,看单元测试报什么错误,进而在ActivatedRouteStub添加对应的属性和功能。在此,我们使用第二种借助于单元测试的方法:
单元测试报错误:TypeError: Cannot read property 'subscribe' of undefined。则我们如下修正:
klass/edit/activated-route-stub.ts
```
import {Subject} from 'rxjs';
import {Params} from '@angular/router';
export class ActivatedRouteStub {
subject = new Subject<Params➋>(); ➊
readonly params = this.subject.asObservable();➌
}
```
* ➊ 声明一个Subject,该Subject可以订阅(观察)别人,也可以做为可被观察者被别人订阅(观察)。
* ➋ 该Subject发送的数据类型为`Params 键值对`
* ➌ 设置属性`params`的值:经subject转换得到的可观察者
**小窍门:**先创建一个Subject,然后使用`asObservable()`转换为需要的可观察者
## 模拟发送数据
klass/edit/edit.component.spec.ts
```
fit('should create', () => {
expect(component).toBeTruthy();
let route: ActivatedRouteStub; ➊
route = TestBed.get(ActivatedRoute); ➋
route.subject.next({id: 1});➌
});
```
* ➊ 声明变量类型
* ➋ 由测试机床中获取具有ActivatedRoute功能的服务对象,由于我们在providers中重写了ActivatedRoute,所以最终获取到的将是我们重写对的基于ActivatedRouteStub创建的服务对象。
* ➌ 调用ActivatedRouteStub中的subject的next方法,向组件发送数据
我们在组件的对应位置上打印下获的值 ,看是否发送成功了
klass/edit/edit.component.spec.ts
```
ngOnInit() {
this.formGroup = new FormGroup({
name: new FormControl(),
teacherId: new FormControl()
});
this.route.params.subscribe((param: { id: number }) => {
console.log(param); ✚
this.setUrlById(param.id);
this.loadData();
});
}
```
控制台结果:
```
LOG: Object{id: 1} ①
Chrome 78.0.3904 (Mac OS X 10.13.6): Executed 0 of 11 SUCCESS (0 secs / 0 secs)
Chrome 78.0.3904 (Mac OS X 10.13.6): Executed 1 of 11 (skipped 10) SUCCESS (0.122 secs / 0.103 secs)
TOTAL: 1 SUCCESS
TOTAL: 1 SUCCESS
```
## 写断言
当路由发生变更时,我们最终期待该组件发起http请求,并在请求完成后,在V层中显示对应的数据,由此我们的测试代码如下:
klass/edit/edit.component.spec.ts
```
/**
* 组件初始化
* 发送路由参数
* 断言发起了HTTP请求
* 断言请求的方法为PUT
*/
fit('should create', () => {
expect(component).toBeTruthy();
let route: ActivatedRouteStub;
route = TestBed.get(ActivatedRoute);
route.subject.next({id: 1});
/*断言http请求*/ ➊
const httpTestingController: HttpTestingController = TestBed.get(HttpTestingController);
const req = httpTestingController.expectOne('http://localhost:8080/Klass/1');
expect(req.request.method).toEqual('GET');
req.flush(new Klass(1, '测试编辑班级', new Teacher(1, null, null)));
fixture.whenStable().then(() => {
// todo: 获取input的值,被与预期值做比较
});
});
```
* ➊ 一个优秀的项目,离不开良好的注释;一个优秀的项目,离不开良好的注释规范。该注释是一个良好的注释,但却违背了良好的注释习惯。
因为在良好的注释习惯中有一个原则是:尽可能的规避在方法中添加注释。所以当前我们面临了一个两难的问题。如果我们不添加此行注释,我们则是在书写不负责的代码;如果我们添加注释,就违背了注释的原则。当遇到此问题时,我们使用剥离新方法来解决。
### 剥离新方法
klass/edit/edit.component.spec.ts
```
/**
* 组件初始化
* 发送路由参数
* 断言发起了HTTP请求
* 断言请求的方法为PUT
*/
fit('should create', () => {
expect(component).toBeTruthy();
let route: ActivatedRouteStub;
route = TestBed.get(ActivatedRoute);
route.subject.next({id: 1});
testGetHttp(1);
});
/**
* 测试组件发起的GET请求
* @param id 请求的班级ID
*/
const testGetHttp = (id: number) => {
const httpTestingController: HttpTestingController = TestBed.get(HttpTestingController);
const req = httpTestingController.expectOne(`http://localhost:8080/Klass/${id}`);
expect(req.request.method).toEqual('GET');
req.flush(new Klass(id, '测试编辑班级', new Teacher(1, null, null)));
fixture.whenStable().then(() => {
// todo: 获取input的值,被与预期值做比较
});
};
```
此时,我们就可以名正言顺的为新方法写注释了。这样便即达到了有良好的注释,又符合我们的良好的注释习惯。
### 不造重复的轮子
在刚刚的代码中我们增加了`todo`,这是因为我们实在不想再写一些重复的获取input的值的语句了,我们的的确确已经写过够多的这样的语句了。何苦不在这此稍微的费点力气,把一些我们常的方法给剥离出来以达到不造重复的轮子且有效的提升生产力的目的呢?为此,我们在app目录中新建testing文件夹,并在此文件夹中书写一些在测试中可能被多个测试类使用的方法,比如我们新建一个FormTest类,并在该类中增加一个获取input值的方法:
testing/FormTest.ts
```
import {DebugElement} from '@angular/core';
import {ComponentFixture} from '@angular/core/testing';
import {By} from '@angular/platform-browser';
import {isNull} from 'util';
/**
* 表单测试
*/
export class FormTest {
/**
* 获取input输入框的值
* 首先获取整个V层元素
* 然后根据CSS选择器,获取指定的元素
* 最后将获取的元素转换为HTMLInput元素并返回该元素的值
* @param fixture 组件夹具
* @param cssSelector CSS选择器
*/
static① getInputValueByFixtureAndCss(fixture: ComponentFixture<any>➊, cssSelector: string): string {
const debugElement: DebugElement = fixture.debugElement;
const nameElement = debugElement.query(By.css(cssSelector));
if (isNull(nameElement)) {
return null;
}
const nameInput: HTMLInputElement = nameElement.nativeElement;
return nameInput.value;
}
}
```
* ① 声明为静态方法以表现属于`类`而非`对象`。
* ➊ 暂时不要管这个变量类型是怎么来的。
当前目录树结构大体如下:
```
panjiedeMac-Pro:app panjie$ tree -L 2
.
├── app-routing.module.ts
├── app.component.html
├── app.component.sass
├── app.component.spec.ts
├── app.component.ts
├── app.module.ts
├── klass
│ ├── add
│ ├── edit
│ ├── index
│ └── klass.module.ts
├── norm
│ └── entity
├── teacher
│ ├── teacher-add.component.html
│ ├── teacher-add.component.ts
│ ├── teacher-edit.component.html
│ ├── teacher-edit.component.ts
│ ├── teacher-index.component.html
│ └── teacher-index.component.ts
└── testing
└── FormTest.ts
```
接下来我们回来班级班级组件测试中引用刚刚写的方法来获取input的值。
```
import {FormTest} from '../../testing/FormTest';
/**
* 测试组件发起的GET请求
* 断言请求地址及方法
* 返回数据后,断言input项成功绑定返回数据
* @param id 请求的班级ID
*/
const testGetHttp = (id: number) => {
const httpTestingController: HttpTestingController = TestBed.get(HttpTestingController);
const req = httpTestingController.expectOne(`http://localhost:8080/Klass/${id}`);
expect(req.request.method).toEqual('GET');
req.flush(new Klass(id, '测试编辑班级', new Teacher(1, null, null)));
fixture.whenStable().then(() => {
expect(FormTest.getInputValueByFixtureAndCss(fixture, '#name')).toEqual('测试编辑班级');
expect(FormTest.getInputValueByFixtureAndCss(fixture, '#teacherId')).toEqual('1');
});
};
```
测试结果:
```
LOG: Object{id: 1}
Chrome 78.0.3904 (Mac OS X 10.13.6): Executed 0 of 11 SUCCESS (0 secs / 0 secs)
Chrome 78.0.3904 (Mac OS X 10.13.6): Executed 1 of 11 (skipped 10) SUCCESS (0.071 secs / 0.051 secs)
TOTAL: 1 SUCCESS
TOTAL: 1 SUCCESS
```
# 参考文档
| 名称 | 链接 | 预计学习时长(分) |
| --- | --- | --- |
| 源码地址 | [https://github.com/mengyunzhi/spring-boot-and-angular-guild/releases/tag/step3.4.3](https://github.com/mengyunzhi/spring-boot-and-angular-guild/releases/tag/step3.4.3) | - |
| 依赖提供商 | [https://www.angular.cn/guide/dependency-injection-providers](https://www.angular.cn/guide/dependency-injection-providers) | 15 |
| ActivatedRouteStub | [https://www.angular.cn/guide/testing#activatedroutestub](https://www.angular.cn/guide/testing#activatedroutestub) | 10 |
| Subject = Observable + Observer | [https://wiki.jikexueyuan.com/project/rxjava//chapter2/subject\_observable\_observer.html](https://wiki.jikexueyuan.com/project/rxjava//chapter2/subject_observable_observer.html) | 10 |
| 依赖注入 | 参阅教程1.5.1 | - |
| 观察者模式 | 参阅教程2.4.7 | - |
| Angular 中的观察者 | [https://www.angular.cn/guide/observables-in-angular#observables-in-angular](https://www.angular.cn/guide/observables-in-angular#observables-in-angular) | - |
| 可观察对象 | [https://www.angular.cn/guide/observables](https://www.angular.cn/guide/observables) | - |
- 序言
- 第一章:Hello World
- 第一节:Angular准备工作
- 1 Node.js
- 2 npm
- 3 WebStorm
- 第二节:Hello Angular
- 第三节:Spring Boot准备工作
- 1 JDK
- 2 MAVEN
- 3 IDEA
- 第四节:Hello Spring Boot
- 1 Spring Initializr
- 2 Hello Spring Boot!
- 3 maven国内源配置
- 4 package与import
- 第五节:Hello Spring Boot + Angular
- 1 依赖注入【前】
- 2 HttpClient获取数据【前】
- 3 数据绑定【前】
- 4 回调函数【选学】
- 第二章 教师管理
- 第一节 数据库初始化
- 第二节 CRUD之R查数据
- 1 原型初始化【前】
- 2 连接数据库【后】
- 3 使用JDBC读取数据【后】
- 4 前后台对接
- 5 ng-if【前】
- 6 日期管道【前】
- 第三节 CRUD之C增数据
- 1 新建组件并映射路由【前】
- 2 模板驱动表单【前】
- 3 httpClient post请求【前】
- 4 保存数据【后】
- 5 组件间调用【前】
- 第四节 CRUD之U改数据
- 1 路由参数【前】
- 2 请求映射【后】
- 3 前后台对接【前】
- 4 更新数据【前】
- 5 更新某个教师【后】
- 6 路由器链接【前】
- 7 观察者模式【前】
- 第五节 CRUD之D删数据
- 1 绑定到用户输入事件【前】
- 2 删除某个教师【后】
- 第六节 代码重构
- 1 文件夹化【前】
- 2 优化交互体验【前】
- 3 相对与绝对地址【前】
- 第三章 班级管理
- 第一节 JPA初始化数据表
- 第二节 班级列表
- 1 新建模块【前】
- 2 初识单元测试【前】
- 3 初始化原型【前】
- 4 面向对象【前】
- 5 测试HTTP请求【前】
- 6 测试INPUT【前】
- 7 测试BUTTON【前】
- 8 @RequestParam【后】
- 9 Repository【后】
- 10 前后台对接【前】
- 第三节 新增班级
- 1 初始化【前】
- 2 响应式表单【前】
- 3 测试POST请求【前】
- 4 JPA插入数据【后】
- 5 单元测试【后】
- 6 惰性加载【前】
- 7 对接【前】
- 第四节 编辑班级
- 1 FormGroup【前】
- 2 x、[x]、{{x}}与(x)【前】
- 3 模拟路由服务【前】
- 4 测试间谍spy【前】
- 5 使用JPA更新数据【后】
- 6 分层开发【后】
- 7 前后台对接
- 8 深入imports【前】
- 9 深入exports【前】
- 第五节 选择教师组件
- 1 初始化【前】
- 2 动态数据绑定【前】
- 3 初识泛型
- 4 @Output()【前】
- 5 @Input()【前】
- 6 再识单元测试【前】
- 7 其它问题
- 第六节 删除班级
- 1 TDD【前】
- 2 TDD【后】
- 3 前后台对接
- 第四章 学生管理
- 第一节 引入Bootstrap【前】
- 第二节 NAV导航组件【前】
- 1 初始化
- 2 Bootstrap格式化
- 3 RouterLinkActive
- 第三节 footer组件【前】
- 第四节 欢迎界面【前】
- 第五节 新增学生
- 1 初始化【前】
- 2 选择班级组件【前】
- 3 复用选择组件【前】
- 4 完善功能【前】
- 5 MVC【前】
- 6 非NULL校验【后】
- 7 唯一性校验【后】
- 8 @PrePersist【后】
- 9 CM层开发【后】
- 10 集成测试
- 第六节 学生列表
- 1 分页【后】
- 2 HashMap与LinkedHashMap
- 3 初识综合查询【后】
- 4 综合查询进阶【后】
- 5 小试综合查询【后】
- 6 初始化【前】
- 7 M层【前】
- 8 单元测试与分页【前】
- 9 单选与多选【前】
- 10 集成测试
- 第七节 编辑学生
- 1 初始化【前】
- 2 嵌套组件测试【前】
- 3 功能开发【前】
- 4 JsonPath【后】
- 5 spyOn【后】
- 6 集成测试
- 7 @Input 异步传值【前】
- 8 值传递与引入传递
- 9 @PreUpdate【后】
- 10 表单验证【前】
- 第八节 删除学生
- 1 CSS选择器【前】
- 2 confirm【前】
- 3 功能开发与测试【后】
- 4 集成测试
- 5 定制提示框【前】
- 6 引入图标库【前】
- 第九节 集成测试
- 第五章 登录与注销
- 第一节:普通登录
- 1 原型【前】
- 2 功能设计【前】
- 3 功能设计【后】
- 4 应用登录组件【前】
- 5 注销【前】
- 6 保留登录状态【前】
- 第二节:你是谁
- 1 过滤器【后】
- 2 令牌机制【后】
- 3 装饰器模式【后】
- 4 拦截器【前】
- 5 RxJS操作符【前】
- 6 用户登录与注销【后】
- 7 个人中心【前】
- 8 拦截器【后】
- 9 集成测试
- 10 单例模式
- 第六章 课程管理
- 第一节 新增课程
- 1 初始化【前】
- 2 嵌套组件测试【前】
- 3 async管道【前】
- 4 优雅的测试【前】
- 5 功能开发【前】
- 6 实体监听器【后】
- 7 @ManyToMany【后】
- 8 集成测试【前】
- 9 异步验证器【前】
- 10 详解CORS【前】
- 第二节 课程列表
- 第三节 果断
- 1 初始化【前】
- 2 分页组件【前】
- 2 分页组件【前】
- 3 综合查询【前】
- 4 综合查询【后】
- 4 综合查询【后】
- 第节 班级列表
- 第节 教师列表
- 第节 编辑课程
- TODO返回机制【前】
- 4 弹出框组件【前】
- 5 多路由出口【前】
- 第节 删除课程
- 第七章 权限管理
- 第一节 AOP
- 总结
- 开发规范
- 备用