在继续操作以前,先修正下学生实体。由于我们前面的误操作,在进行学生实体实始化时,忘记加入班级信息了。下面,我们来共同修正一下学生实体。
norm/entity/student.ts
```
@NgModule({})
export class Student {
id: number;
klass: Klass; ➊
name: string;
sno: string;
constructor(data?: { id?: number; klass?: Klass ➊; name?: string; sno?: string }) {
if (!data) {
return;
}
this.id = data.id ? data.id : null;
this.klass = data.klass ? data.klass : null; ➊
this.name = data.name ? data.name : '';
this.sno = data.sno ? data.sno : '';
}
}
```
* ➊ 加入了班级信息,幸运的是由于我们使用了更加优化的构造函数。我们刚刚的操作对历史代码没有造成任何影响。
# MVC
在上个小节中,大家使用常规的方法完成新增学生组件的功能,现在我们使用MVC的思想重新开发一遍。
我们刚刚接触了直接与用户进行交互的V层 -- add.component.html,以及与V层进行直接交互的C层 -- add.component.ts。按MVC的开发思想:V层负责响应用户;C层负责接收数据接收、数据较验、数据转发;M层则负责逻辑处理。回想下3.6.2删除班级的小节,我们在后台进行班级删除时也正是这么做的。
在使用Angular进行开发时,我们也应该将逻辑处理由C层中剥离出来,进而提升代码的可读性、降低软件维护的成本。当前我们需要一个学生服务来完成学生新增的逻辑功能。
写代码之前,我们先简单画个图,这样自己编写或是与团队成员交流的时候会更清晰:
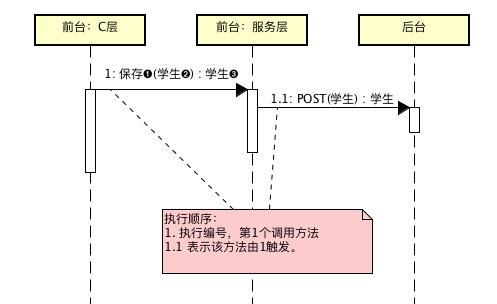
* 方法前面的序号代码执行顺序
* ➊ 方法名
* ➋ 输入参数
* ➌ 返回值
# M层初始化
与后台的开发思路一致:我们在app目录下新建service子目录 -> 在该目录下使用angular-cli生成student服务。
```
panjiedeMac-Pro:app panjie$ mkdir service
panjiedeMac-Pro:app panjie$ cd service/
panjiedeMac-Pro:service panjie$ ng g s student
CREATE src/app/service/student.service.spec.ts (338 bytes)
CREATE src/app/service/student.service.ts (136 bytes)
```
自动生成的代码如下所示:
```
import { Injectable } from '@angular/core';
@Injectable({
providedIn: 'root' ➊
})
export class StudentService {
constructor() { }
}
```
➊ 声明被注入范围为`root`,即整个系统。此时我们可以在整个项目像注入这个服务,比如我们需要在student/add/add.component.ts中注入这个服务,则可以直接在该文件中这么写:
```
constructor(private studentService: StudentService) {
}
```
## 增加SAVE方法
在MVC的思想,我们将原来在C层中进行的请求后台的操作转移到StudentService的save方法中。
service/student.service.ts
```
@Injectable({
providedIn: 'root'
})
export class StudentService {
constructor(private httpClient: HttpClient) {
}
/**
* 保存学生
* 直接调用HttpClient post方法
* @param student 学生
* @return 此返回值是个可观察对象:
* 1. 其它人可以通过 订阅 操作来获取该对象后续发送的值。
* 2. 该对象如果发送值,那么该值的类型必然是Student。
*/
save(student: Student): Observable<Student> {
const url = 'http://localhost:8080/Student';
return this.httpClient.post<Student➊>(url, student);
}
}
```
我们往往与新增教师、新增班级时没有返回值不同,在定义新增学生接口时我们定义了其返回值为Student,也就是说后台需要将持久化后的学生再返回给前台。this.httpClient.post的功能是发请一个http post请求,其返回值的类型取决于后台具体返回的类型,也就是说:该方法的返回类型不定,但必然应该有一个类型(哪怕是void),而泛型就恰到好处的可以实现这一点。我们使用➊来规定此this.httpClient.post发送的请求的返回值类型为Student。
## 单元测试
和测试组件的方法一致,我们来到service/student.service.spec.ts,并对自动生成的文件进行小幅重构。
```
import {TestBed} from '@angular/core/testing';
import {StudentService} from './student.service';
import {HttpClientTestingModule} from '@angular/common/http/testing';
fdescribe('service -> StudentService', () => {
let service: StudentService; ➊
beforeEach(() => TestBed.configureTestingModule({
imports: [HttpClientTestingModule] ①
}));
beforeEach(() => { ➋
service = TestBed.get(StudentService); ➌
});
it('should be created', () => {
expect(service).toBeTruthy();
});
it('save', () => { ➍
});
});
```
* ➊ 将公共的对象(每个测试用例都会用到)向上抽离
* ➋ 在每个测试用例执行前,本方法内的语句均执行1次
* ➌ 在每个测试用例前,均重新获取一个StudentService
* ➍ 新建测试用例测试save方法
### 完善测试功能
在写单元测试以前,我们必须要弄清两个问题:输入与输出。在save方法中,输入的为Teacher,输出的为一个**可观察者**。如果想确认这个**可观察者**发送的数据是否符合我们的预期,则要进行**订阅**操作。我们按模拟输入、调用方法、断言输出的步骤来编写以下测试代码:
```
/**
* 测试新增
* 1. 初始化测试数据
* 2. 调用保存方法并进行订阅
* 2.1 断言响应中返回了学生ID信息
* 3. 断言发起了HTTP POST请
* 4. 断言请求数据
* 5. 模拟HTTP响应数据
* 6. 断言订阅的方法被调用
*/
it('save', () => {
const student: Student = new Student(
{
name: 'test',
klass: new Klass(1, null, null)
});
let called = false;
service.save(student).subscribe①((returnStudent: Student) => {
called = true; ③
expect(returnStudent.id).toBe(-1);
});
const httpTestingController: HttpTestingController = TestBed.get(HttpTestingController);
const req = httpTestingController.expectOne('http://localhost:8080/Student');
expect(req.request.method).toEqual('POST');
const studentBody: Student = req.request.body.valueOf();
expect(studentBody.name).toEqual(student.name);
expect(studentBody.klass.id).toEqual(student.klass.id);
req.flush(new Student({id: -1})); ②
expect(called).toBe(true); ④
});
```
* 程序执行顺序 ①②③④

测试通过,说明符合预期,M层开发完毕。
# C层
由于StudentService声明的被注入范围为root,所以我们可以在直接在student/add/add.component.ts中注入该服务。
```
export class AddComponent implements OnInit {
student: Student;
formGroup: FormGroup;
constructor(private studentService: StudentService①) {
}
```
* ① 和注入其它协作者的方法一样。
## 调用M层
然后在需要的方法中直接进行相关调用:
student/add/add.component.ts
```
onSubmit(): void {
this.student = this.formGroup.value;
this.studentService.save(this.student).subscribe★((student: Student) => {①
console.log(student);
});
}
```
* ★ 必须进行订阅,否则HttpClient将不会发起POST请求。
HttpClient这个被订阅者有点意思,它像极了现实社会中的房地产商。几年前的房地产商拿到地以后,下一步就是做模型画大饼来告知老百姓:我将要盖一个什么样的房子,然后价格是多少。如果没有用户愿意购买,那么前面就会一直停留计划之中;只有当用户真真切切的交了钱,房地产商才会真真正正的去盖楼。现实社会中这无形的助长了地价的飙升,增加了购房人面临的延期交房或是不交房的风险。但在计算机的世界时,这却不失为一种最佳的解决方案:HttpClinet.post方法只是表明将进行一个post请求,而如果没有人想知道请求结果的话,那我一直不会发起真实请求,只有当有人订阅了它表明想获取请求结果时,它才会真真切切的去发起这个HTTP请求。所以如果要保证该请求真实发生,必须对其进行订阅。
## 单元测试
由于我们在组件中引入了UserService,而在UserService又引入了HttpClient,所以执行原单元测试将会报没有HttpClient的提供者错误。
```
NullInjectorError: StaticInjectorError(DynamicTestModule)\[HttpClient\]: StaticInjectorError(Platform: core)\[HttpClient\]: NullInjectorError: No provider for HttpClient!
```
与解决其它的此类问题的方法相同,我们在单元测试中引入HttpClientTestingModule。
```
beforeEach(async(() => {
TestBed.configureTestingModule({
declarations: [AddComponent],
imports: [
ReactiveFormsModule,
HttpClientTestingModule ①
],
})
.compileComponents();
}));
```
### 增加测试内容
为了确保当用户添加写相关的内容后点击保存按钮发起我们预期的请求,我们对以前的测试代码进行以下补充。
```
/**
* 1. 向表单中输入值
* 2. 点击保存按钮
* 3. 断言输入的值传入到了C层
*/
fit('should create', () => {
expect(component).toBeTruthy();
formTest.setInputValue('input[name="name"]', 'testname');
formTest.setInputValue('input[name="sno"]', 'testno');
formTest.clickButton('button[type="submit"]');
fixture.detectChanges();
expect(component.student.name).toEqual('testname');
expect(component.student.sno).toEqual('testno');
savePostTest(); ①
});
/**
* 断言发起了相关请求
* 断言在请求的中接收到了对应的值
*/
const savePostTest = (): void => { ②
const httpTestingController: HttpTestingController = TestBed.get(HttpTestingController);
const req = httpTestingController.expectOne('http://localhost:8080/Student');
expect(req.request.method).toEqual('POST');
const student: Student = req.request.body.valueOf();
expect(student.name).toEqual('testname');
expect(student.sno).toEqual('testno');
};
```
由于我们在组件中订阅返回内容后,仅仅是进行控制台打印操作,所以未对组件订阅后的内容进行测试。

测试通过。
# 加入选择班级组件
最后让我们加入选择班级组件
## V层
student/add/add.component.html
```
<label>班级:<app-klass-select (selected)="onSelectKlass($event)"></app-klass-select></label>
```
## C层
student/add/add.component.ts
```
export class AddComponent implements OnInit {
...
klass: Klass; ✚
constructor(private studentService: StudentService) {
}
ngOnInit() {
this.student = new Student();
this.formGroup = new FormGroup({
name: new FormControl(''),
sno: new FormControl('')
});
}
onSelectKlass(klass: Klass): void { ✚
this.klass = klass;
}
onSubmit(): void {
this.student = this.formGroup.value;
this.student.klass = this.klass; ✚
this.studentService.save(this.student).subscribe((student: Student) => {
console.log(student);
});
}
```
## 单元测试
在当前的测试思路下,初始化单元测试时必须先要弄清各个模块前的依赖关系。
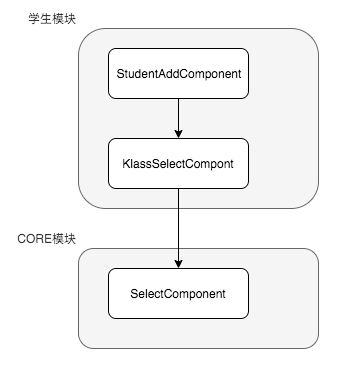
按上述依赖图,我们需要如下定制测试文件:
```
beforeEach(async(() => {
TestBed.configureTestingModule({
declarations: [AddComponent, KlassSelectComponent①],
imports: [
ReactiveFormsModule,
HttpClientTestingModule,
CoreModule ②
],
})
.compileComponents();
}));
```
* ① 同模块的该组件加入到declarations中
* ② 不同模块的将组件所在的模块加入到imports中
### 增加测试内容
student/add/add.component.spec.ts
```
expect(component).toBeTruthy();
component.klass = new Klass(-1, null, null); ✚
formTest.setInputValue('input[name="name"]', 'testname')
...
const savePostTest = (): void => {
...
expect(student.sno).toEqual('testno');
expect(student.klass.id).toEqual(-1); ✚
};
```

## 整体测试
最后,将特定方法上的`f`去除,进行整个项目的单元测试.
# 参考文档
| 名称 | 链接 | 预计学习时长(分) |
| --- | --- | --- |
| 源码地址 | [https://github.com/mengyunzhi/spring-boot-and-angular-guild/releases/tag/step4.5.5](https://github.com/mengyunzhi/spring-boot-and-angular-guild/releases/tag/step4.5.5) | \- |
- 序言
- 第一章:Hello World
- 第一节:Angular准备工作
- 1 Node.js
- 2 npm
- 3 WebStorm
- 第二节:Hello Angular
- 第三节:Spring Boot准备工作
- 1 JDK
- 2 MAVEN
- 3 IDEA
- 第四节:Hello Spring Boot
- 1 Spring Initializr
- 2 Hello Spring Boot!
- 3 maven国内源配置
- 4 package与import
- 第五节:Hello Spring Boot + Angular
- 1 依赖注入【前】
- 2 HttpClient获取数据【前】
- 3 数据绑定【前】
- 4 回调函数【选学】
- 第二章 教师管理
- 第一节 数据库初始化
- 第二节 CRUD之R查数据
- 1 原型初始化【前】
- 2 连接数据库【后】
- 3 使用JDBC读取数据【后】
- 4 前后台对接
- 5 ng-if【前】
- 6 日期管道【前】
- 第三节 CRUD之C增数据
- 1 新建组件并映射路由【前】
- 2 模板驱动表单【前】
- 3 httpClient post请求【前】
- 4 保存数据【后】
- 5 组件间调用【前】
- 第四节 CRUD之U改数据
- 1 路由参数【前】
- 2 请求映射【后】
- 3 前后台对接【前】
- 4 更新数据【前】
- 5 更新某个教师【后】
- 6 路由器链接【前】
- 7 观察者模式【前】
- 第五节 CRUD之D删数据
- 1 绑定到用户输入事件【前】
- 2 删除某个教师【后】
- 第六节 代码重构
- 1 文件夹化【前】
- 2 优化交互体验【前】
- 3 相对与绝对地址【前】
- 第三章 班级管理
- 第一节 JPA初始化数据表
- 第二节 班级列表
- 1 新建模块【前】
- 2 初识单元测试【前】
- 3 初始化原型【前】
- 4 面向对象【前】
- 5 测试HTTP请求【前】
- 6 测试INPUT【前】
- 7 测试BUTTON【前】
- 8 @RequestParam【后】
- 9 Repository【后】
- 10 前后台对接【前】
- 第三节 新增班级
- 1 初始化【前】
- 2 响应式表单【前】
- 3 测试POST请求【前】
- 4 JPA插入数据【后】
- 5 单元测试【后】
- 6 惰性加载【前】
- 7 对接【前】
- 第四节 编辑班级
- 1 FormGroup【前】
- 2 x、[x]、{{x}}与(x)【前】
- 3 模拟路由服务【前】
- 4 测试间谍spy【前】
- 5 使用JPA更新数据【后】
- 6 分层开发【后】
- 7 前后台对接
- 8 深入imports【前】
- 9 深入exports【前】
- 第五节 选择教师组件
- 1 初始化【前】
- 2 动态数据绑定【前】
- 3 初识泛型
- 4 @Output()【前】
- 5 @Input()【前】
- 6 再识单元测试【前】
- 7 其它问题
- 第六节 删除班级
- 1 TDD【前】
- 2 TDD【后】
- 3 前后台对接
- 第四章 学生管理
- 第一节 引入Bootstrap【前】
- 第二节 NAV导航组件【前】
- 1 初始化
- 2 Bootstrap格式化
- 3 RouterLinkActive
- 第三节 footer组件【前】
- 第四节 欢迎界面【前】
- 第五节 新增学生
- 1 初始化【前】
- 2 选择班级组件【前】
- 3 复用选择组件【前】
- 4 完善功能【前】
- 5 MVC【前】
- 6 非NULL校验【后】
- 7 唯一性校验【后】
- 8 @PrePersist【后】
- 9 CM层开发【后】
- 10 集成测试
- 第六节 学生列表
- 1 分页【后】
- 2 HashMap与LinkedHashMap
- 3 初识综合查询【后】
- 4 综合查询进阶【后】
- 5 小试综合查询【后】
- 6 初始化【前】
- 7 M层【前】
- 8 单元测试与分页【前】
- 9 单选与多选【前】
- 10 集成测试
- 第七节 编辑学生
- 1 初始化【前】
- 2 嵌套组件测试【前】
- 3 功能开发【前】
- 4 JsonPath【后】
- 5 spyOn【后】
- 6 集成测试
- 7 @Input 异步传值【前】
- 8 值传递与引入传递
- 9 @PreUpdate【后】
- 10 表单验证【前】
- 第八节 删除学生
- 1 CSS选择器【前】
- 2 confirm【前】
- 3 功能开发与测试【后】
- 4 集成测试
- 5 定制提示框【前】
- 6 引入图标库【前】
- 第九节 集成测试
- 第五章 登录与注销
- 第一节:普通登录
- 1 原型【前】
- 2 功能设计【前】
- 3 功能设计【后】
- 4 应用登录组件【前】
- 5 注销【前】
- 6 保留登录状态【前】
- 第二节:你是谁
- 1 过滤器【后】
- 2 令牌机制【后】
- 3 装饰器模式【后】
- 4 拦截器【前】
- 5 RxJS操作符【前】
- 6 用户登录与注销【后】
- 7 个人中心【前】
- 8 拦截器【后】
- 9 集成测试
- 10 单例模式
- 第六章 课程管理
- 第一节 新增课程
- 1 初始化【前】
- 2 嵌套组件测试【前】
- 3 async管道【前】
- 4 优雅的测试【前】
- 5 功能开发【前】
- 6 实体监听器【后】
- 7 @ManyToMany【后】
- 8 集成测试【前】
- 9 异步验证器【前】
- 10 详解CORS【前】
- 第二节 课程列表
- 第三节 果断
- 1 初始化【前】
- 2 分页组件【前】
- 2 分页组件【前】
- 3 综合查询【前】
- 4 综合查询【后】
- 4 综合查询【后】
- 第节 班级列表
- 第节 教师列表
- 第节 编辑课程
- TODO返回机制【前】
- 4 弹出框组件【前】
- 5 多路由出口【前】
- 第节 删除课程
- 第七章 权限管理
- 第一节 AOP
- 总结
- 开发规范
- 备用