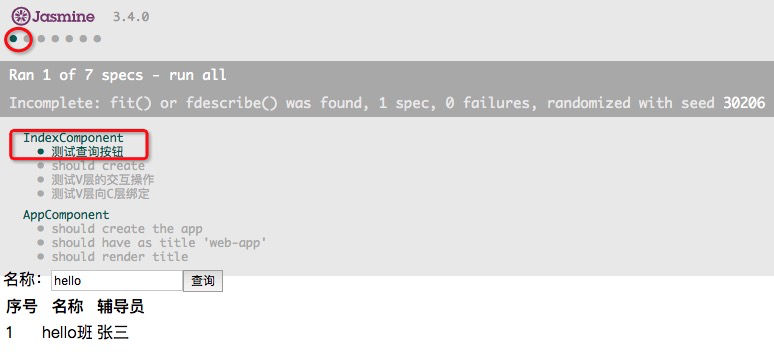
测试button相对比较简单,在测试过程中,注意以下两点即可:
* 组件进行页面渲染是异步且需要一定的时间的,所以在获取html时,必须使用`fixture.whenStable().then()`来等待V层渲染完毕。
* 在单元测试中,变更完C层的数据后组件并不会自动的进行V层的渲染,如果需要断言渲染后的数据,需要使用`fixture.detectChanges();`方法。
```
fit('测试查询按钮', () => { ①
expect(component).toBeTruthy(); ②
const name = 'hello'; ➊
component.params.name = name; ➋
fixture.detectChanges(); ③
fixture.whenStable().then(() => {
const queryButton: HTMLButtonElement = fixture.debugElement.query(By.css('button')).nativeElement; ➌
queryButton.click(); ➍
const req = httpTestingController.expectOne(`http://localhost:8080/Klass?name=${name}`); ④
req.flush([ ⑤
new Klass(1, 'hello班', new Teacher(1, 'zhagnsan', '张三'))
]);
fixture.detectChanges(); ⑥
fixture.whenStable().then(() => {
const debugElement: DebugElement = fixture.debugElement; ⑦
const tableElement = debugElement.query(By.css('table')); ⑧
const tableHtml: HTMLTableElement = tableElement.nativeElement; ➎
expect(tableHtml.rows.length).toBe(2); ⑨
});
});
});
```
* ① 使用`fit`在单元测试中跳过`it`测试。
* ② 断言组件被成功创建(与前面的`it`相冗余,无实际的意义,主要是防止报测试用例无任何断言的错误)
* ➊ 定义参数
* ➋ 给参考赋值
* ③ 重新渲染V层
* ➌ 通过`CSS`定位器来获取`button`
* ➍ 发送按钮点击事件
* ④ 断言截取到了一个http请求,请求地址中带有我们定义的参数➊
* ⑤ 模拟返回http请求的数据
* ⑥ 重新渲染V层
* ⑦ 获取整个debug元素
* ⑧ 获取table原生元素(该元素兼容非HTML)
* ➎ 由table原生元素中获取table Html元素
* ⑨ 断言table有两行(其中一行为表头,一行为数据)
## 测试
使用`ng test`进行测试:

测试通过
# 参考文档
| 名称 | 链接 | 预计学习时长(分) |
| --- | --- | --- |
| 源码地址 | [https://github.com/mengyunzhi/spring-boot-and-angular-guild/releases/tag/step3.2.7](https://github.com/mengyunzhi/spring-boot-and-angular-guild/releases/tag/step3.2.7) | - |
- 序言
- 第一章:Hello World
- 第一节:Angular准备工作
- 1 Node.js
- 2 npm
- 3 WebStorm
- 第二节:Hello Angular
- 第三节:Spring Boot准备工作
- 1 JDK
- 2 MAVEN
- 3 IDEA
- 第四节:Hello Spring Boot
- 1 Spring Initializr
- 2 Hello Spring Boot!
- 3 maven国内源配置
- 4 package与import
- 第五节:Hello Spring Boot + Angular
- 1 依赖注入【前】
- 2 HttpClient获取数据【前】
- 3 数据绑定【前】
- 4 回调函数【选学】
- 第二章 教师管理
- 第一节 数据库初始化
- 第二节 CRUD之R查数据
- 1 原型初始化【前】
- 2 连接数据库【后】
- 3 使用JDBC读取数据【后】
- 4 前后台对接
- 5 ng-if【前】
- 6 日期管道【前】
- 第三节 CRUD之C增数据
- 1 新建组件并映射路由【前】
- 2 模板驱动表单【前】
- 3 httpClient post请求【前】
- 4 保存数据【后】
- 5 组件间调用【前】
- 第四节 CRUD之U改数据
- 1 路由参数【前】
- 2 请求映射【后】
- 3 前后台对接【前】
- 4 更新数据【前】
- 5 更新某个教师【后】
- 6 路由器链接【前】
- 7 观察者模式【前】
- 第五节 CRUD之D删数据
- 1 绑定到用户输入事件【前】
- 2 删除某个教师【后】
- 第六节 代码重构
- 1 文件夹化【前】
- 2 优化交互体验【前】
- 3 相对与绝对地址【前】
- 第三章 班级管理
- 第一节 JPA初始化数据表
- 第二节 班级列表
- 1 新建模块【前】
- 2 初识单元测试【前】
- 3 初始化原型【前】
- 4 面向对象【前】
- 5 测试HTTP请求【前】
- 6 测试INPUT【前】
- 7 测试BUTTON【前】
- 8 @RequestParam【后】
- 9 Repository【后】
- 10 前后台对接【前】
- 第三节 新增班级
- 1 初始化【前】
- 2 响应式表单【前】
- 3 测试POST请求【前】
- 4 JPA插入数据【后】
- 5 单元测试【后】
- 6 惰性加载【前】
- 7 对接【前】
- 第四节 编辑班级
- 1 FormGroup【前】
- 2 x、[x]、{{x}}与(x)【前】
- 3 模拟路由服务【前】
- 4 测试间谍spy【前】
- 5 使用JPA更新数据【后】
- 6 分层开发【后】
- 7 前后台对接
- 8 深入imports【前】
- 9 深入exports【前】
- 第五节 选择教师组件
- 1 初始化【前】
- 2 动态数据绑定【前】
- 3 初识泛型
- 4 @Output()【前】
- 5 @Input()【前】
- 6 再识单元测试【前】
- 7 其它问题
- 第六节 删除班级
- 1 TDD【前】
- 2 TDD【后】
- 3 前后台对接
- 第四章 学生管理
- 第一节 引入Bootstrap【前】
- 第二节 NAV导航组件【前】
- 1 初始化
- 2 Bootstrap格式化
- 3 RouterLinkActive
- 第三节 footer组件【前】
- 第四节 欢迎界面【前】
- 第五节 新增学生
- 1 初始化【前】
- 2 选择班级组件【前】
- 3 复用选择组件【前】
- 4 完善功能【前】
- 5 MVC【前】
- 6 非NULL校验【后】
- 7 唯一性校验【后】
- 8 @PrePersist【后】
- 9 CM层开发【后】
- 10 集成测试
- 第六节 学生列表
- 1 分页【后】
- 2 HashMap与LinkedHashMap
- 3 初识综合查询【后】
- 4 综合查询进阶【后】
- 5 小试综合查询【后】
- 6 初始化【前】
- 7 M层【前】
- 8 单元测试与分页【前】
- 9 单选与多选【前】
- 10 集成测试
- 第七节 编辑学生
- 1 初始化【前】
- 2 嵌套组件测试【前】
- 3 功能开发【前】
- 4 JsonPath【后】
- 5 spyOn【后】
- 6 集成测试
- 7 @Input 异步传值【前】
- 8 值传递与引入传递
- 9 @PreUpdate【后】
- 10 表单验证【前】
- 第八节 删除学生
- 1 CSS选择器【前】
- 2 confirm【前】
- 3 功能开发与测试【后】
- 4 集成测试
- 5 定制提示框【前】
- 6 引入图标库【前】
- 第九节 集成测试
- 第五章 登录与注销
- 第一节:普通登录
- 1 原型【前】
- 2 功能设计【前】
- 3 功能设计【后】
- 4 应用登录组件【前】
- 5 注销【前】
- 6 保留登录状态【前】
- 第二节:你是谁
- 1 过滤器【后】
- 2 令牌机制【后】
- 3 装饰器模式【后】
- 4 拦截器【前】
- 5 RxJS操作符【前】
- 6 用户登录与注销【后】
- 7 个人中心【前】
- 8 拦截器【后】
- 9 集成测试
- 10 单例模式
- 第六章 课程管理
- 第一节 新增课程
- 1 初始化【前】
- 2 嵌套组件测试【前】
- 3 async管道【前】
- 4 优雅的测试【前】
- 5 功能开发【前】
- 6 实体监听器【后】
- 7 @ManyToMany【后】
- 8 集成测试【前】
- 9 异步验证器【前】
- 10 详解CORS【前】
- 第二节 课程列表
- 第三节 果断
- 1 初始化【前】
- 2 分页组件【前】
- 2 分页组件【前】
- 3 综合查询【前】
- 4 综合查询【后】
- 4 综合查询【后】
- 第节 班级列表
- 第节 教师列表
- 第节 编辑课程
- TODO返回机制【前】
- 4 弹出框组件【前】
- 5 多路由出口【前】
- 第节 删除课程
- 第七章 权限管理
- 第一节 AOP
- 总结
- 开发规范
- 备用