
## Appium XCUITest Driver 真机设置
### 安装依赖
从 1.15.0 版本开始,Appium 通过 [appium-ios-device](https://github.com/appium/appium-ios-device) 和真机交互。
已经不需要安装额外的依赖。
XCUITest driver 会在设备上安装一个名为 `WebDriverAgent-Runner` 的辅助应用,然后通过它操纵待测应用。
虽然理论上简单,但处理签名和 provisioning 让开发和测试变得有点儿麻烦。
Xcode 需要能访问这个设备。请通过 _设备 或 _模拟器 的 Xcode 日志确保测试用的设备可以正常连接到 Xcode。
[appium-xcuitest-driver](https://github.com/appium/appium-xcuitest-driver) 的文档也有助于处理依赖。
### 基础 (自动) 配置
在 iOS 真机上支持 Appium XCUITest 运行的最简单的方法是使用自动配置策略。有两种做法:
* 使用 `xcodeOrgId` 和 `xcodeSigningId` desired capabilities:
```json
{
"xcodeOrgId": "<Team ID>",
"xcodeSigningId": "iPhone Developer"
}
```
* 新建一个 `.xcconfig` 文件,添加如下内容:
```
DEVELOPMENT_TEAM = <Team ID>
CODE_SIGN_IDENTITY = iPhone Developer
```
不论哪种做法,Team ID 是苹果生成后分配给你团队的一个唯一的 10 位字符串。用开发者账号可以找到你的 Team ID。
登录 [developer.apple.com/account](http://developer.apple.com/account),在边栏点击 Membership。
你的 Team ID 在 Membership Information 分节的 team name 下面。在“钥匙串访问”,你的 iPhone Developer
证书的“组织单位”的值也是 Team ID。
注意这两个做法互斥,使用 `xcodeConfigFile` capability 或者 `xcodeOrgId` 和 `xcodeSigningId`
组合的其中一个。
配置完成后,应该只需要给 `udid` desired capability 指定一个真机就可以开始测试了。
如果没有正常运行,通常会在 Appium server 日志中列出一些错误和`info XCUITest xcodebuild exited with code '65' and signal 'null'`。这通常是因为没有正确设置代码签名。接着可以通过 [基础 (手动) 配置](#basic-manual-configuration) 来修正。
如果真机上成功安装了 `WebDriverAgentRunner`,但是 Appium 日志有这样的错误信息:
```
2017-01-24 09:02:18.358 xcodebuild[30385:339674] Error Domain=com.apple.platform.iphoneos Code=-12 "Unable to launch com.apple.test.WebDriverAgentRunner-Runner" UserInfo={NSLocalizedDescription=Unable to launch com.apple.test.WebDriverAgentRunner-Runner, NSUnderlyingError=0x7fa839cadc60 {Error Domain=DTXMessage Code=1 "(null)" UserInfo={DTXExceptionKey=The operation couldn’t be completed. Unable to launch com.apple.test.WebDriverAgentRunner-Runner because it has an invalid code signature, inadequate entitlements or its profile has not been explicitly trusted by the user. : Failed to launch process with bundle identifier 'com.apple.test.WebDriverAgentRunner-Runner'}}}
2017-01-24 09:02:18.358 xcodebuild[30385:339674] Error Domain=IDETestOperationsObserverErrorDomain Code=5 "Early unexpected exit, operation never finished bootstrapping - no restart will be attempted" UserInfo={NSLocalizedDescription=Early unexpected exit, operation never finished bootstrapping - no restart will be attempted}
Testing failed:
Test target WebDriverAgentRunner encountered an error (Early unexpected exit, operation never finished bootstrapping - no restart will be attempted)
```
这是因为开发者没有在设备上被信任,尝试在设备上手动运行 `WebDriverAgentRunner` 应用,
会弹出一条消息:
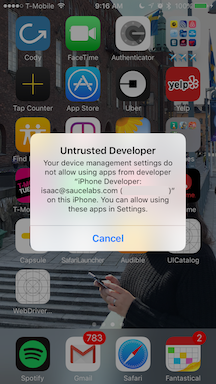
在设备的 设置 => 通用 => 设备管理 里信任开发者以允许使用 `WebDriverAgentRunner` 应用。
(查看 [苹果文档获取更多信息](https://support.apple.com/en-us/HT204460))。
### 基础(手动)配置
很多情况下用基础自动配置还不够。为了在真机上运行测试一般还需要处理项目的签名和配置。一般在使用免费开发者账号
的时会出现这种情况,因为既不能创建通配符 provisioning profile,也不会给默认应用包创建。
会有这种报错 Xcode **failed to create provisioning profile**
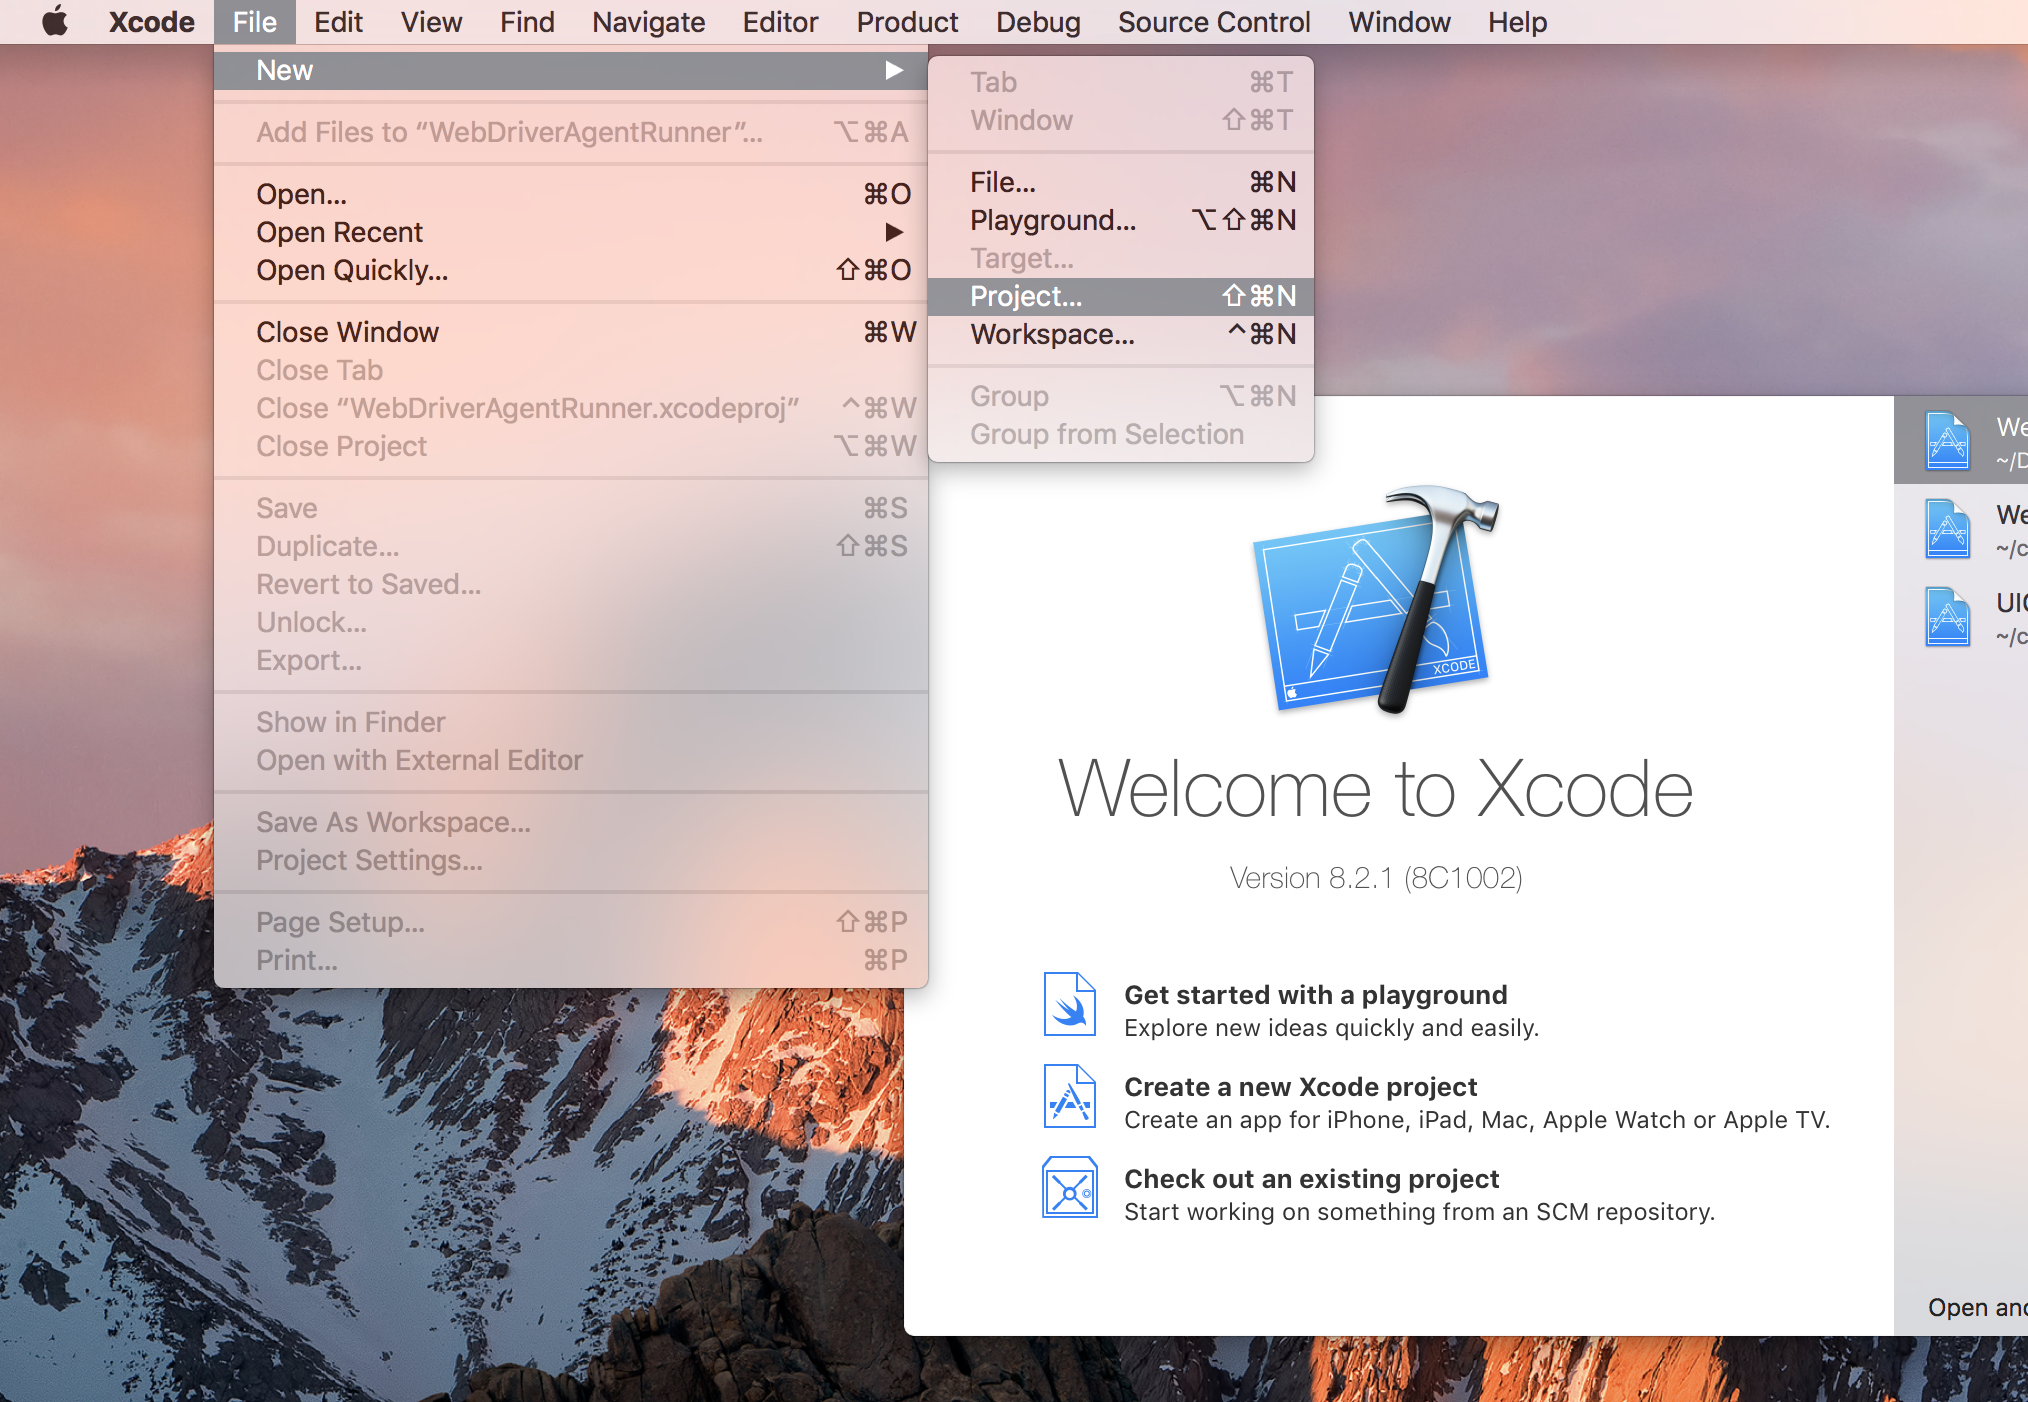
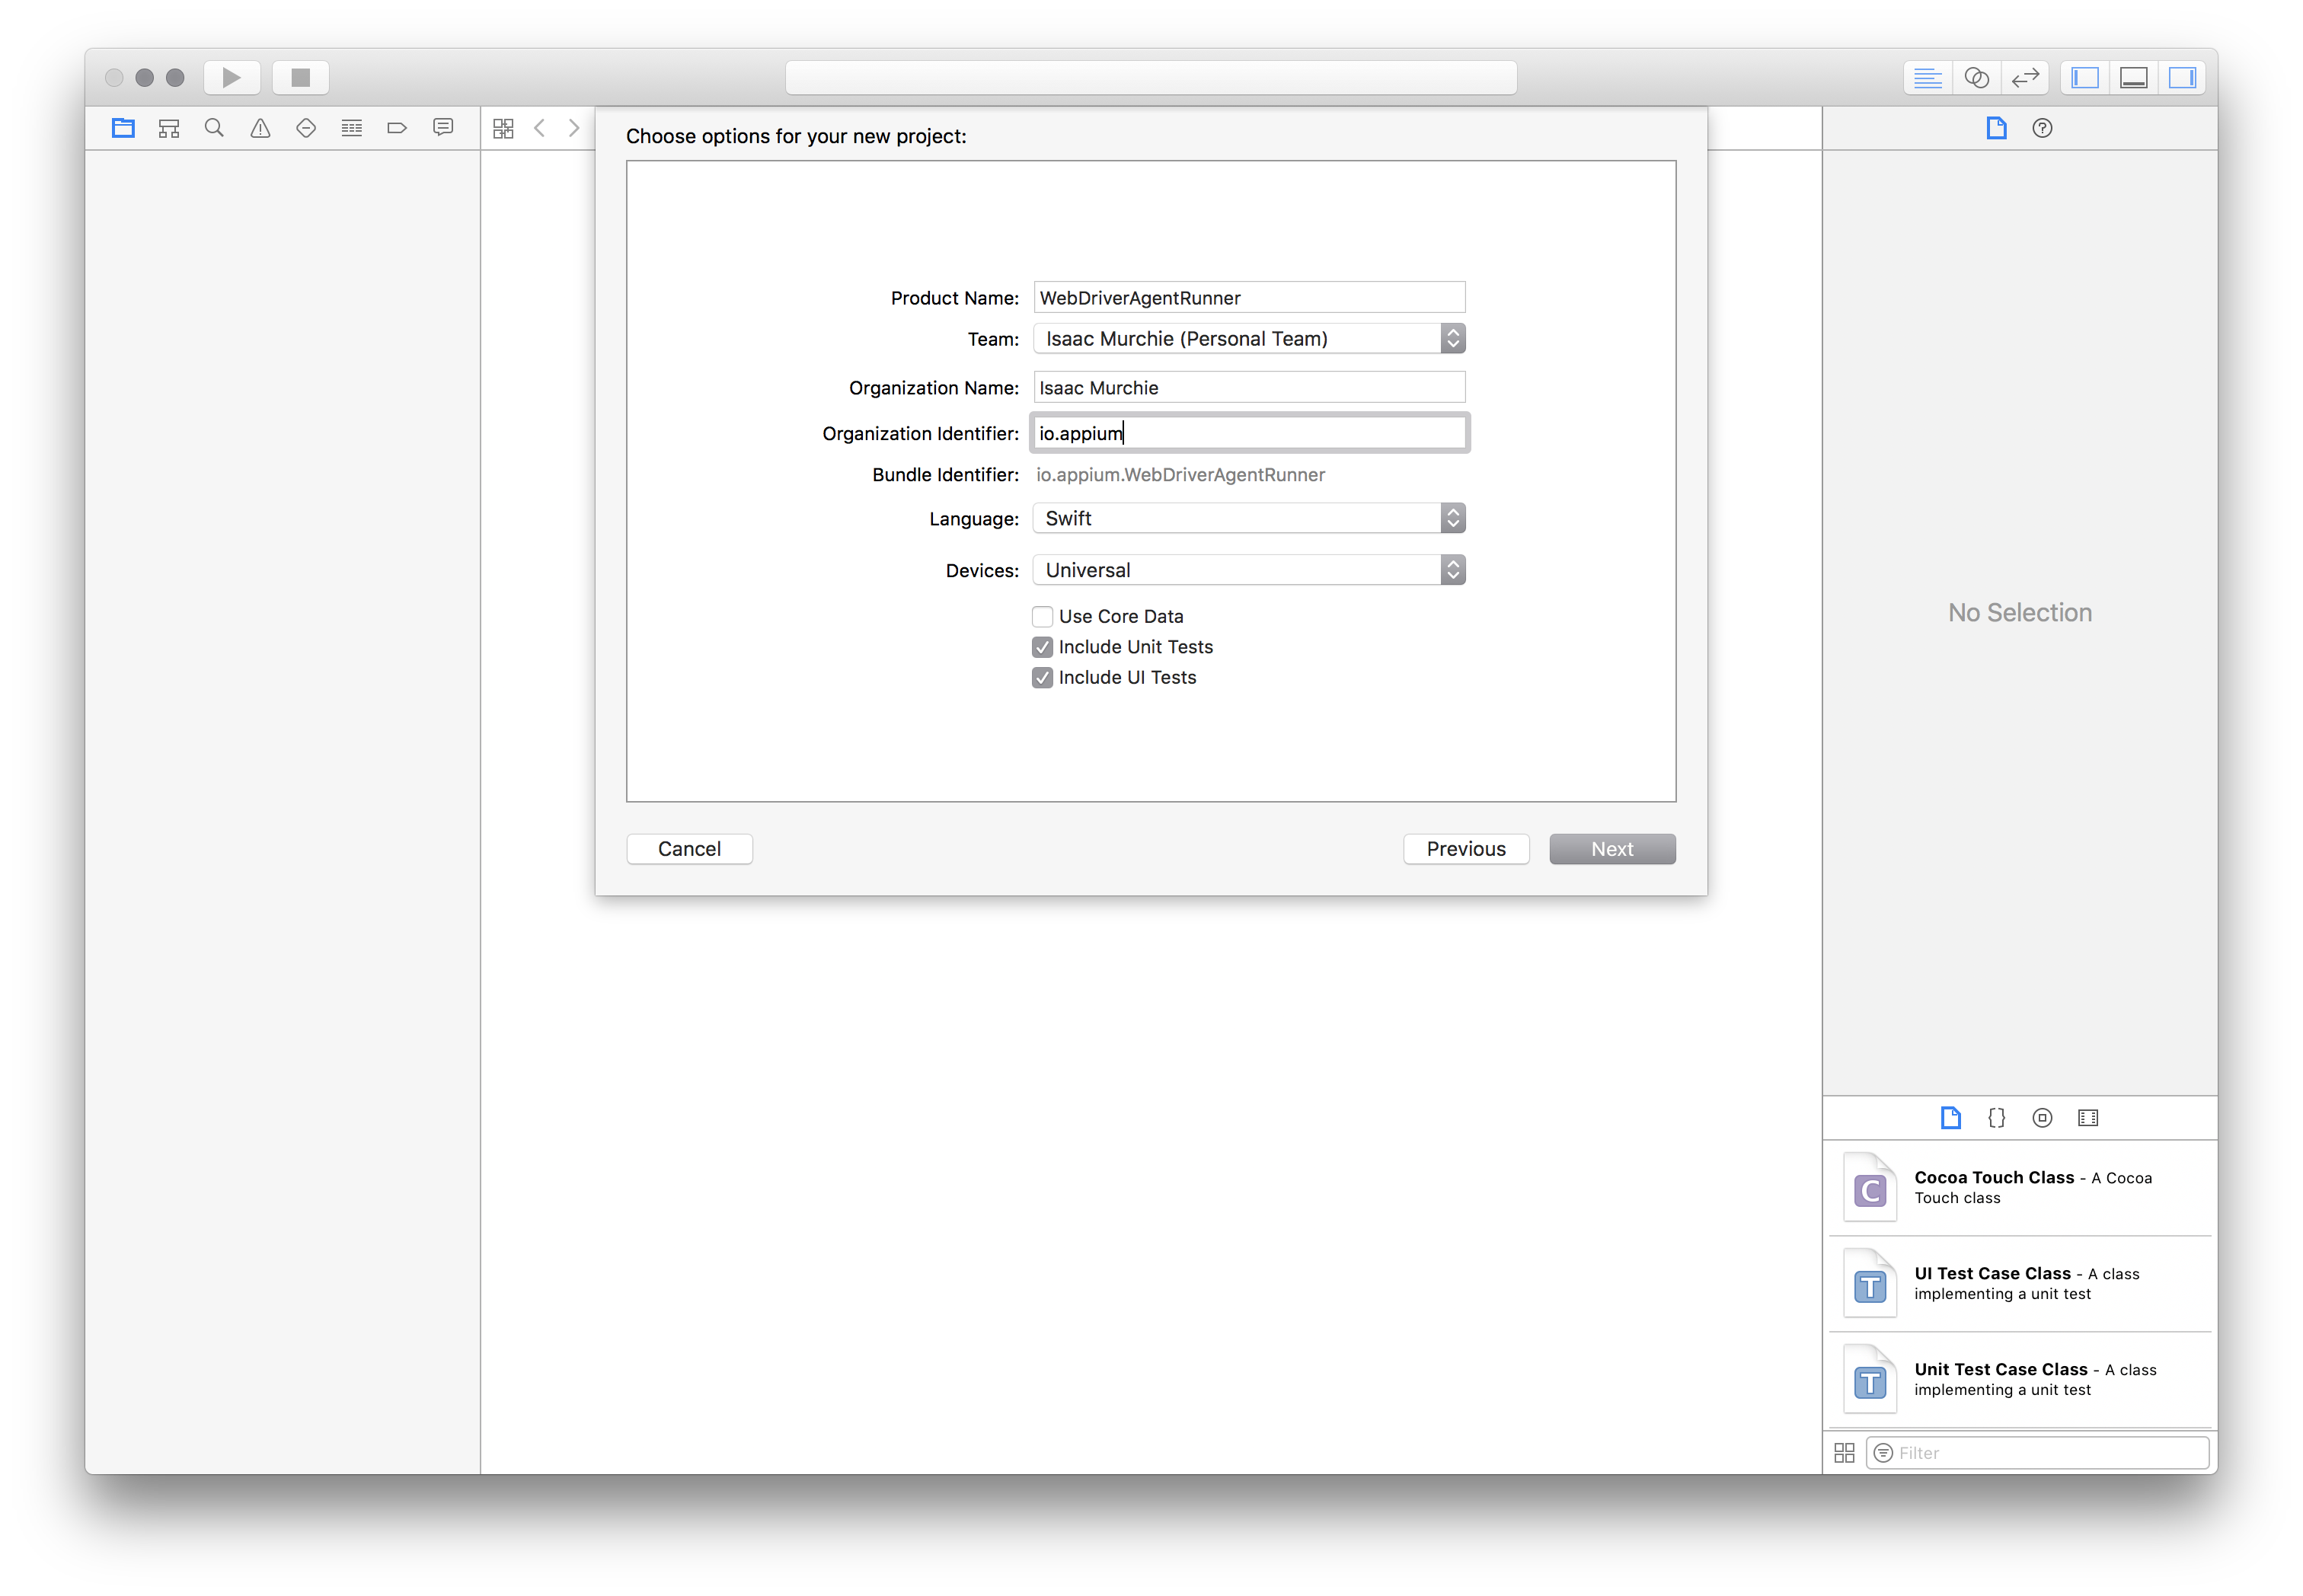
简单的处理方法是打开 [Xcode](https://developer.apple.com/xcode/) 新建一个项目并创建
provisioning profile:
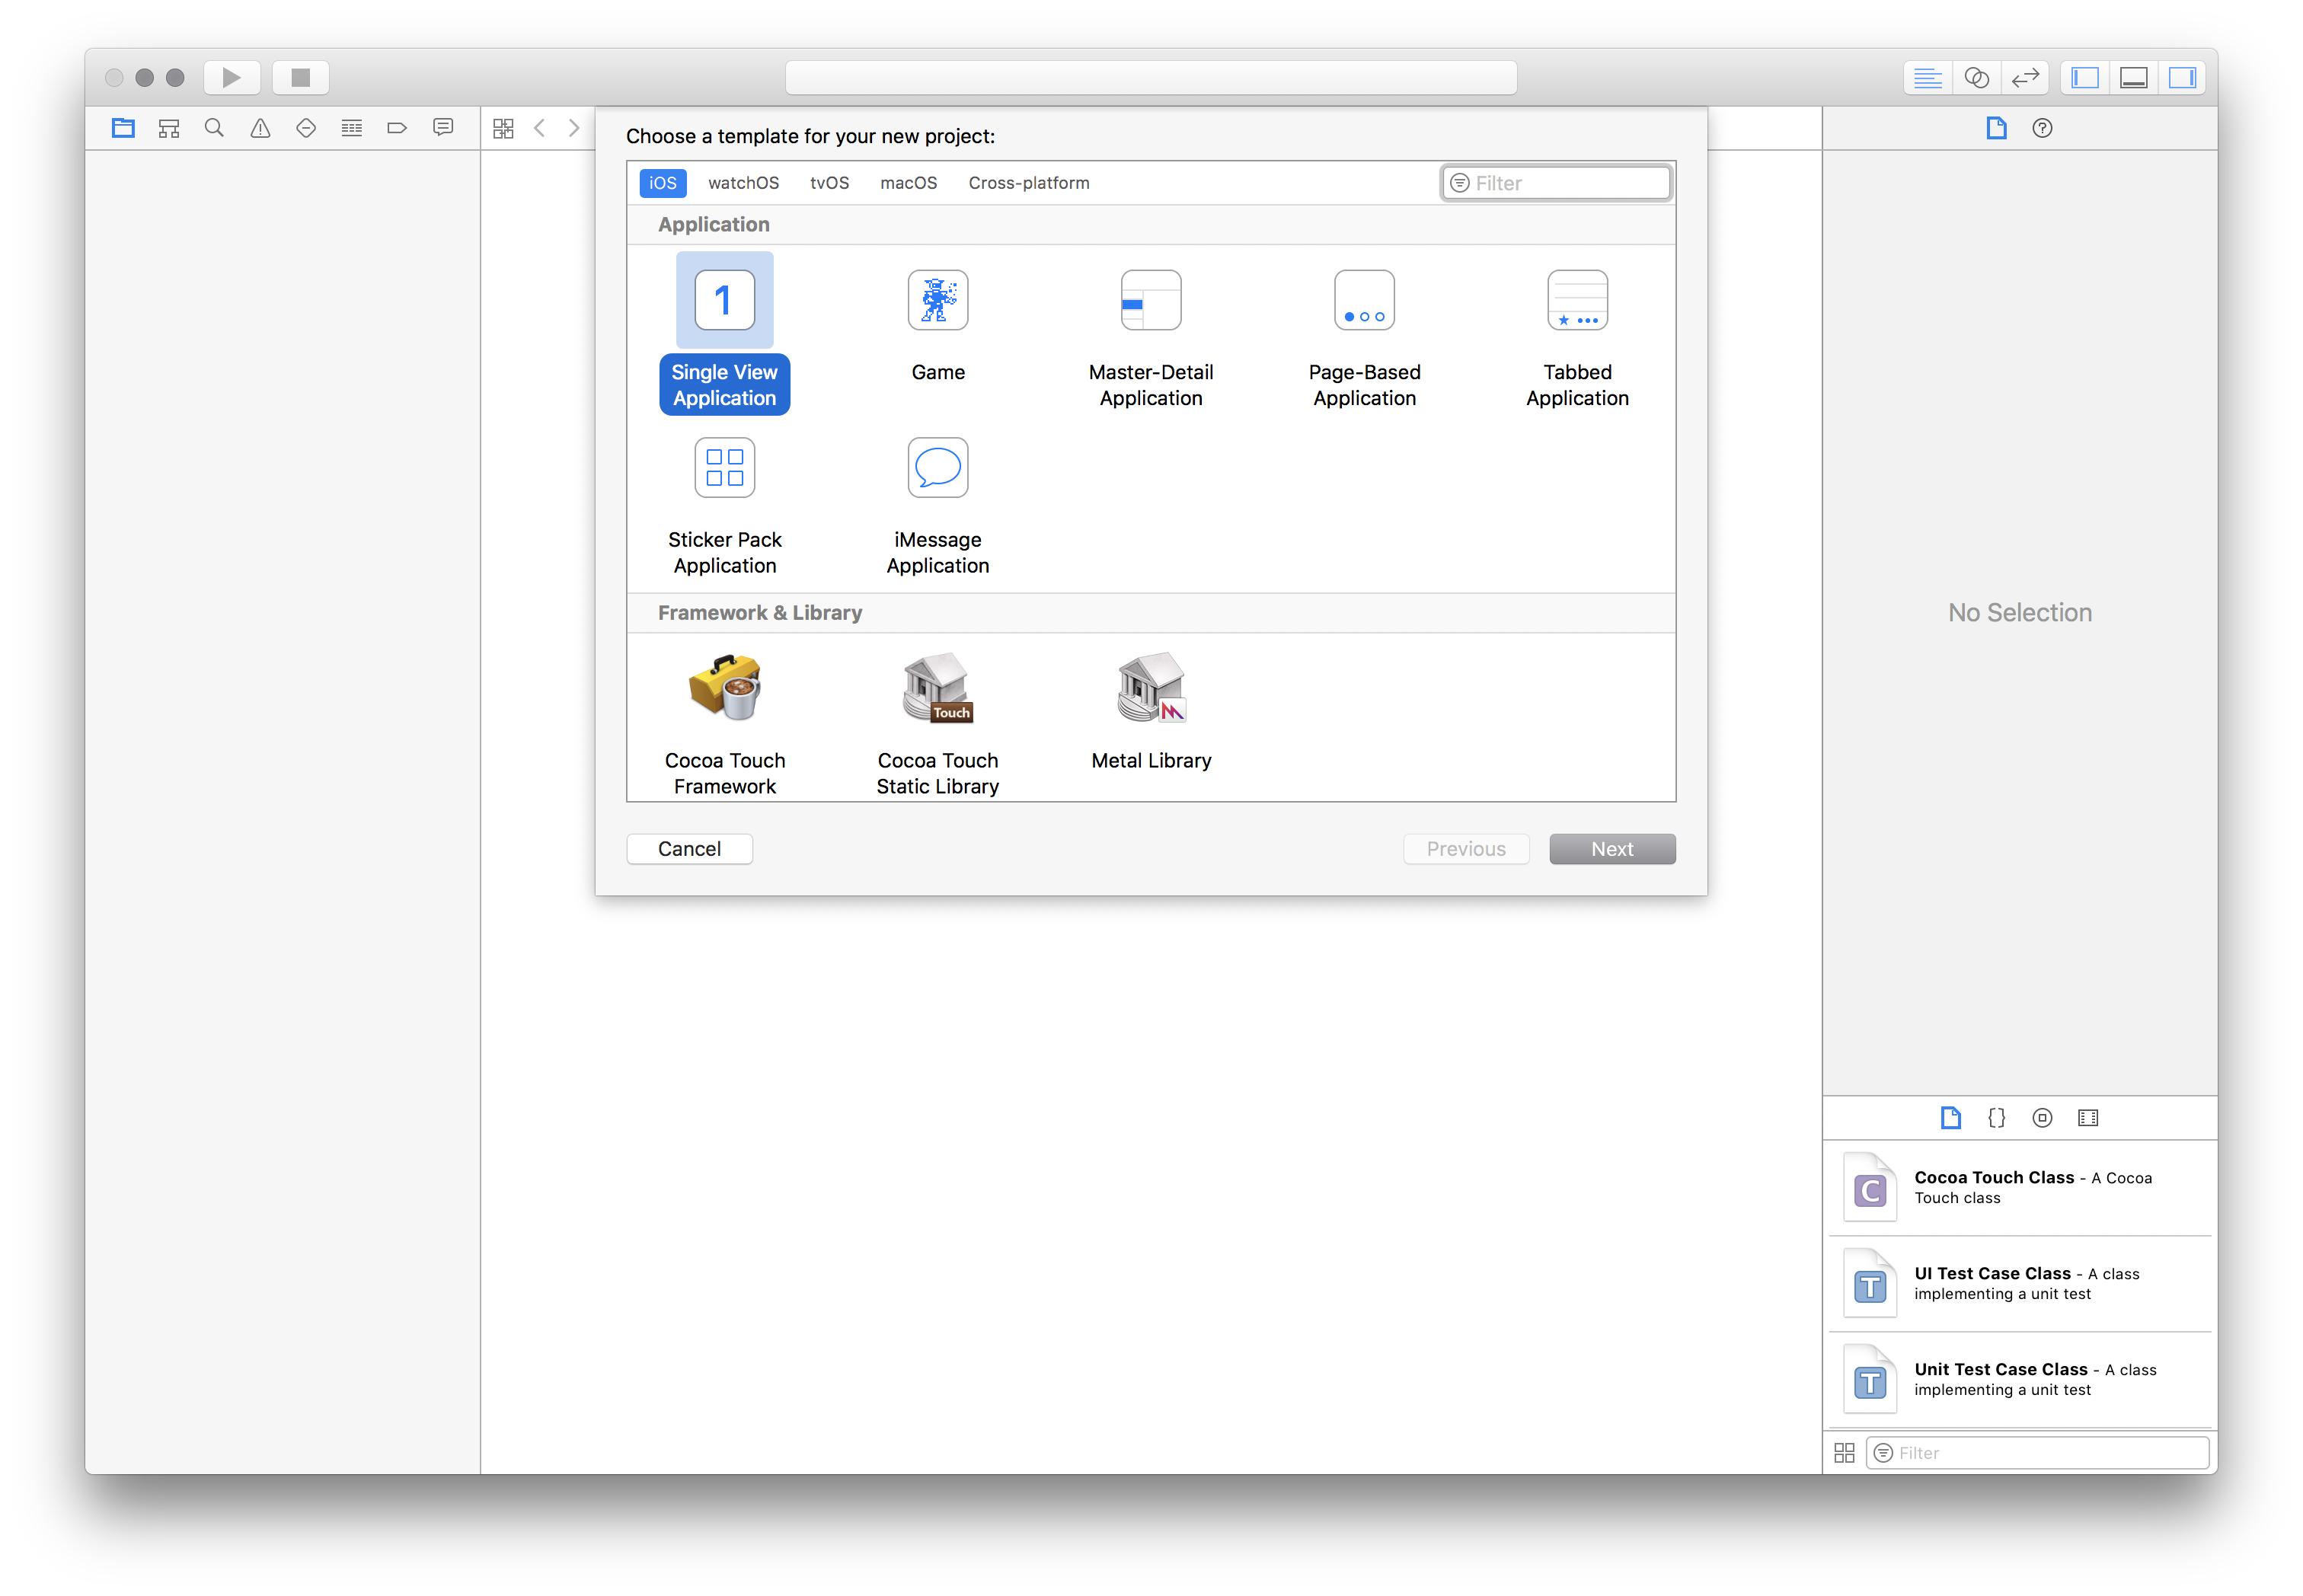
"iOS" 下的什么类型都行。最简单的是 "Single View Application":
重要的是使用唯一的 "Product Name" 和 "Organization Name"。还有选择你的 "Team"。
在 "Project" 标签里可以确认 provisioning profile 有没有创建。

也可以在账户设置查看 provisioning profile:
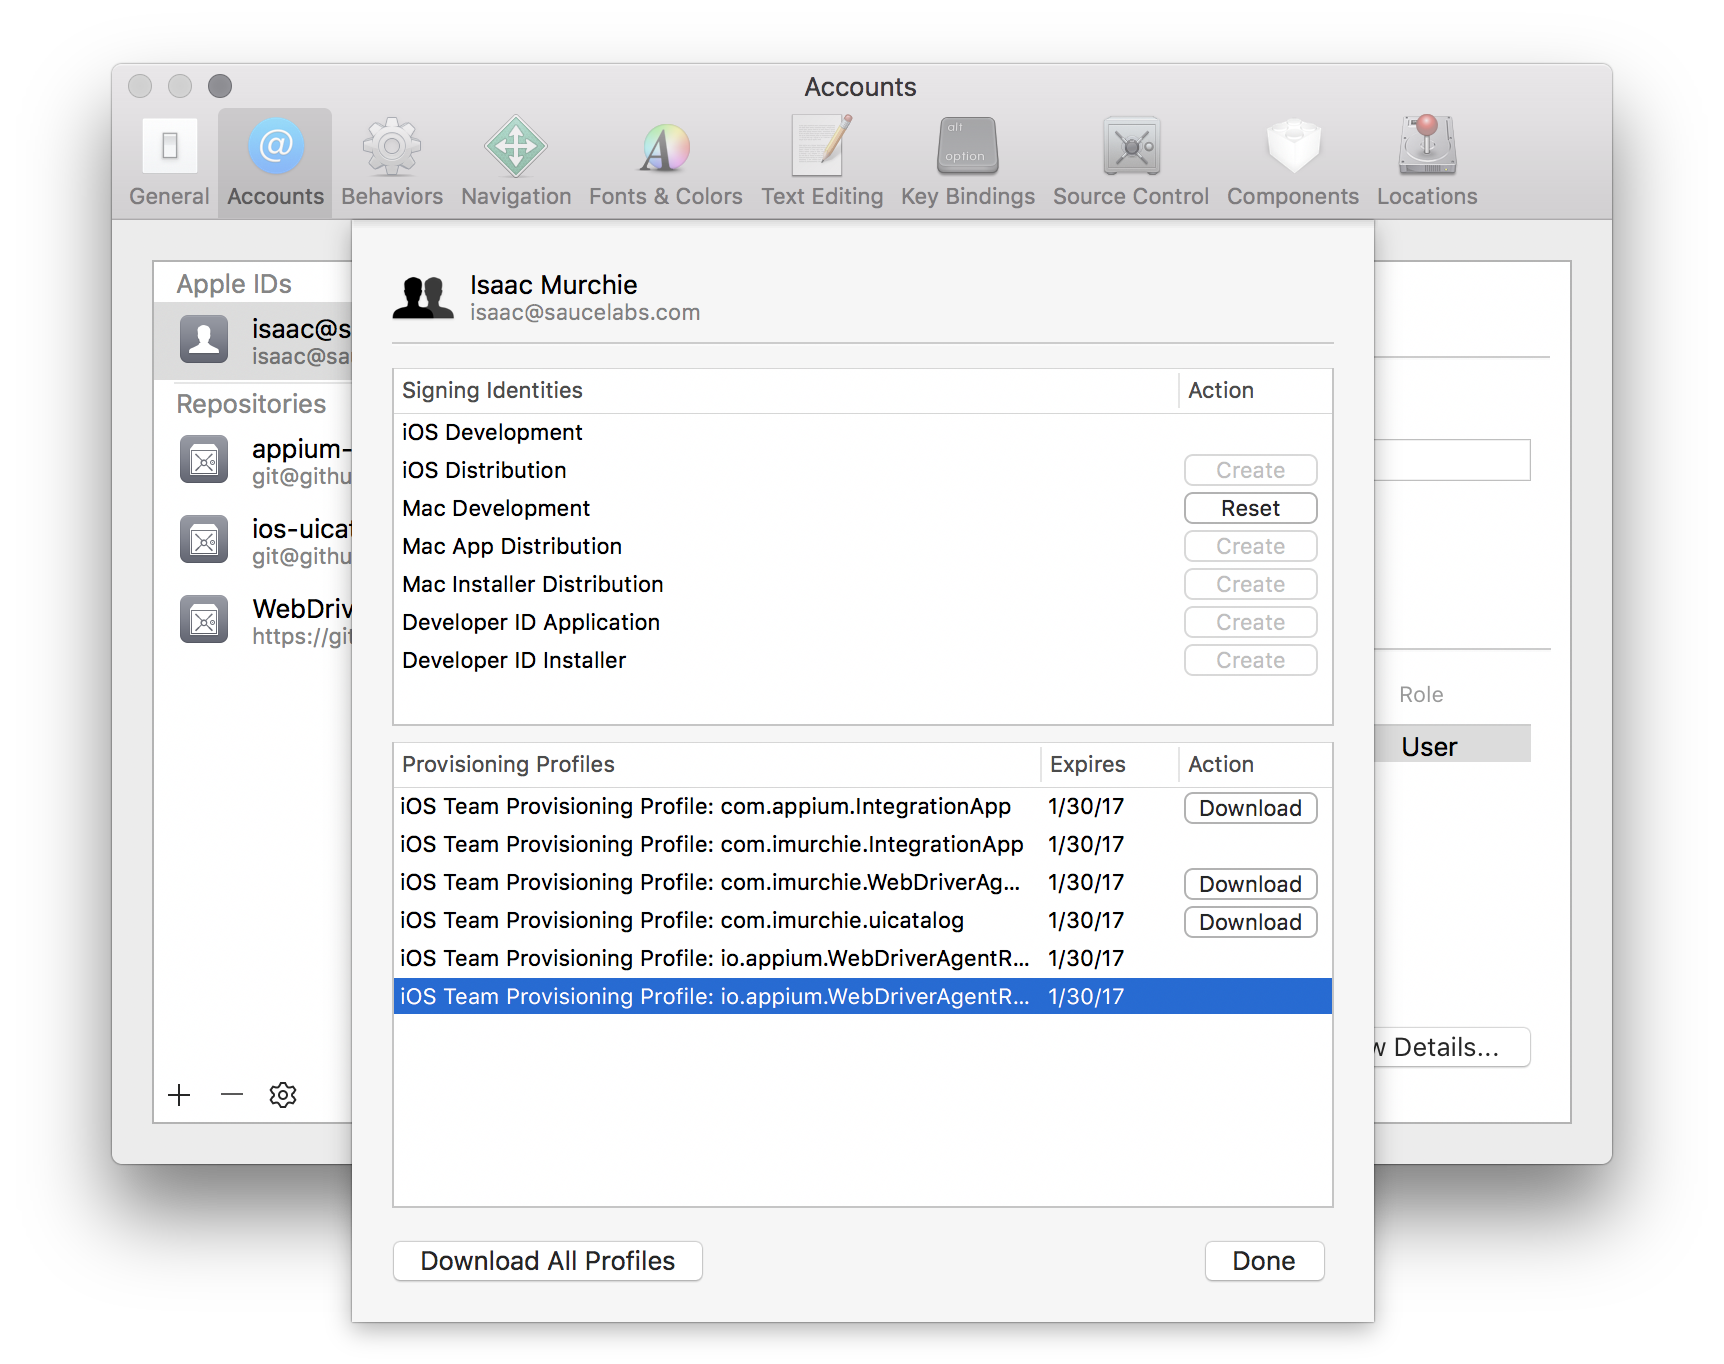
现在就有有效的 provisioning profile 了。把 bundle id 填在你测试项目的 `updatedWDABundleId` desired
capability 里。然后再按照 [initial instructions for automatic configuration](#basic-automatic-configuration) 做。
### 全手动配置
也可以手动关联项目和 provisioning profile(请记得每次升级 WebDriverAgent 以及安装 Appium
新版本之后都需要重新配置一遍,不建议用这种方式):
* 查找 Appium 安装在哪里:
```
$ which appium
/path/where/installed/bin/appium
```
* 如果路径是 `/path/where/installed/bin/appium`,`WebDriverAgent` 项目会在 `/path/where/installed/lib/node_modules/appium/node_modules/appium-webdriveragent`。
在终端进入这个路径,执行以下命令完成项目设置:
```
mkdir -p Resources/WebDriverAgent.bundle
./Scripts/bootstrap.sh -d
```
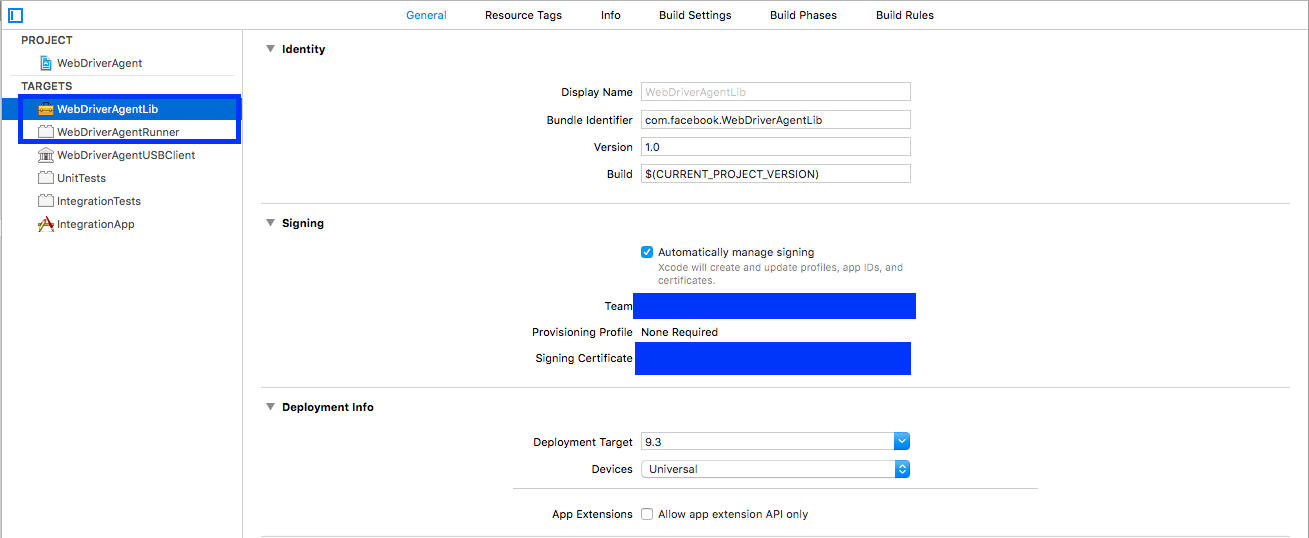
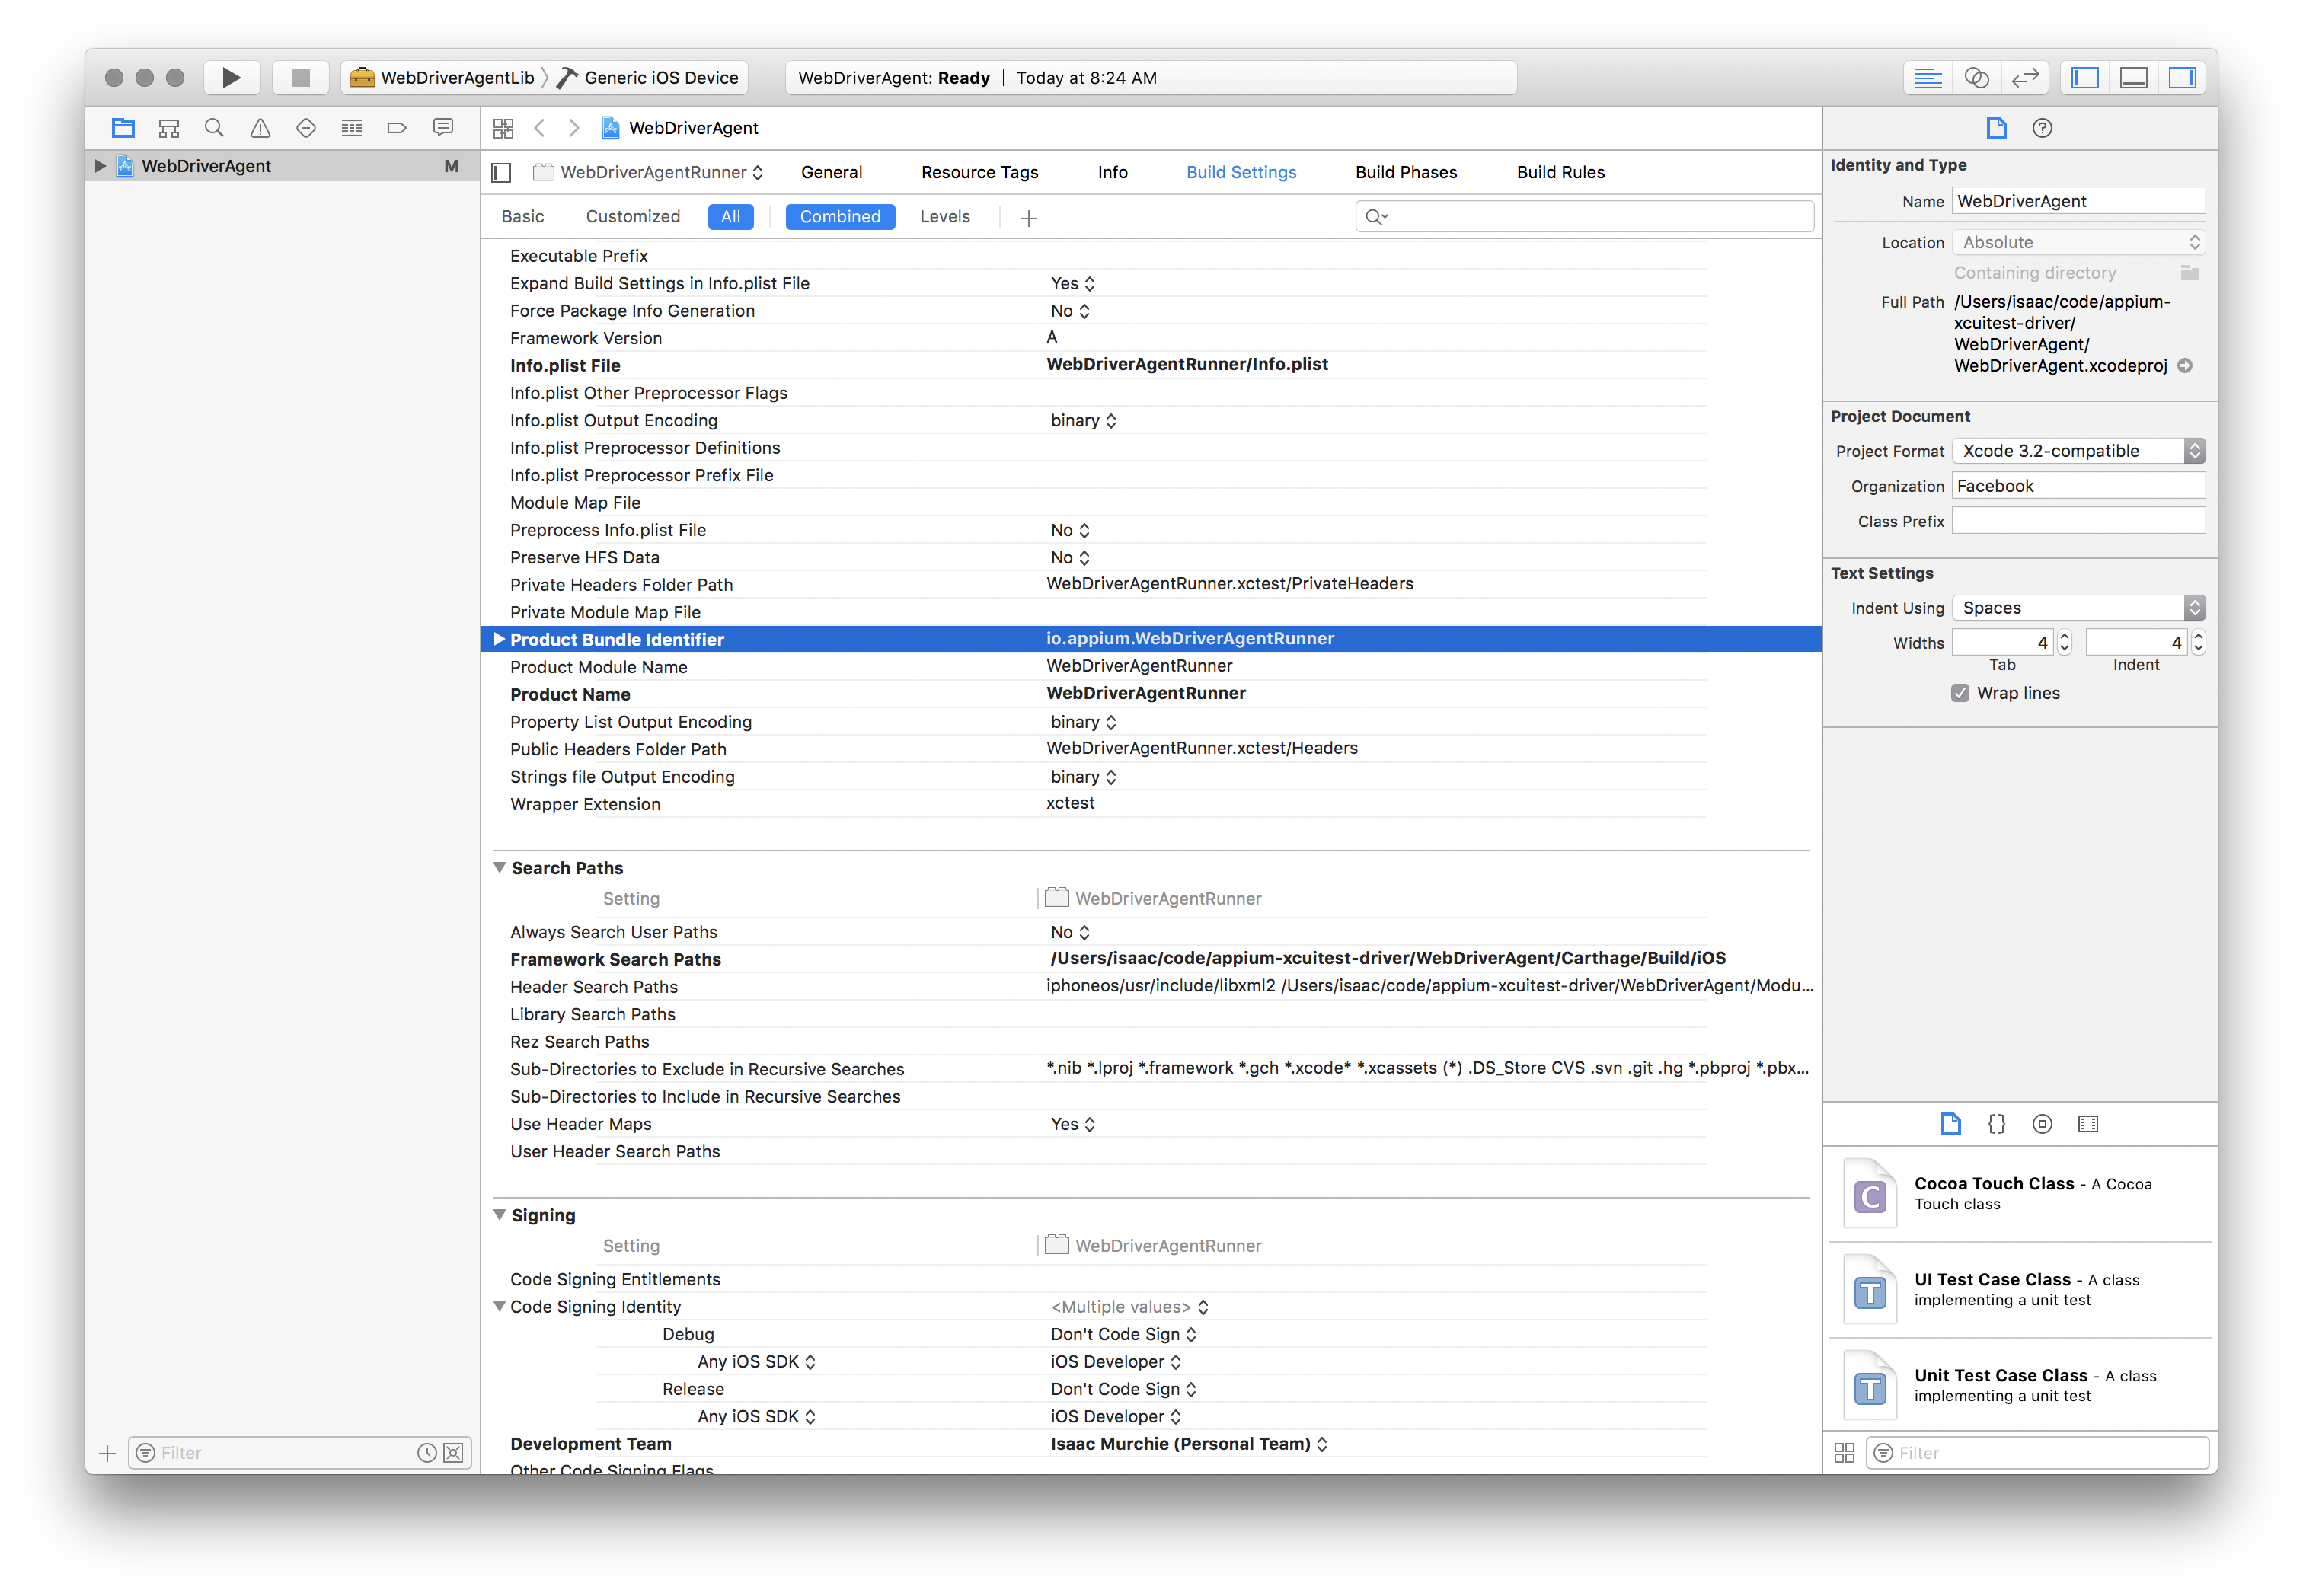
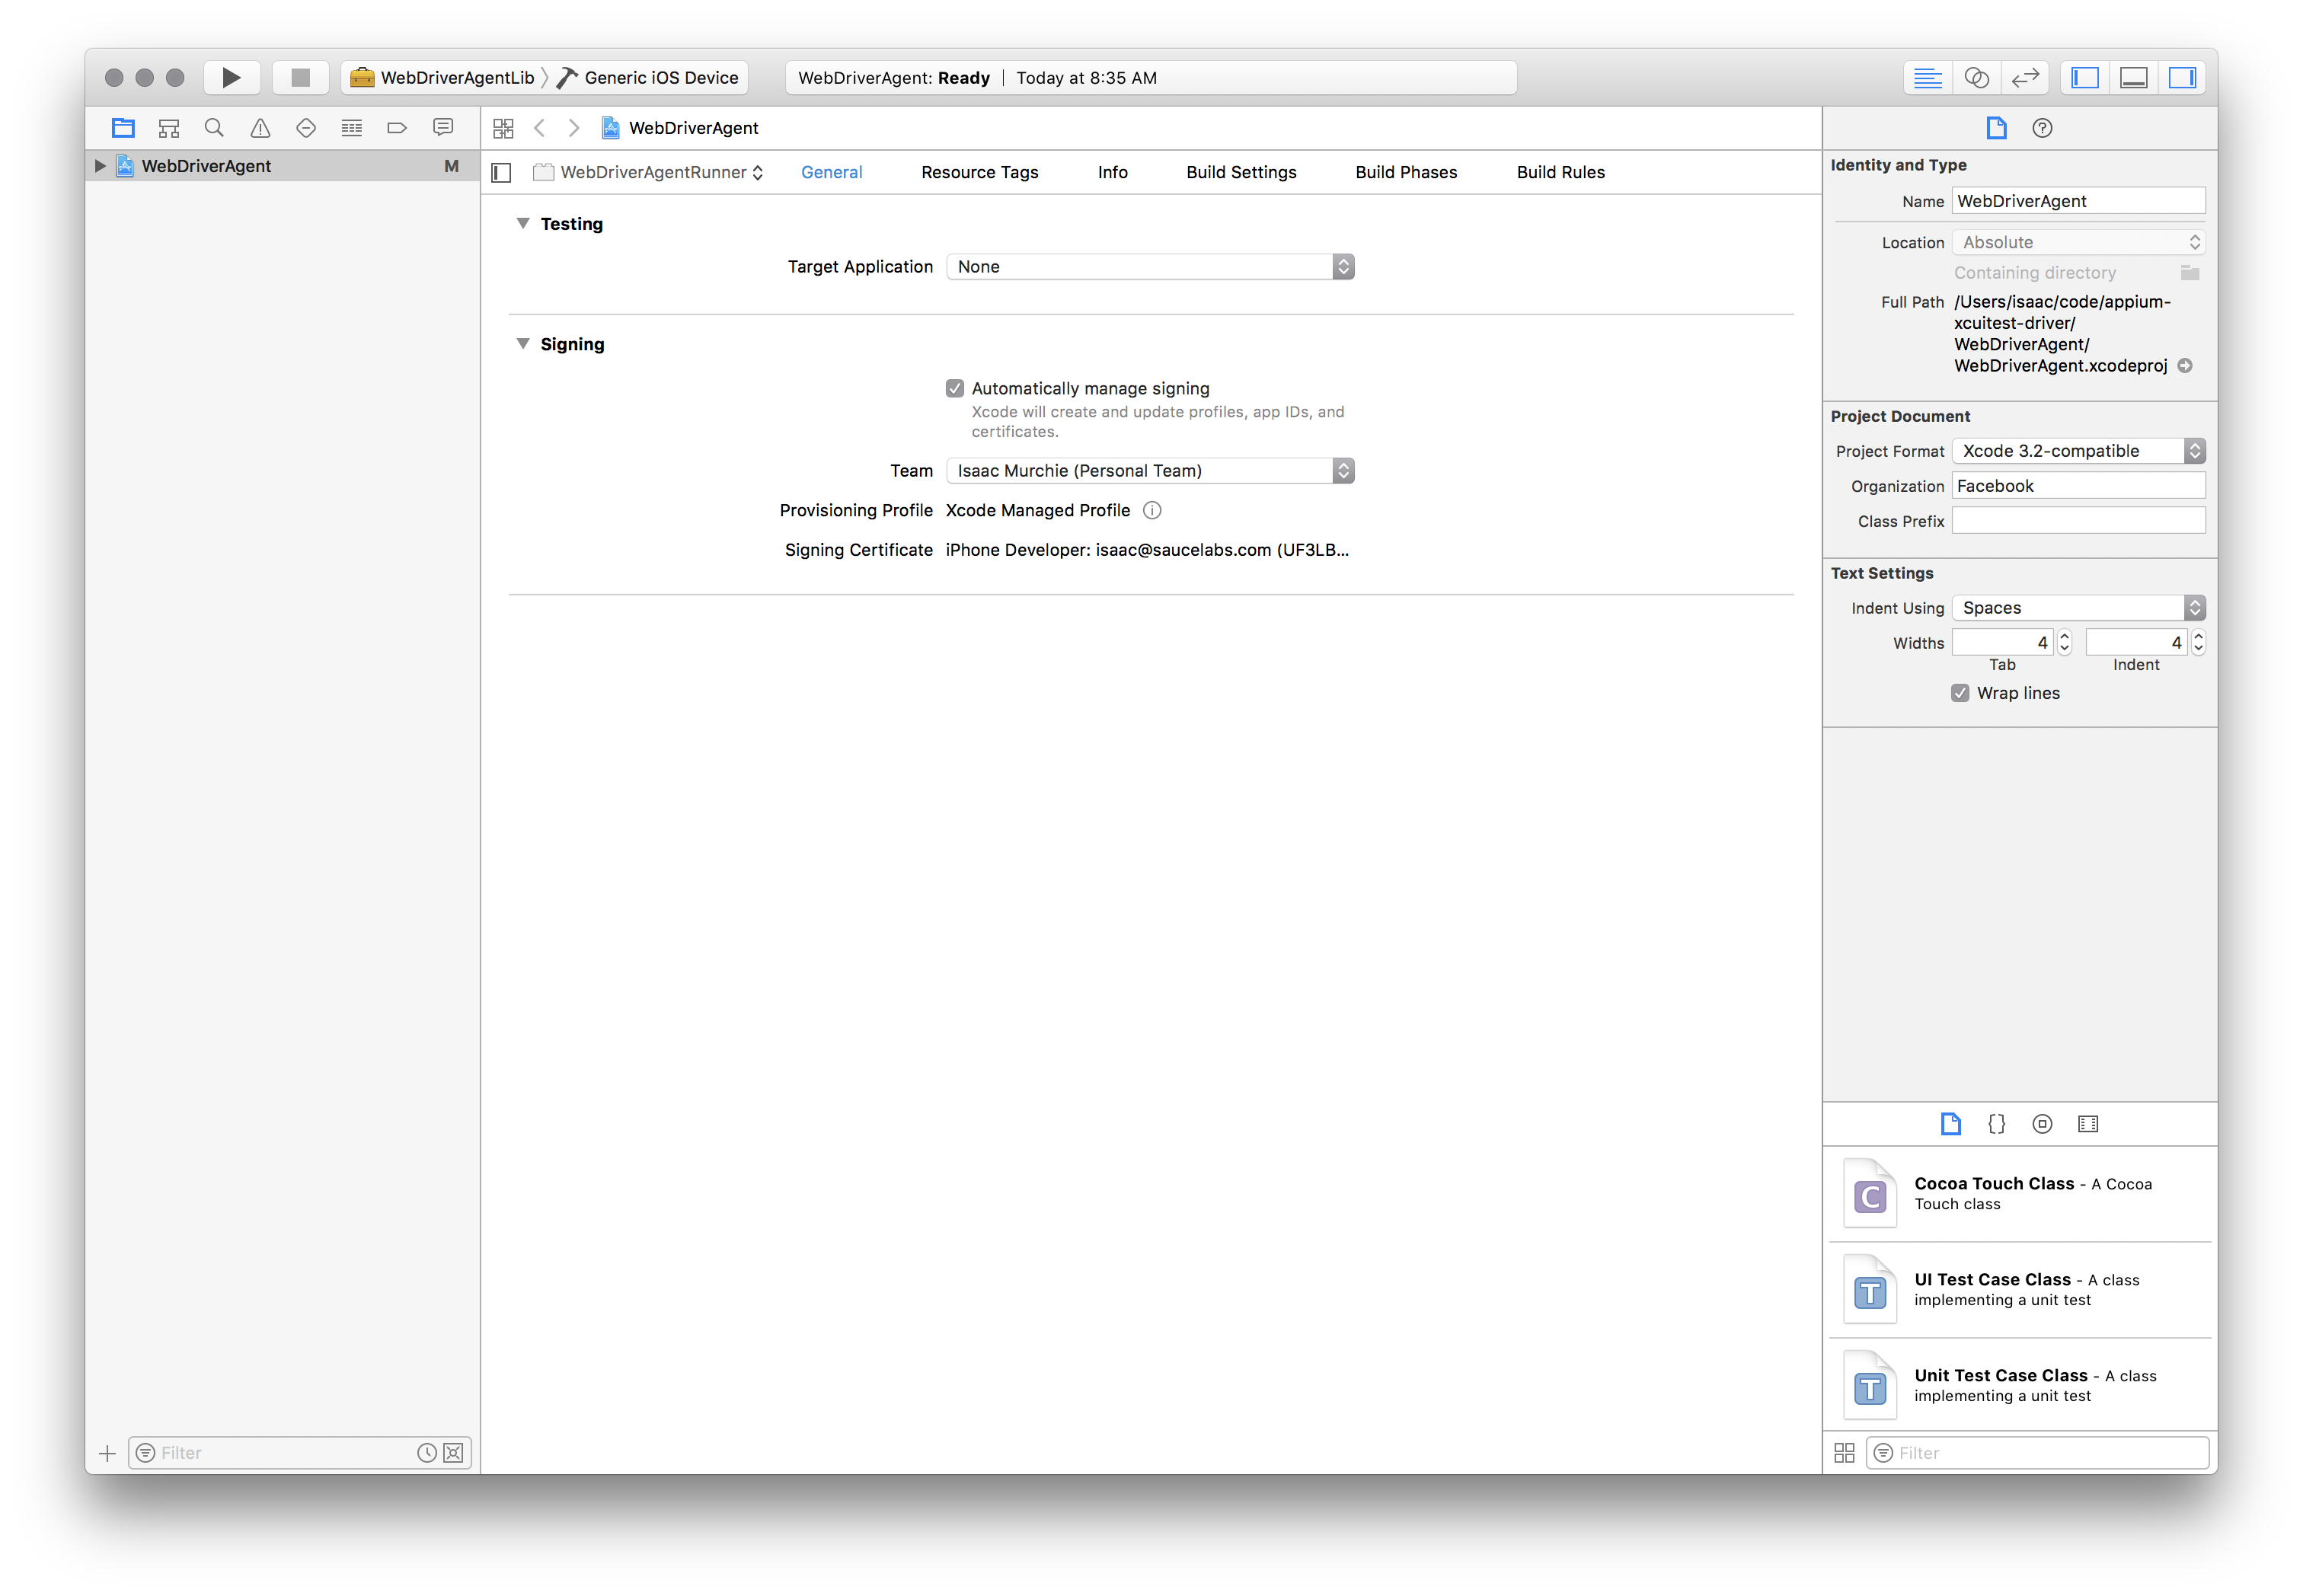
* 用 Xcode 打开 `WebDriverAgent.xcodeproj`,分别在 `WebDriverAgentLib` 和 `WebDriverAgentRunner`
targets 的 "General" 选项卡里勾选 "Automatically manage signing",并选上你的 `Development Team`。
然后会自动选上 `Signing Ceritificate`。看起来应该如下图:
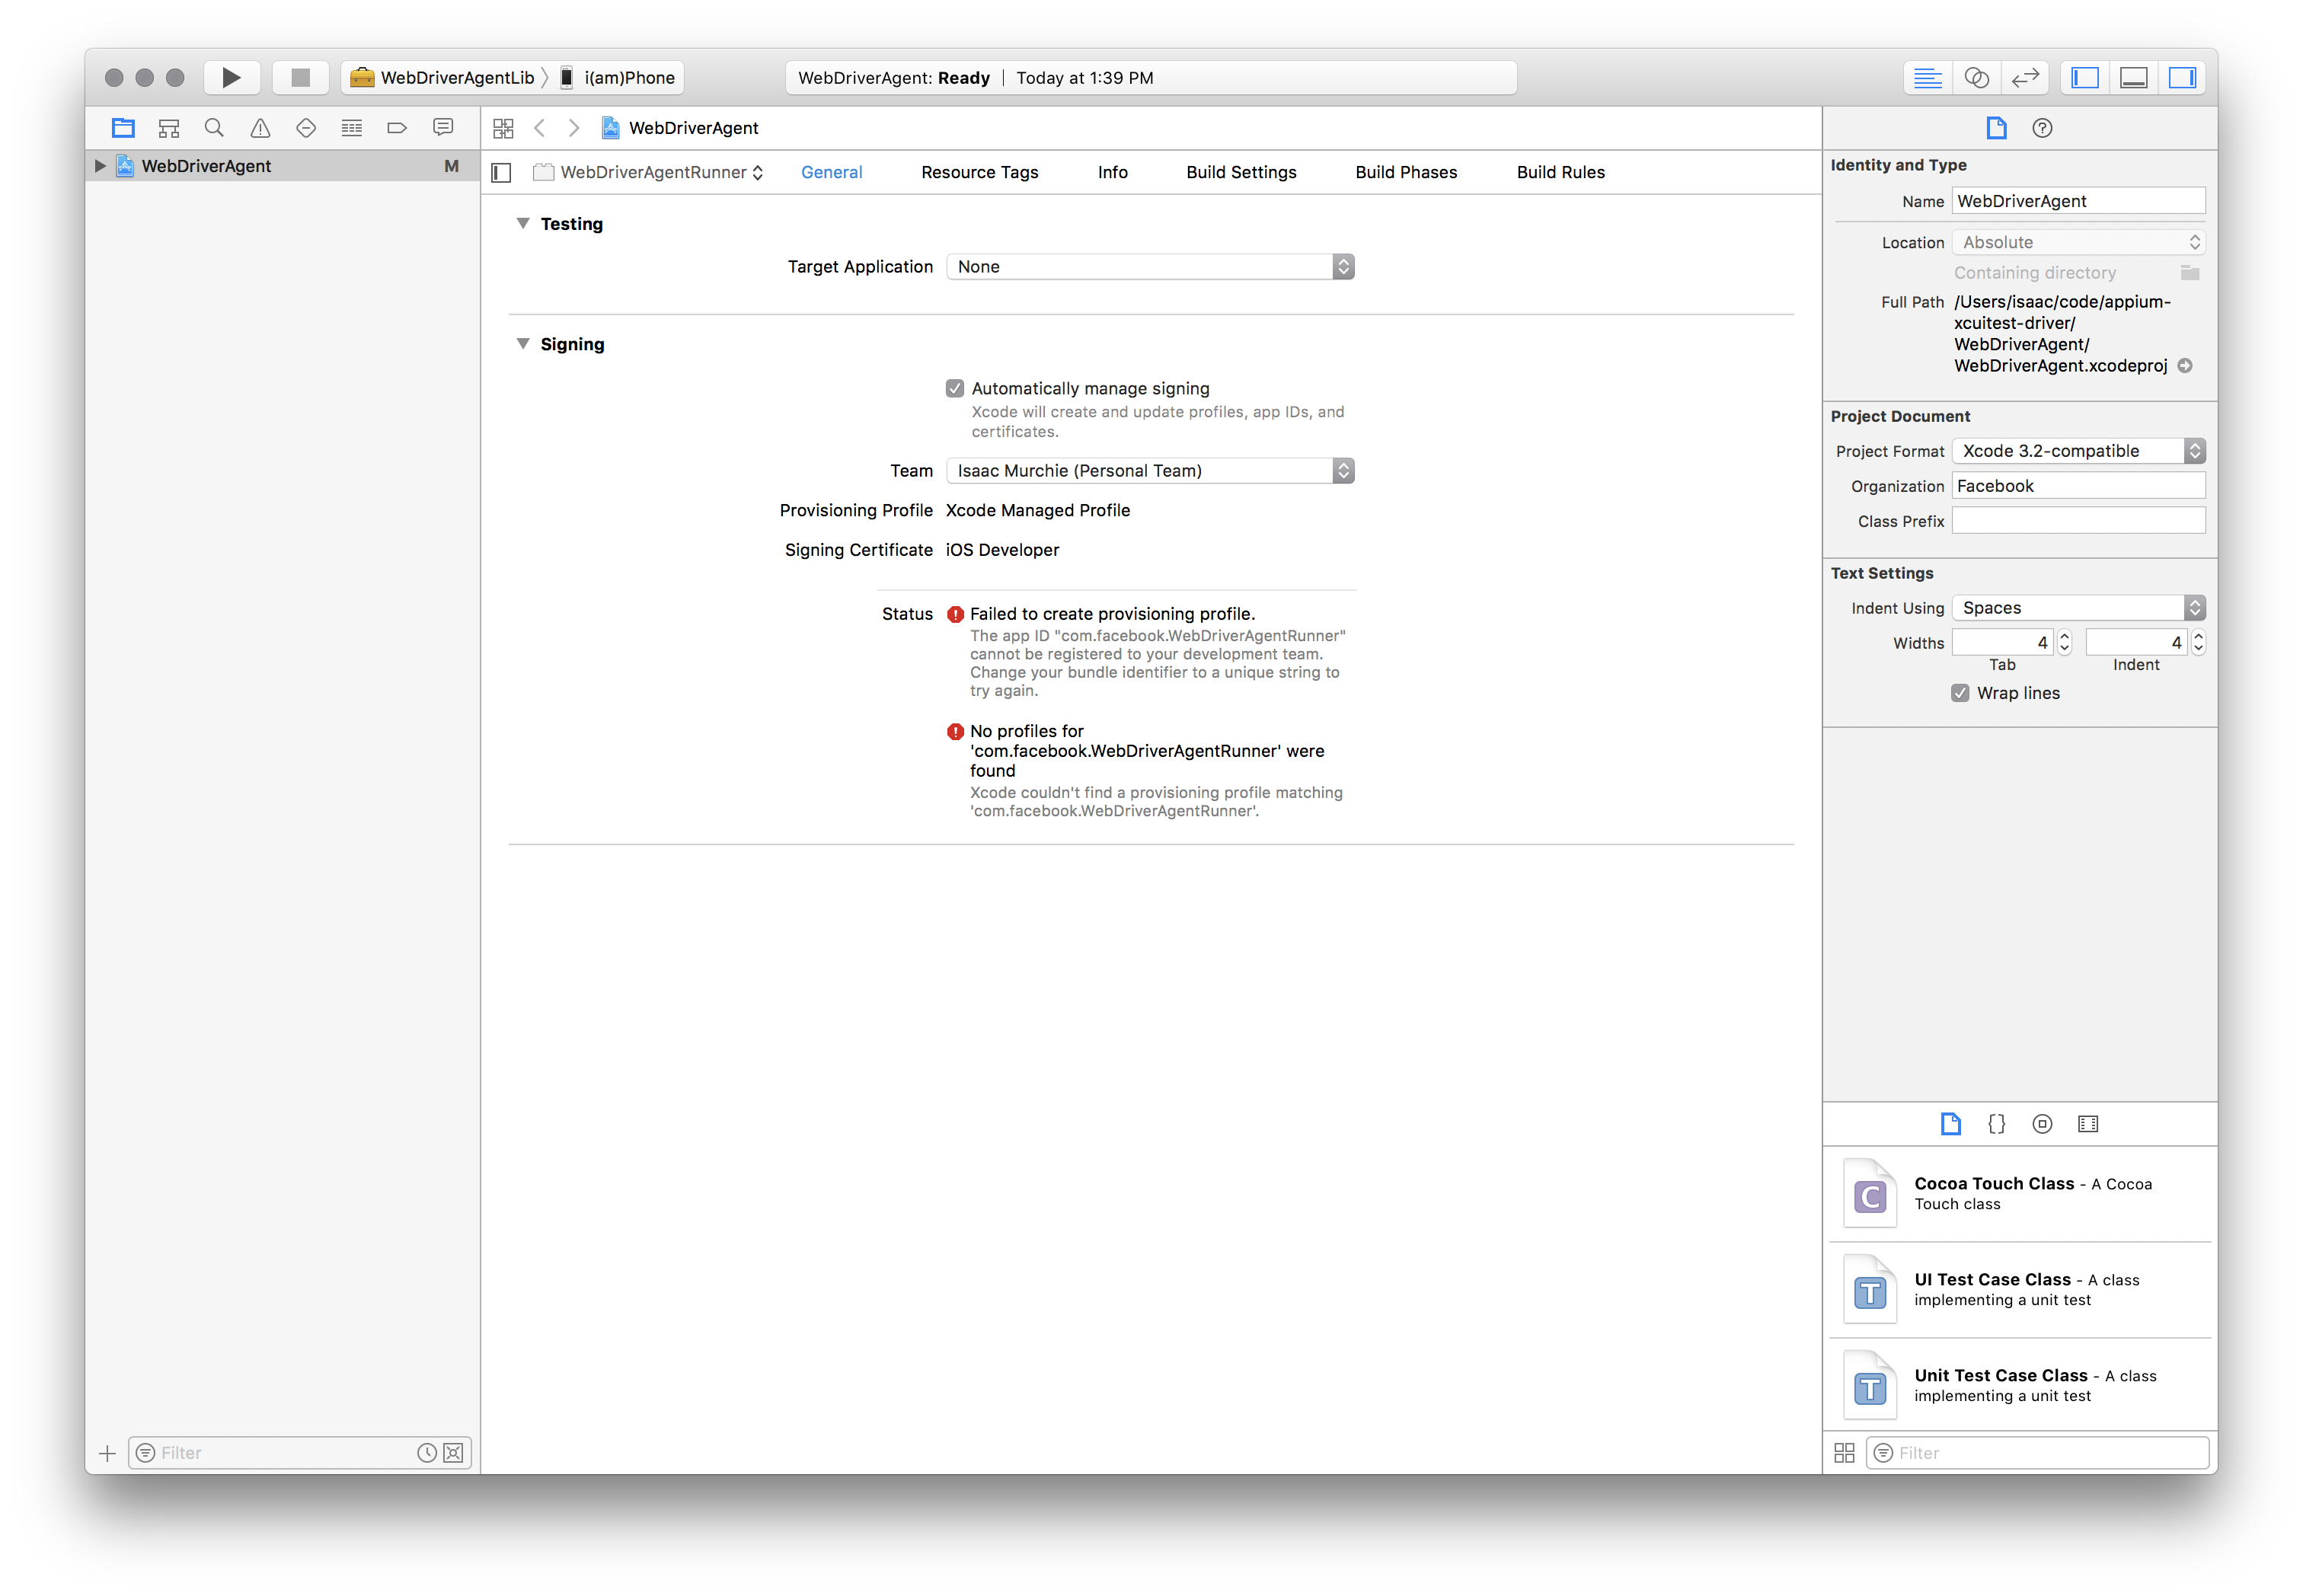
* Xcode 给 `WebDriverAgentRunner` 创建 provisioning profile 的时候可能会失败:
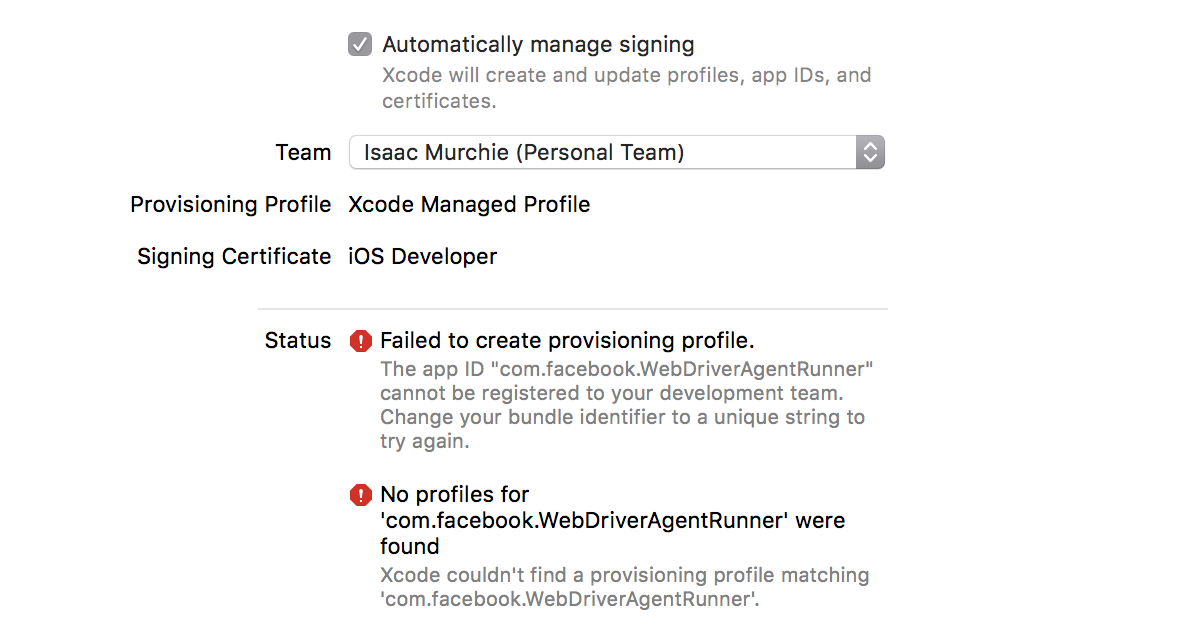
* 需要手动在 "Build Settings" 选项卡修改 target 的 bundle id,并且把 "Product Bundle Identifier"
从 `com.facebook.WebDriverAgentRunner` 改为 Xcode 可以通过的内容:
* 回到 "General" 选项卡的 `WebDriverAgentRunner` target,现在应该看到它创建了
provisioning profile 并且一切正常:
* 最后,验证下是否可以正常运行。编译项目:
```
xcodebuild -project WebDriverAgent.xcodeproj -scheme WebDriverAgentRunner -destination 'id=<udid>' test
```
如果编译成功,应该输出如下内容:
```
Test Suite 'All tests' started at 2017-01-23 15:49:12.585
Test Suite 'WebDriverAgentRunner.xctest' started at 2017-01-23 15:49:12.586
Test Suite 'UITestingUITests' started at 2017-01-23 15:49:12.587
Test Case '-[UITestingUITests testRunner]' started.
t = 0.00s Start Test at 2017-01-23 15:49:12.588
t = 0.00s Set Up
```
* 为了完全验证,可以尝试访问 WebDriverAgent 服务状态(**注意:** 你必须和设备在同一个网络,
并且知道设备的 IP 地址,可以在 设置 => Wi-Fi => 连接中的网络 查看):
```
export DEVICE_URL='http://<device IP>:8100'
export JSON_HEADER='-H "Content-Type: application/json;charset=UTF-8, accept: application/json"'
curl -X GET $JSON_HEADER $DEVICE_URL/status
```
应该看到输出如下返回:
```
{
"value" : {
"state" : "success",
"os" : {
"name" : "iOS",
"version" : "10.2"
},
"ios" : {
"simulatorVersion" : "10.2",
"ip" : "192.168.0.7"
},
"build" : {
"time" : "Jan 23 2017 14:59:57"
}
},
"sessionId" : "8951A6DD-F3AD-410E-A5DB-D042F42F68A7",
"status" : 0
}
```
### 配置待测 App
除了 WebDriverAgent,为了在设备上运行,你的 App 也需要配置好。主要要求是一样的:用开发
provisioning profile build 的 App(`.ipa` 文件)。[这里](https://medium.com/ios-os-x-development/ios-code-signing-provisioning-in-a-nutshell-d5b247760bef#.5hirl92tn)有一个不错的流程概述,还有
[这里](https://www.nodesagency.com/understanding-code-signing-for-ios-apps)。
再详细的说,为了使用真机,你需要:
* [Apple Developer ID](https://developer.apple.com/programs/ios/) 和配置好开发者证书
和 provisioning profile 的有效的开发者账号。
* 在真机上测试有效的 iOS 开发证书和 Provisioning Profile 是必要的。你的 App 也需要被签名。在 [Apple documentation](https://developer.apple.com/library/ios/documentation/IDEs/Conceptual/AppDistributionGuide/TestingYouriOSApp/TestingYouriOSApp.html) 可以找到相关信息。
* 一个配置好可以在 Xcode 里开发用的 iPad 或者 iPhone。
* 一个签过名的 `.app` 或者 `.ipa` 文件,或者从源码 build 一个。
* 一台有 [Xcode](https://developer.apple.com/xcode/) 和 Xcode Command Line Developer Tools
的 Mac。
Appium 用 `ideviceinstaller` (作为 `libimobiledevice` 的一部分被安装) 把应用安装到设备上。
不过有时候预先用 Xcode 安装 App 会更容易确认有没有问题(再看看 [Apple documentation](https://developer.apple.com/library/content/documentation/IDEs/Conceptual/AppDistributionGuide/TestingYouriOSApp/TestingYouriOSApp.html)。
### 排障方法
1. 通过 Xcode 的 Organizer 或者 iTunes 确认 UDID 是否正确。UDID 是一长串字符(20 个字符以上)。
2. 确认你的测试可以在模拟器上执行。
3. 确认以下设置在你的设备上是**启用**的:
1. 设置 -> 开发者 -> **Enable UI Automation**
2. 设置 -> Safari 浏览器 -> 高级 -> **网页检查器** 和 **远程自动化**
1. 请阅读 [Automating mobile web apps](/writing-running-appium/web/mobile-web) 了解更多关于 WebView 的细节。
4. 如果你不想为了手工配置生成使用通配符的 provisioning profile ,可以考虑使用 `.xctrunner` 作为 identifier。从 Xcode 11 开始支持了 `.xctrunner` 配置,[参考](https://github.com/appium/appium/issues/13610)。
5. 确认设备没有越狱
- 设备上管理应用的服务 `com.apple.mobile.installation_proxy` 会[无法工作](https://github.com/appium/appium-desktop/issues/1447)。
- 关于TesterHome和MTSC
- 关于Appium
- 简介
- Appium 客户端
- 入门指南
- 已支持的平台
- API 文档
- Appium驱动
- XCUITest (iOS)
- XCUITest Real Devices (iOS)
- UIAutomation (iOS)
- UIAutomation Safari Launcher (iOS)
- UIAutomator (Android)
- UIAutomator2 (Android)
- Espresso (Android)
- Windows
- Mac
- Appium命令
- Status
- Execute Mobile Command
- Session
- Create
- End
- Get Session Capabilities
- Go Back
- Screenshot
- Source
- Timeouts
- Timeouts
- Implicit Wait
- Async Script
- Orientation
- Get Orientation
- Set Orientation
- Geolocation
- Get Geolocation
- Set Geolocation
- Logs
- Get Log Types
- Get Logs
- Events
- Log event
- Get events
- Settings
- Update Settings
- Get Device Settings
- Settings
- Update Settings
- Get Device Settings
- Execute Driver Script
- Device
- Activity
- Start Activity
- Current Activity
- Current Package
- App
- Install App
- Is App Installed
- Launch App
- Background App
- Close App
- Reset App
- Remove App
- Activate App
- Terminate App
- Get App State
- Get App Strings
- End Test Coverage
- Clipboard
- Get Clipboard
- Set Clipboard
- Emulator
- Power AC
- Power Capacity
- Files
- Push File
- Pull File
- Pull Folder
- Interactions
- Shake
- Lock
- Unlock
- Is Locked
- Rotate
- Keys
- Press keycode
- Long press keycode
- Hide Keyboard
- Is Keyboard Shown
- Network
- Toggle Airplane Mode
- Toggle Data
- Toggle WiFi
- Toggle Location Services
- Send SMS
- GSM Call
- GSM Signal
- GSM Voice
- Network Speed
- Performance Data
- Get Performance Data
- Performance Data Types
- Screen Recording
- Start Screen Recording
- Stop Screen Recording
- Simulator
- Perform Touch ID
- Toggle Touch ID Enrollment
- System
- Open Notifications
- System Bars
- System Time
- Display density
- Authentication
- Finger Print
- Element
- Find Element
- Find Elements
- Actions
- Click
- Send Keys
- Clear
- Attributes
- Text
- Name
- Attribute
- Selected
- Enabled
- Displayed
- Location
- Size
- Rect
- CSS Property
- Location in View
- Other
- Submit
- Active Element
- Equals Element
- Context
- Get Context
- Get All Contexts
- Set Context
- Interactions
- Mouse
- Move To
- Click
- Double Click
- Button Down
- Button Up
- Touch
- Single Tap
- Double Tap
- Move
- Touch Down
- Touch Up
- Long Press
- Scroll
- Flick
- Multi Touch Perform
- Touch Perform
- W3C Actions
- Web
- Window
- Set Window
- Close Window
- Get Handle
- Get Handles
- Get Title
- Get Window Size
- Set Window Size
- Get Window Position
- Set Window Position
- Maximize Window
- Navigation
- Go to URL
- Get URL
- Back
- Forward
- Refresh
- Storage
- Get All Cookies
- Set Cookie
- Delete Cookie
- Delete All Cookies
- Frame
- Switch to Frame
- Switch to Parent Frame
- Execute Async
- Execute
- 编写 & 运行Appium脚本
- Running Tests
- Desired Capabilities
- The --default-capabilities flag
- Finding Elements
- Touch Actions
- CLI Arguments
- Server Security
- Web/Web Views
- Mobile Web Testing
- Automating Hybrid Apps
- Using ios-webkit-debug-proxy
- Using Chromedriver
- Image Comparison
- iOS
- Low-Level Insights on iOS Input Events
- XCUITest Mobile Gestures
- XCUITest Mobile App Management
- iOS Pasteboard Guide
- iOS Predicate Guide
- iOS Touch ID Guide
- iOS Install Certificate
- tvOS support
- Pushing/Pulling files
- Audio Capture
- Android
- Low-Level Insights on Android Input Events
- UiSelector Guide
- Espresso Datamatcher Guide
- Android Code Coverage Guide
- Activities Startup Troubleshooting Guide
- How To Execute Shell Commands On The Remote Device
- Android Device Screen Streaming
- How To Emulate IME Actions Generation
- How To Test Android App Bundle
- Other
- Reset Strategies
- Network Connection Guide
- Using Unicode with Appium
- Troubleshooting
- Tutorial
- Swipe Tutorial
- Screen
- Element
- Partial screen
- Simple
- Multiple scroll views
- Add scroll layout
- Tricks and Tips
- Screen
- Element
- Element search
- Fast
- Slow
- Guide
- 进阶概念
- 定位图像中的元素
- 使用定位元素的插件
- 迁移到 XCUITest
- 在 Appium 中使用 Selenium Grid
- Appium Logs Filtering
- 跨域 iframes
- 使用自定义 WDA 服务器
- 使用不同版本的 Xcode 运行
- The Event Timings API
- 并行测试的设置
- The Settings API
- Memory Collection
- 向Appium项目做贡献
- 从源代码运行 Appium
- 开发者概述
- 标准开发命令
- Appium 风格指南
- 如何编写文档
- Appium 包结构
- 鸣谢