# 第08章 数据清理
```py
In[1]: import pandas as pd
import numpy as np
```
## 1\. 用stack清理变量值作为列名
```py
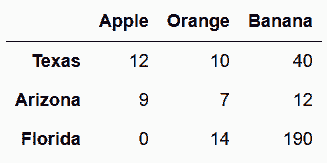
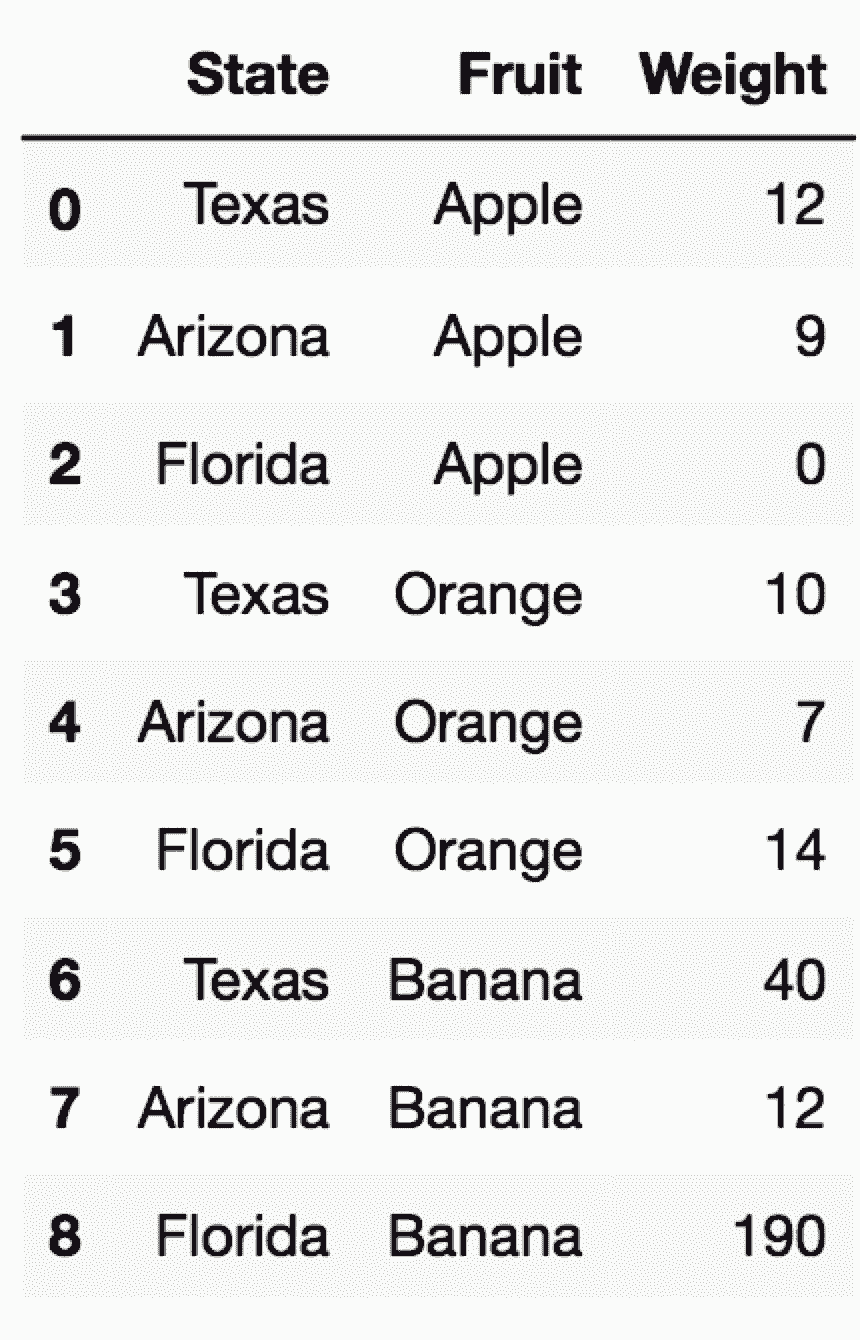
# 加载state_fruit数据集
In[2]: state_fruit = pd.read_csv('data/state_fruit.csv', index_col=0)
state_fruit
out[2]:
```
```py
# stack方法可以将所有列名,转变为垂直的一级行索引
In[3]: state_fruit.stack()
out[3]: Texas Apple 12
Orange 10
Banana 40
Arizona Apple 9
Orange 7
Banana 12
Florida Apple 0
Orange 14
Banana 190
dtype: int64
```
```py
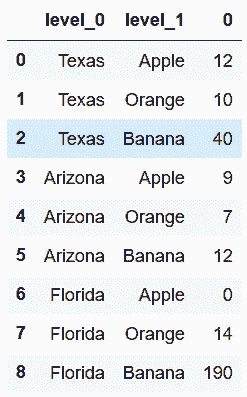
# 使用reset_index(),将结果变为DataFrame
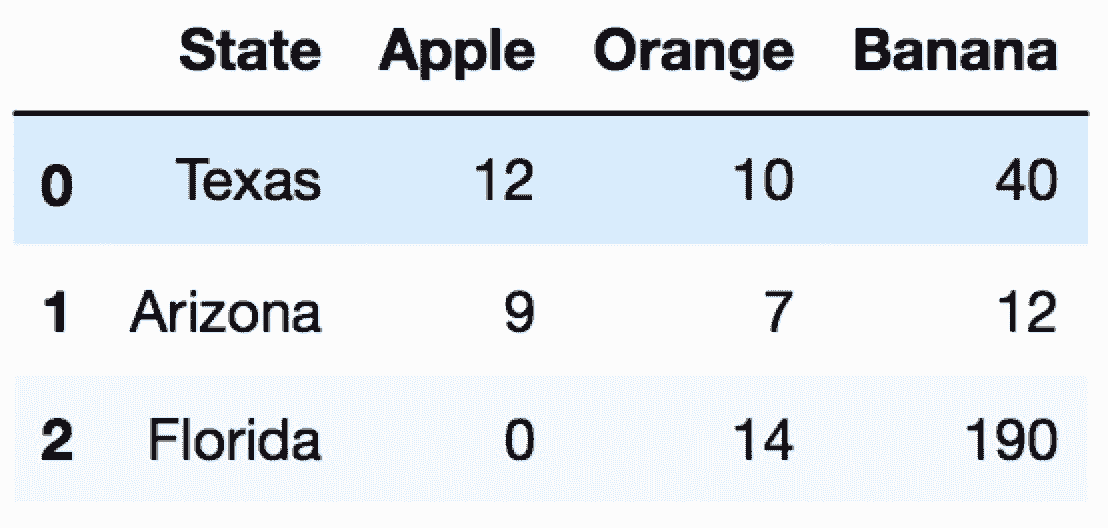
In[4]: state_fruit_tidy = state_fruit.stack().reset_index()
state_fruit_tidy
out[4]:
```
```py
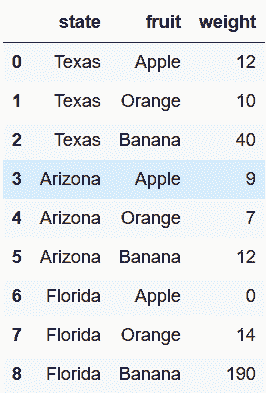
# 重命名列名
In[5]: state_fruit_tidy.columns = ['state', 'fruit', 'weight']
state_fruit_tidy
out[5]:
```
```py
# 也可以使用rename_axis给不同的行索引层级命名
In[6]: state_fruit.stack()\
.rename_axis(['state', 'fruit'])\
out[6]: state fruit
Texas Apple 12
Orange 10
Banana 40
Arizona Apple 9
Orange 7
Banana 12
Florida Apple 0
Orange 14
Banana 190
dtype: int64
```
```py
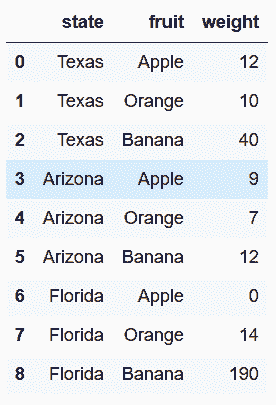
# 再次使用reset_index方法
In[7]: state_fruit.stack()\
.rename_axis(['state', 'fruit'])\
.reset_index(name='weight')
out[7]:
```
### 更多
```py
# 读取state_fruit2数据集
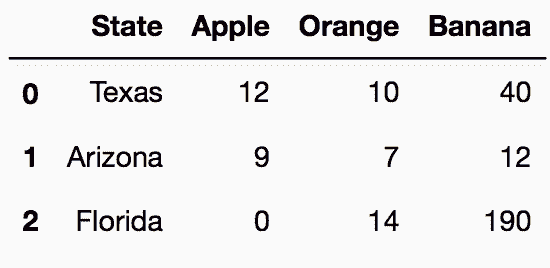
In[8]: state_fruit2 = pd.read_csv('data/state_fruit2.csv')
state_fruit2
out[8]:
```
```py
# 州名不在行索引的位置上,使用stack将所有列名变为一个长Series
In[9]: state_fruit2.stack()
out[9]: 0 State Texas
Apple 12
Orange 10
Banana 40
1 State Arizona
Apple 9
Orange 7
Banana 12
2 State Florida
Apple 0
Orange 14
Banana 190
dtype: object
```
```py
# 先设定state作为行索引名,再stack,可以得到和前面相似的结果
In[10]: state_fruit2.set_index('State').stack()
out[10]: 0 State Texas
Apple 12
Orange 10
Banana 40
1 State Arizona
Apple 9
Orange 7
Banana 12
2 State Florida
Apple 0
Orange 14
Banana 190
dtype: object
```
## 2\. 用melt清理变量值作为列名
```py
# 读取state_fruit2数据集
In[11]: state_fruit2 = pd.read_csv('data/state_fruit2.csv')
state_fruit2
out[11]:
```
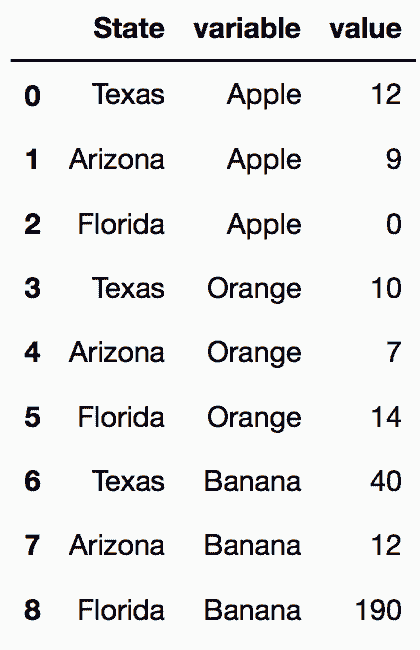
```py
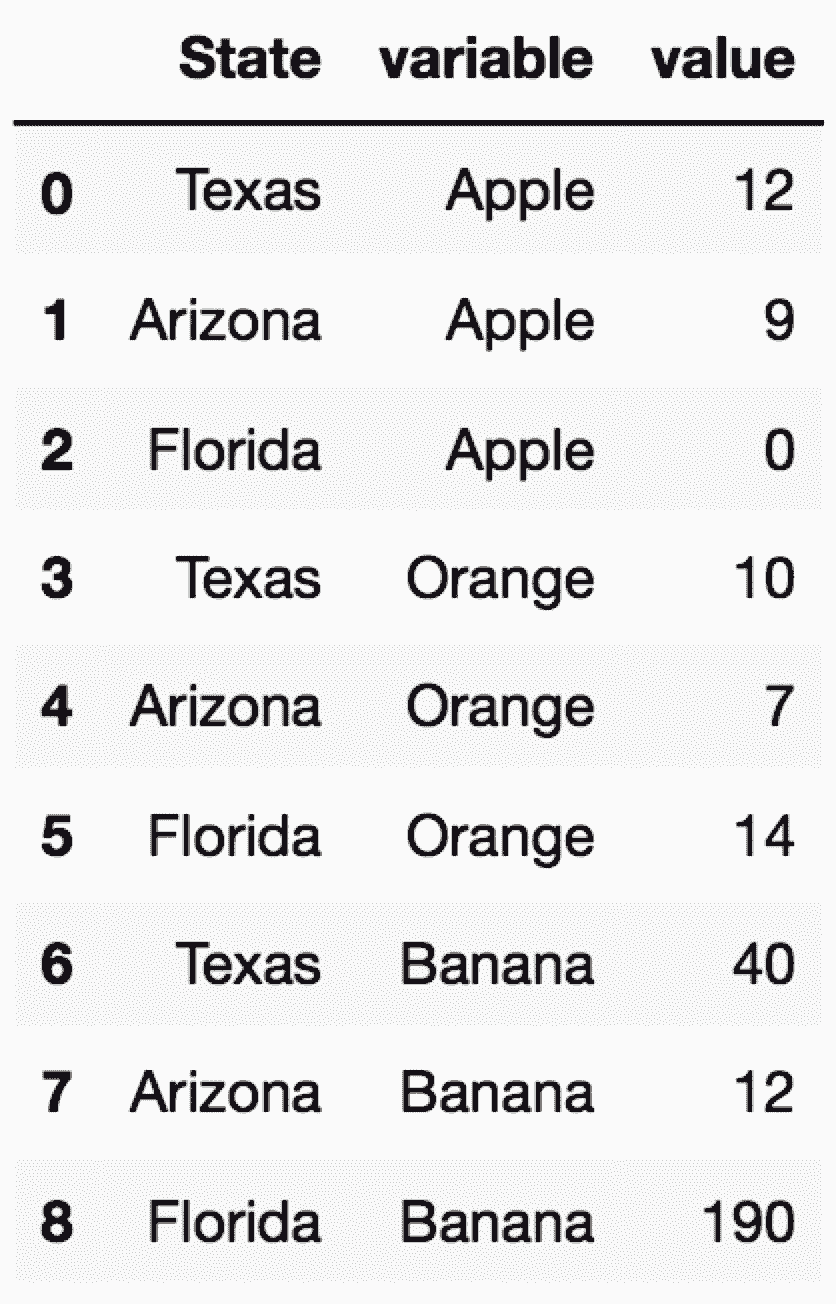
# 使用melt方法,将列传给id_vars和value_vars。melt可以将原先的列名作为变量,原先的值作为值。
In[12]: state_fruit2.melt(id_vars=['State'],
value_vars=['Apple', 'Orange', 'Banana'])
out[12]:
```
```py
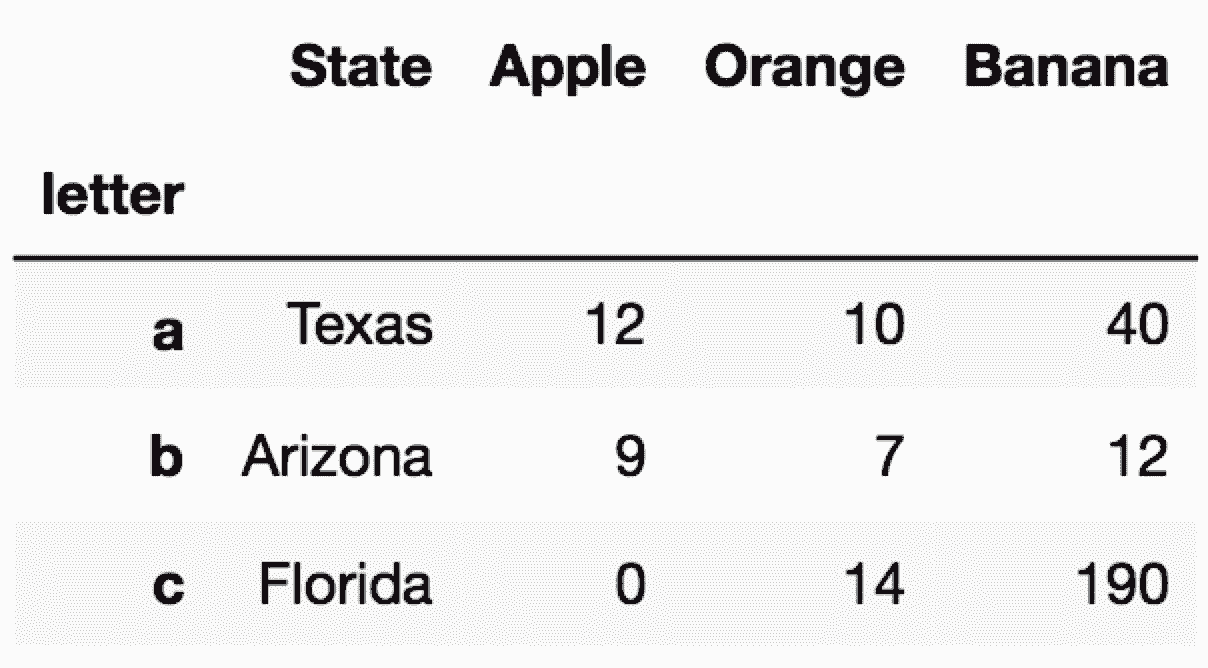
# 随意设定一个行索引
In[13]: state_fruit2.index=list('abc')
state_fruit2.index.name = 'letter'
In[14]: state_fruit2
out[14]:
```
```py
# var_name和value_name可以用来重命名新生成的变量列和值的列
In[15]: state_fruit2.melt(id_vars=['State'],
value_vars=['Apple', 'Orange', 'Banana'],
var_name='Fruit',
value_name='Weight')
out[15]:
```
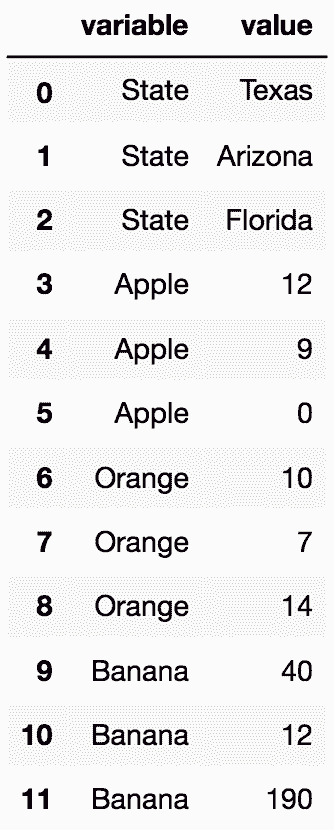
```py
# 如果你想让所有值都位于一列,旧的列标签位于另一列,可以直接使用melt
In[16]: state_fruit2.melt()
out[16]:
```
```py
# 要指明id变量,只需使用id_vars参数
In[17]: state_fruit2.melt(id_vars='State')
out[17]:
```
## 3\. 同时stack多组变量
```py
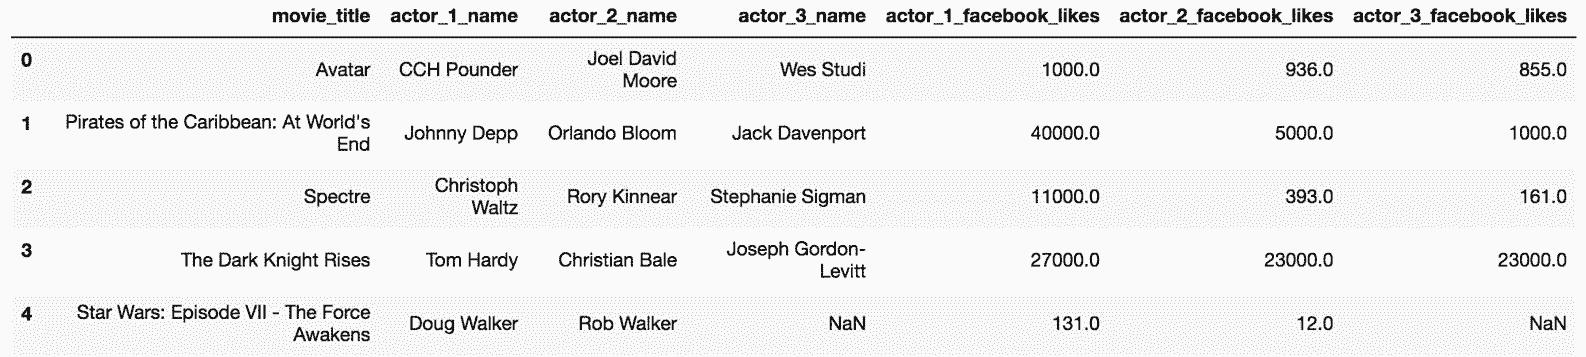
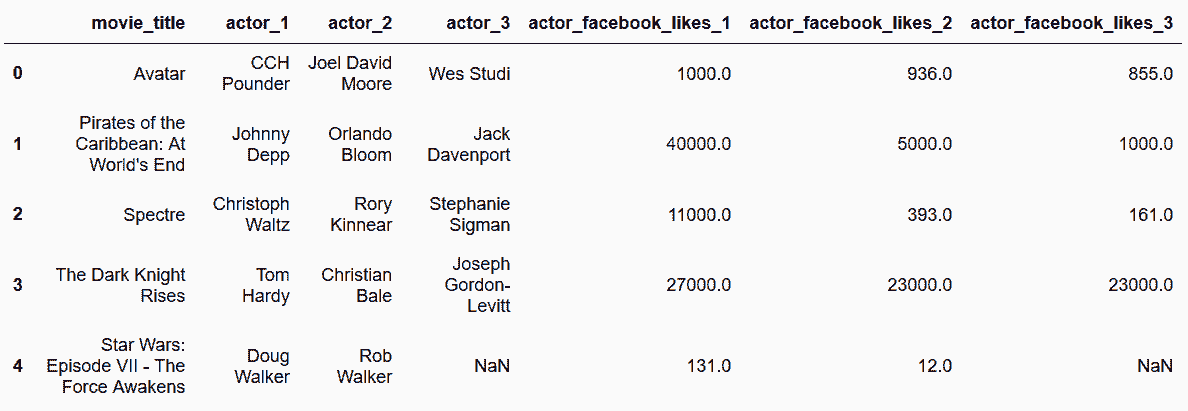
# 读取movie数据集,选取所有演员名和其Facebook likes
In[18]: movie = pd.read_csv('data/movie.csv')
actor = movie[['movie_title', 'actor_1_name', 'actor_2_name', 'actor_3_name',
'actor_1_facebook_likes', 'actor_2_facebook_likes', 'actor_3_facebook_likes']]
actor.head()
out[18]:
```
```py
# 创建一个自定义函数,用来改变列名。wide_to_long要求分组的变量要有相同的数字结尾:
In[19]: def change_col_name(col_name):
col_name = col_name.replace('_name', '')
if 'facebook' in col_name:
fb_idx = col_name.find('facebook')
col_name = col_name[:5] + col_name[fb_idx - 1:] + col_name[5:fb_idx-1]
return col_name
In[20]: actor2 = actor.rename(columns=change_col_name)
actor2.head()
out[20]:
```
```py
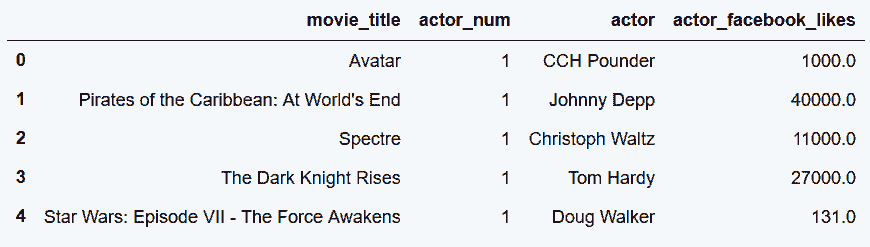
# 使用wide_to_long函数,同时stack两列actor和Facebook
In[21]: stubs = ['actor', 'actor_facebook_likes']
actor2_tidy = pd.wide_to_long(actor2,
stubnames=stubs,
i=['movie_title'],
j='actor_num',
sep='_').reset_index()
actor2_tidy.head()
out[21]:
```
### 更多
```py
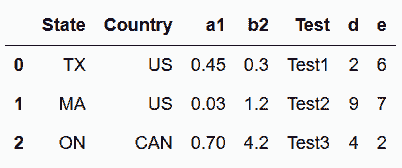
# 加载数据
In[22]: df = pd.read_csv('data/stackme.csv')
df
out[22]:
```
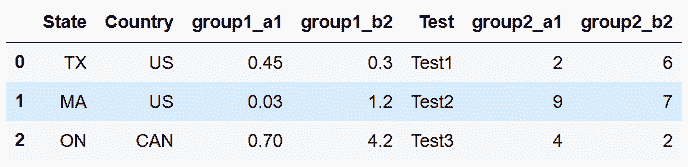
```py
# 对列重命名
In[23]: df2 = df.rename(columns = {'a1':'group1_a1', 'b2':'group1_b2',
'd':'group2_a1', 'e':'group2_b2'})
df2
out[23]:
```
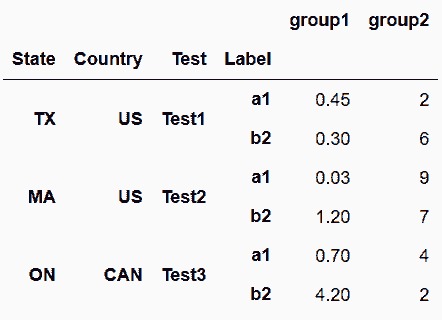
```py
# 设定stubnames=['group1', 'group2'],对任何数字都起作用
In[24]: pd.wide_to_long(df2,
stubnames=['group1', 'group2'],
i=['State', 'Country', 'Test'],
j='Label',
suffix='.+',
sep='_')
out[24]:
```
## 4\. 反转stacked数据
```py
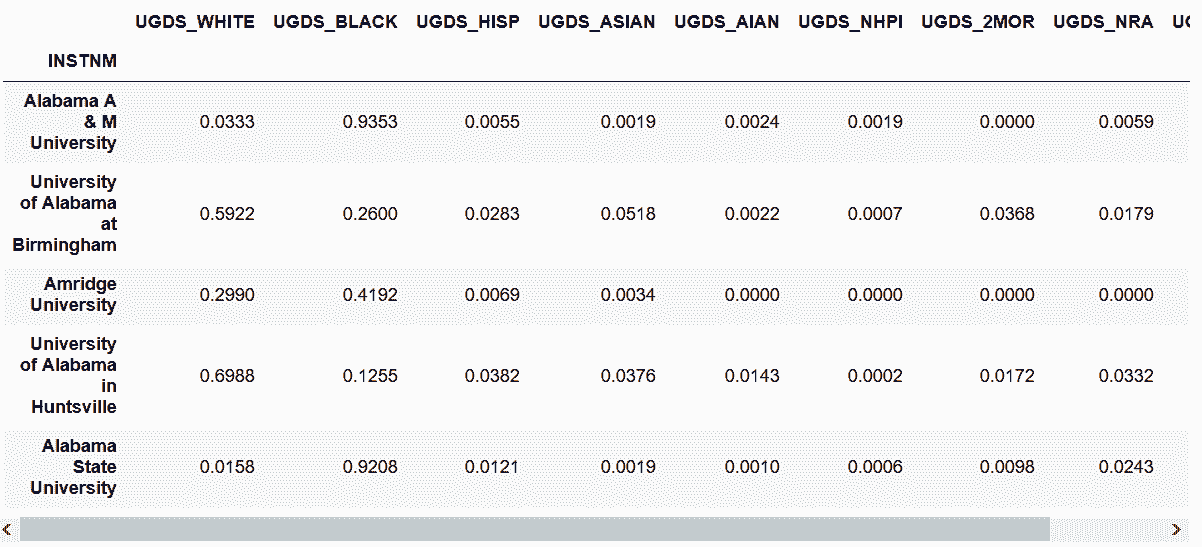
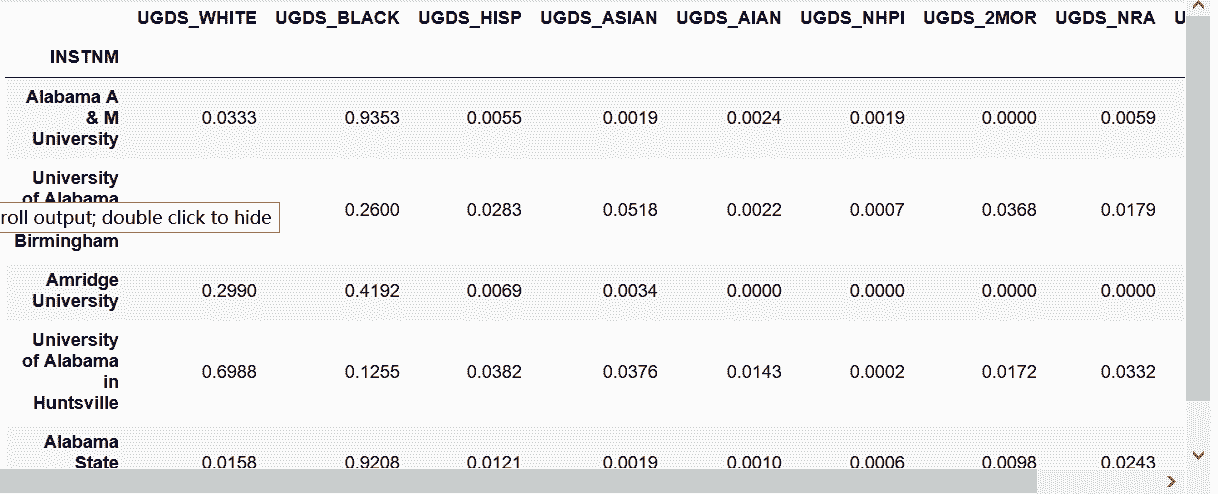
# 读取college数据集,学校名作为行索引,,只选取本科生的列
In[25]: usecol_func = lambda x: 'UGDS_' in x or x == 'INSTNM'
college = pd.read_csv('data/college.csv',
index_col='INSTNM',
usecols=usecol_func)
college.head()
out[25]:
```
```py
# 用stack方法,将所有水平列名,转化为垂直的行索引
In[26]: college_stacked = college.stack()
college_stacked.head(18)
out[26]: INSTNM
Alabama A & M University UGDS_WHITE 0.0333
UGDS_BLACK 0.9353
UGDS_HISP 0.0055
UGDS_ASIAN 0.0019
UGDS_AIAN 0.0024
UGDS_NHPI 0.0019
UGDS_2MOR 0.0000
UGDS_NRA 0.0059
UGDS_UNKN 0.0138
University of Alabama at Birmingham UGDS_WHITE 0.5922
UGDS_BLACK 0.2600
UGDS_HISP 0.0283
UGDS_ASIAN 0.0518
UGDS_AIAN 0.0022
UGDS_NHPI 0.0007
UGDS_2MOR 0.0368
UGDS_NRA 0.0179
UGDS_UNKN 0.0100
dtype: float64
```
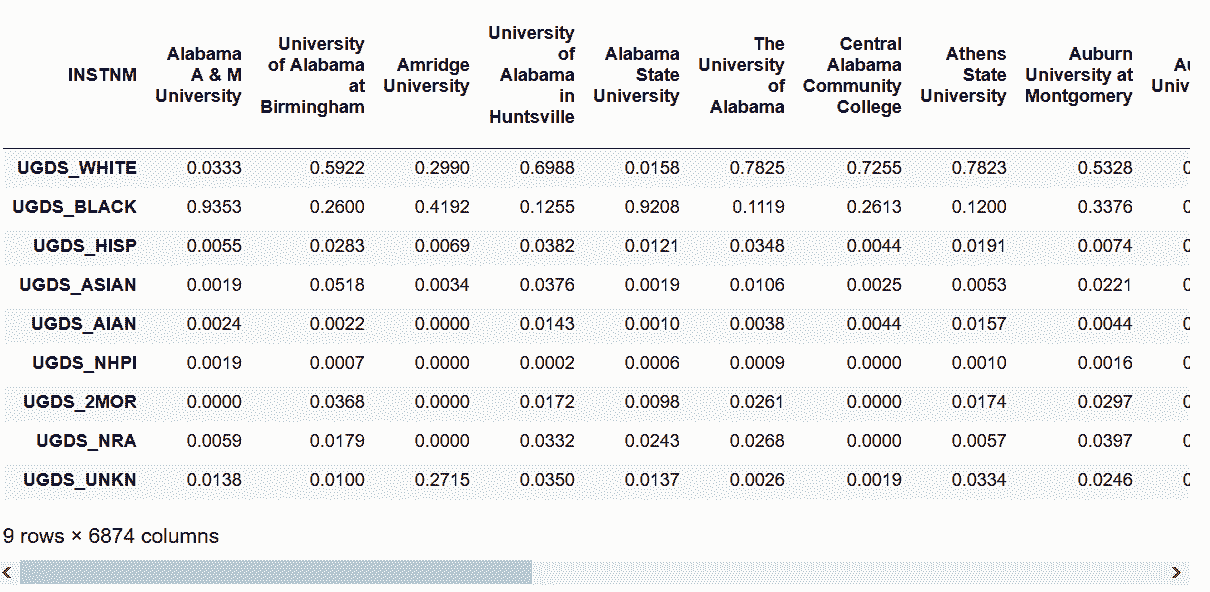
```py
# unstack方法可以将其还原
In[27]: college_stacked.unstack().head()
out[27]:
```
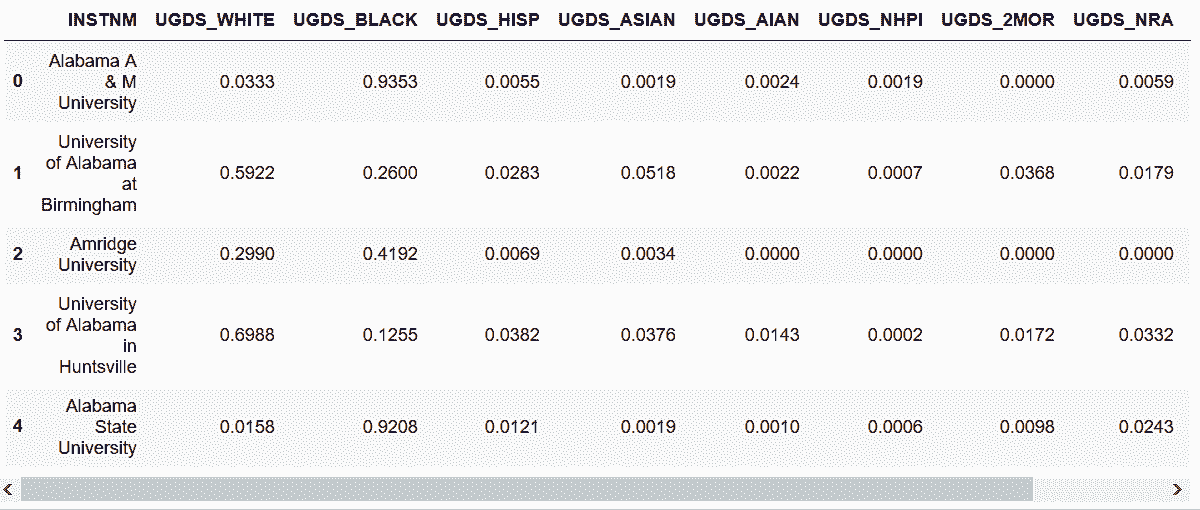
```py
# 另一种方式是先用melt,再用pivot。先加载数据,不指定行索引名
In[28]: college2 = pd.read_csv('data/college.csv',
usecols=usecol_func)
college2.head()
out[28]:
```
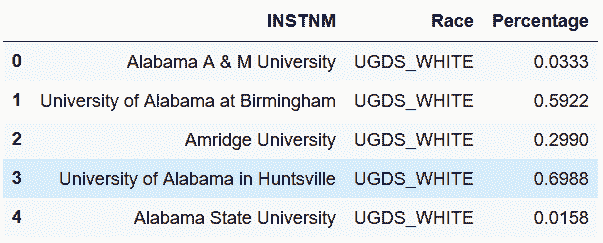
```py
# 使用melt,将所有race列变为一列
In[29]: college_melted = college2.melt(id_vars='INSTNM',
var_name='Race',
value_name='Percentage')
college_melted.head()
out[29]:
```
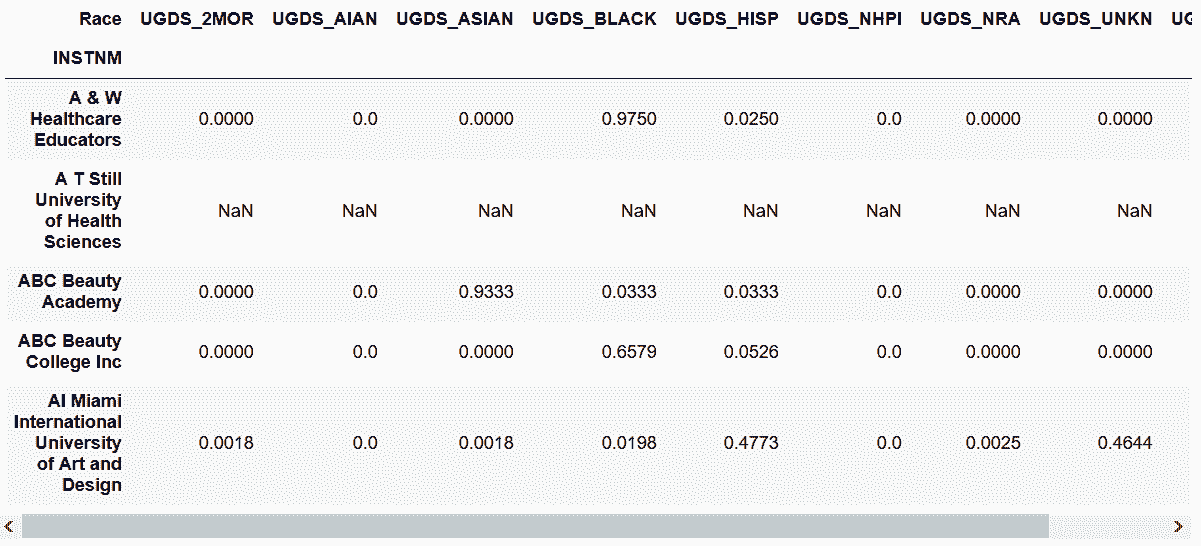
```py
# 用pivot还原
In[30]: melted_inv = college_melted.pivot(index='INSTNM',
columns='Race',
values='Percentage')
melted_inv.head()
out[30]:
```
```py
# 用loc同时选取行和列,然后重置索引,可以获得和原先索引顺序一样的DataFrame
In[31]: college2_replication = melted_inv.loc[college2['INSTNM'],
college2.columns[1:]]\
.reset_index()
college2.equals(college2_replication)
out[31]: True
```
### 更多
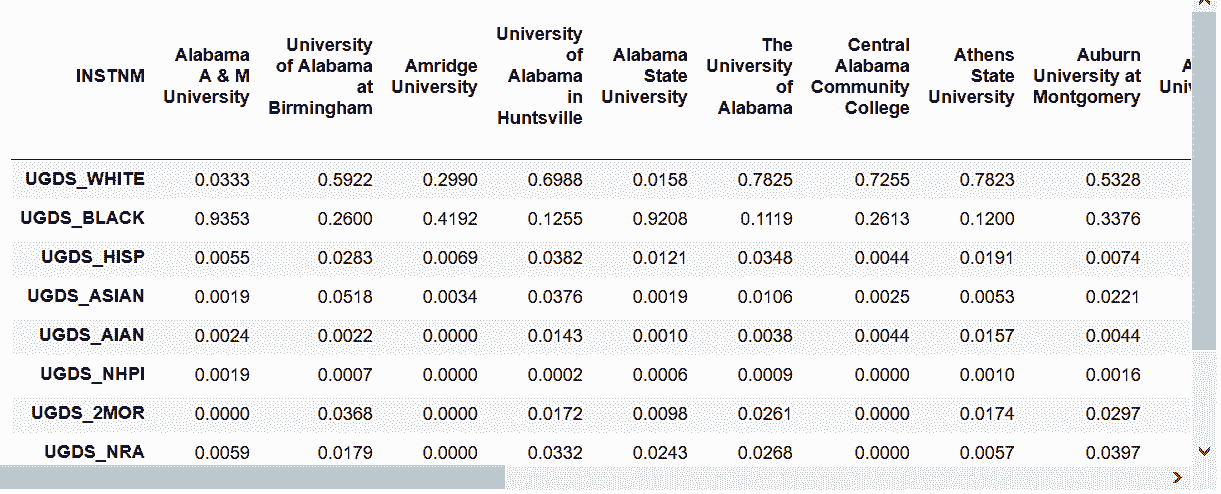
```py
# 使用最外层的行索引做unstack
In[32]: college.stack().unstack(0)
out[32]:
```
```py
# 转置DataFrame更简单的方法是transpose()或T
In[33]: college.T
out[33]:
```
## 5\. 分组聚合后unstacking
```py
# 读取employee数据集,求出每个种族的平均工资
In[34]: employee = pd.read_csv('data/employee.csv')
In[35]: employee.groupby('RACE')['BASE_SALARY'].mean().astype(int)
out[35]: RACE
American Indian or Alaskan Native 60272
Asian/Pacific Islander 61660
Black or African American 50137
Hispanic/Latino 52345
Others 51278
White 64419
Name: BASE_SALARY, dtype: int64
```
```py
# 对种族和性别分组,求平均工资
In[36]: agg = employee.groupby(['RACE', 'GENDER'])['BASE_SALARY'].mean().astype(int)
agg
out[36]: RACE GENDER
American Indian or Alaskan Native Female 60238
Male 60305
Asian/Pacific Islander Female 63226
Male 61033
Black or African American Female 48915
Male 51082
Hispanic/Latino Female 46503
Male 54782
Others Female 63785
Male 38771
White Female 66793
Male 63940
Name: BASE_SALARY, dtype: int64
```
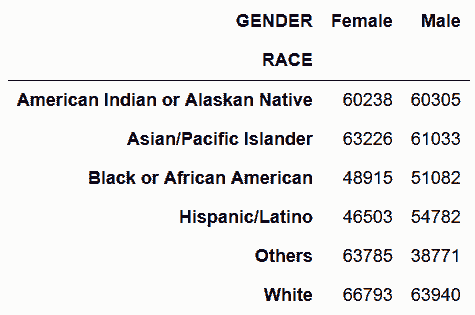
```py
# 对索引层GENDER做unstack
In[37]: agg.unstack('GENDER')
out[37]:
```
```py
# 对索引层RACE做unstack
In[38]: agg.unstack('RACE')
out[38]:
```

### 更多
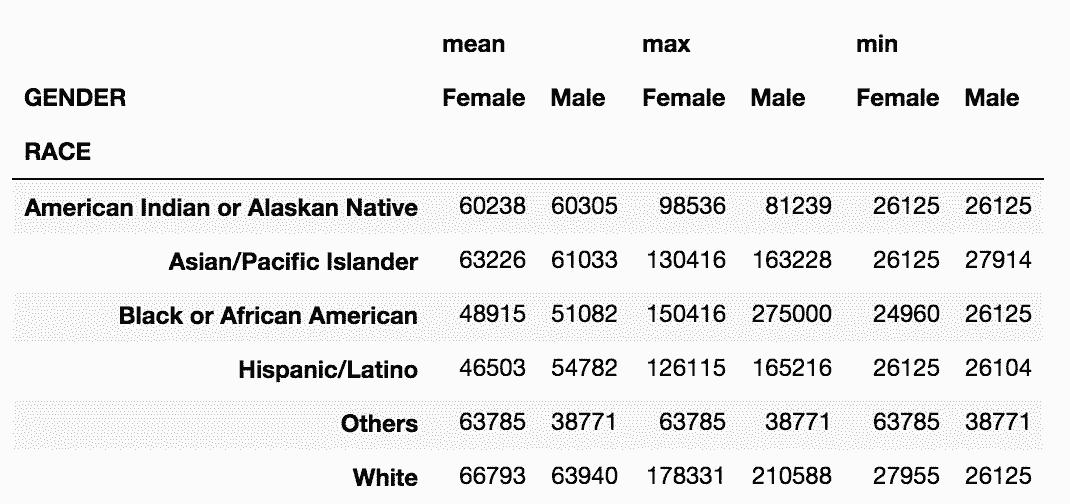
```py
# 按RACE和GENDER分组,求工资的平均值、最大值和最小值
In[39]: agg2 = employee.groupby(['RACE', 'GENDER'])['BASE_SALARY'].agg(['mean', 'max', 'min']).astype(int)
agg2
out[39]:
```

```py
# 此时unstack('GENDER')会生成多级列索引,可以用stack和unstack调整结构
agg2.unstack('GENDER')
```
## 6\. 用分组聚合实现透视表
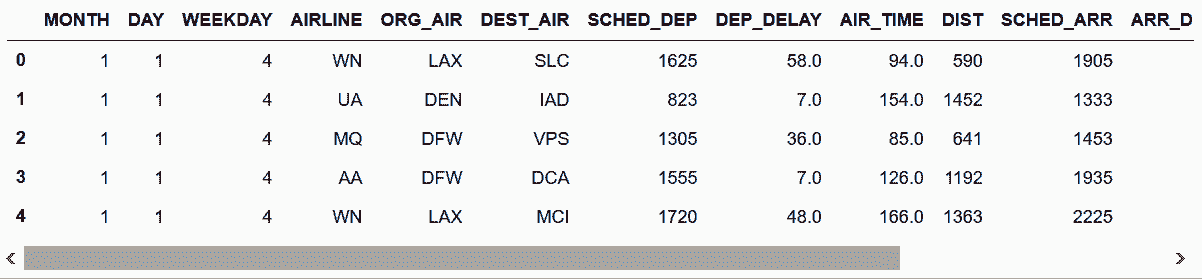
```py
# 读取flights数据集
In[40]: flights = pd.read_csv('data/flights.csv')
flights.head()
out[40]:
```
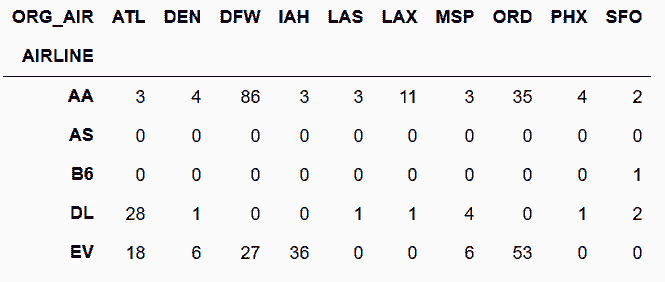
```py
# 用pivot_table方法求出每条航线每个始发地的被取消的航班总数
In[41]: fp = flights.pivot_table(index='AIRLINE',
columns='ORG_AIR',
values='CANCELLED',
aggfunc='sum',
fill_value=0).round(2)
fp.head()
out[41]:
```

```py
# groupby聚合不能直接复现这张表。需要先按所有index和columns的列聚合
In[42]: fg = flights.groupby(['AIRLINE', 'ORG_AIR'])['CANCELLED'].sum()
fg.head()
out[42]: AIRLINE ORG_AIR
AA ATL 3
DEN 4
DFW 86
IAH 3
LAS 3
Name: CANCELLED, dtype: int64
```
```py
# 再使用unstack,将ORG_AIR这层索引作为列名
In[43]: fg_unstack = fg.unstack('ORG_AIR', fill_value=0)
fg_unstack.head()
out[43]:
```
```py
# 判断两个方式是否等价
In[44]: fg_unstack = fg.unstack('ORG_AIR', fill_value=0)
fp.equals(fg_unstack)
out[44]: True
```
### 更多
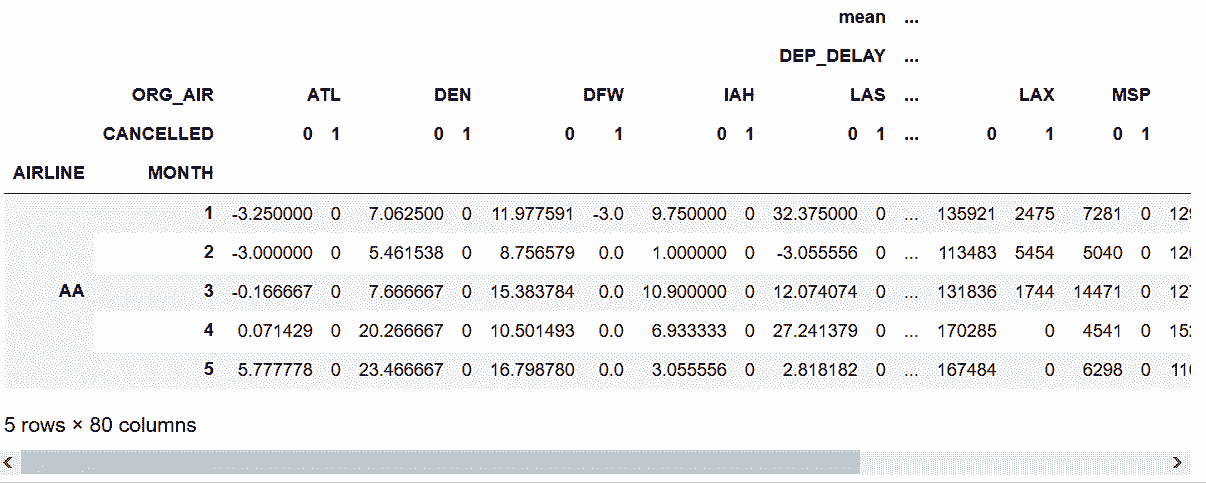
```py
# 先实现一个稍微复杂的透视表
In[45]: fp2 = flights.pivot_table(index=['AIRLINE', 'MONTH'],
columns=['ORG_AIR', 'CANCELLED'],
values=['DEP_DELAY', 'DIST'],
aggfunc=[np.mean, np.sum],
fill_value=0)
fp2.head()
out[45]:
```
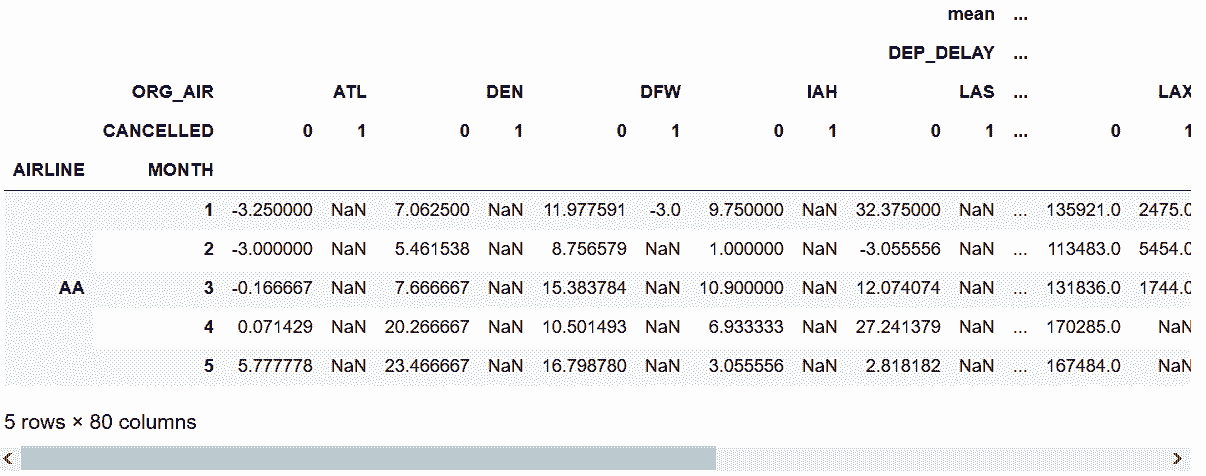
```py
# 用groupby和unstack复现上面的方法
In[46]: flights.groupby(['AIRLINE', 'MONTH', 'ORG_AIR', 'CANCELLED'])['DEP_DELAY', 'DIST'] \
.agg(['mean', 'sum']) \
.unstack(['ORG_AIR', 'CANCELLED'], fill_value=0) \
.swaplevel(0, 1, axis='columns') \
.head()
out[46]:
```
## 7\. 为了更容易reshaping,重新命名索引层
```py
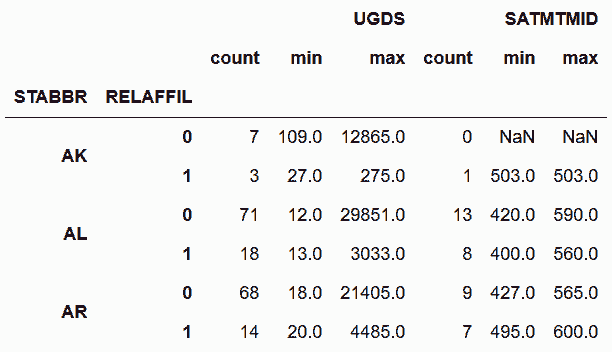
# 读取college数据集,分组后,统计本科生的SAT数学成绩信息
In[47]: college = pd.read_csv('data/college.csv')
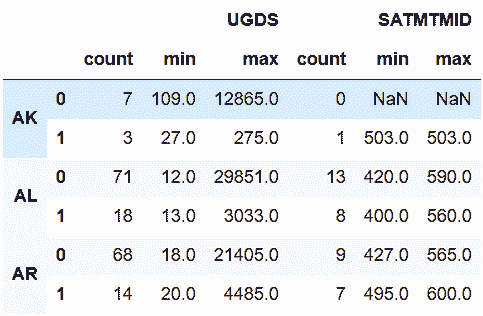
In[48]: cg = college.groupby(['STABBR', 'RELAFFIL'])['UGDS', 'SATMTMID'] \
.agg(['count', 'min', 'max']).head(6)
In[49]: cg
out[49]:
```
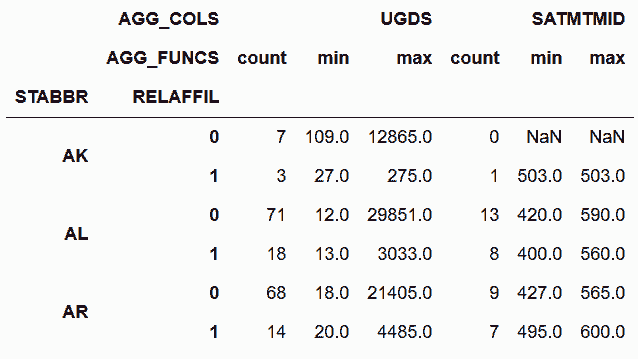
```py
# 行索引的两级都有名字,而列索引没有名字。用rename_axis给列索引的两级命名
In[50]:cg = cg.rename_axis(['AGG_COLS', 'AGG_FUNCS'], axis='columns')
cg
out[50]:
```
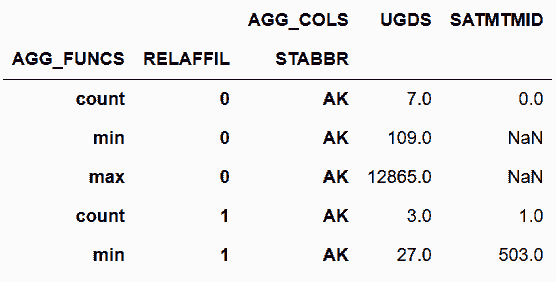
```py
# 将AGG_FUNCS列移到行索引
In[51]:cg.stack('AGG_FUNCS').head()
out[51]:
```

```py
# stack默认是将列放到行索引的最内层,可以使用swaplevel改变层级
In[52]:cg.stack('AGG_FUNCS').swaplevel('AGG_FUNCS', 'STABBR', axis='index').head()
out[52]:
```
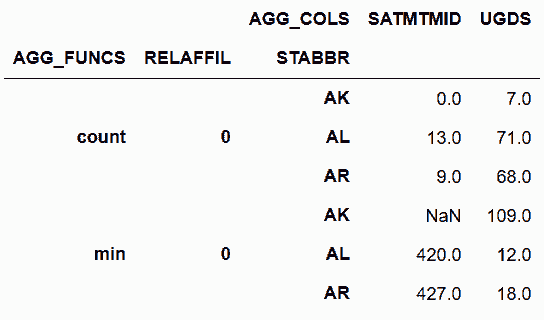
```py
# 在此前的基础上再做sort_index
In[53]:cg.stack('AGG_FUNCS') \
.swaplevel('AGG_FUNCS', 'STABBR', axis='index') \
.sort_index(level='RELAFFIL', axis='index') \
.sort_index(level='AGG_COLS', axis='columns').head(6)
out[53]:
```
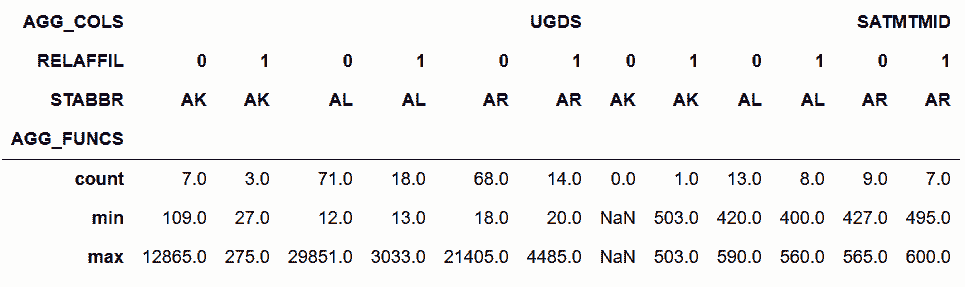
```py
# 对一些列做stack,对其它列做unstack
In[54]:cg.stack('AGG_FUNCS').unstack(['RELAFFIL', 'STABBR'])
out[54]:
```
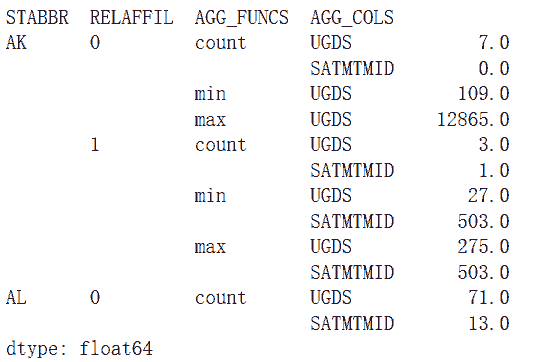
```py
# 对所有列做stack,会返回一个Series
In[55]:cg.stack(['AGG_FUNCS', 'AGG_COLS']).head(12)
out[55]:
```
### 更多
```py
# 删除行和列索引所有层级的名称
In[56]:cg.rename_axis([None, None], axis='index').rename_axis([None, None], axis='columns')
out[56]:
```
## 8\. 当多个变量被存储为列名时进行清理
```py
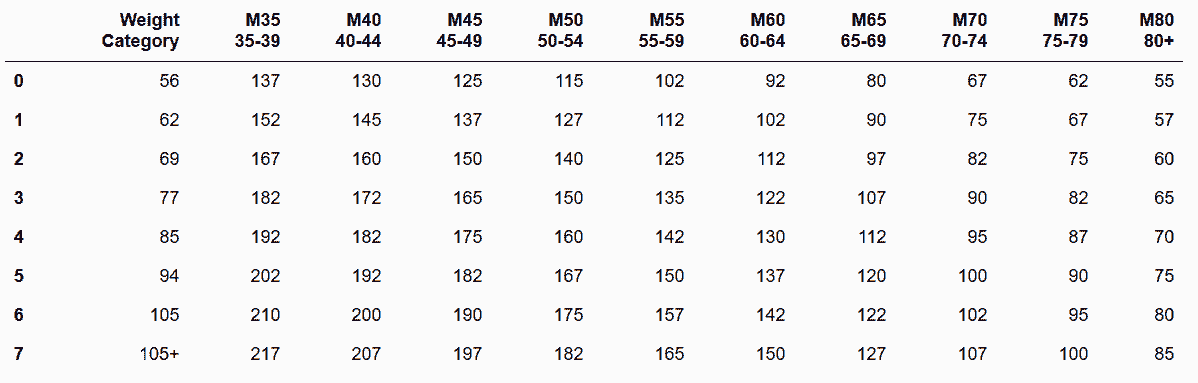
# 读取weightlifting数据集
In[57]:weightlifting = pd.read_csv('data/weightlifting_men.csv')
weightlifting
out[57]:
```
```py
# 用melt方法,将sex_age放入一个单独的列
In[58]:wl_melt = weightlifting.melt(id_vars='Weight Category',
var_name='sex_age',
value_name='Qual Total')
wl_melt.head()
out[58]:
```

```py
# 用split方法将sex_age列分为两列
In[59]:sex_age = wl_melt['sex_age'].str.split(expand=True)
sex_age.head()
out[59]: 0 1
0 M35 35-39
1 M35 35-39
2 M35 35-39
3 M35 35-39
4 M35 35-39
```
```py
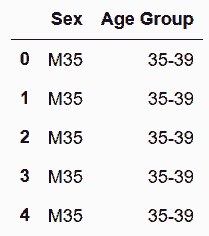
# 给列起名
In[60]:sex_age.columns = ['Sex', 'Age Group']
sex_age.head()
out[60]:
```
```py
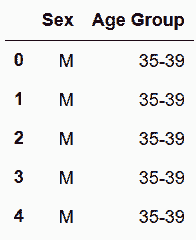
# 只取出字符串中的M
In[61]:sex_age['Sex'] = sex_age['Sex'].str[0]
sex_age.head()
out[61]:
```
```py
# 用concat方法,将sex_age,与wl_cat_total连接起来
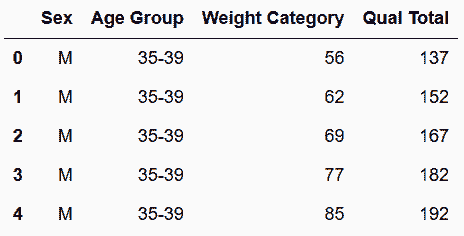
In[62]:wl_cat_total = wl_melt[['Weight Category', 'Qual Total']]
wl_tidy = pd.concat([sex_age, wl_cat_total], axis='columns')
wl_tidy.head()
out[62]:
```
```py
# 上面的结果也可以如下实现
In[63]:cols = ['Weight Category', 'Qual Total']
sex_age[cols] = wl_melt[cols]
```
### 更多
```py
# 也可以通过assign的方法,动态加载新的列
In[64]: age_group = wl_melt.sex_age.str.extract('(\d{2}[-+](?:\d{2})?)', expand=False)
sex = wl_melt.sex_age.str[0]
new_cols = {'Sex':sex,
'Age Group': age_group}
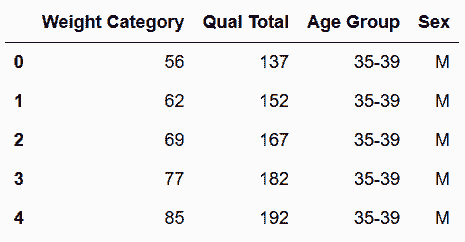
In[65]: wl_tidy2 = wl_melt.assign(**new_cols).drop('sex_age', axis='columns')
wl_tidy2.head()
out[65]:
```
```py
# 判断两种方法是否等效
In[66]: wl_tidy2.sort_index(axis=1).equals(wl_tidy.sort_index(axis=1))
out[66]: True
```
## 9\. 当多个变量被存储为列的值时进行清理
```py
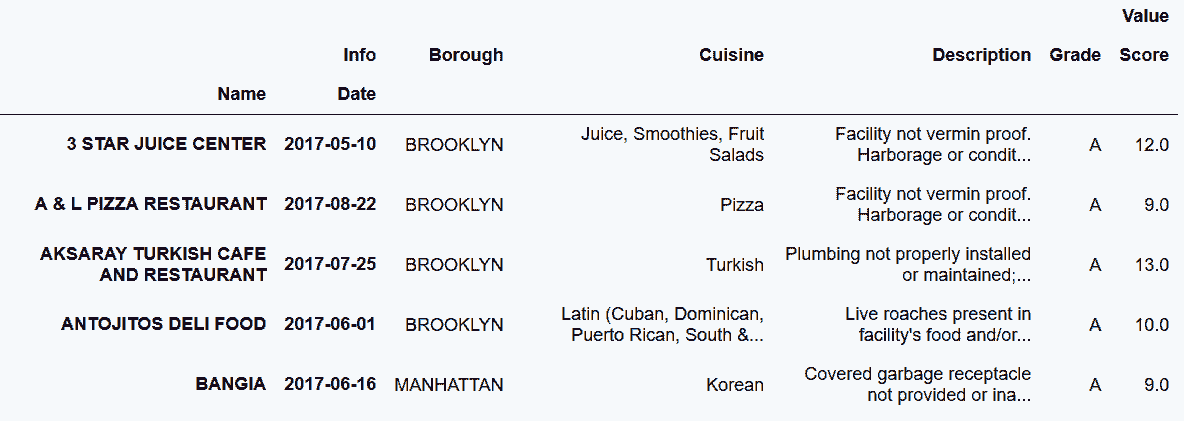
# 读取restaurant_inspections数据集,将Date列的数据类型变为datetime64
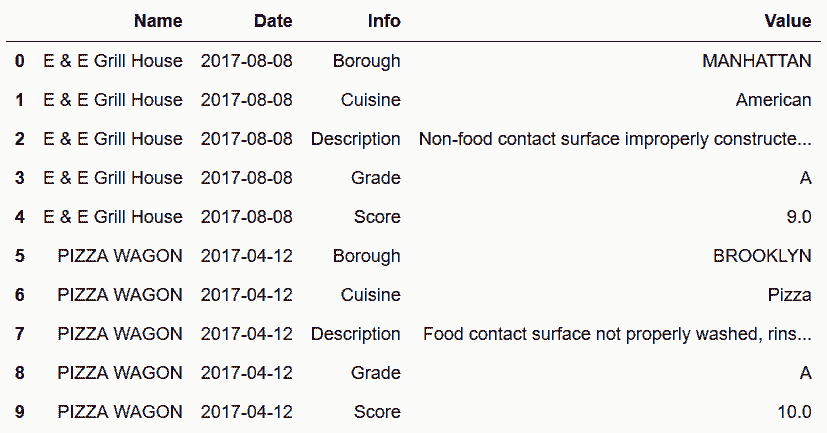
In[67]: inspections = pd.read_csv('data/restaurant_inspections.csv', parse_dates=['Date'])
inspections.head(10)
out[67]:
```
```py
# 用info列的所有值造一个新列。但是,Pandas不支持这种功能
In[68]: inspections.pivot(index=['Name', 'Date'], columns='Info', values='Value')
---------------------------------------------------------------------------
ValueError Traceback (most recent call last)
/Users/Ted/anaconda/lib/python3.6/site-packages/pandas/core/categorical.py in __init__(self, values, categories, ordered, fastpath)
297 try:
--> 298 codes, categories = factorize(values, sort=True)
299 except TypeError:
/Users/Ted/anaconda/lib/python3.6/site-packages/pandas/core/algorithms.py in factorize(values, sort, order, na_sentinel, size_hint)
559 check_nulls = not is_integer_dtype(original)
--> 560 labels = table.get_labels(values, uniques, 0, na_sentinel, check_nulls)
561
pandas/_libs/hashtable_class_helper.pxi in pandas._libs.hashtable.PyObjectHashTable.get_labels (pandas/_libs/hashtable.c:21922)()
ValueError: Buffer has wrong number of dimensions (expected 1, got 2)
During handling of the above exception, another exception occurred:
NotImplementedError Traceback (most recent call last)
<ipython-input-68-754f69d68d6c> in <module>()
----> 1 inspections.pivot(index=['Name', 'Date'], columns='Info', values='Value')
/Users/Ted/anaconda/lib/python3.6/site-packages/pandas/core/frame.py in pivot(self, index, columns, values)
3851 """
3852 from pandas.core.reshape.reshape import pivot
-> 3853 return pivot(self, index=index, columns=columns, values=values)
3854
3855 def stack(self, level=-1, dropna=True):
/Users/Ted/anaconda/lib/python3.6/site-packages/pandas/core/reshape/reshape.py in pivot(self, index, columns, values)
375 index = self[index]
376 indexed = Series(self[values].values,
--> 377 index=MultiIndex.from_arrays([index, self[columns]]))
378 return indexed.unstack(columns)
379
/Users/Ted/anaconda/lib/python3.6/site-packages/pandas/core/indexes/multi.py in from_arrays(cls, arrays, sortorder, names)
1098 from pandas.core.categorical import _factorize_from_iterables
1099
-> 1100 labels, levels = _factorize_from_iterables(arrays)
1101 if names is None:
1102 names = [getattr(arr, "name", None) for arr in arrays]
/Users/Ted/anaconda/lib/python3.6/site-packages/pandas/core/categorical.py in _factorize_from_iterables(iterables)
2191 # For consistency, it should return a list of 2 lists.
2192 return [[], []]
-> 2193 return map(list, lzip(*[_factorize_from_iterable(it) for it in iterables]))
/Users/Ted/anaconda/lib/python3.6/site-packages/pandas/core/categorical.py in <listcomp>(.0)
2191 # For consistency, it should return a list of 2 lists.
2192 return [[], []]
-> 2193 return map(list, lzip(*[_factorize_from_iterable(it) for it in iterables]))
/Users/Ted/anaconda/lib/python3.6/site-packages/pandas/core/categorical.py in _factorize_from_iterable(values)
2163 codes = values.codes
2164 else:
-> 2165 cat = Categorical(values, ordered=True)
2166 categories = cat.categories
2167 codes = cat.codes
/Users/Ted/anaconda/lib/python3.6/site-packages/pandas/core/categorical.py in __init__(self, values, categories, ordered, fastpath)
308
309 # FIXME
--> 310 raise NotImplementedError("> 1 ndim Categorical are not "
311 "supported at this time")
312
NotImplementedError: > 1 ndim Categorical are not supported at this time
```
```py
# 将'Name','Date', 'Info'作为所索引
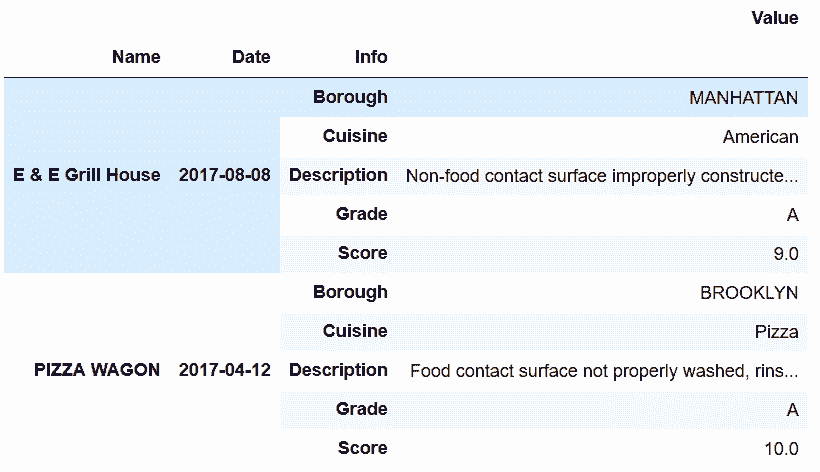
In[69]: inspections.set_index(['Name','Date', 'Info']).head(10)
out[69]:
```
```py
# 用pivot,将info列中的值变为新的列
In[70]: inspections.set_index(['Name','Date', 'Info']).unstack('Info').head()
out[70]:
```
```py
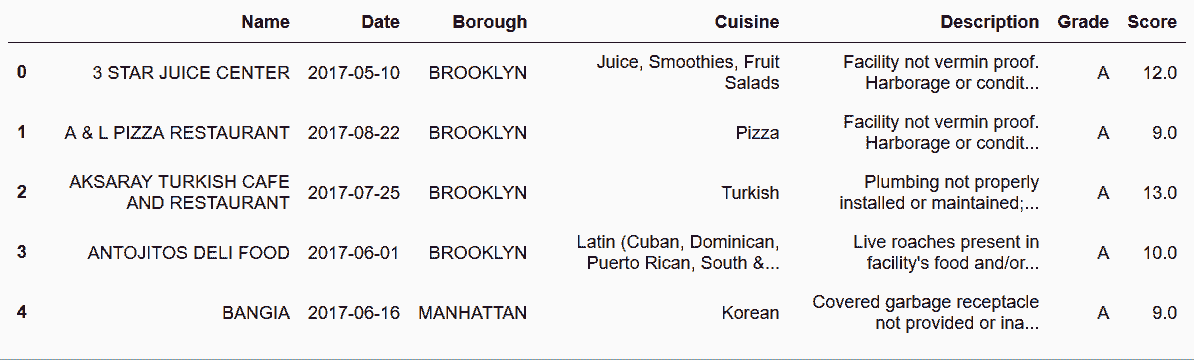
# 用reset_index方法,使行索引层级与列索引相同
In[71]: insp_tidy = inspections.set_index(['Name','Date', 'Info']) \
.unstack('Info') \
.reset_index(col_level=-1)
insp_tidy.head()
out[71]:
```

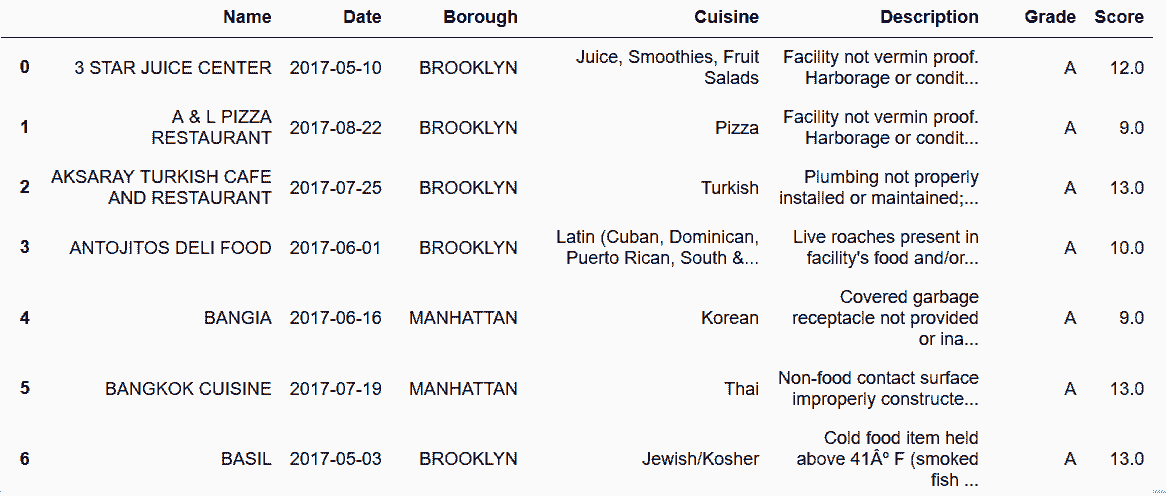
```py
# 除掉列索引的最外层,重命名行索引的层为None
In[72]: insp_tidy.columns = insp_tidy.columns.droplevel(0).rename(None)
insp_tidy.head()
out[72]:
```
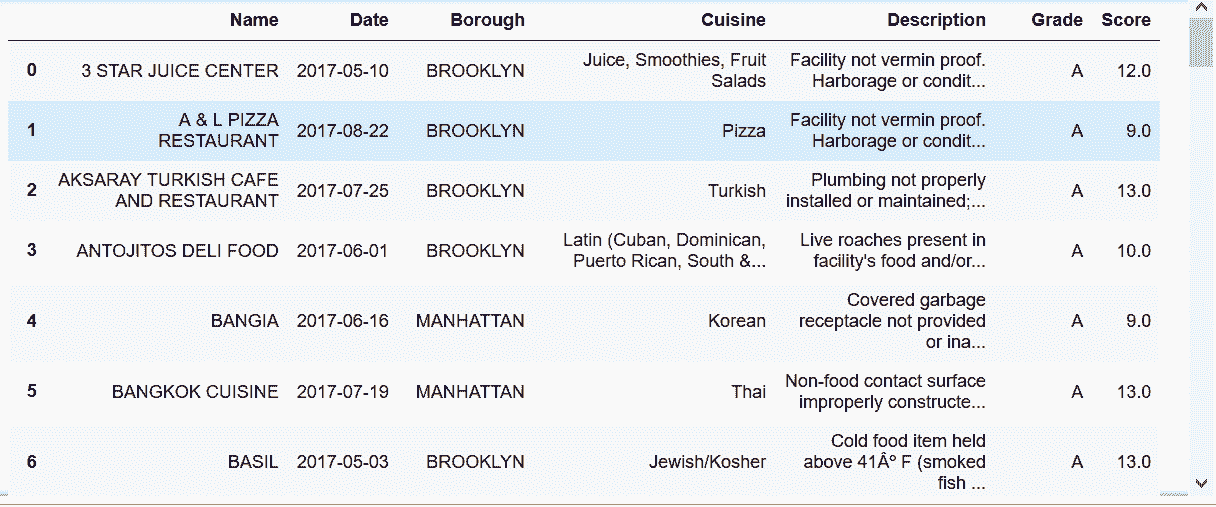
```py
# 使用squeeze方法,可以避免前面的多级索引
In[73]: inspections.set_index(['Name','Date', 'Info']) \
.squeeze() \
.unstack('Info') \
.reset_index() \
.rename_axis(None, axis='columns')
out[73]:
```
### 更多
```py
# pivot_table需要传入聚合函数,才能产生一个单一值
In[74]: inspections.pivot_table(index=['Name', 'Date'],
columns='Info',
values='Value',
aggfunc='first') \
.reset_index()\
.rename_axis(None, axis='columns')
out[74]:
```
## 10\. 当两个或多个值存储于一个单元格时进行清理
```py
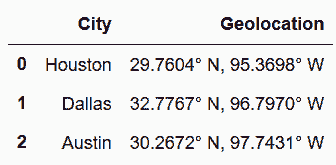
# 读取texas_cities数据集
In[75]: cities = pd.read_csv('data/texas_cities.csv')
cities
out[75]:
```
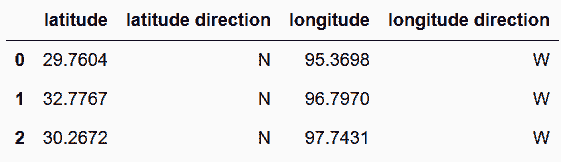
```py
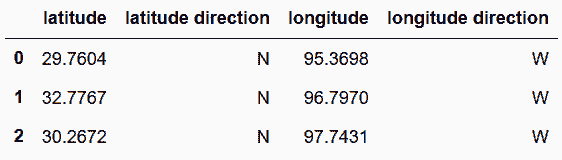
# 将Geolocation分解为四个单独的列
In[76]: geolocations = cities.Geolocation.str.split(pat='. ', expand=True)
geolocations.columns = ['latitude', 'latitude direction', 'longitude', 'longitude direction']
geolocations
out[76]:
```
```py
# 转变数据类型
In[77]: geolocations = geolocations.astype({'latitude':'float', 'longitude':'float'})
geolocations.dtypes
out[77]: latitude float64
latitude direction object
longitude float64
longitude direction object
dtype: object
```
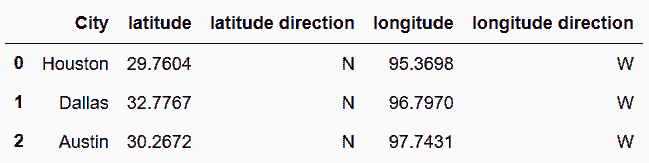
```py
# 将新列与原先的city列连起来
In[78]: cities_tidy = pd.concat([cities['City'], geolocations], axis='columns')
cities_tidy
out[78]:
```
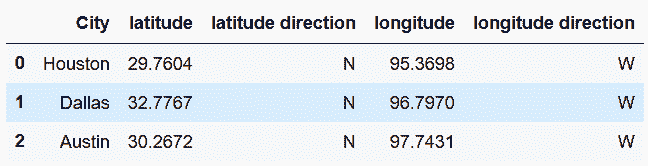
```py
# 忽略,作者这里是写重复了
In[79]: pd.concat([cities['City'], geolocations], axis='columns')
out[79]:
```
### 原理
```py
# 函数to_numeric可以将每列自动变为整数或浮点数
In[80]: temp = geolocations.apply(pd.to_numeric, errors='ignore')
temp
out[80]:
```
```py
# 再查看数据类型
In[81]: temp.dtypes
out[81]: latitude float64
latitude direction object
longitude float64
longitude direction object
dtype: object
```
### 更多
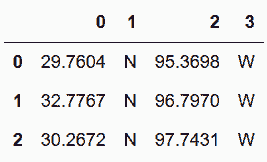
```py
# |符,可以对多个标记进行分割
In[82]: cities.Geolocation.str.split(pat='° |, ', expand=True)
out[82]:
```
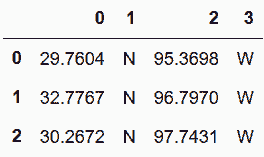
```py
# 更复杂的提取方式
In[83]: cities.Geolocation.str.extract('([0-9.]+). (N|S), ([0-9.]+). (E|W)', expand=True)
out[83]:
```
## 11\. 当多个变量被存储为列名和列值时进行清理
```py
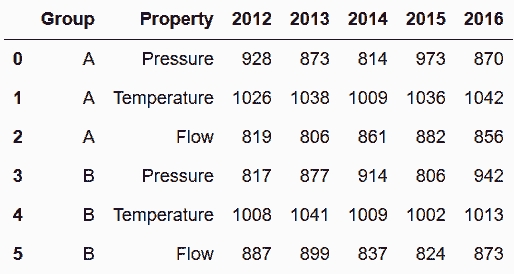
# 读取sensors数据集
In[84]: sensors = pd.read_csv('data/sensors.csv')
sensors
out[84]:
```
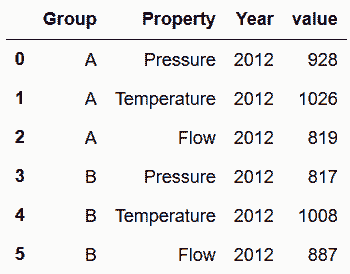
```py
# 用melt清理数据
In[85]: sensors.melt(id_vars=['Group', 'Property'], var_name='Year').head(6)
out[85]:
```
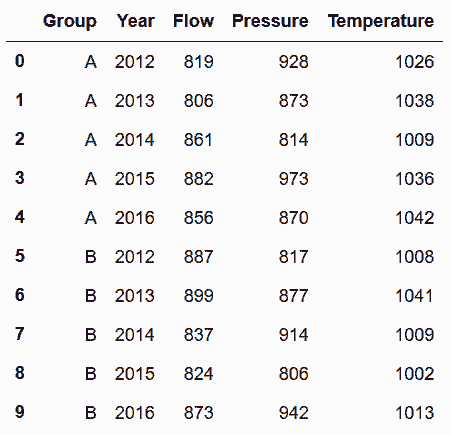
```py
# 用pivot_table,将Property列转化为新的列名
In[86]: sensors.melt(id_vars=['Group', 'Property'], var_name='Year') \
.pivot_table(index=['Group', 'Year'], columns='Property', values='value') \
.reset_index() \
.rename_axis(None, axis='columns')
out[86]:
```
### 更多
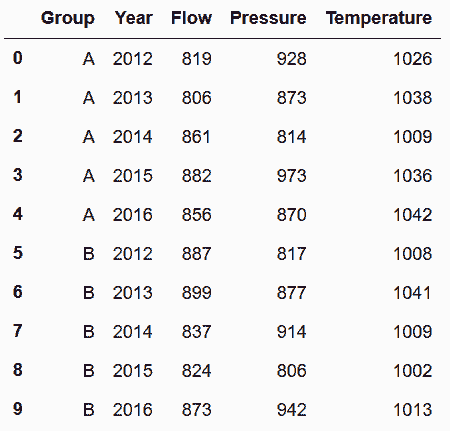
```py
# 用stack和unstack实现上述方法
In[87]: sensors.set_index(['Group', 'Property']) \
.stack() \
.unstack('Property') \
.rename_axis(['Group', 'Year'], axis='index') \
.rename_axis(None, axis='columns') \
.reset_index()
out[87]:
```
## 12\. 当多个观察单位被存储于同一张表时进行清理
```py
# 读取movie_altered数据集
In[88]: movie = pd.read_csv('data/movie_altered.csv')
movie.head()
out[88]:
```
```py
# 插入新的列,用来标识每一部电影
In[89]: movie.insert(0, 'id', np.arange(len(movie)))
movie.head()
out[89]:
```

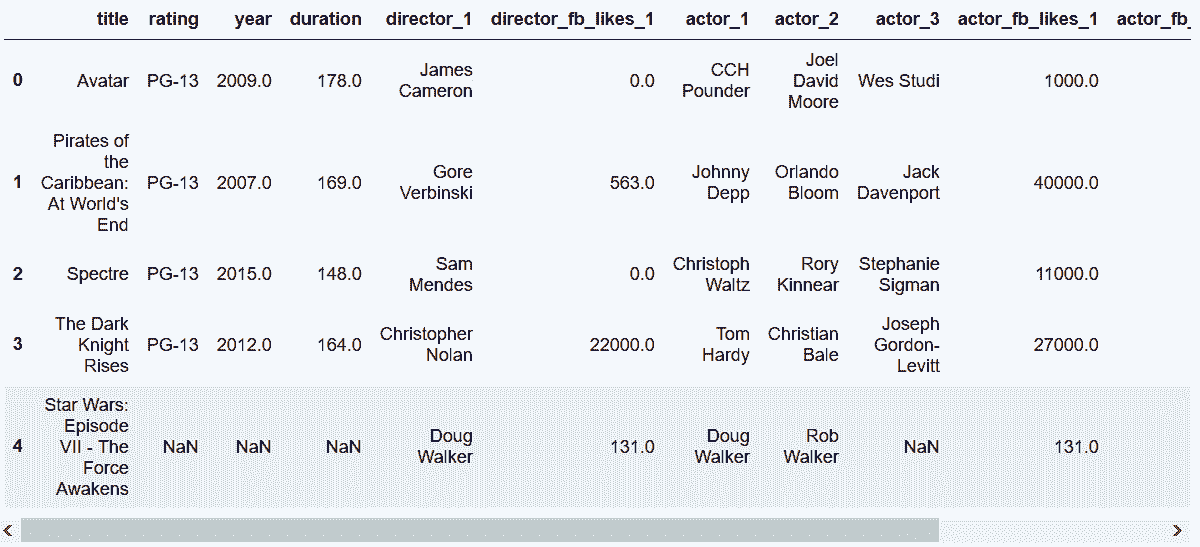
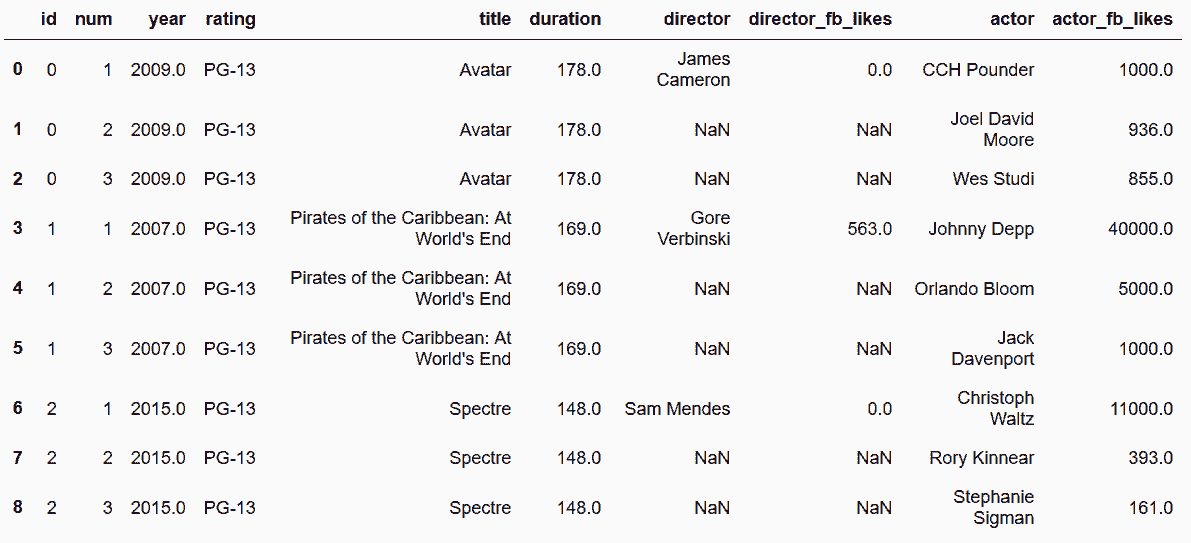
```py
# 用wide_to_long,将所有演员放到一列,将所有Facebook likes放到一列
In[90]: stubnames = ['director', 'director_fb_likes', 'actor', 'actor_fb_likes']
movie_long = pd.wide_to_long(movie,
stubnames=stubnames,
i='id',
j='num',
sep='_').reset_index()
movie_long['num'] = movie_long['num'].astype(int)
movie_long.head(9)
out[90]:
```
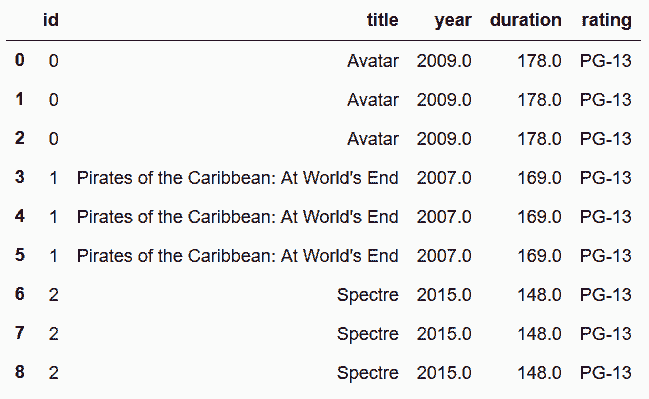
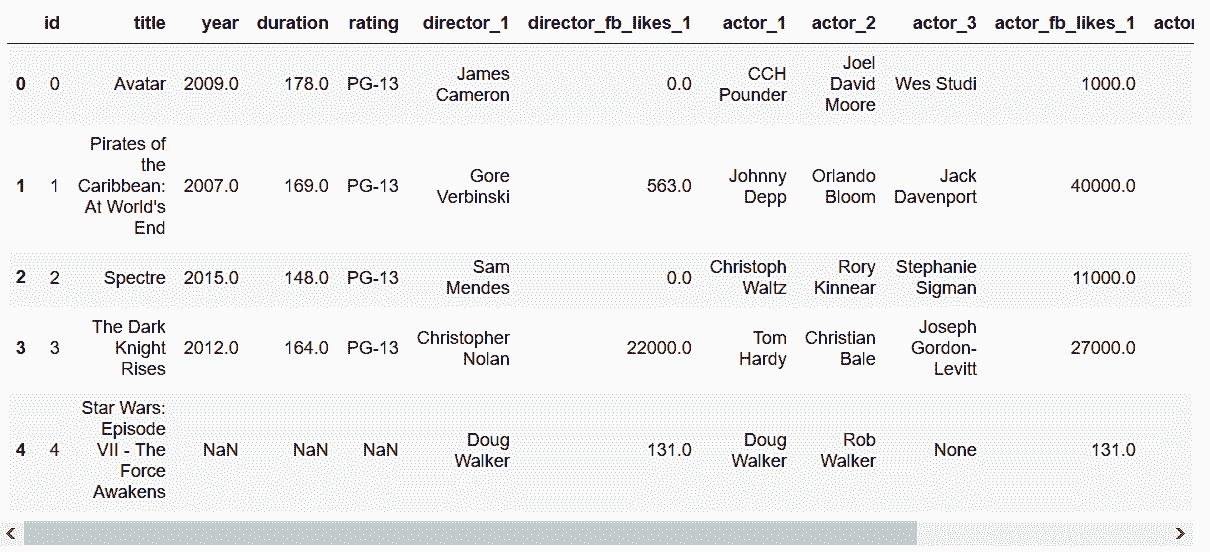
```py
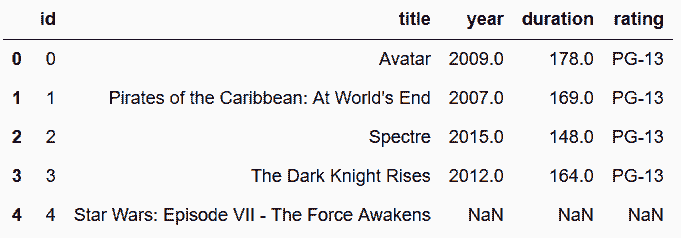
# 将这个数据分解成多个小表
In[91]: movie_table = movie_long[['id','title', 'year', 'duration', 'rating']]
director_table = movie_long[['id', 'director', 'num', 'director_fb_likes']]
actor_table = movie_long[['id', 'actor', 'num', 'actor_fb_likes']]
In[92]: movie_table.head(9)
out[90]:
```
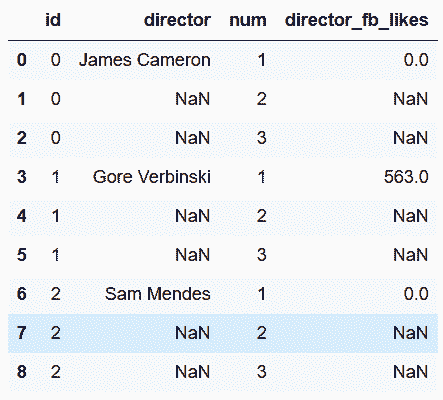
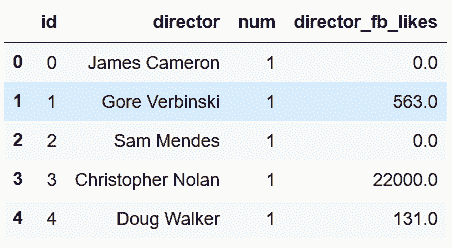
```py
In[93]: director_table.head(9)
out[93]:
```
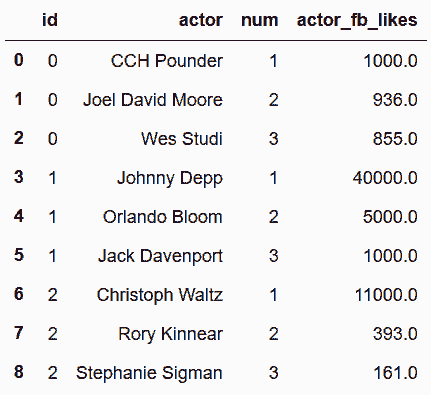
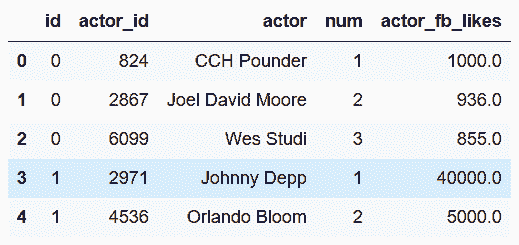
```py
In[94]: actor_table.head(9)
out[94]:
```
```py
# 做一些去重和去除缺失值的工作
In[95]: movie_table = movie_table.drop_duplicates().reset_index(drop=True)
director_table = director_table.dropna().reset_index(drop=True)
actor_table = actor_table.dropna().reset_index(drop=True)
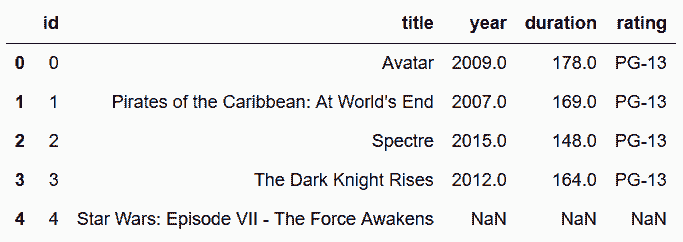
In[96]: movie_table.head()
out[96]:
```
```py
In[97]: director_table.head()
out[97]:
```
```py
# 比较内存的使用量
In[98]: movie.memory_usage(deep=True).sum()
out[98]: 2318234
In[99]: movie_table.memory_usage(deep=True).sum() + \
director_table.memory_usage(deep=True).sum() + \
actor_table.memory_usage(deep=True).sum()
out[99]: 2624898
```
```py
# 创建演员和导演的id列
In[100]: director_cat = pd.Categorical(director_table['director'])
director_table.insert(1, 'director_id', director_cat.codes)
actor_cat = pd.Categorical(actor_table['actor'])
actor_table.insert(1, 'actor_id', actor_cat.codes)
director_table.head()
out[100]:
```

```py
In[101]: actor_table.head()
out[101]:
```
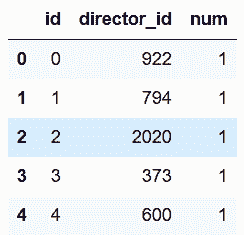
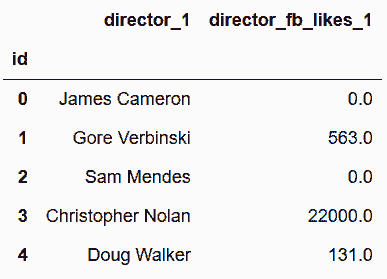
```py
# 可以用这两张表生成要用的中间表。先来做director表
In[102]: director_associative = director_table[['id', 'director_id', 'num']]
dcols = ['director_id', 'director', 'director_fb_likes']
director_unique = director_table[dcols].drop_duplicates().reset_index(drop=True)
director_associative.head()
out[102]:
```
```py
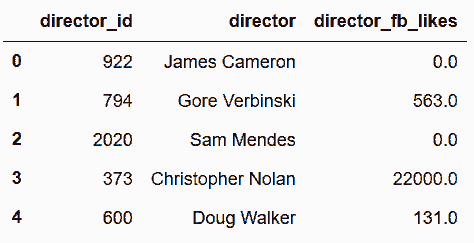
In[103]: director_unique.head()
out[103]:
```
```py
# 再来做actor表
In[104]: actor_associative = actor_table[['id', 'actor_id', 'num']]
acols = ['actor_id', 'actor', 'actor_fb_likes']
actor_unique = actor_table[acols].drop_duplicates().reset_index(drop=True)
actor_associative.head()
out[104]:
```

```py
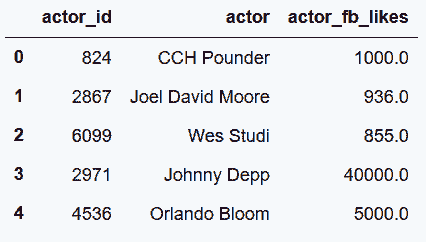
In[105]: actor_unique.head()
out[105]:
```
```py
# 查看新的表所使用的内存量
In[106]: movie_table.memory_usage(deep=True).sum() + \
director_associative.memory_usage(deep=True).sum() + \
director_unique.memory_usage(deep=True).sum() + \
actor_associative.memory_usage(deep=True).sum() + \
actor_unique.memory_usage(deep=True).sum()
out[106]: 1833402
```
```py
In[107]: movie_table.head()
out[107]:
```
```py
# 可以通过将左右表组合起来形成movie表。首先将附表与actor/director表结合,然后将num列pivot,再加上列的前缀
In[108]: actors = actor_associative.merge(actor_unique, on='actor_id') \
.drop('actor_id', 1) \
.pivot_table(index='id', columns='num', aggfunc='first')
actors.columns = actors.columns.get_level_values(0) + '_' + \
actors.columns.get_level_values(1).astype(str)
directors = director_associative.merge(director_unique, on='director_id') \
.drop('director_id', 1) \
.pivot_table(index='id', columns='num', aggfunc='first')
directors.columns = directors.columns.get_level_values(0) + '_' + \
directors.columns.get_level_values(1).astype(str)
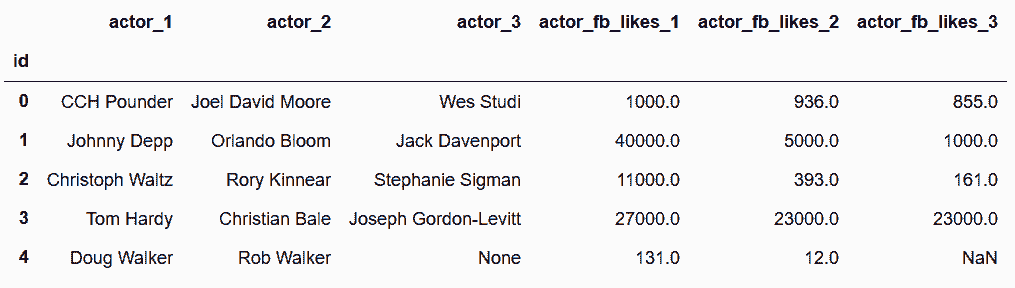
In[109]: actors.head()
out[109]:
```
```py
In[110]: directors.head()
out[110]:
```
```py
In[111]: movie2 = movie_table.merge(directors.reset_index(), on='id', how='left') \
.merge(actors.reset_index(), on='id', how='left')
In[112]: movie2.head()
out[112]:
```
```py
In[113]: movie.equals(movie2[movie.columns])
out[113]: True
```
