
1、Python访问剪贴板
~~~bash
$ sudo pip2 install pyperclip
~~~
### 测试使用
~~~python
>>>import pyperclip
>>>pyperclip.copy("this is a test")
>>>pyperclip.paste()
this is a test
~~~
可以先用鼠标选中一部分文字进行复制,然后运行`pyperclip.paste()`,你会发现输出的就是你复制的内容.如果先用`pyperclip.copy("this is a test")`,再用鼠标进行粘贴也会是this is test.
总结来说:
* pyperclip.copy()用于将文字复制进剪切板
* pyperclip.paste()用于将文字从剪切板复制出来
#
## **PyAutoGUI程序自动化控制**
PyAutoGUI是一个款Python的GUI自动化工具,其目的是利用脚本控制鼠标和键盘操作。PyAutoGUI 适用于 Windows、macOS 和 Linux,并在 Python 2 和 3 上运行。
在已安装Python环境的基础上通过pip安装
PyAutoGUI库:
pip install -i https://pypi.douban.com/simple pyautogui
源码地址:https://github.com/asweigart/pyautogui
功能:
移动鼠标,单击或键入其他应用程序的窗口。
向应用程序发送击键(例如,填写表单)。
截屏,并给出一个图像(例如,按钮或复选框),在屏幕上找到它。
找到应用程序的窗口,并移动、调整大小、最大化、最小化或关闭它(当前仅使用 Windows)
在 GUI 自动化脚本运行时显示用户交互的消息框。
# 【python+WinAppDriver】windows自动化测试
最近有些忙,随便写写吧
先安装winappdriver,使用的话就像appium一样,开启服务一直运行着
代码也跟移动端一样,直接看吧
import unittest
from appium import webdriver
from selenium.webdriver.common.keys import Keys
import time
desired_caps = {}
desired_caps['app'] = r"notepad.exe"
driver = webdriver.Remote(
command_executor='http://127.0.0.1:4723',
desired_capabilities=desired_caps)
driver.find_element_by_name("文本编辑器").send_keys("polyv")
time.sleep(5)
driver.quit()
*****
# [聊聊 PC 端自动化最佳方案 - WinAppDriver](https://blog.csdn.net/qq_39241986/article/details/119834169)
~~~php
人人都可以简单入门Python、爬虫、数据分析 简说Python推荐 来源:AirPython作者:星安果
~~~
## 1\. 前言
一提到自动化,可能大家想到的是 App 端的 Appium、Airtest、AutoJS,亦或是 Selenium、Puppeteer、Cypress 等 Web 端的自动化框架
本篇文章,我将和大家聊聊 PC 端的自动化工具 - WinAppDriver
## 2\. 准备
WinAppDriver,全称为 Windows Application Driver,它是 Windows 上一个类似 Selenium 的 UI 自动化驱动服务框架
它支持 Appium,可以使用 Appium-[Python](https://so.csdn.net/so/search?from=pc_blog_highlight&q=Python)\-Client 依赖库完成对 Windows 桌面程序的自动化操作
项目地址:https://github.com/Microsoft/WinAppDriver
需要注意的是,要使用 WinAppDriver 服务框架完成 Windows 的自动化,需要满足 Windows10 或 Windows Server 2016 以上系统
另外,它支持的应用程序包含:
* UWP - Universal Windows Platform
* WinForms - Windows Forms
* WPF - Windows Presentation Foundation
* Win32 - Classic Windows
在实现之前,我们需要做好以下准备工作
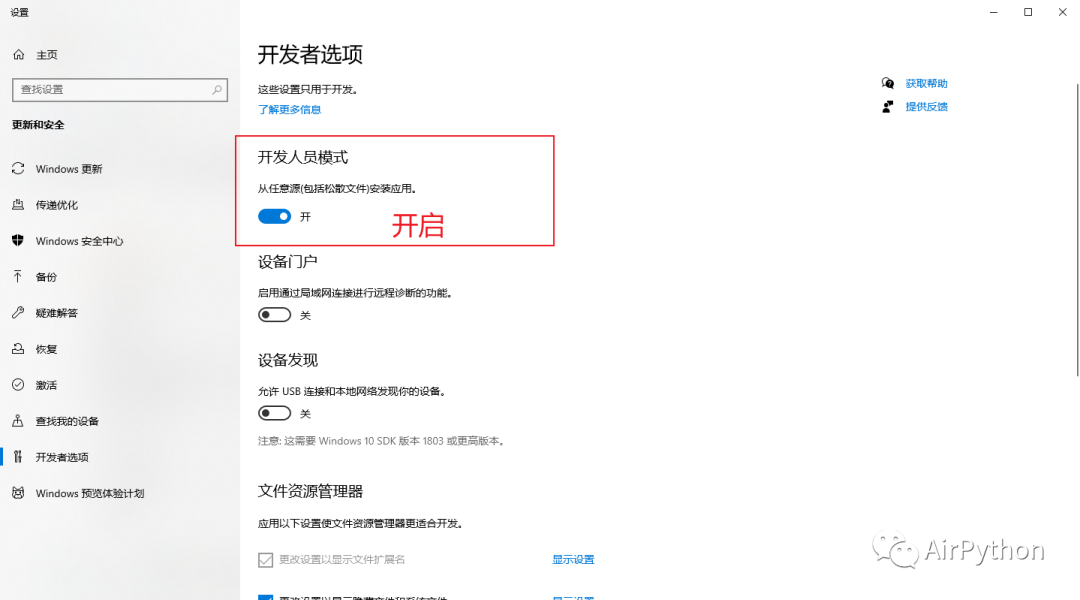
2-1 开启「 开发者模式 」
关键字搜索「 开发者设置 」,选择开启「 开发者模式 」
2-2 安装窗口组件元素识别工具
常用的 2 种窗口元素识别工具为:inspect.exe、FlaUInspect
其中
作为官方的组件元素识别工具,inspect.exe 集成于 Windows SDK
如果本地不存在该文件,可以通过下面链接进行安装
https://download.microsoft.com/download/4/d/2/4d2b7011-606a-467e-99b4-99550bf24ffc/windowssdk/winsdksetup.exe
相比 inspect.exe,FlaUInspect 界面更简洁,功能更易用( 推荐 )
项目地址:https://github.com/FlaUI/FlaUInspect
2-3 安装 WinAppDriver
通过下面链接下载 WinAppDriver 应用程序,并在本地运行起来
https://github.com/Microsoft/WinAppDriver/releases
2-4 搭建 Appium 环境
这部分内容涉及 NodeJS 安装及 Appium-Server 环境的搭建
可以参考:https://www.cnblogs.com/amoyshmily/p/10500687.html
2-5 安装依赖
最后安装 Python 依赖库 Appium-Python-Client
~~~go
# 安装依赖 Appium-Python-Clientpip3 install Appium-Python-Client
~~~
## 3. 实战一下
我们以操作 PC 端的微信为例,聊聊自动化的常见步骤
首先,我们在本机打开 WinAppDriver 服务,让它在后台运行
然后,我们使用 Python 编写自动化脚本
通过 ip 地址、端口号及 PC 版微信的绝对路径,使用 Appium 打开微信
```
import time, osfrom appium
import webdriverfrom selenium.webdriver
import ActionChainsfrom selenium.webdriver.common.keys
import Keysfrom time import sleep class Auto():
def open_weixin(self, host='localhost', port=4723): # 打开WinAppDriver服务
# 注意:如果手动开启,则可以注释掉 # os.system(r'start "" /d "C:\Program Files\Windows Application Driver\" "WinAppDriver.exe"') # 配置信息 # 包含:平台名、系统、应用程序绝对路径
desired_caps = {'platformName': 'Windows', 'deviceName': 'WindowsPC', 'app': r"D:\Program Files (x86)\Tencent\WeChat\WeChat.exe"}
try:
# 连接WinAppDriver服务,打开目标软件
self.driver = webdriver.Remote('http://{}:{}'.format(host, port), desired_caps)
except Exception as e:
raise AssertionError(e)
```
接着,通过「 组件元素识别工具 」拿到界面元素的属性值,执行常见的点击、移动、滑动等操作
比如:点击「 文件传输助手 」,发送一条信息
~~~go
# 给文件传输助手发送一条信息def send_msg(self, element_name, msg): """ :param element_name:元素name值 :param msg: :return: """ # 通过name属性,找到目标元素 chat_element = self.weixin_driver.find_element_by_name(target_name) # 点击元素,进入聊天界面 chat_element.click() # 找到输入框,并输入 self.weixin_driver.find_element_by_name("输入").send_keys(msg) # 点击右下角的发送,发送消息出去 self.weixin_driver.find_element_by_name("发送(S)").click()
~~~
需要注意的是,如果涉及界面的滑动,可以使用「 ActionChains 」移动鼠标,然后使用 win32api 和 win32con 模拟屏幕滑动即可
~~~go
import win32apiimport win32confrom appium import webdriverfrom selenium.webdriver import ActionChains # 模拟屏幕滑动# 1、移动到某个元素区域ActionChains(self.weixin_driver).move_to_element( self.weixin_driver.find_element_by_name("element_name")).perform() # 2、滑动界面# 比如,向上滚动,模拟滑动win32api.mouse_event(win32con.MOUSEEVENTF_WHEEL, 0, 0, -500)
~~~
完成自动化操作后,就可以主动释放资源、关闭 WinAppDriver 服务
~~~go
# 释放资源及关闭服务def tearDownFunc(self): print("准备退出") sleep(2) # 1、释放资源 self.weixin_driver.quit() # 2、关闭WinAppDriver应用程序 os.system(' @taskkill /f /im WinAppDriver.exe')
~~~
## 4\. 最后
在实际使用过程中,可能会遇到复杂的桌面应用程序,这时我们可以通过打印驱动对象的「 page\_source」元素控制树值,以此来帮助我们进行快速定位元素,进而完善自动化脚本
如果你觉得文章还不错,请大家 **点赞、分享、留言** 下,因为这将是我持续输出更多优质文章的最强动力!
- 在线课程
- AI在线学习
- CSS3+H5在线学习
- JAVA基础课程
- SpringBoot要点学习视频课程
- 黑马在线课
- 前端技术
- CSS弹性布局Flex
- CSS网格布局
- CSS定位技术
- H5行内元素和块元素
- CSS3网页动态效果
- 前端动画(transition,animate)
- 网页动画Wow.js
- CSS3实现动态图效果
- JS绑定事件
- 常用JS脚本
- JS跳转页面常用的几种方法
- Js的封装与面向对象
- JS判断为空
- JS调试
- JQ给单选与多选框赋值
- JQuery事件
- Jquery
- 微信开发
- 前端框架
- 开发工具Hbuilder
- VUE
- VUE教程
- UniApp
- LayUI弹出层
- LayUI树
- 模态化封装-Zbra-前端框架
- 小程序开发
- 常用JS库
- web技术JQ懒加载
- 前端JS使用=》箭头的用法
- Linux
- YUM源配置
- PHP
- PHP五种为空
- PHP会话Session共享与还原会话
- PHP的Session机制
- 带你彻底搞懂Cookie、Session和Token
- TP5.0_Model操作
- Model的定义
- Model初始化
- Model新增
- Model更新
- Model分层
- Model数组访问
- 链式操作
- Join
- Laravel5.2说明手册
- ThinkPHP5手册
- TP面向对象继承
- PHP强制转换类型
- PHP解决高并发超发优惠券
- ThinkPHP实现Redis队列的订阅与消费
- 智慧工地
- 网络音柱
- 3.新建广播任务
- 2.获取文件和添加推流说明
- 01广播任务说明-音柱对接
- 海康威视
- 海康(设备端)创建人脸库
- 海康人脸比对布防
- 海康人脸比对SDK开发
- 海康萤石云API开放平台
- 人脸比对模块流程
- 人脸返回集调试
- 人脸抓拍代码示例
- NET_DVR_UploadFile_V40
- 海康人脸比对事件代码对比表
- 海康SDK网络错误代码对照表
- 注册回调函数接收设备报警
- 人脸参数NET_DVR_GetSTDConfig
- 人脸返回NET_VCA_FACESNAP_RESULT
- 上传人脸库NET_DVR_SEND_PARAM_IN
- 海康人脸比对模式配置
- NET_DVR_FACELIB_COND
- 海康威视SDK开发包
- bim开发
- 建筑专业领域知识
- 微软Project的MPP文件解析成甘特图
- Bim轻量化
- 甘特图进度纠偏
- BIM显示怎么看?如何在浏览器中显示BIM三维模型
- BIM5D怎么关联模型?BIM5D模型关联分析
- 行业软件数据库设计
- BIM5D功能说明- 流水段定义
- BIM5D功能说明-高级工程量查询
- BIM5D功能说明-清单工程量查询
- Revit相关操作
- 葛兰代尔操作手册
- 其它SDK
- 宇泛物联网操作系统 Ucon-SDK
- ffmpeg简单实现视频文件转推流
- 施工交底是什么
- 人机料法环全面解析
- 现场签证是什么
- 流水施工
- 物联网协议-Modbus、MQTT、WebSocket、Socket
- 物联网协议-传输通道
- Java
- API开发常用工具集
- 部分专有名词
- UML里边界类控制类和实体类
- extends和implements区别
- JAVA实体类的理解
- 若依
- Springboot调用外部RestFul接口
- Mybatis中主从表联查,collection和association的使用区别
- RabbitMQ
- CentOS 下 rpm包与 yum 安装与卸载
- Navicat全局调试执行Mysql的SQL日志
- Marpper中日期条件
- Java中日期笔记
- 报错调试
- 泛型List<T>
- EXCEL批量导入
- java字符串使用方法.split(“.“)不能正常分割
- 读取配置文件yml
- 若依ruoyi
- Idea打开若依项目
- SpringBoot快速上手
- SpringMVC向页面传递参数的5种方式
- shiro注解@RequiresPermissions多权限任选一参数用法
- JAVA要点
- SpringBoot内置了tomcat
- Spring @RequestMapping 注解使用技巧
- 若依拓展系统
- SpringBoot基础技术
- 反向API-什么是 Webhook?
- SDK 和 API 的区别是什么?
- yaml
- 微服务架构
- SpringCloud启动
- Jfinal框架热部署环境
- Tomcat搭建
- tomcate部署多个war包
- Nginx反向代理配置示例
- Linux查看端口号
- Nginx负载均衡
- JAVA环境配置
- Jar与War包区别
- JFinal实现文件上传以及解析
- Jfinal知识商城部署
- JAVA文件路径Linux和Win的写法
- 获取和设置HTML5视频当前播放时间的方法
- Spring Boot 整合 Spring Data Jpa
- Docker
- JAVA设计模式
- JAVA反射举例
- 什么是Bean
- Jar war打包部署
- intelij idea 和 eclipse 使用上的区别
- IntelliJ IDEA 升级Maven版本
- 单点登录应用技术 JWT
- JAVA基础中toString()的讲解
- JAVA发送http get/post请求,调用http接口、方法
- JAVA搞定API接口描述、日志记录
- Mybatis传多个参数如int 和String该怎么传
- JAVA收到字符串ids
- Lambda表达
- Sentinel介绍与使用(熔断降级、系统负载保护)
- Activiti7的基本原理和使用
- Feign原理 (图解)
- Java 8 Stream—List流高阶用法
- JAVA循环迭代器
- SpringBoot上传文件
- 从面向服务架构(SOA)学习:微服务时代应该借鉴的5条经验教训
- IDEA高频快捷键盘
- JAVA面试
- 面向接口编程new与newInstance实例化的区别
- Mybatis调试
- Maven查看最新依赖库的版本
- JAVA@Valid数据较验
- 日志写法
- RUOYI多模块部署
- ruoyi改造的商用项目
- Tomcat三种运行模式(BIO, NIO, APR)的比较和场景分析
- JAVA之HTTP请求
- 验证器
- 修饰符protected,public,private详解(Java)
- Java 反射(Reflect)详解
- 深入解析Java中反射中的invoke()方法
- 开发框架
- DAO层、Service层、Controller层、View层
- java三层架构持久层、业务层、表现层的理解
- spring常用注解及用法总结
- Maven入门总结
- 三大框架的运行流程、原理、核心技术详解
- Mybatis入门总结
- Swagger专题
- SpringBoot入门
- 从0开始创建Springboot项目
- Python
- JAVA实现webdrive自动化测试
- UI自动化测试
- Python自动化控制测试
- Python使用 Pywinauto自动发送微信消息
- Python最新抓取朋友圈
- Pywinauto测试Win程序
- 浅谈UI自动化测试
- pynput监听、操作键盘鼠标库
- PyAutoGUI——图形用户界面自动化
- Python 通过截图匹配原图中的位置(opencv)
- Python大图找小图的位置和信息
- App爬虫神器mitmproxy和mitmdump的使用
- Python爬取抖音音视频
- 如何爬取抖音小视频
- python微信三方库
- Itchat再见了
- 用Itchat库每日发送一句话
- WechatPCAPI库微信电脑端实现自动化回复
- 微信电脑端登陆_Python操作微信
- appium自动化
- appium手机自动化环境搭建
- appium自动化测试QQ发信息
- python采集多网站视频
- APPiUM朋友圈
- 在Linux上运行py程序
- dotNet
- 反射、委托、事件的概念区分
- Git操作
- fork
- 版本控制
- Ideal的Git操作
- IP打造营销
- 私域营销
- 广告创意
- 日常广告形式记录
- 直播号运营SOP
- SaaS市场
- 推广运营
- 网站诊断SEO院长
- 好的文章内容长啥样
- 谷歌SEO
- 谷歌搜索营销分析
- 谷歌异常阀值
- 谷歌名词
- 如何设置谷歌询盘转化
- 谷歌设置事件转换
- 谷歌GTM管理
- 谷歌分析事件设定
- 谷歌转换次数
- H1标签的布局使用
- 行业动向分析平台
- 设计UI
- 免费商用字体
- 免费商用设计字体
- PS设计和通道原理
- AI与PS如何选
- KANO模型与PSM模型
- 产品经理设计
- 如何快速树立项目需求
- 需求分析调研心态
- 项目需求分析步骤
- 如何通过需求清单梳理业务场景
- 实例分享产品需求文档
- 二清结算规则
- Axure9操作快捷键
- 文化沉淀与提升
- 职业明灯
- 职场能级三角逻辑学
- 霍金斯情绪能量图
- 一即一切,一切即一
- 幽默金句
- 人文锦句
- 刘礼涛生活教练对白
- 2022
- 生活喜剧
- 考研英语
- 大语文
- Linux系统运维
- Kubernetes+Promethues+Cloud Alert实践分享
- Mysql调试与SQL日志跟踪
- Nginx添加虚拟目录
- 为什么代码审查非常重要?
- 企业建立成功 DevOps 模式所需应对的5个挑战
- 什么是Prometheus
- 代码审查怎么做?
- K8S(Kubernetes)
- Win给指定盘扩容存储空间
- Llinux系统(Centos/Ubuntu/Debian)弹性云系统盘扩容方法
- Nginx模块OpenResty实现流量负载
- VPN服务
- Linux命令行
- Nginx反向代理配置
- K8S安装与docker
- Mysql常用操作
- 安全渗透
- 网络安全渗透
- 逆向解密网页-爬虫-Webpack逆向实战
- CTF-识别常用密文加密方式
- ERP
- 生产ERP
- 生产ERP调研究
- 如何理解敏捷需求管理的四个关键词
- 优秀可视化表单、流程开源设计器
- 质量检测
- 问题分析
- 采购流程
- ERP低代码平台
- 基于时间序列分析的趋势预测算法
- 架构师
- 数据库技术
- Mysql优化方法
- 主从分离技术
- 基于容器docker主从同步配置
- Mysql主从分离数据库配置技术
- 索引存储B树 B+树
- 数据库分区技术
- ORACLE物化视图
- 主从数据库热备份
- Win计划任务实现MYsql备份
- 分布式数据库落地应用
- Ngnix负载均衡
- ESB与微服务区别
- SOA、ESB、微服务的关系梳理
- 预示敏捷方法走偏的15个标志——第2部分
- JAVA中多线程的PV操作
- 软件集统集成学术论文
- .Net core ,EFCore
- donet6 技术栈
- 常用编码-base64到底是什么
- CDN
- CDN常用问题
- CDN诊断
- 2021年软件测试工具大全(自动化、接口、性能、安全、测试管理)
- 微服务测试
- BPMN三种视图
- 内网穿透调试本地web
- 什么是云原生
- 25大DevOps工具
- 云原生的12因素
- 哈夫曼编码
- 大数据
- 主流企业架构有哪些?Zachman、TOGAF、DoD AF有啥区别
- 架构师知识点列表
- 经典设计模式案例学习
- 模拟鸭子
- 什么是EDI
- 通信加密技术
- 物化视图
- AES加密
- ZooKeepe选举机制
- 数据库与数据仓库的区别
- 什么是工作流,flowable 与 Activiti对比
- Activiti工作流教程
- 十四五规划和2035计划
- 大数据专栏
- 测试专题
- Redis专题
- 内存数据库Redis
- 干货|搞懂「异地多活」,看这篇就够了
- 如何画架构图
- 系统分析师
- 为什么要用UML建模
- 需求工程
- 结构化分析方法
- 冒烟测试
- 软件测试
- UML工具-EA解模
- 去哪儿核心领域DEVOPS
- 用例图
- 如何从用例图过渡到类图
- UML
- 软件工程
- 人与机
- EnterpriseA 从用例到甘特图项目管理
- UML建模全过程目标对照表
- 抽象类和抽象接口有啥区别
- 易错题
- RD和NOSQL、NewSQL的数据同步
- 乐观锁悲观锁
- k8S搭建无状态服务PRod
- Ngnix+Keeplive实现负载均衡
- MQ消息队列的关键用法
- SpringCloud实现集群
- Redission基于Redis的分布式锁实现
- 函数与方法的区别
- OS进程的五态模型
- 网络核心概念
- 数据流图DFD
- 软考查询入口
- Eriksson建模
- 需求分析师的项目能力管理
- Https通信过程原理
- 工作流引擎
- 获取请求端真实IP和远程主机IP详解Remote Address
- 系统分析师常用表
- 开发方法
- 敏捷开发
- 互联网医院
- 互联网医院服务提供
- 什么是HIS、PACS、LIS、RIS
- 算法与数据结构
- 为什么要用红黑树
- 抖音电商开发
- ABP框架
- APR机器人自动化
- CMS技术点归档
- CMS补丁
- SwfUpload上传导致Session丢失问题
- 伪静态
- divCMS常用标签
- DEDECMS 标签
- 百度UE编辑器
- 博达组件
- 常用网站售后
- robots写法
- 网站Flash组件被拦截处理办法
- 阿里云解析类型
- GIT同步网站
- cms操作手册
- PHP-DIVCMS后台
- 同时使用国内cdn与cloudflare CDN服务
- CMS内容保存长文本不完整-之text有长度
- DIVCMS上传组件升级
- 知识商城
- Jfinal框架数据获取
- 部署说明
- 局域网本地透传(调用公众号)
- JAVA手写代码笔记
- EXCEL导入工具
- 微信网页授权
- 实现一手机多平台推流直播
- Logs
- 扬州博物馆
- 算法
- 内容推荐算法
- 数据结构基础指针的使用