## 使用 Electron 创建和管理窗体
Electron 中的 BrowserWindow 模块允许您创建新的浏览器窗口或管理现有的浏览器窗口.
每个浏览器窗口都是一个单独的进程, 称为渲染器进程. 这个进程, 像控制应用程序生命周期的主进程一样,可以完全访问 Node.js API.
查看 [完整的 API 文档](http://electron.atom.io/docs/api/browser-window)
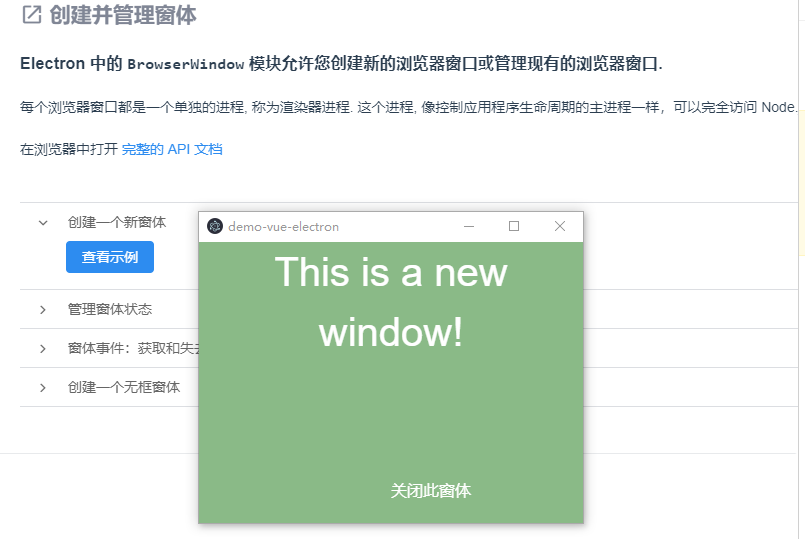
### 创建一个新窗体
`支持: Win, macOS, Linux | 进程: Main`
通过 BrowserWindow 模块可以在应用程序中创建新窗口. 这个主进程模块可以和渲染器进程与 [remote 模块]([https://www.electronjs.org/docs/api/remote](https://www.electronjs.org/docs/api/remote))一起使用, 如本示例中所示.
创建新窗口时有很多参数. 示例中用了一部分, 完整的列表请查看 [API 文档](http://electron.atom.io/docs/api/browser-window)
渲染器进程
```
createNewWin () {
const {BrowserWindow, screen} = require('electron').remote
this.win = new BrowserWindow({
width: 400,
height: 320,
movable: true, // 窗口是否可以移动
show: false, // 先不让窗口显示
autoHideMenuBar: true,
webPreferences: {
devTools: false, // 关闭调试工具
webSecurity: true,
nodeIntegration: true
}
});
const size = screen.getPrimaryDisplay().workAreaSize; // 获取显示器的宽高
const winSize = this.win.getSize(); // 获取窗口宽高
if (process.env.NODE_ENV === 'development') {
// Load the url of the dev server if in development mode
this.win.loadURL('http://localhost:8080#/newWin')
} else {
// Load the index.html when not in development
this.win.loadURL(`file://${__dirname}/index.html#/newWin`)
}
// 设置窗口的位置 注意x轴要桌面的宽度 - 窗口的宽度
this.win.setPosition((size.width - winSize[0]) / 2, 350);
// 监听渲染完成
this.win.once('ready-to-show', () => {
this.win.show();
});
// 监听窗口关闭
this.win.on('close', () => {
this.win = null;
});
global.newPage = {
id: this.win.id
};
},
```
#### 高级技巧
使用不可见的浏览器窗口来运行后台任务.
您可以将新的浏览器窗口设置为不显示 (即不可见), 以便将该渲染器进程作为 JavaScript 的一种新线程附加在应用程序后台运行. 您可以通过在定义新窗口时将 show 属性设置为 false 来执行此操作.
```
var win = new BrowserWindow({
width: 400, height: 225, show: false
})
```
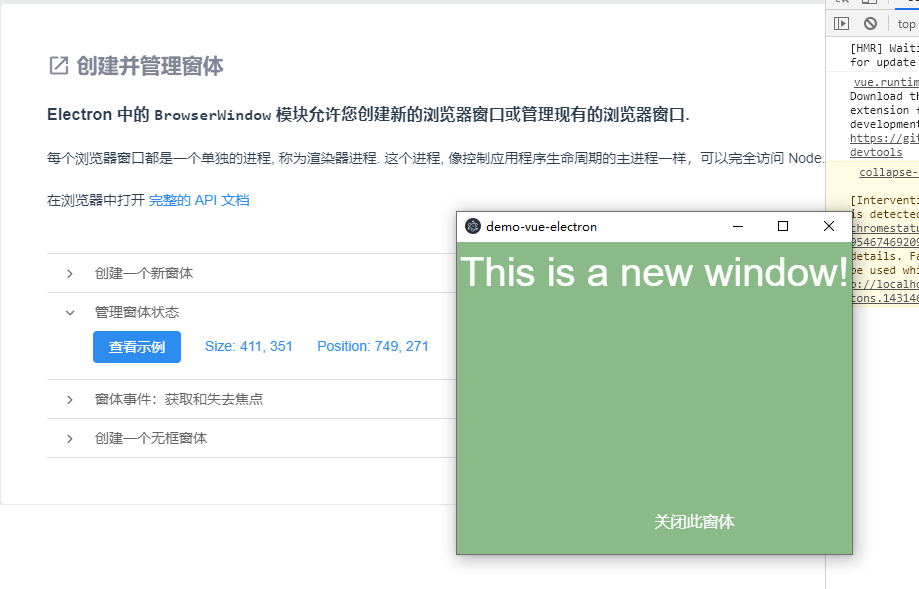
### 管理窗体状态
`支持: Win, macOS, Linux | 进程: Main`
在这个示例中, 我们创建一个新窗口, 并监听 move 和 resize 事件. 点击示例按钮, 并更改新窗口大小和位置, 然后在上方查看输出的大小和位置信息.
有很多方法用于控制窗口的状态, 如大小, 位置和焦点状态以及监听窗口更改的事件. 完整的列表请查看[API 文档](http://electron.atom.io/docs/api/browser-window)
渲染器进程
```
getWinStatus () {
if (!this.win) {
this.createNewWin();
}
this.win.on('resize', this.updateStatus);
this.win.on('move', this.updateStatus);
},
updateStatus() {
this.winSize = this.win.getSize();
this.winPosition = this.win.getPosition();
},
```
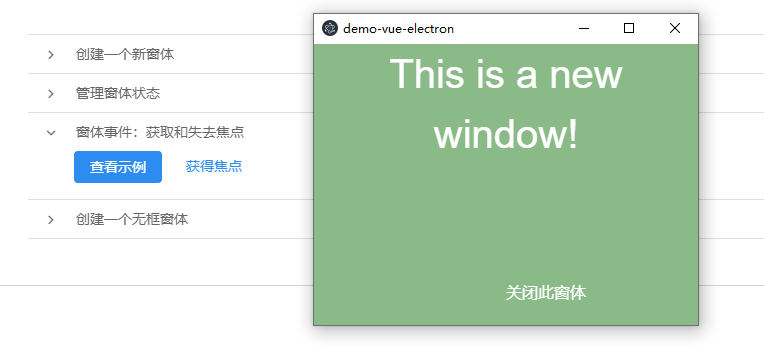
### 窗体事件: 获取和失去焦点
`支持: Win, macOS, Linux | 进程: Main`
在这个示例中, 我们创建一个新窗体并监听它的 blur 事件. 点击示例按钮创建一个新的模态窗体, 然后点击父级窗体来切换焦点. 你可以通过点击 示例获取焦点 按钮来让示例窗体再次获得焦点.
渲染器进程
```
getFocusStatus() {
if (!this.win) {
this.createNewWin();
}
this.win.on('focus', this.getFocused);
this.win.on('blur', this.lostFocused);
},
getFocused() {
this.focused = true;
},
lostFocused() {
this.focused = false;
}
```
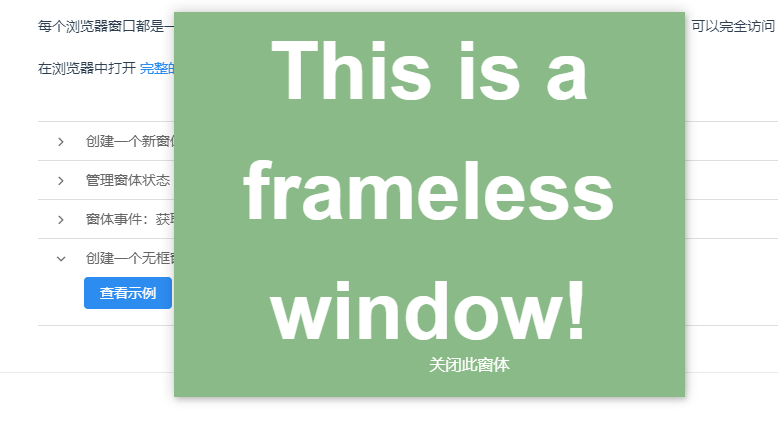
### 创建一个无框窗体
`支持: Win, macOS, Linux | 进程: Main`
无框窗口就是一个没有 "chrome" 的窗口, 比如工具栏,标题栏,状态栏,边框等. 你可以在创建窗体时通过设置 frame 为 false 来创建一个无框的窗体.
渲染器进程
```
createFramelessWin () {
const {BrowserWindow} = require('electron').remote
if (!this.flsWin) {
this.flsWin = new BrowserWindow({
width: 400,
height: 320,
frame: false, // 要创建无边框窗口
show: false, // 先不让窗口显示
webPreferences: {
nodeIntegration: true
}
});
if (process.env.NODE_ENV === 'development') {
this.flsWin.loadURL('http://localhost:8080#/framelessWin')
} else {
this.flsWin.loadURL(`file://${__dirname}/index.html#/framelessWin`)
}
// 监听渲染完成
this.flsWin.once('ready-to-show', () => {
this.flsWin.show();
});
// 监听窗口关闭
this.flsWin.on('close', () => {
this.flsWin = null;
});
}
},
```
窗体也可以有一个透明的背景. 通过设置 transparent 参数为 true, 你也可以让你的无框窗口透明:
```
var win = new BrowserWindow({
transparent: true,
frame: false
})
```
更多内容, 请查阅 [无框窗体文档](http://electron.atom.io/docs/api/frameless-window/)
## 使用 Electron 处理窗体崩溃和挂起
BrowserWindow 模块将在渲染器进程崩溃或挂起时发出事件. 您可以监听这些事件, 并给用户重新加载, 等待或关闭该窗口的机会.
在浏览器中打开完整的 [API 文档](http://electron.atom.io/docs/api/browser-window)
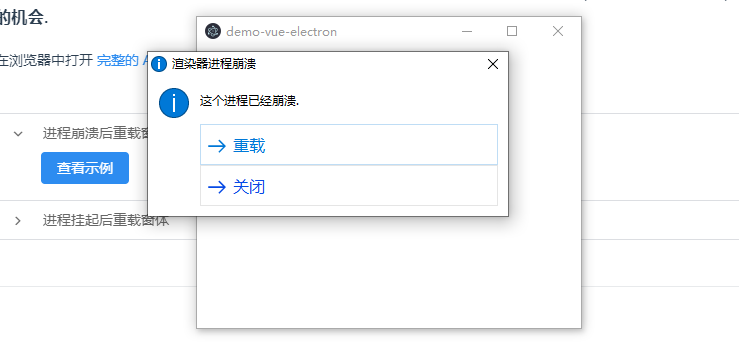
### 进程崩溃后重载窗体
`支持: Win, macOS, Linux | 进程: Main`
在这个示例中我们创建一个新窗口 (通过 remote 模块) 并提供了一个使用 process.crash() 方法强制崩溃的链接.
当前窗体正在监听崩溃事件, 当此事件发生时, 它提供用户两个选项: 重新加载或关闭.

渲染器进程
```
<a class="crash" href="javascript:process.crash()">崩溃此进程</a>
processCrash () {
const {BrowserWindow, dialog} = require('electron').remote
this.crashWin = new BrowserWindow({
width: 400,
height: 320,
movable: true, // 窗口是否可以移动
show: false, // 先不让窗口显示
autoHideMenuBar: true,
webPreferences: {
devTools: false, // 关闭调试工具
webSecurity: true,
nodeIntegration: true
}
});
if (process.env.NODE_ENV === 'development') {
this.crashWin.loadURL('http://localhost:8080#/crashWin')
} else {
this.crashWin.loadURL(`file://${__dirname}/index.html#/crashWin`)
}
this.crashWin.once('ready-to-show', () => {
this.crashWin.show();
});
this.crashWin.webContents.on('crashed', () => {
const options = {
type: 'info',
title: '渲染器进程崩溃',
message: '这个进程已经崩溃.',
buttons: ['重载', '关闭']
}
dialog.showMessageBox(options, (index) => {
if (index === 0) this.crashWin.reload()
else this.crashWin.close()
})
})
this.crashWin.on('close', () => {
this.crashWin = null;
});
},
```
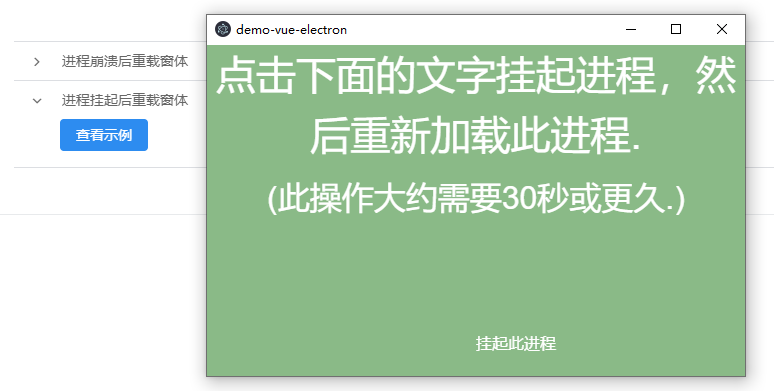
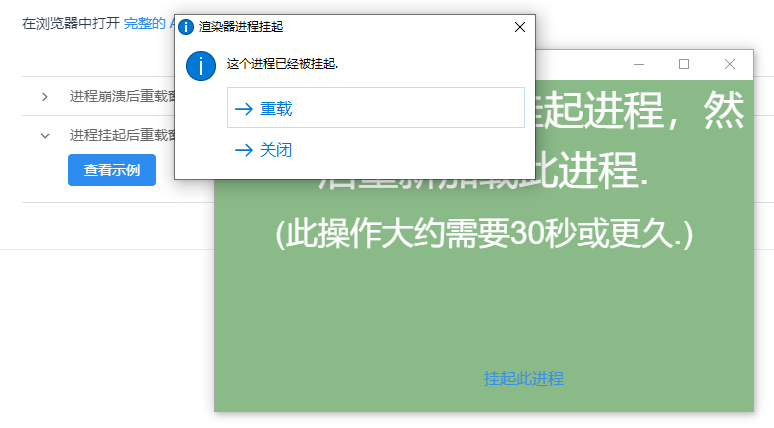
### 进程挂起后重载窗体
在这个示例中我们创建一个新窗口 (通过 remote 模块) 并提供了一个使用 process.hang() 方法强制挂起进程的链接.
当前窗体正在监听进程是否真正无响应 (这可能需要长达30秒). 当此事件发生时, 它提供用户两个选项: 重新加载或关闭.
渲染器进程
```
<a class="crash" href="javascript:process.hang()">挂起此进程</a>
processHang () {
const {BrowserWindow, dialog} = require('electron').remote
this.hangWin = new BrowserWindow({
width: 400,
height: 320,
movable: true, // 窗口是否可以移动
show: false, // 先不让窗口显示
autoHideMenuBar: true,
webPreferences: {
devTools: false, // 关闭调试工具
webSecurity: true,
nodeIntegration: true
}
});
if (process.env.NODE_ENV === 'development') {
this.hangWin.loadURL('http://localhost:8080#/hangWin')
} else {
this.hangWin.loadURL(`file://${__dirname}/index.html#/hangWin`)
}
this.hangWin.once('ready-to-show', () => {
this.hangWin.show();
});
this.hangWin.on('unresponsive', () => {
const options = {
type: 'info',
title: '渲染器进程挂起',
message: '这个进程已经被挂起.',
buttons: ['重载', '关闭']
}
dialog.showMessageBox(options, (index) => {
if (index === 0) this.hangWin.reload()
else this.hangWin.close()
})
})
this.hangWin.on('close', () => {
this.hangWin = null;
});
}
```
#### 高级技巧
等待进程再次响应.
在进程挂起的的情况下, 第三个选择是等待并查看问题是否解决, 允许进程再次响应. 为此, 请使用 BrowserWindow 的 "responsive" 事件, 如下所示:
```
win.on('responsive', function () {
// 当窗口再次响应时做些什么
})
```
