
[TOC]
# 1. 简介
## 1.1 功能
JNI是Java Native Interface的缩写,在实际中主要也是为了完成C/C++和Java程序的互相调用。因为C/C++存在更久,且对于浮点数的计算更快,且Android底层驱动大多是C/C++来完成的。所以有些时候需要使用C/C++代码,比如驱动开发、音频开发等。
## 1.2 Android中的JNI
在Android中JUC编程中,尤其是在锁的底层,我们都可以看到native修饰的方法,这个也就是本地方法。在Android中使用NDK这个工具包来完成JNI的开发。JNI可以看做是规定的协议,而NDK是谷歌提供的实践的工具。
## 1.3 NDK
NDK是一套工具原生开发套件,使你能够在 Android 应用中使用 C 和 C++ 代码,并提供众多平台库,你可使用这些平台库管理原生 Activity 和访问物理设备组件,例如传感器和轻触输入。那么什么时候可以考虑使用NDK?
* 提高应用的执行效率。将浮点数计算过多的逻辑使用C/C++语言开发。
* 代码的保护。C/C++库反编译难度较大。
* 可以方便地使用C/C++代码编写的开源库,比如OpenCV做图像识别。
* 便于移植。方便在其他的嵌入式平台上使用。
# 2. NDK 环境配置
## 2.1 下载地址
可以直接从官网中选择所需要的版本,地址:[NDK 修订历史记录 | Android NDK | Android Developers](https://developer.android.com/ndk/downloads/revision_history)
## 2.2 AndroidStudio中配置
这里可以直接在AndroidStudio中进行配置,直接进行下载:
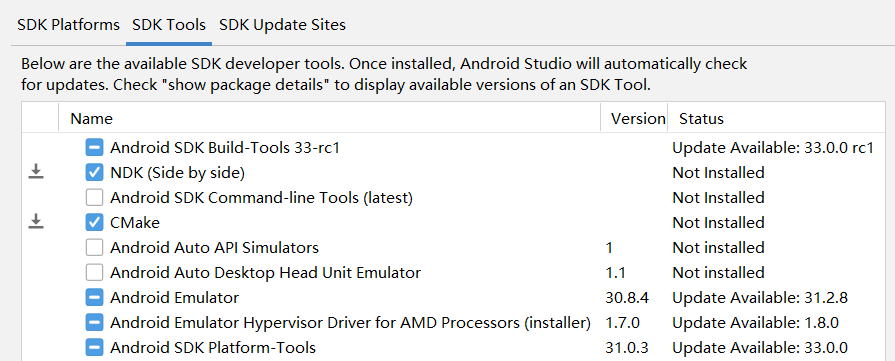
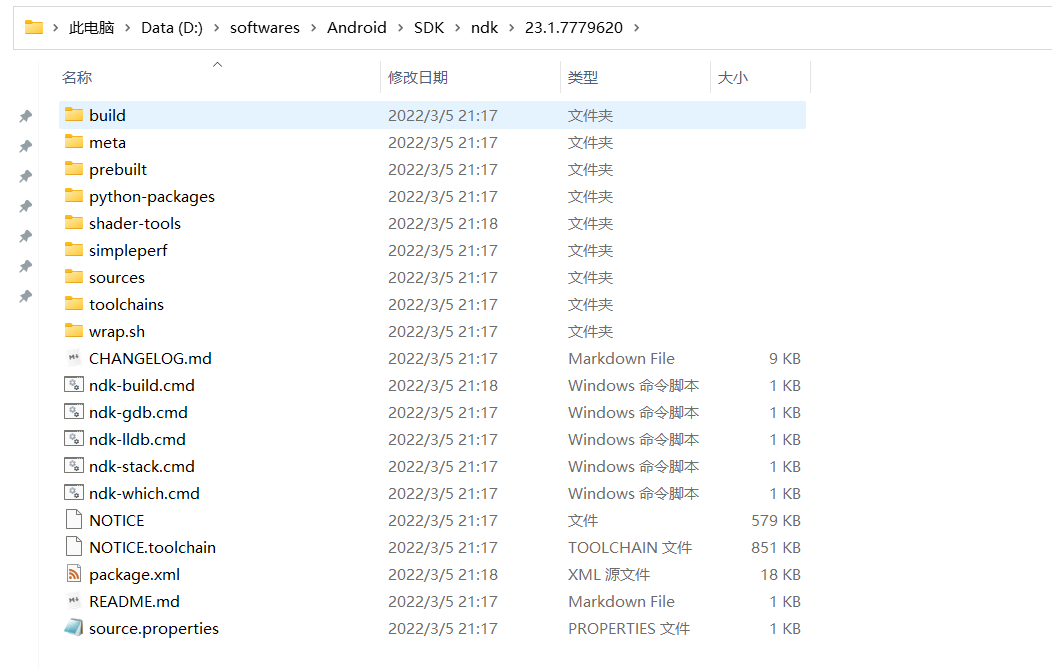
选择NDK,应用即可下载。然后可以在本地的AndroidSDK环境中找到刚刚下载的NDK:
然后配置一下环境变量,配置后就可以使用cmd进行检测:

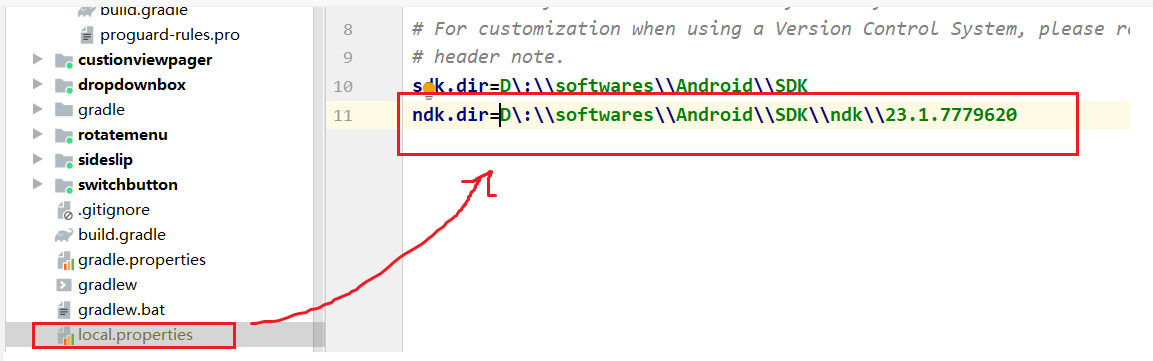
然后在local.properties文件中配置:
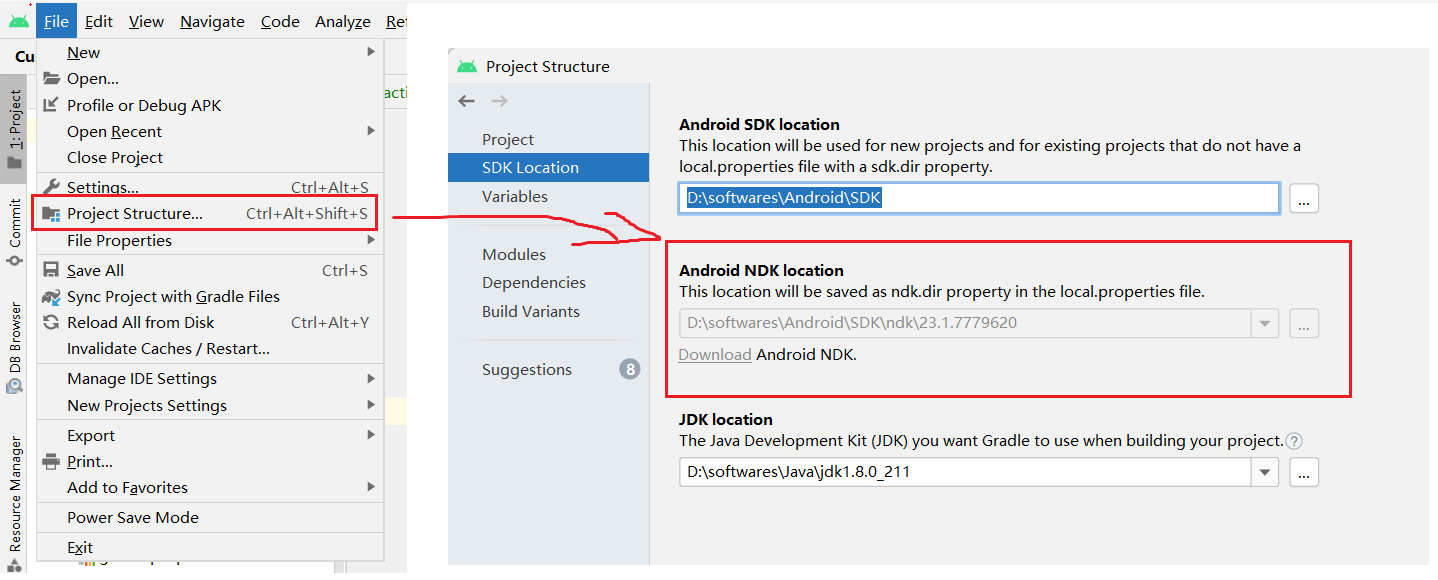
配置好后可以再次检查一次:
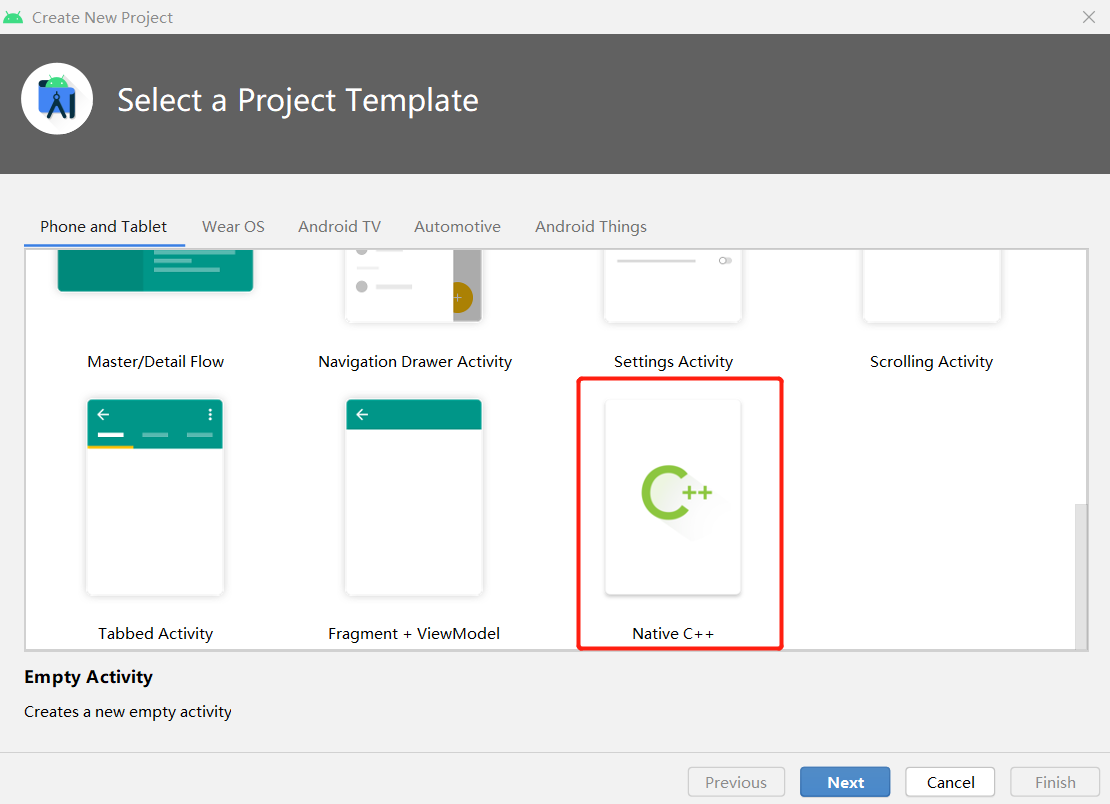
# 3. JNI案例
首先来体验一下,直接使用Android Studio直接创建,即:
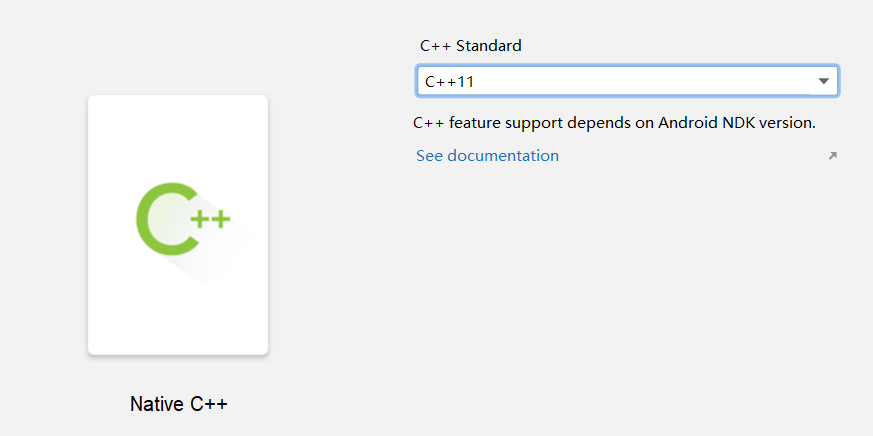
然后选择C++版本为11:
首先来看下这个项目和普通的项目有什么不同:
## 3.1 项目结构
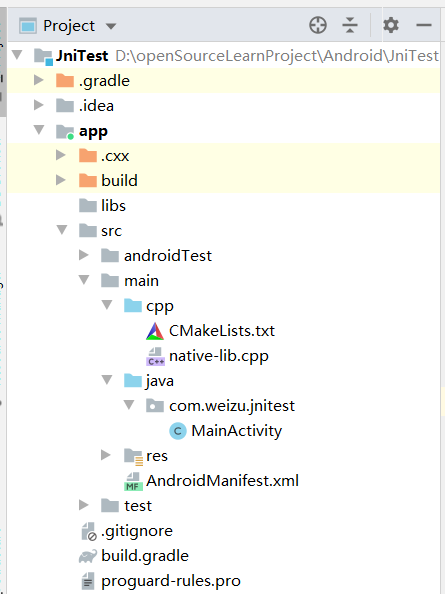
在项目目录中的main文件夹下多了cpp文件夹,在该文件夹下使用了CMake配置和Cpp文件。分别看下这个两个文件:
### 3.1.1 CMakeLists.txt
~~~
# For more information about using CMake with Android Studio, read the
# documentation: https://d.android.com/studio/projects/add-native-code.html
# Sets the minimum version of CMake required to build the native library.
cmake_minimum_required(VERSION 3.10.2)
# Declares and names the project.
project("jnitest")
# Creates and names a library, sets it as either STATIC
# or SHARED, and provides the relative paths to its source code.
# You can define multiple libraries, and CMake builds them for you.
# Gradle automatically packages shared libraries with your APK.
add_library( # Sets the name of the library.
native-lib
# Sets the library as a shared library.
SHARED
# Provides a relative path to your source file(s).
native-lib.cpp )
# Searches for a specified prebuilt library and stores the path as a
# variable. Because CMake includes system libraries in the search path by
# default, you only need to specify the name of the public NDK library
# you want to add. CMake verifies that the library exists before
# completing its build.
find_library( # Sets the name of the path variable.
log-lib
# Specifies the name of the NDK library that
# you want CMake to locate.
log )
# Specifies libraries CMake should link to your target library. You
# can link multiple libraries, such as libraries you define in this
# build script, prebuilt third-party libraries, or system libraries.
target_link_libraries( # Specifies the target library.
native-lib
# Links the target library to the log library
# included in the NDK.
${log-lib} )
~~~
从注释中我们知道,关于如何使用CMake给了一个文档地址:https://d.android.com/studio/projects/add-native-code.html
在这个配置文件中做了这么几件事:
* 指定最小CMake版本和项目名称;
* 添加类库,也就是这里的第二个文件,native-lib.cpp;
* 指定查找路径和链接库的名字;
### 3.1.2 MainActivity.java
~~~
public class MainActivity extends AppCompatActivity {
// 加载
static {
System.loadLibrary("native-lib");
}
@Override
protected void onCreate(Bundle savedInstanceState) {
super.onCreate(savedInstanceState);
setContentView(R.layout.activity_main);
// 调用
TextView tv = findViewById(R.id.sample_text);
tv.setText(stringFromJNI());
}
public native String stringFromJNI();
}
~~~
起始也就是定义供Java代码调用的接口,这里即为native修饰的stringFromJNI方法。
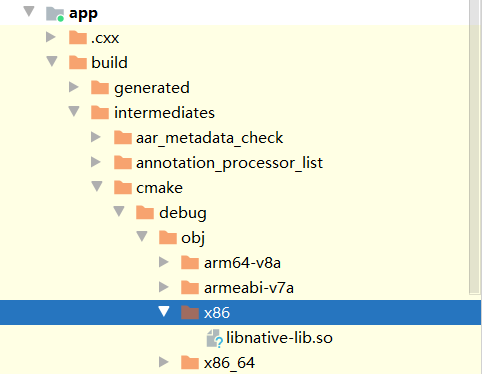
然后我们编译一下项目,可以看见生成的SO文件:
### 3.1.3 native-lib.cpp
最后来看下这个文件:
~~~
#include <jni.h>
#include <string>
extern "C" JNIEXPORT jstring JNICALL
Java_com_weizu_jnitest_MainActivity_stringFromJNI(
JNIEnv* env,
jobject /* this */) {
std::string hello = "Hello from C++";
return env->NewStringUTF(hello.c_str());
}
~~~
方法的命名规则为Java\_全类名\_本地方法名。至于类型这里为JNI所规定的,后面在继续学习。
### 3.1.4 build.gradle
在该模块的build.gradle文件中:
~~~
android {
...
defaultConfig {
...
externalNativeBuild {
cmake {
cppFlags "-std=c++11"
}
}
}
externalNativeBuild {
cmake {
path "src/main/cpp/CMakeLists.txt"
version "3.10.2"
}
}
}
~~~
也配置了对应的C++版本和对应的Cmake配置和版本。
然后运行一下项目,可以看见确实成功了:

从这个流程来看这里所使用的方式和我们在第二步中所配置的略微不相关。那么接下来就使用cmake的方式。接下来尝试将其按照上面的规则进行迁移到任意一个Android Studio项目中。
# 4. 项目配置
拷贝上面的CMakeLists.txt以及lib.cpp文件到新的项目,然后修改一下native-lib.cpp文件:
~~~
#include <jni.h>
#include <string>
extern "C" JNIEXPORT jstring JNICALL
Java_com_weizu_jnitest_JNITest_helloJni(
JNIEnv* env,
jobject /* this */) {
std::string hello = "Hello from C++";
return env->NewStringUTF(hello.c_str());
}
~~~
然后在新工程中创建对应的包名和方法:
~~~
package com.weizu.jnitest;
public class JNITest {
// 加载
static {
System.loadLibrary("native-lib");
}
// Java_com_weizu_jnitest_MainActivity_helloJni
public native String helloJni();
}
~~~
最后拷贝一下build.gradle中的配置内容,指定C++版本和CMakeLists.txt文件路径。然后就可以调用了:
~~~
class MainActivity : AppCompatActivity() {
override fun onCreate(savedInstanceState: Bundle?) {
super.onCreate(savedInstanceState)
setContentView(R.layout.activity_main)
Log.e("TAG", "onCreate: ${JNITest().helloJni()}" )
}
}
~~~
结果:

- 介绍
- UI
- MaterialButton
- MaterialButtonToggleGroup
- 字体相关设置
- Material Design
- Toolbar
- 下拉刷新
- 可折叠式标题栏
- 悬浮按钮
- 滑动菜单DrawerLayout
- NavigationView
- 可交互提示
- CoordinatorLayout
- 卡片式布局
- 搜索框SearchView
- 自定义View
- 简单封装单选
- RecyclerView
- xml设置点击样式
- adb
- 连接真机
- 小技巧
- 通过字符串ID获取资源
- 自定义View组件
- 使用系统控件重新组合
- 旋转菜单
- 轮播图
- 下拉输入框
- 自定义VIew
- 图片组合的开关按钮
- 自定义ViewPager
- 联系人快速索引案例
- 使用ListView定义侧滑菜单
- 下拉粘黏效果
- 滑动冲突
- 滑动冲突之非同向冲突
- onMeasure
- 绘制字体
- 设置画笔Paint
- 贝赛尔曲线
- Invalidate和PostInvalidate
- super.onTouchEvent(event)?
- setShadowLayer与阴影效果
- Shader
- ImageView的scaleType属性
- 渐变
- LinearGradient
- 图像混合模式
- PorterDuffXfermode
- 橡皮擦效果
- Matrix
- 离屏绘制
- Canvas和图层
- Canvas简介
- Canvas中常用操作总结
- Shape
- 圆角属性
- Android常见动画
- Android动画简介
- View动画
- 自定义View动画
- View动画的特殊使用场景
- LayoutAnimation
- Activity的切换转场效果
- 属性动画
- 帧动画
- 属性动画监听
- 插值器和估值器
- 工具
- dp和px的转换
- 获取屏幕宽高
- JNI
- javah命令
- C和Java相互调用
- WebView
- Android Studio快捷键
- Bitmap和Drawable图像
- Bitmap简要介绍
- 图片缩放和裁剪效果
- 创建指定颜色的Bitmap图像
- Gradle本地仓库
- Gradle小技巧
- RxJava+Okhttp+Retrofit构建网络模块
- 服务器相关配置
- node环境配置
- 3D特效