
# 批量安装系统-cobbler
[TOC]
## 1 环境准备
### 1.1 简介
cobbler可以理解为是kickstart的升级版,将其封装并了个web界面,可以附带管理DHCP,DNS等,提供了API接口可供二次开发.
官网:https://cobbler.github.io
### 1.2 系统信息
```
cat /etc/redhat-release
CentOS Linux release 7.4.1708 (Core)
uname -r
3.10.0-693.el7.x86_64
hostname -I
10.0.0.201 172.16.1.201
```
### 1.3 防火墙、selinux
```
sed -i 's/SELINUX=enforcing/SELINUX=disabled/g' /etc/selinux/config
setenforce 0
systemctl stop firewalld.service
systemctl disable firewalld.service
```
## 2 安装cobbler
### 2.1 安装阿里云源
```
curl -o /etc/yum.repos.d/CentOS-Base.repo http://mirrors.aliyun.com/repo/Centos-7.repo
curl -o /etc/yum.repos.d/epel.repo http://mirrors.aliyun.com/repo/epel-7.repo
```
已配置过第三方源可忽略此步骤
### 2.2 安装和启动cobbler
```
yum -y install cobbler cobbler-web dhcp tftp-server pykickstart httpd python-django
systemctl start cobblerd.service
systemctl start httpd.service
```
### 2.3 配置cobbler
1) 校验命令
```
cobbler check
```
检查后会提示需要修改的地方,根据提示进行修改
2) 根据提示修改
```
sed -i '/^server/ s#127.0.0.1#172.16.1.201#g' /etc/cobbler/settings
sed -i '/^next_server/ s#127.0.0.1#172.16.1.201#g' /etc/cobbler/settings
sed -ri 's#(.*disable.*= )yes#\1no#g' /etc/xinetd.d/tftp
cobbler get-loaders
```
3) 让cobbler管理dhcp
```
sed -i 's/manage_dhcp: 0/manage_dhcp: 1/' /etc/cobbler/settings
sed -i.ori 's#192.168.1#172.16.1#g;22d;23d' /etc/cobbler/dhcp.template
```
4) 防止误重装
```
sed -i 's/pxe_just_once: 0/pxe_just_once: 1/' /etc/cobbler/settings
```
5) 启动关联服务
```
systemctl start rsyncd.service
systemctl enable rsyncd.service
systemctl start tftp.socket
systemctl enable tftp.socket
```
6) 提交修改
```
cobbler sync
```
仍然有个别提示,其中包括更改密码的要求,生成环境的话根据要求修改密码
7) 重启所有服务
```
systemctl restart cobblerd.service httpd.service rsyncd.service tftp.socket
systemctl is-active cobblerd.service httpd.service rsyncd.service tftp.socket
```
## 3 web端操作
### 3.1 基础配置
1) 基础信息
网址:https://10.0.0.201/cobbler_web
账号密码:cobbler cobbler
挂载光盘:mount /dev/cdrom /mnt
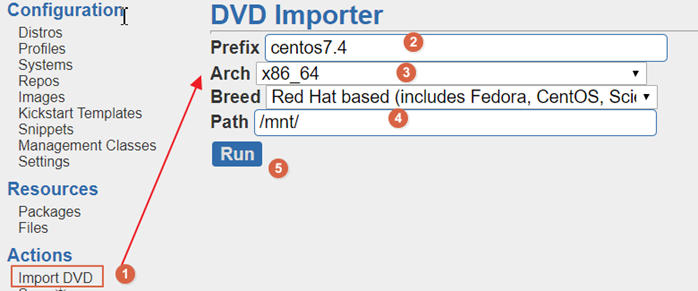
### 3.2 导入光盘
点击actions-->import菜单导入光盘
### 3.3 创建配置文件

### 3.4 匹配配置文件

至此,新建虚拟机,开机后通过通过网络已经可以获得选择菜单,选择版本后即可自动安装,如果还要做的开机后直接安装,不选择版本且按要求配置网络参数的话,还需要接下来这一步
### 3.5 配置全自动安装[非必须]


- shell编程
- 变量1-规范-环境变量-普通变量
- 变量2-位置-状态-特殊变量
- 变量3-变量子串
- 变量4-变量赋值三种方法
- 变量5-数组相关
- 计算1-数值计算命令和案例
- 计算2-expr命令举例
- 计算3-条件表达式和各种操作符
- 计算4-条件表达式和操作符案例
- 循环1-函数的概念与作用
- 循环2-if与case语法
- 循环3-while语法
- 循环4-for循环
- 其他1-判断传入的参数为0或整数的多种思路
- 其他2-while+read按行读取文件
- 其他3-给输出内容加颜色
- 其他4-shell脚本后台运行知识
- 其他5-6种产生随机数的方法
- 其他6-break,continue,exit,return区别
- if语法案例
- case语法案例
- 函数语法案例
- WEB服务软件
- nginx相关
- 01-简介与对比
- 02-日志说明
- 03-配置文件和虚拟主机
- 04-location模块和访问控制
- 05-status状态模块
- 06-rewrite重写模块
- 07-负载均衡和反向代理
- 08-反向代理监控虚拟IP地址
- nginx与https自签发证书
- php-nginx-mysql联动
- Nginx编译安装[1.12.2]
- 案例
- 不同客户端显示不同信息
- 上传和访问资源池分离
- 配置文件
- nginx转发解决跨域问题
- 反向代理典型配置
- php相关
- C6编译安装php.5.5.32
- C7编译php5
- C6/7yum安装PHP指定版本
- tomcxat相关
- 01-jkd与tomcat部署
- 02-目录-日志-配置文件介绍
- 03-tomcat配置文件详解
- 04-tomcat多实例和集群
- 05-tomcat监控和调优
- 06-Tomcat安全管理规范
- show-busy-java-threads脚本
- LVS与keepalived
- keepalived
- keepalived介绍和部署
- keepalived脑裂控制
- keepalived与nginx联动-监控
- keepalived与nginx联动-双主
- LVS负载均衡
- 01-LVS相关概念
- 02-LVS部署实践-ipvsadm
- 03-LVS+keepalived部署实践
- 04-LVS的一些问题和思路
- mysql数据库
- 配置和脚本
- 5.6基础my.cnf
- 5.7基础my.cnf
- 多种安装方式
- 详细用法和命令
- 高可用和读写分离
- 优化和压测
- docker与k8s
- docker容器技术
- 1-容器和docker基础知识
- 2-docker软件部署
- 3-docker基础操作命令
- 4-数据的持久化和共享互连
- 5-docker镜像构建
- 6-docker镜像仓库和标签tag
- 7-docker容器的网络通信
- 9-企业级私有仓库harbor
- docker单机编排技术
- 1-docker-compose快速入门
- 2-compose命令和yaml模板
- 3-docker-compose命令
- 4-compose/stack/swarm集群
- 5-命令补全和资源限制
- k8s容器编排工具
- mvn的dockerfile打包插件
- openstack与KVM
- kvm虚拟化
- 1-KVM基础与快速部署
- 2-KVM日常管理命令
- 3-磁盘格式-快照和克隆
- 4-桥接网络-热添加与热迁移
- openstack云平台
- 1-openstack基础知识
- 2-搭建环境准备
- 3-keystone认证服务部署
- 4-glance镜像服务部署
- 5-nova计算服务部署
- 6-neutron网络服务部署
- 7-horizon仪表盘服务部署
- 8-启动openstack实例
- 9-添加计算节点流程
- 10-迁移glance镜像服务
- 11-cinder块存储服务部署
- 12-cinder服务支持NFS存储
- 13-新增一个网络类型
- 14-云主机冷迁移前提设置
- 15-VXALN网络类型配置
- 未分类杂项
- 部署环境准备
- 监控
- https证书
- python3.6编译安装
- 编译安装curl[7.59.0]
- 修改Redhat7默认yum源为阿里云
- 升级glibc至2.17
- rabbitmq安装和启动
- rabbitmq多实例部署[命令方式]
- mysql5.6基础my.cnf
- centos6[upstart]/7[systemd]创建守护进程
- Java启动参数详解
- 权限控制方案
- app发包仓库
- 版本发布流程
- elk日志系统
- rsyslog日志统一收集系统
- ELK系统介绍及YUM源
- 快速安装部署ELK
- Filebeat模块讲解
- logstash的in/output模块
- logstash的filter模块
- Elasticsearch相关操作
- ES6.X集群及head插件
- elk收集nginx日志(json格式)
- kibana说明-汉化-安全
- ES安装IK分词器
- zabbix监控
- zabbix自动注册模板实现监控项自动注册
- hadoop大数据集群
- hadoop部署
- https证书
- certbot网站
- jenkins与CI/CD
- 01-Jenkins部署和初始化
- 02-Jenkins三种插件安装方式
- 03-Jenkins目录说明和备份
- 04-git与gitlab项目准备
- 05-构建自由风格项目和相关知识
- 06-构建html静态网页项目
- 07-gitlab自动触发项目构建
- 08-pipelinel流水线构建项目
- 09-用maven构建java项目
- iptables
- 01-知识概念
- 02-常规命令实战
- 03-企业应用模板
- 04-企业应用模板[1键脚本]
- 05-企业案例-共享上网和端口映射
- SSH与VPN
- 常用VPN
- VPN概念和常用软件
- VPN之PPTP部署[6.x][7.x]
- 使用docker部署softether vpn
- softEther-vpn静态路由表推送
- SSH服务
- SSH介绍和部署
- SSH批量分发脚本
- 开启sftp日志并限制sftp访问目录
- sftp账号权限分离-开发平台
- ssh配置文件最佳实践
- git-github-gitlab
- git安装部署
- git详细用法
- github使用说明
- gitlab部署和使用
- 缓存数据库
- zookeeper草稿
- mongodb数据库系列
- mongodb基本使用
- mongodb常用命令
- MongoDB配置文件详解
- mongodb用户认证管理
- mongodb备份与恢复
- mongodb复制集群
- mongodb分片集群
- docker部署mongodb
- memcached
- memcached基本概念
- memcached部署[6.x][7.x]
- memcached参数和命令
- memcached状态和监控
- 会话共享和集群-优化-持久化
- memcached客户端-web端
- PHP测试代码
- redis
- 1安装和使用
- 2持久化-事务-锁
- 3数据类型和发布订阅
- 4主从复制和高可用
- 5redis集群
- 6工具-安全-pythonl连接
- redis配置文件详解
- 磁盘管理和存储
- Glusterfs分布式存储
- GlusterFS 4.1 版本选择和部署
- Glusterfs常用命令整理
- GlusterFS 4.1 深入使用
- NFS文件存储
- NFS操作和部署
- NFS文件系统-挂载和优化
- sersync与inotify
- rsync同步服务
- rsyncd.conf
- rsync操作和部署文档
- rsync常见错误处理
- inotify+sersync同步服务
- inotify安装部署
- inotify最佳脚本
- sersync安装部署
- 时间服务ntp和chrony
- 时间服务器部署
- 修改utc时间为cst时间
- 批量操作与自动化
- cobbler与kickstart
- KS+COBBLER文件
- cobbler部署[7.x]
- kickstart部署[7.x]
- kickstar-KS文件和语法解析
- kickstart-PXE配置文件解析
- 自动化之ansible
- ansible部署和实践
- ansible剧本编写规范
- 配置文件示例
- 内网DNS服务
- 压力测试
- 压测工具-qpefr测试带宽和延时