
>[success] # HtmlWebpackPlugin
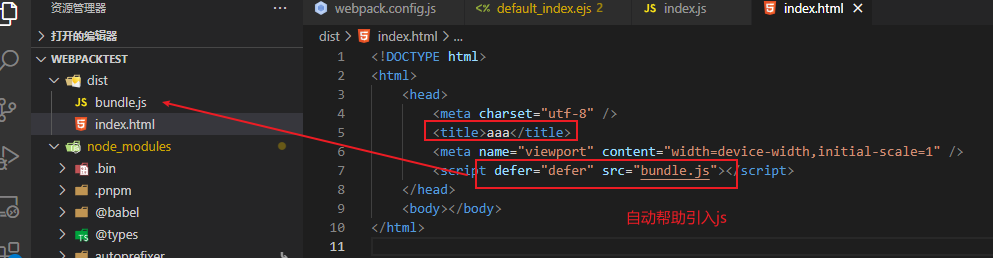
1. `webpack`打包生成**css js 等文件**,但是打包后的`html`页面文件是没有,每次一都需要手动去写 `html `页面并且将打包好的文件引入到手的编写的 `html `中
2. `html-webpack-plugin` 这个插件会将你配置的模板页面,在打包的时候一并生成一个`html `页面,并且将**对应的css和js自动引入**
3. 安装 `npm install html-webpack-plugin -D`
>[danger] ##### 两种模板使用方式
1. 如果没有自定义 `html` 模板,就会使用 插件自己内部的默认模板,在`html-webpack-plugin`的源码中,有一个`default_index.ejs`模块,语法`<% 变量 %>`,这个是`EJS`模块填充数据的方式
~~~html
<!DOCTYPE html>
<html>
<head>
<meta charset="utf-8">
<title><%= htmlWebpackPlugin.options.title %></title>
</head>
<body>
</body>
</html>
~~~
* 配置中`title `可以写入 `htmlWebpackPlugin.options.title`
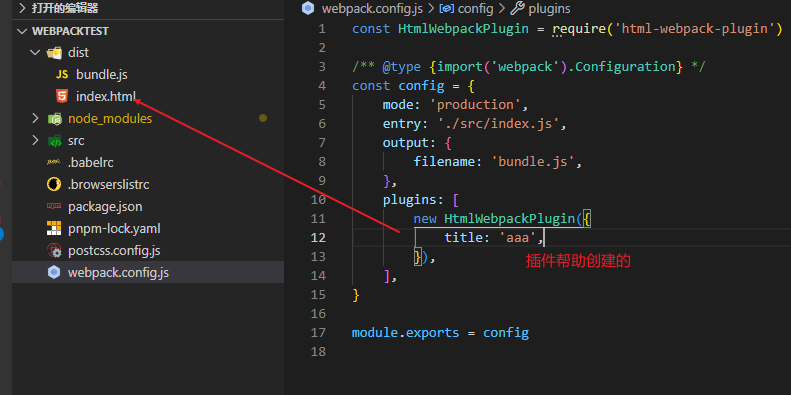
2. 想自己自定义 `html` 模板,就需要使用`template`指定我们要使用的模块所在的路径
~~~
const HtmlWebpackPlugin = require('html-webpack-plugin')
module.export = {
plugins: [
new HtmlWebpackPlugin({
template: path.join(__dirname,'src/search.html'), // 使用模板
filename: 'search.html', // 打包后的文件名
title: 'Webpack Plugin Sample', // 设置html标题
meta: { // 设置对象中的元数据标签
viewport: 'width=device-width'
},
}),
]
}
~~~
>[info] ## 4.x 说明
说明如果你是`webpack4.x` 版本并且运行时候提示`Cannot read property 'tap' of undefined`,将`HtmlWebpackPlugin` 降级到`4.x`版本就好了
- 工程化 -- Node
- vscode -- 插件
- vscode -- 代码片段
- 前端学会调试
- 谷歌浏览器调试技巧
- 权限验证
- 包管理工具 -- npm
- 常见的 npm ci 指令
- npm -- npm install安装包
- npm -- package.json
- npm -- 查看包版本信息
- npm - package-lock.json
- npm -- node_modules 层级
- npm -- 依赖包规则
- npm -- install 安装流程
- npx
- npm -- 发布自己的包
- 包管理工具 -- pnpm
- 模拟数据 -- Mock
- 页面渲染
- 渲染分析
- core.js && babel
- core.js -- 到底是什么
- 编译器那些术语
- 词法解析 -- tokenize
- 语法解析 -- ast
- 遍历节点 -- traverser
- 转换阶段、生成阶段略
- babel
- babel -- 初步上手之了解
- babel -- 初步上手之各种配置(preset-env)
- babel -- 初步上手之各种配置@babel/helpers
- babel -- 初步上手之各种配置@babel/runtime
- babel -- 初步上手之各种配置@babel/plugin-transform-runtime
- babel -- 初步上手之各种配置(babel-polyfills )(未来)
- babel -- 初步上手之各种配置 polyfill-service
- babel -- 初步上手之各种配置(@babel/polyfill )(过去式)
- babel -- 总结
- 各种工具
- 前端 -- 工程化
- 了解 -- Yeoman
- 使用 -- Yeoman
- 了解 -- Plop
- node cli -- 开发自己的脚手架工具
- 自动化构建工具
- Gulp
- 模块化打包工具为什么出现
- 模块化打包工具(新) -- webpack
- 简单使用 -- webpack
- 了解配置 -- webpack.config.js
- webpack -- loader 浅解
- loader -- 配置css模块解析
- loader -- 图片和字体(4.x)
- loader -- 图片和字体(5.x)
- loader -- 图片优化loader
- loader -- 配置解析js/ts
- webpack -- plugins 浅解
- eslit
- plugins -- CleanWebpackPlugin(4.x)
- plugins -- CleanWebpackPlugin(5.x)
- plugin -- HtmlWebpackPlugin
- plugin -- DefinePlugin 注入全局成员
- webapck -- 模块解析配置
- webpack -- 文件指纹了解
- webpack -- 开发环境运行构建
- webpack -- 项目环境划分
- 模块化打包工具 -- webpack
- webpack -- 打包文件是个啥
- webpack -- 基础配置项用法
- webpack4.x系列学习
- webpack -- 常见loader加载器
- webpack -- 移动端px转rem处理
- 开发一个自己loader
- webpack -- plugin插件
- webpack -- 文件指纹
- webpack -- 压缩css和html构建
- webpack -- 清里构建包
- webpack -- 复制静态文件
- webpack -- 自定义插件
- wepack -- 关于静态资源内联
- webpack -- source map 对照包
- webpack -- 环境划分构建
- webpack -- 项目构建控制台输出
- webpack -- 项目分析
- webpack -- 编译提速优护体积
- 提速 -- 编译阶段
- webpack -- 项目优化
- webpack -- DefinePlugin 注入全局成员
- webpack -- 代码分割
- webpack -- 页面资源提取
- webpack -- import按需引入
- webpack -- 摇树
- webpack -- 多页面打包
- webpack -- eslint
- webpack -- srr打包后续看
- webpack -- 构建一个自己的配置后续看
- webpack -- 打包组件和基础库
- webpack -- 源码
- webpack -- 启动都做了什么
- webpack -- cli做了什么
- webpack - 5
- 模块化打包工具 -- Rollup
- 工程化搭建代码规范
- 规范化标准--Eslint
- eslint -- 扩展配置
- eslint -- 指令
- eslint -- vscode
- eslint -- 原理
- Prettier -- 格式化代码工具
- EditorConfig -- 编辑器编码风格
- 检查提交代码是否符合检查配置
- 整体流程总结
- 微前端
- single-spa
- 简单上手 -- single-spa
- 快速理解systemjs
- single-sap 不使用systemjs
- monorepo -- 工程
- Vue -- 响应式了解
- Vue2.x -- 源码分析
- 发布订阅和观察者模式
- 简单 -- 了解响应式模型(一)
- 简单 -- 了解响应式模型(二)
- 简单 --了解虚拟DOM(一)
- 简单 --了解虚拟DOM(二)
- 简单 --了解diff算法
- 简单 --了解nextick
- Snabbdom -- 理解虚拟dom和diff算法
- Snabbdom -- h函数
- Snabbdom - Vnode 函数
- Snabbdom -- init 函数
- Snabbdom -- patch 函数
- 手写 -- 虚拟dom渲染
- Vue -- minVue
- vue3.x -- 源码分析
- 分析 -- reactivity
- 好文
- grpc -- 浏览器使用gRPC
- grcp-web -- 案例
- 待续