
## 目标
建立一个 lesson7 项目,在其中编写代码。
main.js: 类似上文提到的 fibonacci 函数。
此函数的定义为 `int fibonacci(int n)`
* 当 n === 0 时,返回 0;n === 1时,返回 1;
* n > 1 时,返回 `fibonacci(n) === fibonacci(n-1) + fibonacci(n-2)`,如 `fibonacci(10) === 55`;
vendor文件夹: 前端单元测试的环境。
vendor/tests.js 编写针对前端脚本的测试用例
## [](https://github.com/alsotang/node-lessons/tree/master/lesson7#知识点)知识点
1. 学习使用测试框架 mocha 进行前端测试 : [http://mochajs.org/](http://mochajs.org/)
2. 了解全栈的断言库 chai: [http://chaijs.com/](http://chaijs.com/)
3. 了解 headless 浏览器 phantomjs: [http://phantomjs.org/](http://phantomjs.org/)
### [](https://github.com/alsotang/node-lessons/tree/master/lesson7#前端脚本单元测试)前端脚本单元测试
[lesson6](https://github.com/alsotang/node-lessons/tree/master/lesson6) 的内容都是针对后端环境中 node 的一些单元测试方案,出于应用健壮性的考量,针对前端 js 脚本的单元测试也非常重要。而前后端通吃,也是 mocha 的一大特点。
首先,前端脚本的单元测试主要有两个困难需要解决。
1. 运行环境应当在浏览器中,可以操纵浏览器的DOM对象,且可以随意定义执行时的 html 上下文。
2. 测试结果应当可以直接反馈给 mocha,判断测试是否通过。
#### [](https://github.com/alsotang/node-lessons/tree/master/lesson7#浏览器环境执行)浏览器环境执行
我们首先搭建一个测试原型,只需要执行
~~~
//f2e 是原型生成的目录
mocha init f2e
~~~
mocha就会自动帮我们生成一个简单的测试原型
~~~
.
├── index.html
├── mocha.css
├── mocha.js
└── tests.js
~~~
其中 index.html 是单元测试的入口,tests.js 是我们的测试用例文件。
我们直接在 index.html 插入上述示例的 fibonacci 函数以及断言库 chaijs。
~~~
<div id="mocha"></div>
<script src='chai.js'></script>
<script>
var fibonacci = function (n) {
if (n === 0) {
return 0;
}
if (n === 1) {
return 1;
}
return fibonacci(n-1) + fibonacci(n-2);
};
</script>
~~~
然后在tests.js中写入对应测试用例
~~~
var should = chai.should();
describe('simple test', function () {
it('should equal 0 when n === 0', function () {
window.fibonacci(0).should.equal(0);
});
});
~~~
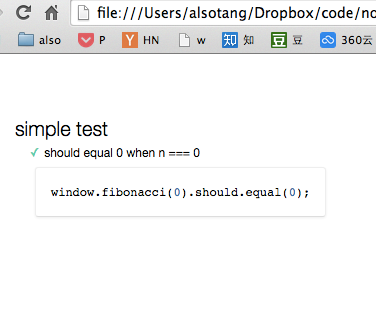
这时打开index.html,可以发现测试结果,我们完成了浏览器端的脚本测试(注意我们调用了 **window** 对象)
[](https://box.kancloud.cn/2015-08-03_55bf0f18cf603.png)
#### [](https://github.com/alsotang/node-lessons/tree/master/lesson7#测试反馈)测试反馈
mocha没有提供一个命令行的前端脚本测试环境(因为我们的脚本文件需要运行在浏览器环境中),因此我们使用phanatomjs帮助我们搭建一个模拟环境。不重复制造轮子,这里直接使用mocha-phantomjs帮助我们在命令行运行测试。
首先安装mocha-phanatomjs
~~~
npm i -g mocha-phantomjs
~~~
然后将index.html对应部分修改为
~~~
<script>
if (window.mochaPhantomJS) { mochaPhantomJS.run(); }
else { mocha.run(); }
</script>
~~~
然后我们在命令行中运行
~~~
mocha-phantomjs index.html
~~~
结果展现是不是和后端代码测试很类似 
你也可以直接在package.json中定义
~~~
"scripts": {
"test": "./node_modules/.bin/mocha-phantomjs vendor/index.html"
},
~~~
将mocha-phantomjs作为依赖
~~~
npm i mocha-phantomjs --save-dev
~~~
直接运行
~~~
npm test
~~~
至此,我们实现了前端脚本的单元测试,基于 phanatomjs 你几乎可以调用所有的浏览器方法,而 mocha-phanatomjs 也可以很便捷地将测试结果反馈到 mocha,便于后续的持续集成。
- 关于
- Lesson 0: 《搭建 Node.js 开发环境》
- Lesson 1: 《一个最简单的 express 应用》
- Lesson 2: 《学习使用外部模块》
- Lesson 3: 《使用 superagent 与 cheerio 完成简单爬虫》
- Lesson 4: 《使用 eventproxy 控制并发》
- Lesson 5: 《使用 async 控制并发》
- Lesson 6: 《测试用例:mocha,should,istanbul》
- Lesson 7: 《浏览器端测试:mocha,chai,phantomjs》
- Lesson 8: 《测试用例:supertest》
- Lesson 9: 《正则表达式》
- Lesson 10: 《benchmark 怎么写》
- Lesson 11: 《作用域与闭包:this,var,(function () {})》
- Lesson 12: 《线上部署:heroku》
- Lesson 13: 《持续集成平台:travis》
- Lesson 14: 《js 中的那些最佳实践》
- Lesson 15: 《Mongodb 与 Mongoose 的使用》
- Lesson 16: 《cookie 与 session》
- Lesson 17: 《使用 promise 替代回调函数》