
维基是Web协同著作平台,可以让任何浏览网页的人都能够方便地参与网页的编辑和创建。这源自于维基如下魔力:
* 快速更改。修改网页无需复杂的后台修改和网页部署流程,浏览的网页直接提供编辑按钮,任何查看网页的用户均可在线编辑网页。
* 简洁语法。编写网页不需要学习复杂的HTML,取而代之的是易学易用的格式化文本(维基语法),有的维基还提供图形化编辑界面。
* 版本控制。熟悉Git的人,可以把维基看作是Web的版本控制。历次修改都记录在案,历史修订可进行比较,可恢复到历史版本等。
* 维基链接。页面链接使用[[页面名称]]语法,可以非常方便地创建新页面,并实现页面间的互联。
GitHub提供了维基模块,方便项目团队创建社区驱动和维护的项目文档。
## 4.6.1\. 维基初始化
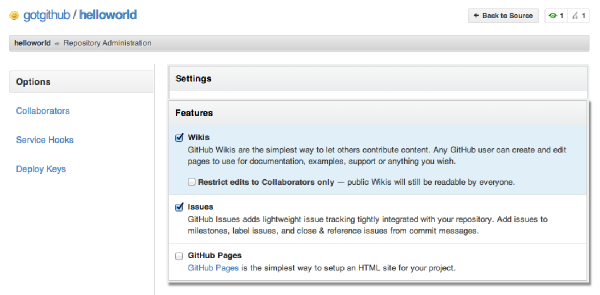
GitHub的维基模块可以通过项目管理页面控制开启或关闭,默认开启,如图4-70所示。因为GitHub提供了项目展示的多种途径,一些小项目如果觉得用README文件构建项目说明,或者用gh-pages分支维护项目主页就足够了,大可关闭维基模块。
[](https://box.kancloud.cn/2015-07-09_559de501d2795.png)
图4-70:开启或关闭Wiki模块
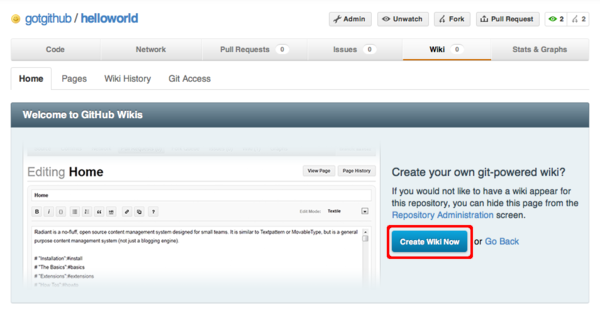
项目启用维基后,进入维基页面,如图4-71所示,会发现维基页面并没有自动创建,还需要进行初始化。
[](https://box.kancloud.cn/2015-07-09_559de507210cd.png)
图4-71:尚未初始化的维基界面
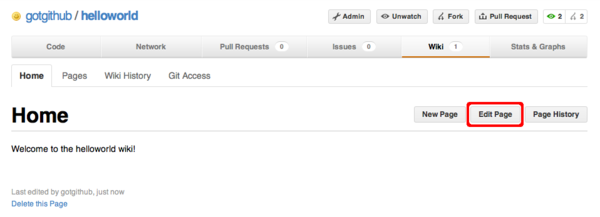
点击“Create Wiki Now”按钮,自动创建维基首页,如图4-72所示。
[](https://box.kancloud.cn/2015-07-09_559de50a8493d.png)
图4-72:自动创建的维基首页
## 4.6.2\. 使用维基
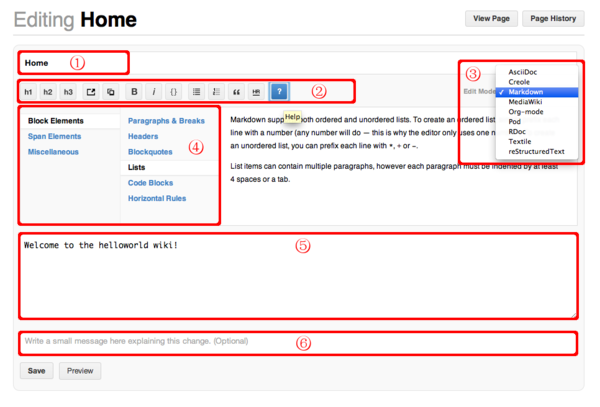
自动创建的维基首页只有非常简单的信息,点击编辑按钮,修改维基首页。编辑界面如图4-73所示。
[](https://box.kancloud.cn/2015-07-09_559de513d7959.png)
图4-73:编辑维基首页
编辑界面有6个部分需要重点说明:
1. 页面名称。首页的页面名称为“Home”,不能随意更改,否则无法找到首页,或者页面之间的跳转会失效。
2. 工具条。从左至右分别是设置一级标题、二级标题、三级标题、插入链接、图片、字体加粗、斜体、代码块、列表、编号列表、引用、水平分割线等。
3. 页面语法格式。默认采用Markdown语法,还可以选用AsciiDoc、Creole等语法。注意如果改变语法格式,该维基页面的内容需要手工进行调整,而且页面的实际存储文件的文件扩展名会改变。
4. 语法帮助。当按下工具条中的帮助按钮会显示本语法帮助表格。
5. 维基内容编辑框。整个维基页面的内容都在这个编辑框中。鼠标拖动该编辑框右下角可以对编辑框大小进行缩放。
6. 可选的修改说明。修改页面时提供说明便于跟踪对页面的历史修订。
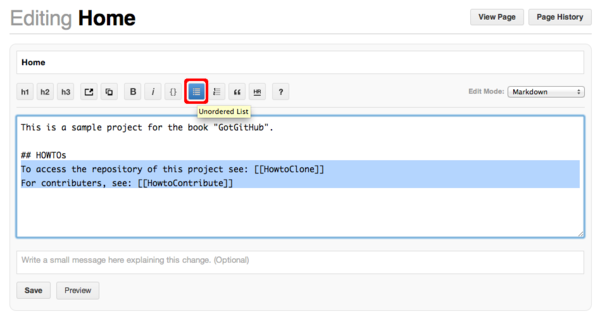
对初始创建的首页进行更改,如图4-74所示。
[](https://box.kancloud.cn/2015-07-09_559de51603e78.png)
图4-74:修改选中文本样式
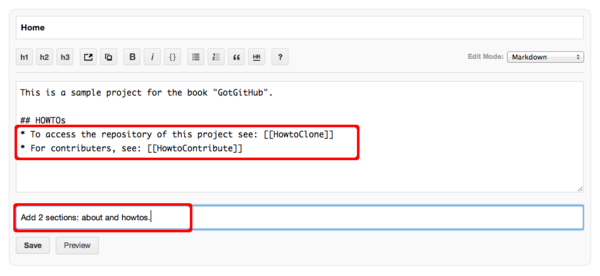
图4-74中,在维基内容编辑框中选择两行文本,然后点击工具栏中的列表按钮,为选中内容应用列表样式。应用新样式后的效果如图4-75所示。然后填写提交说明,点击“Save”按钮保存更改。
[](https://box.kancloud.cn/2015-07-09_559de516edff6.png)
图4-75:填写提交说明保存更改
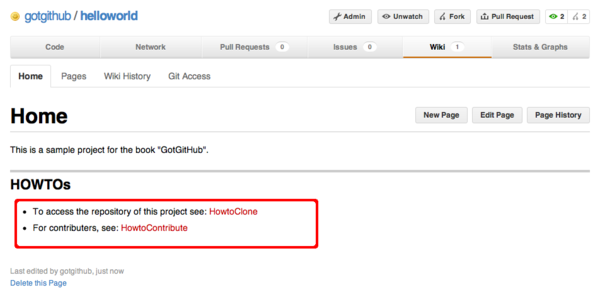
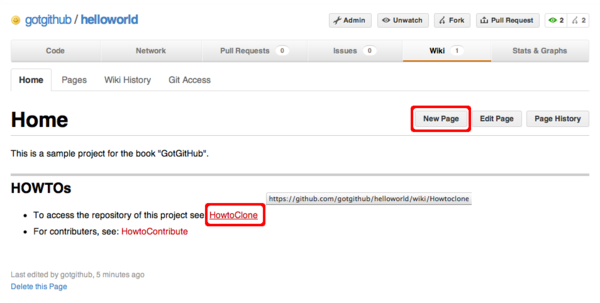
注意图4-75的维基内容中有[[页面名称]]样式的语法,这个语法是维基特色的页面链接语法,指向另外的维基页面。实际页面输出如图4-76所示。
[](https://box.kancloud.cn/2015-07-09_559de5183948c.png)
图4-76:保存更改后的维基首页
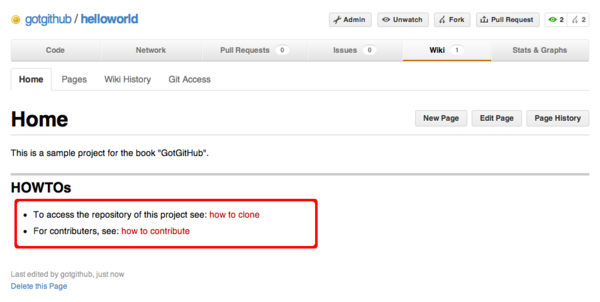
如果对维基语法[[页面名称]]生成的链接标题不满意,还可以用[[链接标题|页面名称]]格式创建维基链接。对首页重新做一次修改,修改如下:
* 将[[HowtoClone]]改为[[how to clone|HowtoClone]]。
* 将[[HowtoContribute]]改为[[how to contribute|HowtoContribute]]。
修改后的首页效果如图4-77所示。
[](https://box.kancloud.cn/2015-07-09_559de51943add.png)
图4-77:修改维基链接标题后的首页
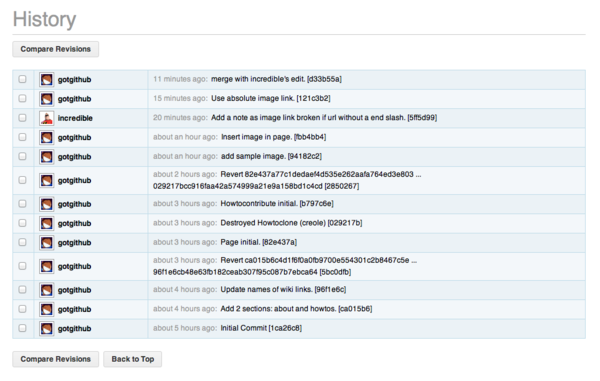
无论怎样更改维基页面都不怕内容丢失,因为维基记录了每一次修订历史,并可以回退任意一次修改。点击维基页面中的“Page History”按钮,查看页面修订历史,如图4-78所示。
[](https://box.kancloud.cn/2015-07-09_559de51a2a6ec.png)
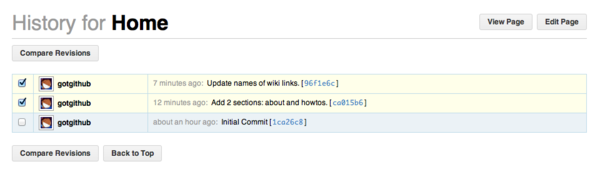
图4-78:页面修订历史
首页的修订历史记录着维基初始化以来所有的修改,包括修改者、修改时间、提交说明,以及一个可点击的对象ID。点击对象ID查看对应版本的页面。还可以对不同版本的页面进行比较,选中两个版本点击“Compare Revisions”按钮,如图4-79所示。
[](https://box.kancloud.cn/2015-07-09_559de51cebf01.png)
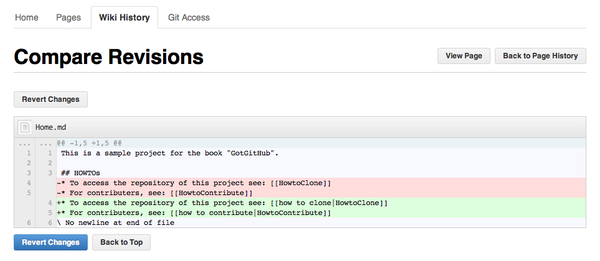
图4-79:页面版本间比较
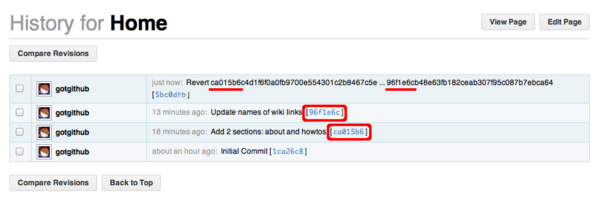
在页面版本间的比较界面中,提供回退此次修改的按钮。点击“Revert Changes”按钮(图4-79所示),可以回退对首页的修改。查看首页的修订历史,会看到回退记录也显示其中,如图4-80所示。
[](https://box.kancloud.cn/2015-07-09_559de51e652c0.png)
图4-80:包含回退记录的页面修订历史
在维基中创建新页面有多种方法,可以点击页面中的“New Page”按钮,也可以像我们之前做的那样先在页面中用[[页面名称]]格式嵌入维基链接,然后在生成的页面中可以看到指向新页面的链接,当然这些链接所指向的页面并不存在。
[](https://box.kancloud.cn/2015-07-09_559de51f366e1.png)
图4-81:页面中的维基链接
如图4-81所示,点击页面中指向不存在维基页面的链接,会自动开启创建新页面的对话框,如图4-82所示。
[](https://box.kancloud.cn/2015-07-09_559de52677fa8.png)
图4-82:创建新维基页面
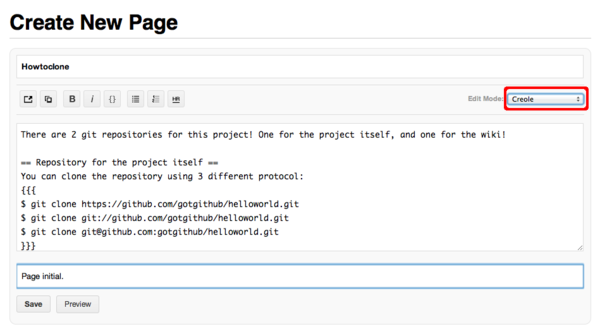
输入维基页面的内容,然后填写提交说明,点击“Save”按钮,保存新页面。生成的新页面如图4-83所示。
[](https://box.kancloud.cn/2015-07-09_559de527d13e1.png)
图4-83:生成的新页面
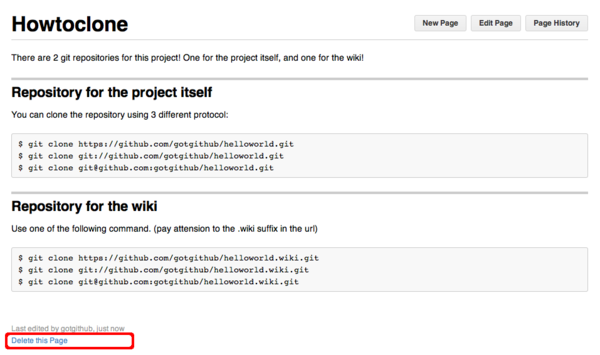
如果当前用户对页面具有写权限,则在页面左下角会看到一个删除本页面的链接。点击“Delete this page”链接并经确认后会删除页面。然后继续在维基中操作,如创建另外一个新页面HowtoContribute。
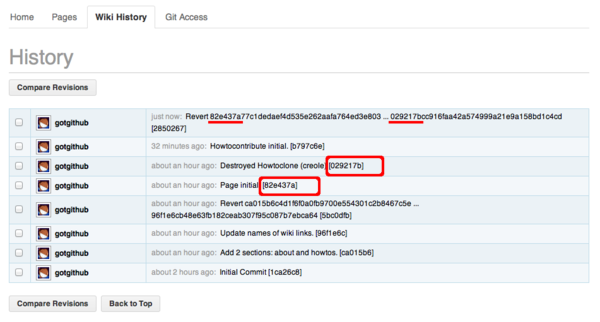
如果对之前删除页面Howtoclone的操作后悔,可以通过下面方法找回。
* 访问菜单中的“Wiki History”项,显示整个维基的修订记录(不是某个页面的修订记录)。如图4-84所示。
[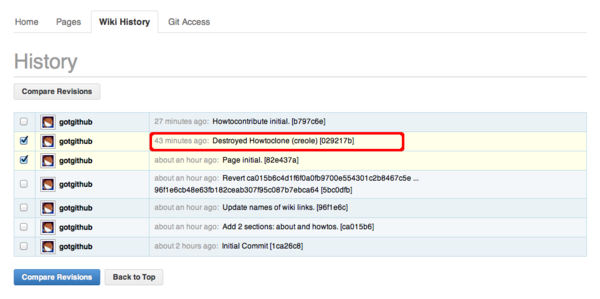](https://box.kancloud.cn/2015-07-09_559de529dbfea.png)
图4-84:维基修订记录
* 从图4-84可见上面第二条记录就是删除HowtoClone页面的操作,选择该记录及前一次记录,执行版本比较,如图4-85所示。
[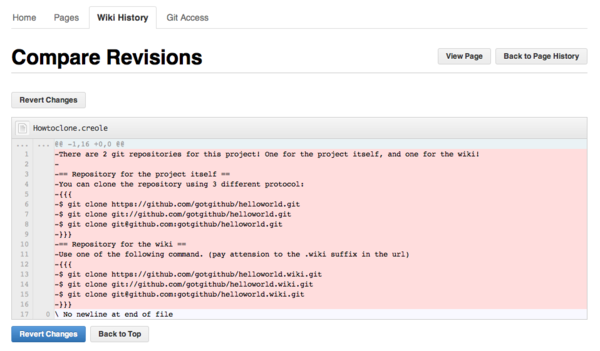](https://box.kancloud.cn/2015-07-09_559de52b59fac.png)
图4-85:版本比较
* 点击“Revert Changes”按钮,可以取消页面删除动作。更新后的维基修订历史如图4-86所示。
[](https://box.kancloud.cn/2015-07-09_559de53a4fb6d.png)
图4-86:还原修订后的维基修订记录
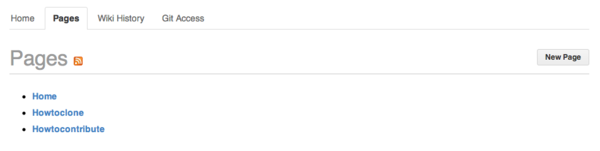
* 查看维基页面列表,可以看到页面Howtoclone已经被找回。
[](https://box.kancloud.cn/2015-07-09_559de53c273ef.png)
图4-87:维基页面列表
## 4.6.3\. 维基与Git
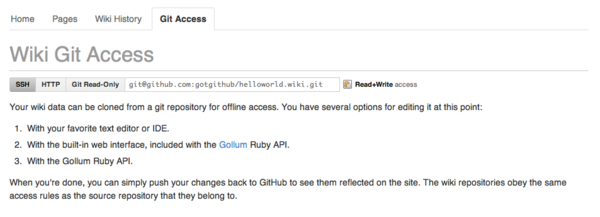
随着对GitHub维基的深入使用,可能会遇到下面的问题:如何嵌入图片?多人编辑时如何避免冲突?解决这几个问题的办法就是用Git操作维基。在之前查看维基修订历史,以及进行版本间比较时可能已经看出和Git是如何的相似,实际上GitHub的维基页面就是用Git版本库实现的。
在维基页面访问菜单中的“Git Access”项,会看到用Git访问维基页面的方法。如图4-88所示。
[](https://box.kancloud.cn/2015-07-09_559de53dd869c.png)
图4-88:用Git访问维基
对于项目gotgithub/helloworld来说,用Git克隆其维基,用如下命令:
~~~
$ git clone git@github.com:gotgithub/helloworld.wiki.git
~~~
进入到刚刚克隆的helloworld.wiki工作区中,查看包含的文件,会看到有三个文件。
~~~
$ cd helloworld.wiki
$ ls
Home.md Howtoclone.creole Howtocontribute.md
~~~
三个文件对应于三个维基页面,文件名就是维基的页面名称,而扩展名对应于采用的维基语法。以.md扩展名结尾的页面采用Markdown语法,而以.creole结尾的文件采用Creole标准维基语法。
下面就通过Git在维基版本库中添加一个图片。添加图片的操作只通过GitHub维基的Web界面是很难实现的,而使用Git则易如反掌。
* 创建一个名为images目录。这个目录并非必须,只是为了易于管理。
~~~
$ mkdir images
$ cd images
~~~
* 在images目录中添加图片。
下面的操作从GitHub官方版本库中下载图片octocat.png并进行适当缩放。
~~~
$ wget https://github.com/github/media/raw/master/octocats/octocat.png
$ mogrify -resize '200' octocat.png
~~~
* 将图片添加到暂存区并提交。
~~~
$ git add octocat.png
$ git commit -m "add sample image."
~~~
* 将本地提交推送到GitHub远程版本库。
~~~
$ git push
~~~
完成推送后,访问下面的网址可以看到刚刚上传的图片:
https://github.com/gotgithub/helloworld/wiki/images/octocat.png
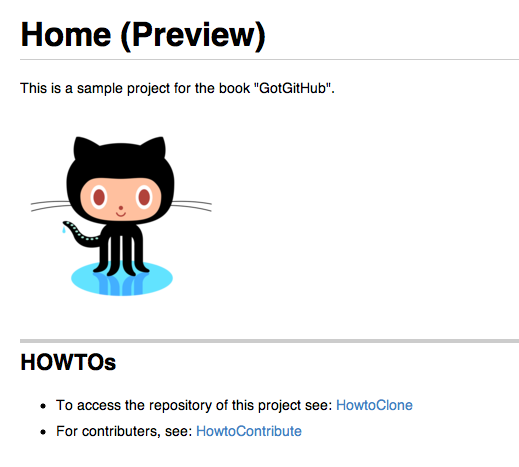
接下来在维基页面中引用图片。嵌入图片的Markdown语法是:。当然可以通过编辑本地版本库gotgithub/helloworld.wiki.git中的文件,但通过GitHub维基编辑界面嵌入图片无需记忆复杂的语法。如图4-89所示。
[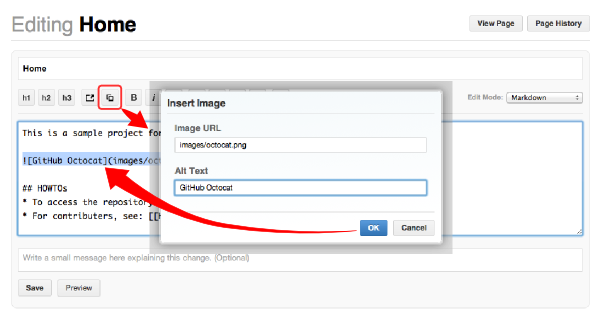](https://box.kancloud.cn/2015-07-09_559de53f12e9b.png)
图4-89:在维基页面中嵌入图片
点击“Preview”按钮,可以在保存前查看效果。在图4-90所示的预览界面中可以看到修改后的效果。
[](https://box.kancloud.cn/2015-07-09_559de5406159f.png)
图4-90:预览效果
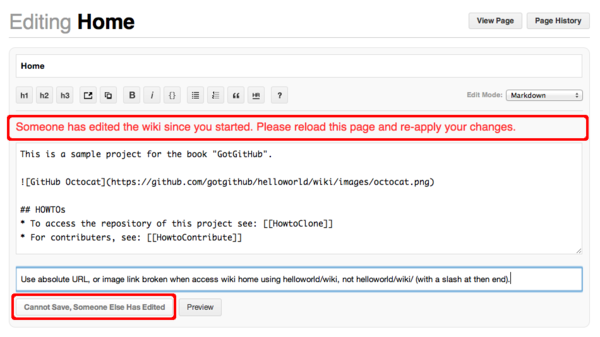
多人同时编辑一个维基页面会引起冲突,先提交的用户会成功,其他用户的编辑界面马上会显示冲突警告,并且保存按钮也被置灰,如图4-91所示。
[](https://box.kancloud.cn/2015-07-09_559de54195384.png)
图4-91:编辑冲突
GitHub的维基编辑界面没有提供冲突解决的工具,而利用Git本身强大的冲突解决功能可以很容易地解决这一难题。
例如用户gotgithub编辑维基首页Home遇到编辑冲突,为防止数据丢失,先将编辑框中的维基文本拷贝并粘贴到一个临时文件中,如文件中/path/to/draft.md。然后进行如下操作将draft.md中内容合并到维基页面中。
* 如果本地已经克隆维基版本库,则执行下面命令更新。
~~~
$ cd helloworld.wiki
$ git pull
~~~
* 如果没有,则克隆维基版本库。
~~~
$ git clone git@github.com:gotgithub/helloworld.wiki.git
$ cd helloworld.wiki
~~~
* 用Git命令查看版本库的历史,以便找出发生冲突的原始版本。
从下面的输出可以看出我们编辑的版本是基于提交fbb4bb4,由于用户incredible先于我们完成了对维基页面的修改以致发生了冲突。
~~~
$ git log -3 --pretty=short
commit 5ff5d998bb6cf99337813915282df94701d17ea0
Author: incredible
Add a note as image link broken if url without a end slash.
commit fbb4bb4f330bacf765d51736359b0a3e81ed945b
Author: gotgithub
Insert image in page.
commit 94182c2b57ebce1f1bf8a310f78df87ae8e8219a
Author: gotgithub
add sample image.
~~~
* 基于提交fbb4bb4建立分支,如分支mywiki。
~~~
$ git checkout -b mywiki fbb4bb4
~~~
* 将保存的draft.md覆盖欲修改的文件,如Home.md。
~~~
$ cp /path/to/draft.md Home.md
~~~
* 提交修改。
~~~
$ git add -u
$ git commit -m "Use absolute image link."
~~~
* 切换到master分支。
~~~
$ git checkout master
~~~
* 合并我们在mywiki分支的修改。
~~~
$ git merge mywiki
Auto-merging Home.md
CONFLICT (content): Merge conflict in Home.md
Automatic merge failed; fix conflicts and then commit the result.
~~~
* 调用图形工具解决冲突。
~~~
$ git mergetool
~~~
* 提交并查看合并后的提交关系图。
~~~
$ git commit -m "merge with incredible's edit."
$ git log --oneline --graph -4
* d33b55a merge with incredible's edit.
|\
| * 121c3b2 Use absolute image link.
* | 5ff5d99 Add a note as image link broken if url without a end slash.
|/
* fbb4bb4 Insert image in page.
~~~
* 查看用户incredible的修改。
~~~
$ git show --oneline HEAD^1
5ff5d99 Add a note as image link broken if url without a end slash.
diff --git a/Home.md b/Home.md
index 6ada8e8..0bca3ec 100644
--- a/Home.md
+++ b/Home.md
@@ -1,5 +1,7 @@
This is a sample project for the book "GotGitHub".
+**Note**: if can not see the following image, add a slash('/') at the end of the URL.
+

## HOWTOs
~~~
* 查看用户gotgithub的修改。
~~~
$ git show --oneline HEAD^2
121c3b2 Use absolute image link.
diff --git a/Home.md b/Home.md
index 6ada8e8..cdb9167 100644
--- a/Home.md
+++ b/Home.md
@@ -1,6 +1,6 @@
This is a sample project for the book "GotGitHub".
-
+
## HOWTOs
* To access the repository of this project see: [[HowtoClone]]
~~~
* 将本地合并后的版本库推送到GitHub。
~~~
$ git push
~~~
再来看看推送后GitHub的维基修订历史,和本地版本库看到的历史是一致的,如图4-92所示。
[](https://box.kancloud.cn/2015-07-09_559de5432437f.png)
图4-92:推送后的维基修订历史
GitHub维基背后的引擎名为Gollum,GitHub已将其开源,项目网址:[https://github.com/github/gollum](https://github.com/github/gollum) 。安装Gollum,在克隆的维基版本库中运行gollum就可以在本地启动维基服务。
- 前言
- 1. 探索GitHub
- 1.1. 什么是GitHub
- 1.2. GitHub亮点
- 1.3. 探索GitHub
- 2. 加入GitHub
- 2.1. 创建GitHub账号
- 2.2. 浏览托管项目
- 2.3. 社交网络
- 3. 项目托管
- 3.1. 创建新项目
- 3.2. 操作版本库
- 3.3. 公钥认证管理
- 3.4. 版本库钩子扩展
- 3.5. 建立主页
- 4. 工作协同
- 4.1. Fork + Pull模式
- 4.2. 共享版本库
- 4.3. 组织和团队
- 4.4. 代码评注
- 4.5. 缺陷跟踪
- 4.6. 维基
- 5. 付费服务
- 5.1. GitHub收费方案
- 5.2. GitHub企业版
- 6. GitHub副产品
- 6.1. GitHub:Gist
- 6.2. 其他版本控制工具支持
- 6.3. 客户端工具
- 6.4. 其他
- 7. 附录:轻量级标记语言
- 贡献者列表