
[TOC]
# Web服务器设置
为了使Phalcon应用程序的路由能够正常工作,您需要设置Web服务器以正确处理重定向。流行Web服务器的安装说明如下:
## PHP-FPM
[PHP-FPM](http://php.net/manual/en/install.fpm.php)(FastCGI Process Manager)通常用于处理PHP文件。如今,PHP-FPM与所有基于Linux的PHP发行版捆绑在一起。
在 **Windows** 上,PHP-FPM通过文件 `php-cgi.exe` 位于PHP分发存档中,您可以使用此脚本启动它以帮助设置选项。Windows不支持unix套接字,因此该脚本将在端口`9000`上以TCP模式启动fast-cgi。
使用以下内容创建文件 `php-fcgi.bat` :
```bat
@ECHO OFF
ECHO Starting PHP FastCGI...
set PATH=C:\PHP;%PATH%
c:\bin\RunHiddenConsole.exe C:\PHP\php-cgi.exe -b 127.0.0.1:9000
```
## PHP内置Web服务器(面向开发人员)
为了加快Phalcon应用程序在开发中的运行速度,最简单的方法是使用这个内置的PHP服务器。请勿在生产环境中使用此服务器。您需要以下Nginx和Apache的配置。
### Phalcon配置
To enable dynamic URI rewrites, without Apache or Nginx, that Phalcon needs, you can use the following router file:
要在没有Apache或Nginx的情况下启用动态URI重写,Phalcon需要,您可以使用以下路由器文件:[.htrouter.php](https://github.com/phalcon/phalcon-devtools/blob/master/templates/.htrouter.php)
如果您使用`Phalcon-Devtools`创建了应用程序,则该文件应该已存在于项目的根目录中,您可以使用以下命令启动服务器:
```bash
$(which php) -S localhost:8000 -t public .htrouter.php
```
上面命令的解剖:
- `$(which php)` - 将插入PHP二进制文件的绝对路径
- `-S localhost:8000` - 使用提供的方式调用服务器模式 `host:port`
- `-t public` - 定义服务器根目录,这是php将请求路由到公共目录中的JS,CSS和图像等静态资源所必需的
- `.htrouter.php` - 将为每个请求设置的入口点
然后将浏览器指向`http://localhost:8000/`以检查一切是否正常。
## Nginx
[Nginx](http://wiki.nginx.org/Main) 是一个免费的,开源的,高性能的HTTP服务器和反向代理,以及IMAP/POP3代理服务器。与传统服务器不同,Nginx不依赖线程来处理请求。相反,它使用更加可扩展的事件驱动(异步)架构。
此体架构在负载下使用较小但更重要的可预测内存量。
Phalcon与Nginx和PHP-FPM提供了一套功能强大的工具,可为PHP应用程序提供最高性能。
### 安装Nginx
[Nginx官网](https://www.nginx.com/resources/wiki/start/topics/tutorials/install/)
### Phalcon配置
您可以使用以下潜在配置来使用Phalcon设置Nginx:
```nginx
server {
# Port 80 will require Nginx to be started with root permissions
# Depending on how you install Nginx to use port 80 you will need
# to start the server with `sudo` ports about 1000 do not require
# root privileges
# listen 80;
listen 8000;
server_name default;
##########################
# In production require SSL
# listen 443 ssl default_server;
# ssl on;
# ssl_session_timeout 5m;
# ssl_protocols SSLv2 SSLv3 TLSv1;
# ssl_ciphers ALL:!ADH:!EXPORT56:RC4+RSA:+HIGH:+MEDIUM:+LOW:+SSLv2:+EXP;
# ssl_prefer_server_ciphers on;
# These locations depend on where you store your certs
# ssl_certificate /var/nginx/certs/default.cert;
# ssl_certificate_key /var/nginx/certs/default.key;
##########################
# This is the folder that index.php is in
root /var/www/default/public;
index index.php index.html index.htm;
charset utf-8;
client_max_body_size 100M;
fastcgi_read_timeout 1800;
# Represents the root of the domain
# http://localhost:8000/[index.php]
location / {
# Matches URLS `$_GET['_url']`
try_files $uri $uri/ /index.php?_url=$uri&$args;
}
# When the HTTP request does not match the above
# and the file ends in .php
location ~ [^/]\.php(/|$) {
# try_files $uri =404;
# Ubuntu and PHP7.0-fpm in socket mode
# This path is dependent on the version of PHP install
fastcgi_pass unix:/var/run/php/php7.0-fpm.sock;
# Alternatively you use PHP-FPM in TCP mode (Required on Windows)
# You will need to configure FPM to listen on a standard port
# https://www.nginx.com/resources/wiki/start/topics/examples/phpfastcgionwindows/
# fastcgi_pass 127.0.0.1:9000;
fastcgi_index /index.php;
include fastcgi_params;
fastcgi_split_path_info ^(.+?\.php)(/.*)$;
if (!-f $document_root$fastcgi_script_name) {
return 404;
}
fastcgi_param PATH_INFO $fastcgi_path_info;
# fastcgi_param PATH_TRANSLATED $document_root$fastcgi_path_info;
# and set php.ini cgi.fix_pathinfo=0
fastcgi_param SCRIPT_FILENAME $document_root$fastcgi_script_name;
}
location ~ /\.ht {
deny all;
}
location ~* \.(js|css|png|jpg|jpeg|gif|ico)$ {
expires max;
log_not_found off;
access_log off;
}
}
```
### 启动Nginx
通常从命令行`启动nginx`,但这取决于您的安装方法。
## Apache
[Apache](http://httpd.apache.org/) 是许多平台上流行且众所周知的Web服务器。
### Phalcon配置
以下是可用于使用Phalcon设置Apache的潜在配置。这些注释主要关注`mod_rewrite`模块的配置,允许使用友好URL和路由器组件。通常,应用程序具有以下结构:
```bash
test/
app/
controllers/
models/
views/
public/
css/
img/
js/
index.php
```
#### 根目录
这是最常见的情况,应用程序安装在文档根目录下的任何目录中。在这种情况下,我们使用两个`.htaccess`文件,第一个隐藏应用程序代码,将所有请求转发到应用程序的文档根目录(`public/`)。
>[danger] 请注意,使用`.htaccess`文件需要安装apache才能设置`AllowOverride All`选项。
```apacheconfig
# test/.htaccess
<IfModule mod_rewrite.c>
RewriteEngine on
RewriteRule ^$ public/ [L]
RewriteRule ((?s).*) public/$1 [L]
</IfModule>
```
第二个`.htaccess` 文件位于`public/`目录中,这会将所有URI重写为`public/index.php`文件:
```apacheconfig
# test/public/.htaccess
<IfModule mod_rewrite.c>
RewriteEngine On
RewriteCond %{REQUEST_FILENAME} !-d
RewriteCond %{REQUEST_FILENAME} !-f
RewriteRule ^((?s).*)$ index.php?_url=/$1 [QSA,L]
</IfModule>
```
对于在uri参数中使用波斯字母'م'(meem)的用户,`mod_rewrite`存在问题。要使匹配与英文字符一样工作,您需要更改`.htaccess`文件:
```apacheconfig
# test/public/.htaccess
<IfModule mod_rewrite.c>
RewriteEngine On
RewriteCond %{REQUEST_FILENAME} !-d
RewriteCond %{REQUEST_FILENAME} !-f
RewriteRule ^([0-9A-Za-z\x7f-\xff]*)$ index.php?params=$1 [L]
</IfModule>
```
如果您的uri包含英语以外的字符,您可能需要采用上述更改以允许`mod_rewrite`准确匹配您的路由。
#### Apache配置
如果您不想使用`.htaccess`文件,可以将这些配置移动到apache的主配置文件中:
```apacheconfig
<IfModule mod_rewrite.c>
<Directory "/var/www/test">
RewriteEngine on
RewriteRule ^$ public/ [L]
RewriteRule ((?s).*) public/$1 [L]
</Directory>
<Directory "/var/www/test/public">
RewriteEngine On
RewriteCond %{REQUEST_FILENAME} !-d
RewriteCond %{REQUEST_FILENAME} !-f
RewriteRule ^((?s).*)$ index.php?_url=/$1 [QSA,L]
</Directory>
</IfModule>
```
#### 虚拟服务器
第二种配置允许您在虚拟主机中安装Phalcon应用程序:
```apacheconfig
<VirtualHost *:80>
ServerAdmin admin@example.host
DocumentRoot "/var/vhosts/test/public"
DirectoryIndex index.php
ServerName example.host
ServerAlias www.example.host
<Directory "/var/vhosts/test/public">
Options All
AllowOverride All
Require all granted
</Directory>
</VirtualHost>
```
## Cherokee
[Cherokee](http://www.cherokee-project.com/) 是一款高性能的网络服务器。它非常快速,灵活且易于配置。
### Phalcon配置
Cherokee提供友好的图形界面,几乎可以配置Web服务器中的所有可用设置。
切换root管理员权限, 执行`/path-to-cherokee/sbin/cherokee-admin`以启动Cherokee

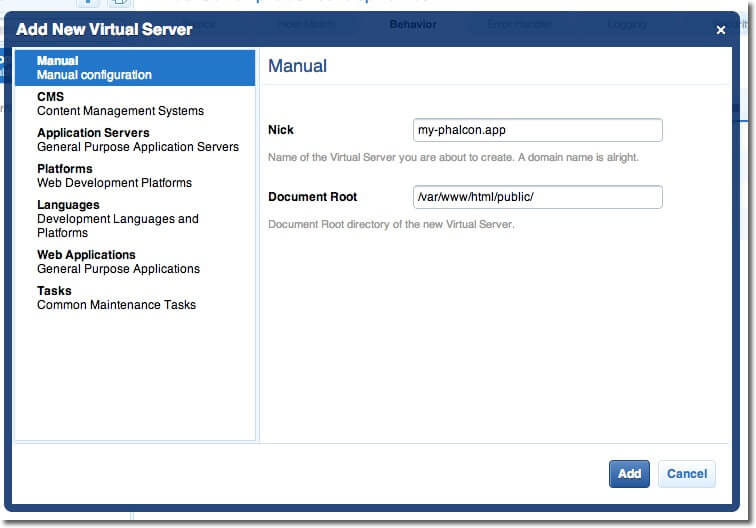
单击`vServers`创建新的虚拟主机,然后添加新的虚拟服务器:
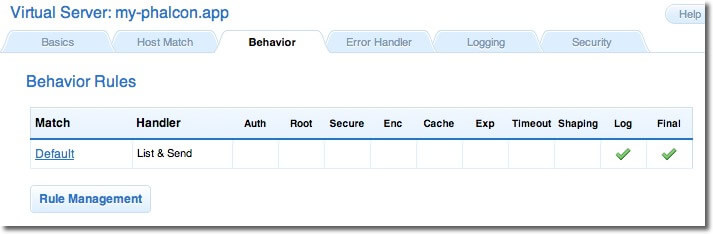
最近添加的虚拟服务器必定出现在屏幕的左侧栏中。在`Behaviors`选项卡中,您将看到此虚拟服务器的一组默认行为。单击`Rule Management` 按钮。删除标记为`Directory /cherokee\_themes`和`Directory /cherokee\_themes`的那些:
使用向导添加`PHP Language`行为。此行为允许您运行PHP应用程序:

通常,此行为不需要其他设置。添加其他行为,这次是在`Manual Configuration`部分。在`Rule Type`中选择`File Exists`,然后确保启用了`Match any file`选项:
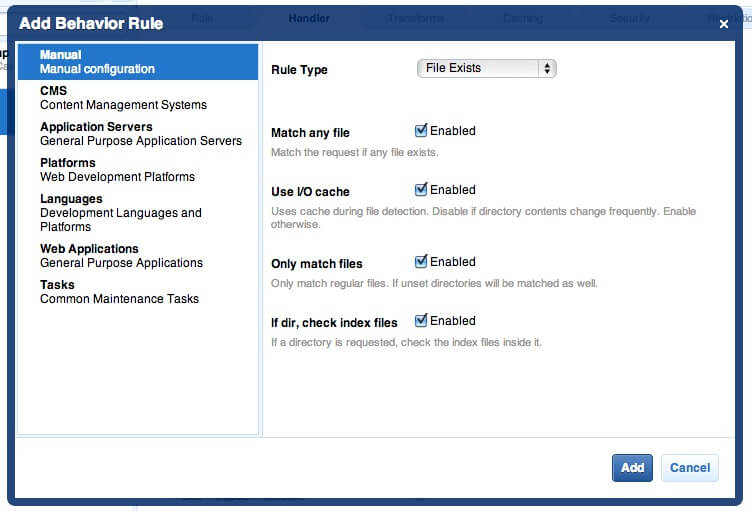
在`Handler`选项卡中,选择`List & Send`作为处理程序:

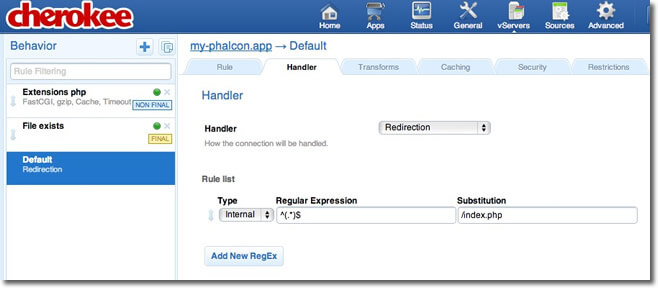
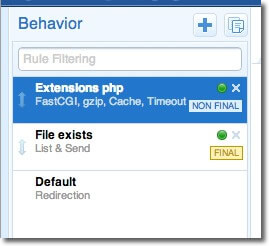
编辑`Default`行为以启用URL重写引擎。将处理程序更改为`Redirection`,然后将以下正则表达式添加到引擎`^(.\*)$`:
最后,确保行为具有以下顺序:
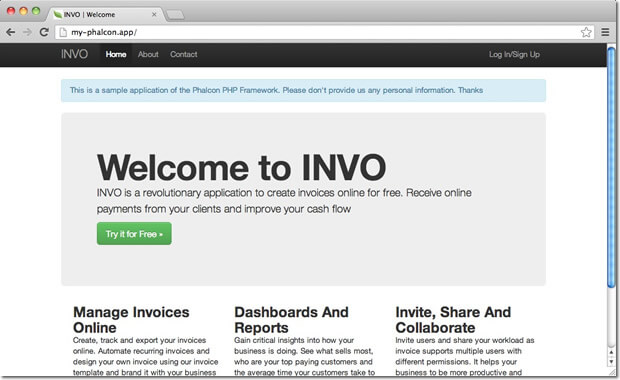
在浏览器中执行应用程序:
- 常规
- Welcome
- 贡献
- 生成回溯
- 测试重现
- 单元测试
- 入门
- 安装
- Web服务器设置
- WAMP
- XAMPP
- 教程
- 基础教程
- 教程:创建一个简单的REST API
- 教程:Vökuró
- 提升性能
- 教程:INVO
- 开发环境
- Phalcon Compose (Docker)
- Nanobox
- Phalcon Box (Vagrant)
- 开发工具
- Phalcon开发者工具的安装
- Phalcon开发者工具的使用
- 调试应用程序
- 核心
- MVC应用
- 微应用
- 创建命令行(CLI)应用程序
- 依赖注入与服务定位
- MVC架构
- 服务
- 使用缓存提高性能
- 读取配置
- 上下文转义
- 类加载器
- 使用命名空间
- 日志
- 队列
- 数据库
- 数据库抽象层
- Phalcon查询语言(PHQL)
- ODM(对象文档映射器)
- 使用模型
- 模型行为
- ORM缓存
- 模型事件
- 模型元数据
- 模型关系
- 模型事务
- 验证模型
- 数据库迁移
- 分页
- 前端
- Assets管理
- 闪存消息
- 表单
- 图像
- 视图助手(标签)
- 使用视图
- Volt:模板引擎
- 业务逻辑
- 访问控制列表(ACL)
- 注解解析器
- 控制器
- 调度控制器
- 事件管理器
- 过滤与清理
- 路由
- 在session中存储数据
- 生成URL和路径
- 验证
- HTTP
- Cookies管理
- 请求环境
- 返回响应
- 安全
- 加密/解密
- 安全
- 国际化
- 国际化
- 多语言支持