
## 一、概述
GitHub Packages 是一种包管理服务,可让你轻松地在源代码旁边发布公共包或专用包;
## 二、发布jar包到Maven仓库
包发布到Maven中之后,只需要通过Maven的POM文件即可完成依赖的引入,无需再使用本地库了,非常方便;
### **安装和配置Maven**
这里基于独立安装,非常简单,参考[开发工具/Maven/安装配置](../Maven/%E5%AE%89%E8%A3%85%E9%85%8D%E7%BD%AE.md);
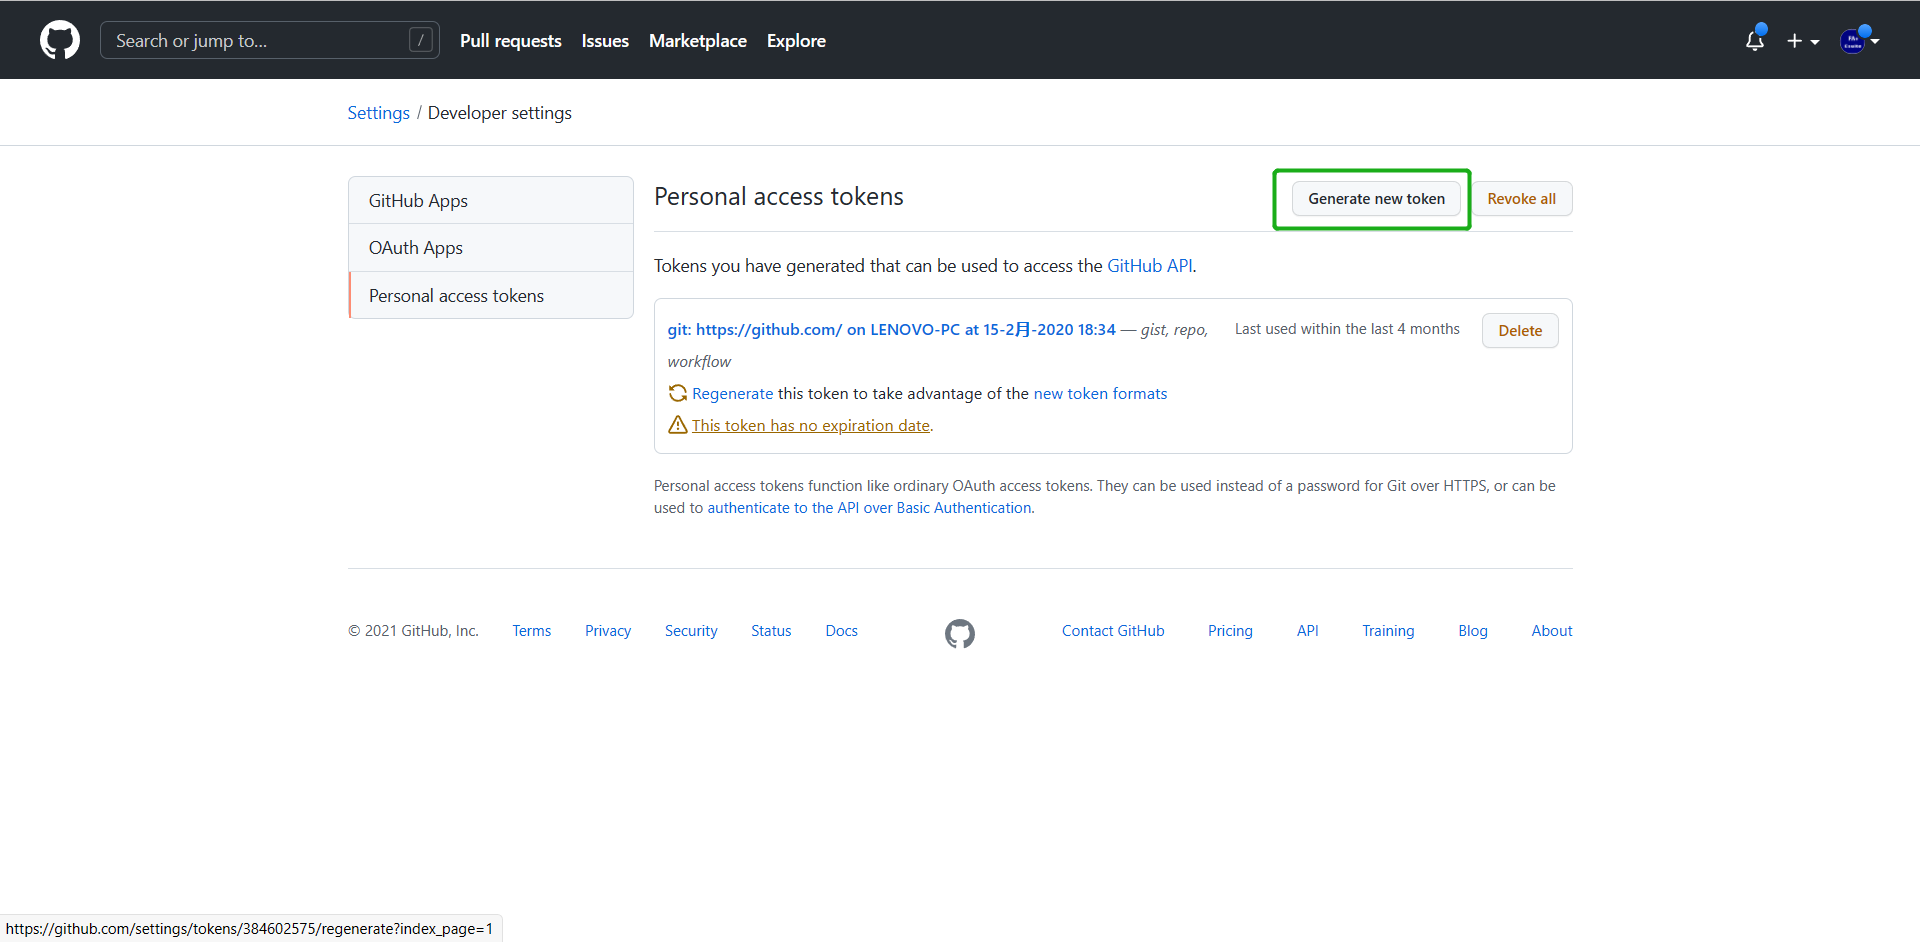
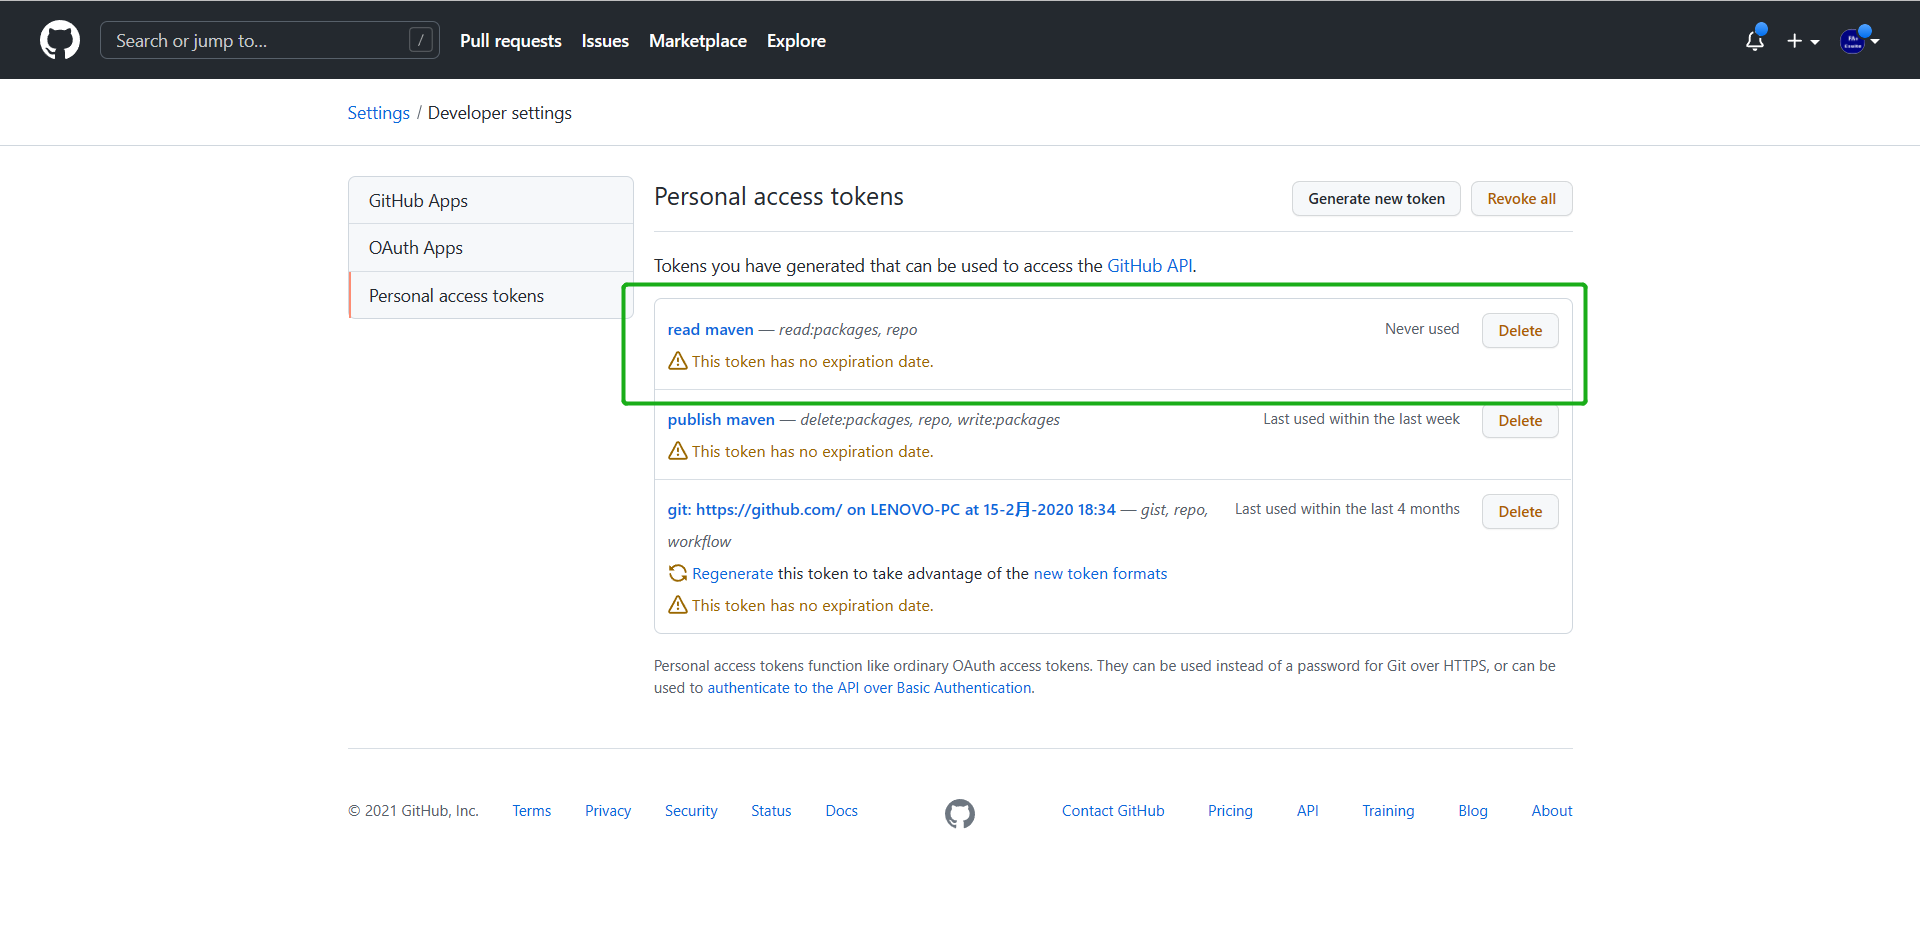
### **创建token**
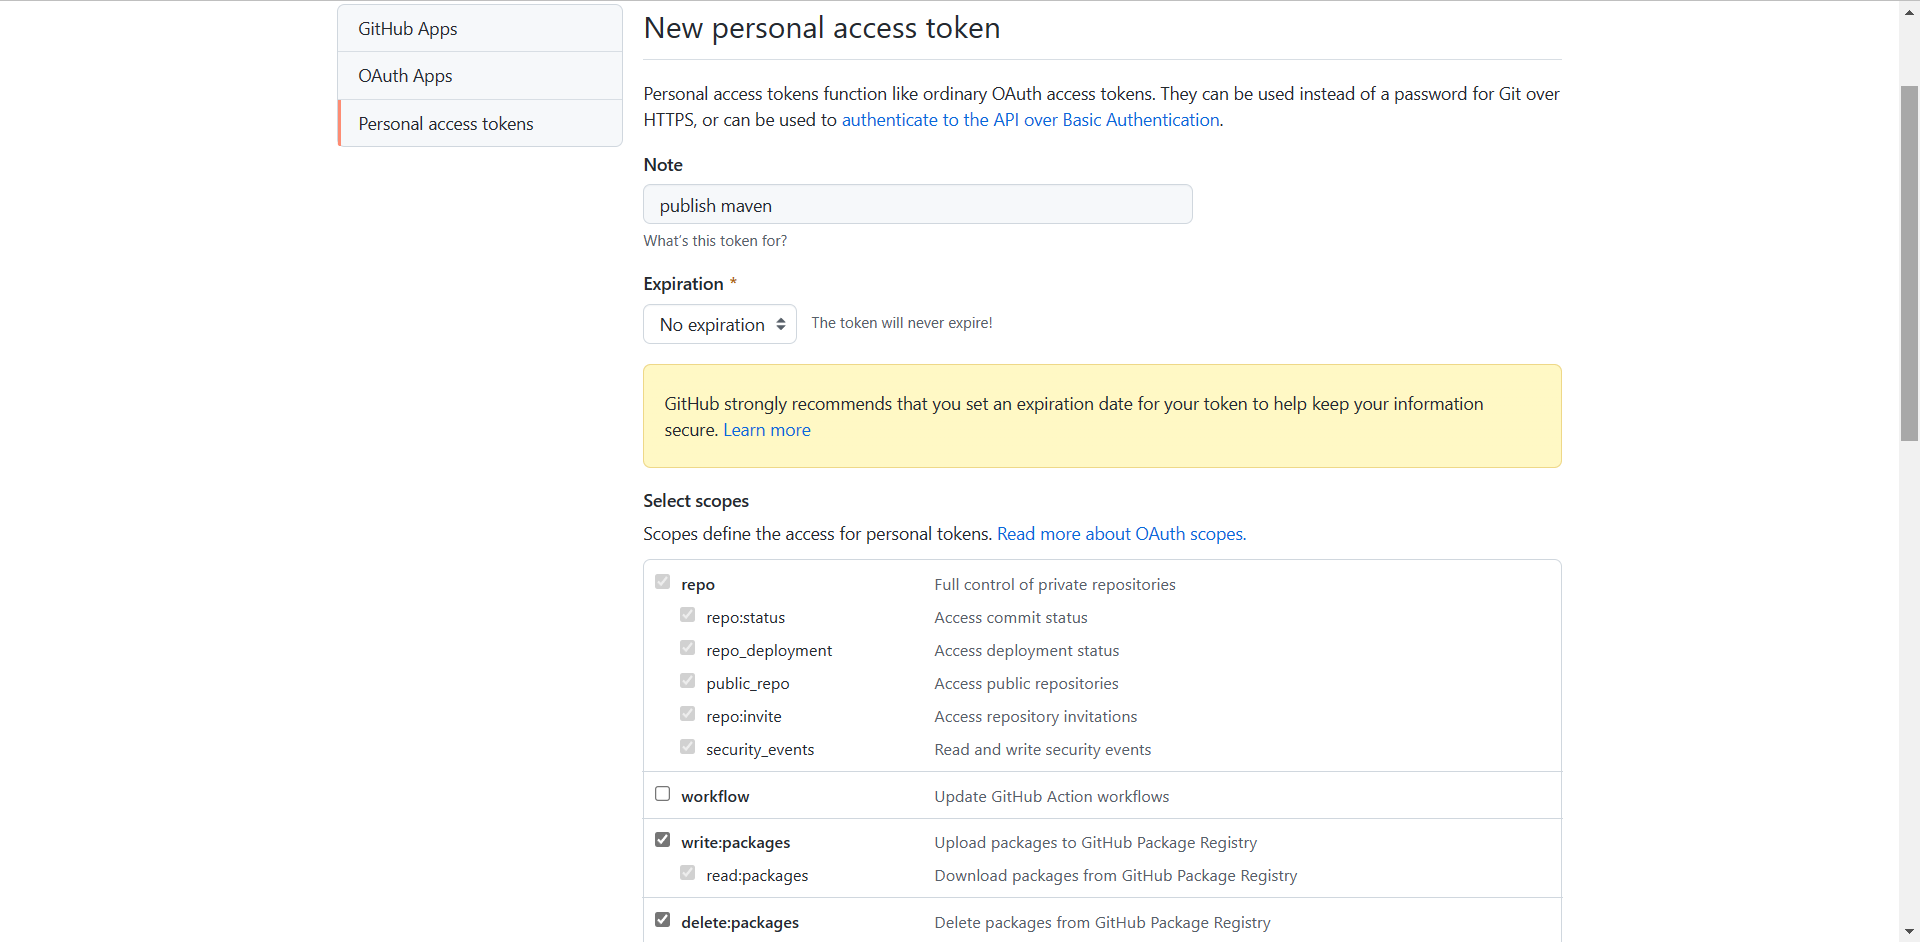
在Settings>Developer settings>Personal access tokens里创建一个发布包的token,这个tokens应当能够访问repo的基本信息、读写、删除packages;
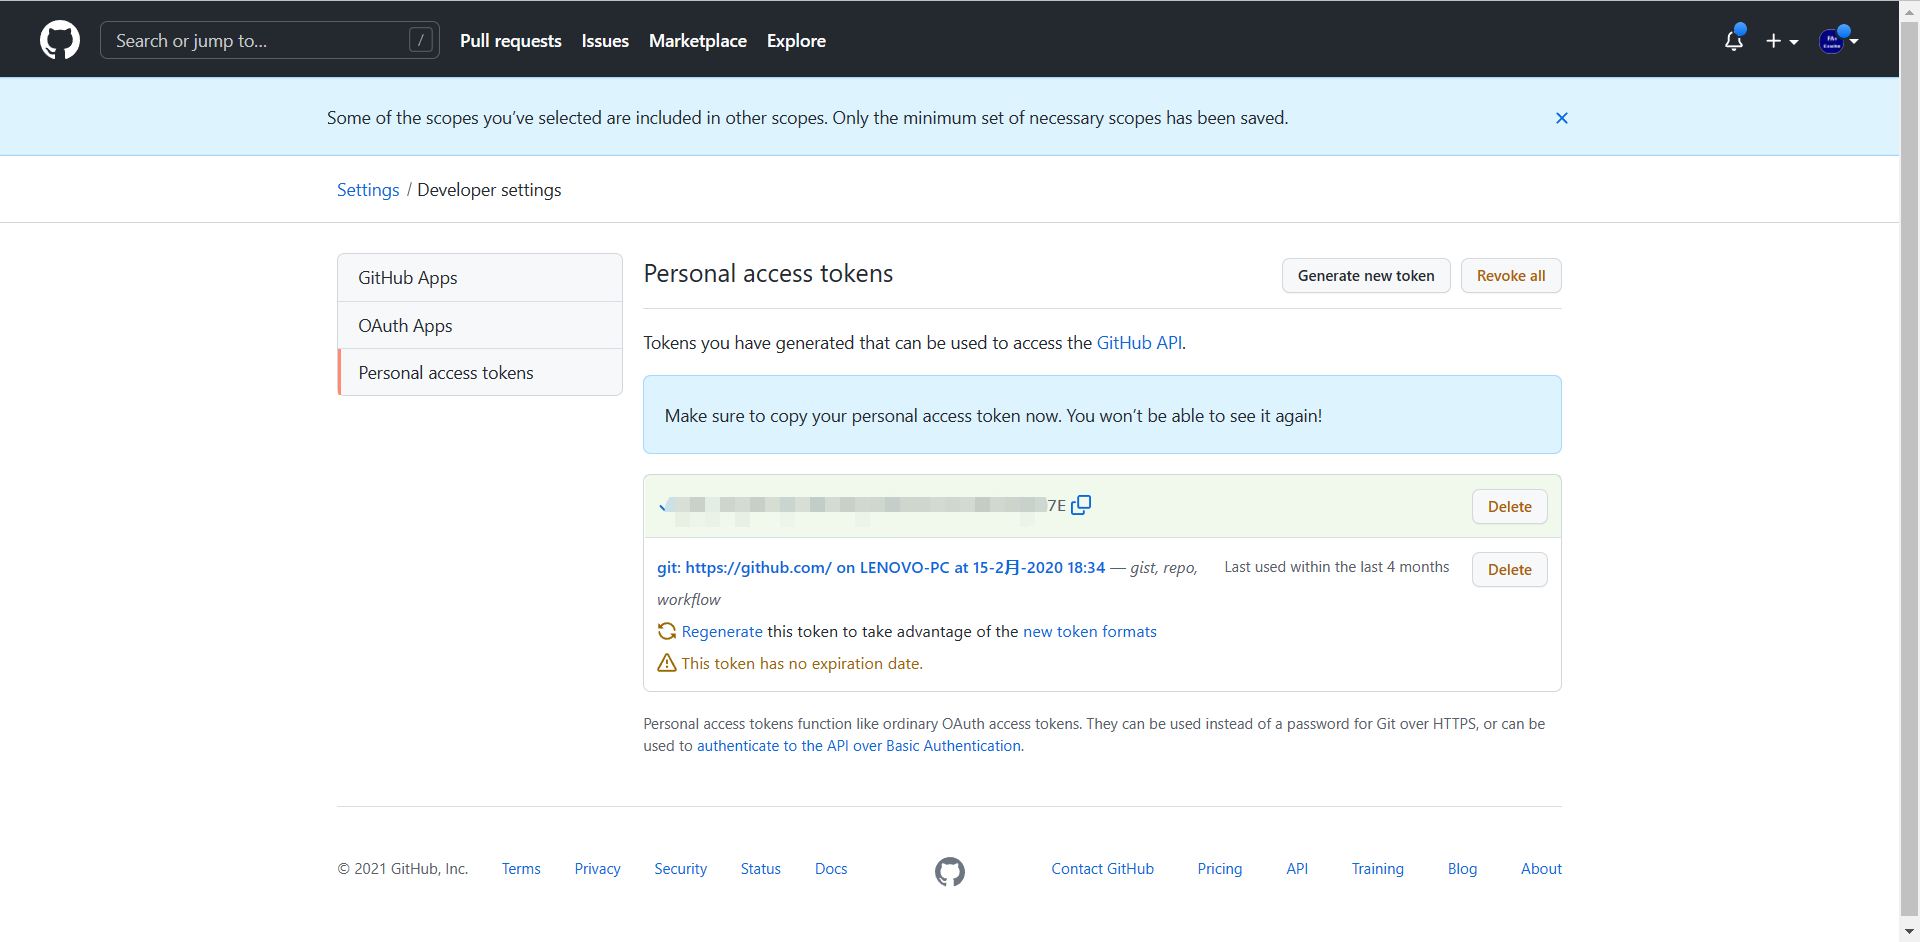
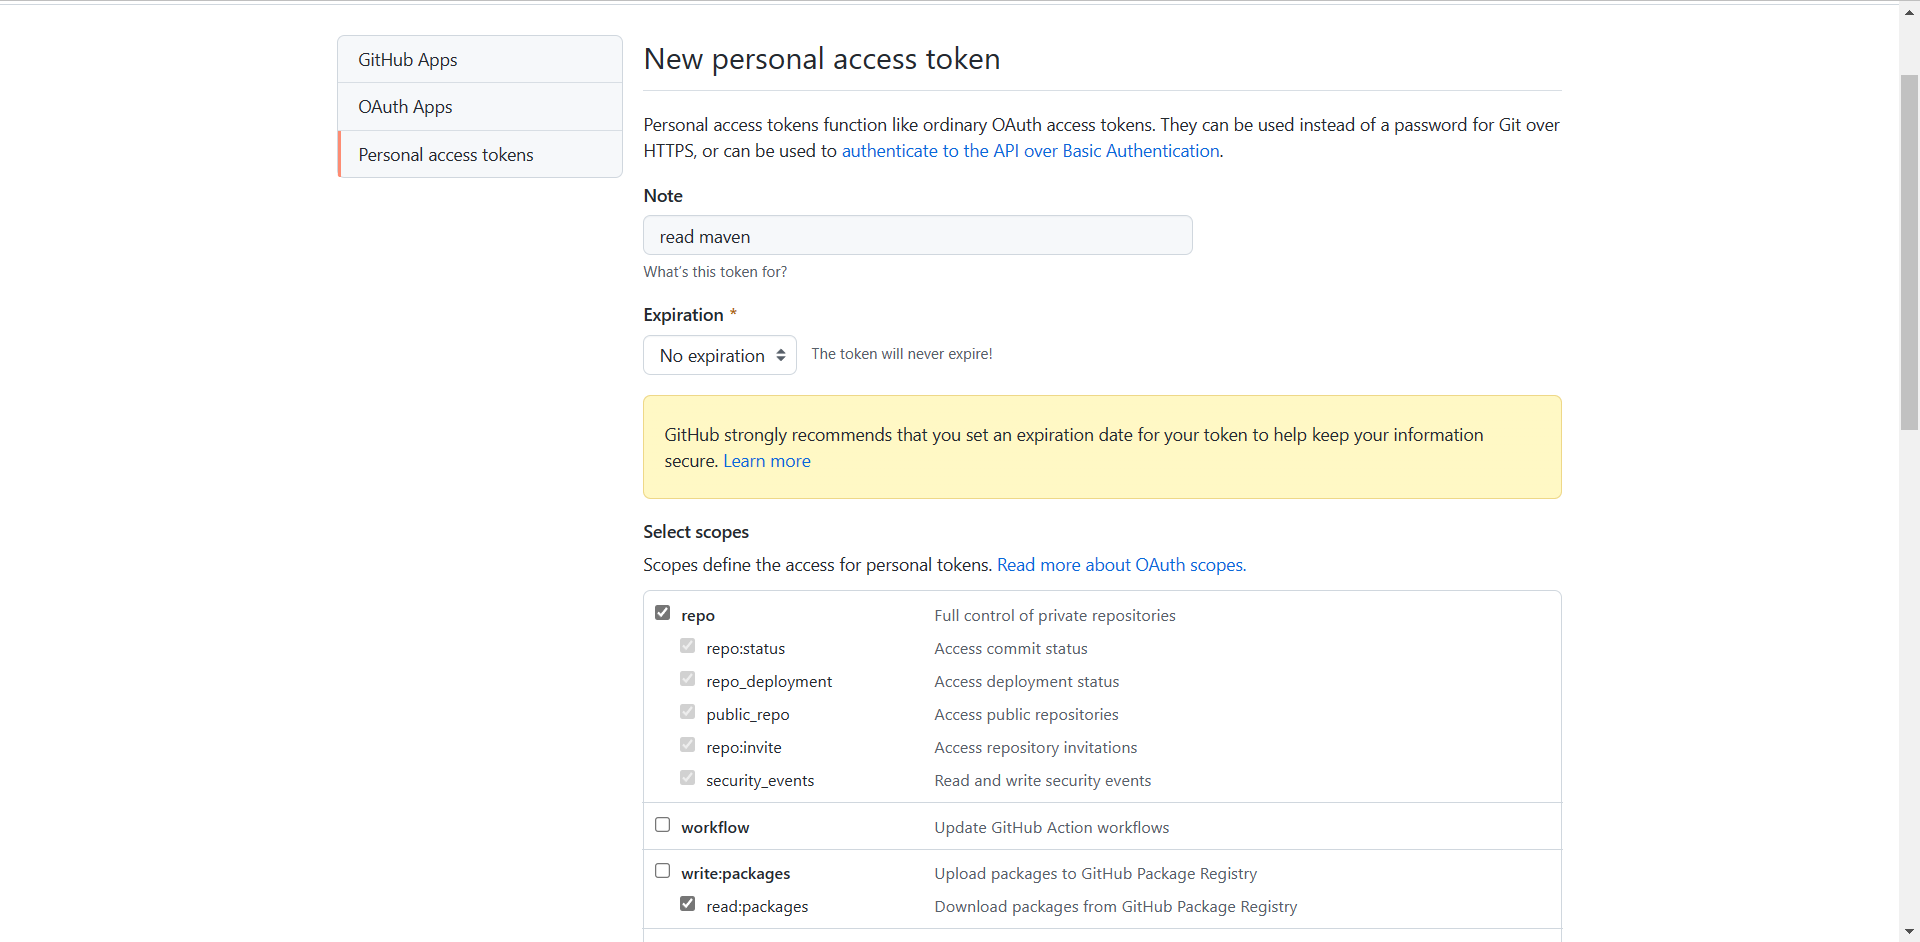
在Settings>Developer settings>Personal access tokens里创建一个安装包的token,这个tokens应当能够访问repo的基本信息、读;
```
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
```
### **配置setting.xml**
可以直接用下面的配置内容覆盖掉setting.xml:
```
<settings xmlns="http://maven.apache.org/SETTINGS/1.0.0"
xmlns:xsi="http://www.w3.org/2001/XMLSchema-instance"
xsi:schemaLocation="http://maven.apache.org/SETTINGS/1.0.0
http://maven.apache.org/xsd/settings-1.0.0.xsd">
<activeProfiles>
<activeProfile>github</activeProfile>
</activeProfiles>
<profiles>
<profile>
<id>github</id>
<repositories>
<repository>
<id>central</id>
<url>https://repo1.maven.org/maven2</url>
</repository>
<repository>
<id>github</id>
<url>https://maven.pkg.github.com/4170804/raymaven</url>
<snapshots>
<enabled>true</enabled>
</snapshots>
</repository>
</repositories>
</profile>
</profiles>
<servers>
<server>
<id>github</id>
<username>4170804</username>
<password>${token}</password>
</server>
</servers>
</settings>
```
>[danger]
> 需要替代:
${token}: 上面创建token环节产生的token字符串,如果当前是发布环境,则需要配置发布环境读写token,如果只是使用,则只需要配置只读的token;
### **配置工程POM**
需要发布包的工程POM文件中,加入
```
<distributionManagement>
<repository>
<id>github</id>
<name>raymaven</name>
<url>https://maven.pkg.github.com/4170804/raymaven</url>
</repository>
</distributionManagement>
```
### **执行命令发布**
进入工程根目录,执行命令:
```
cd D:\eclipseray\workspace\rayframework
mvn clean
mvn deploy -f pom.release.xml -e
```
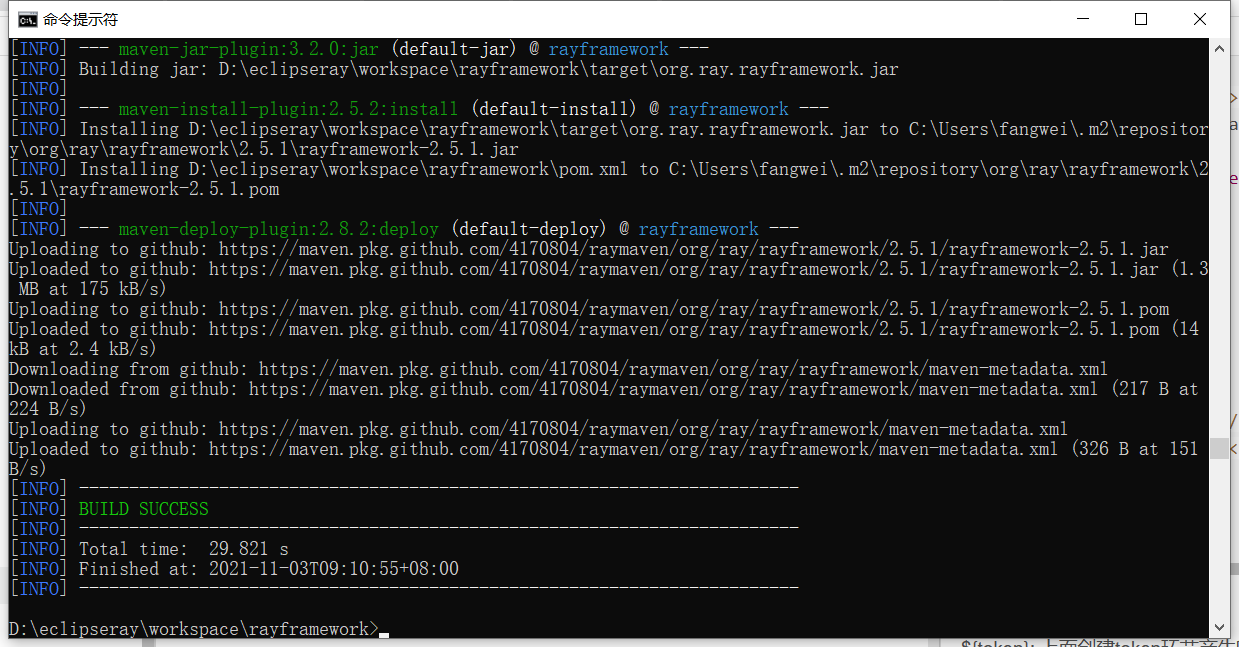
效果:
>[danger]
> 1、打包的时候,用命令行,关掉eclipse,建议打包的过程,全程不要开eclipse;
> 2、如果发布的时候,报证书错误,加入命令行看看:`-Dmaven.wagon.http.ssl.insecure=true -Dmaven.wagon.http.ssl.allowall=true`
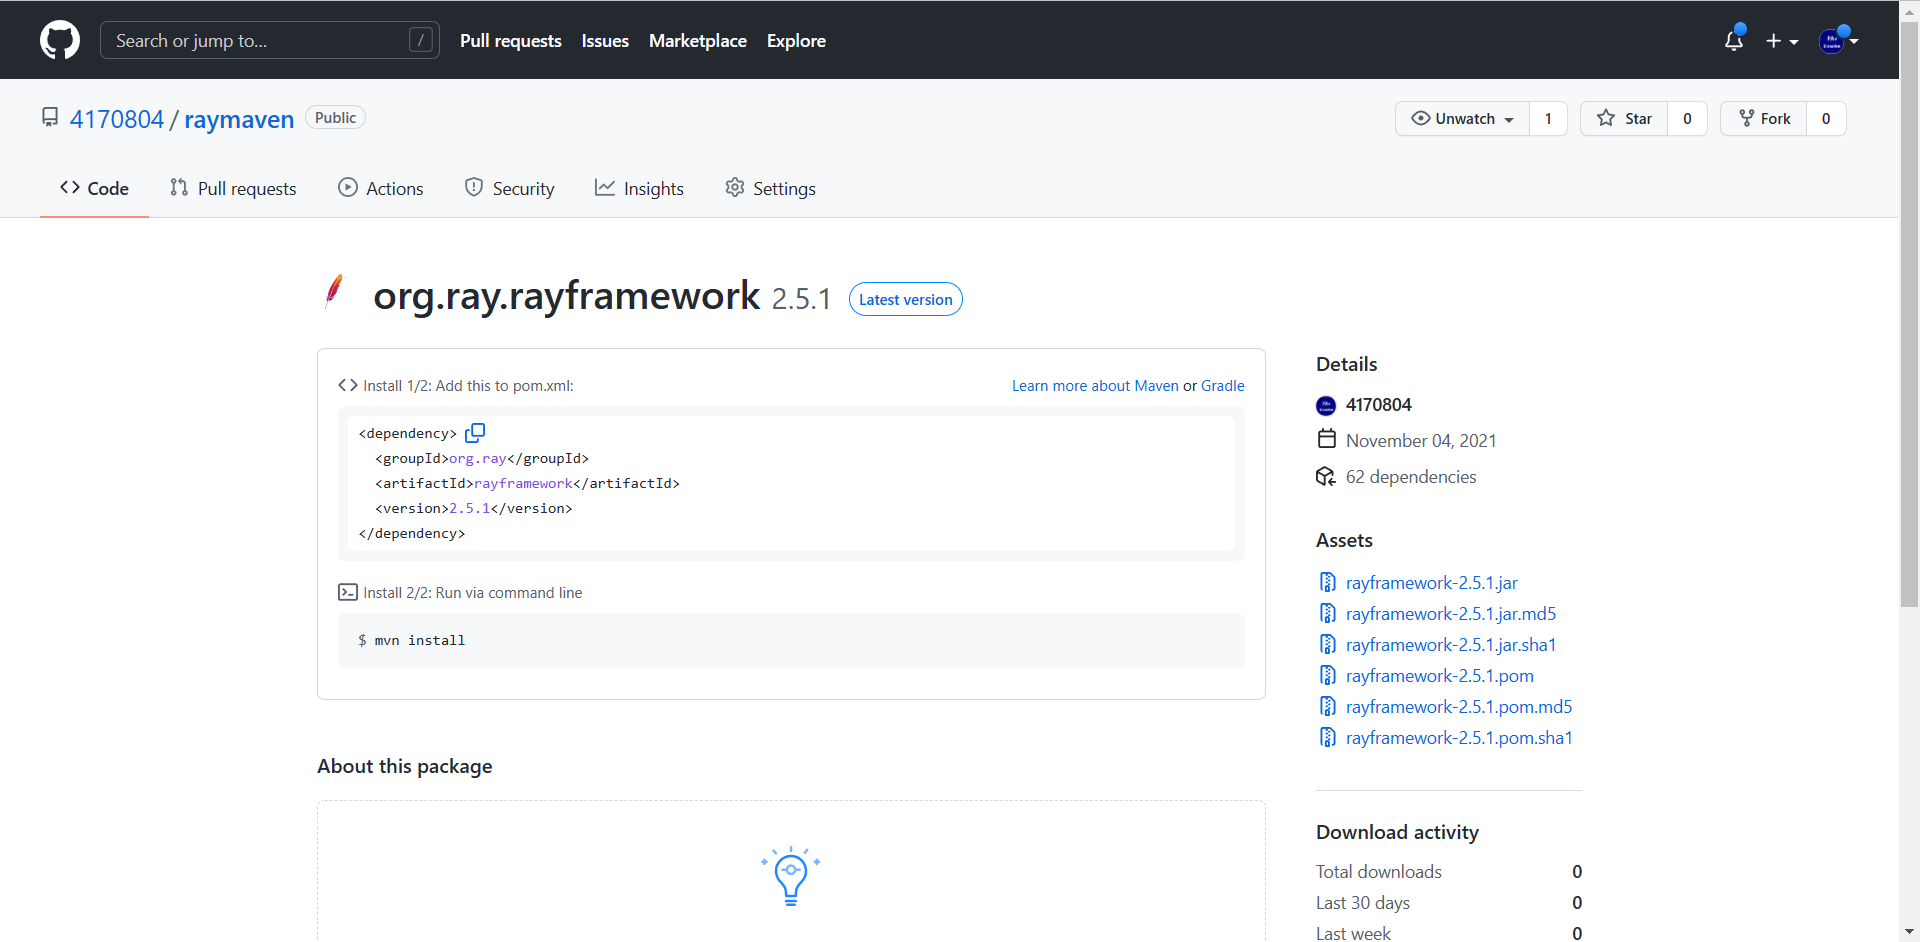
### **包设置为公共**
首次发布包时,默认可见性是私有的,只有您才能看到包。 您可以通过更改访问设置来修改私有或公共容器映像的访问权限;
公共包可以匿名访问,无需身份验证。 包一旦被设为公共,便无法再次将其设为私有。
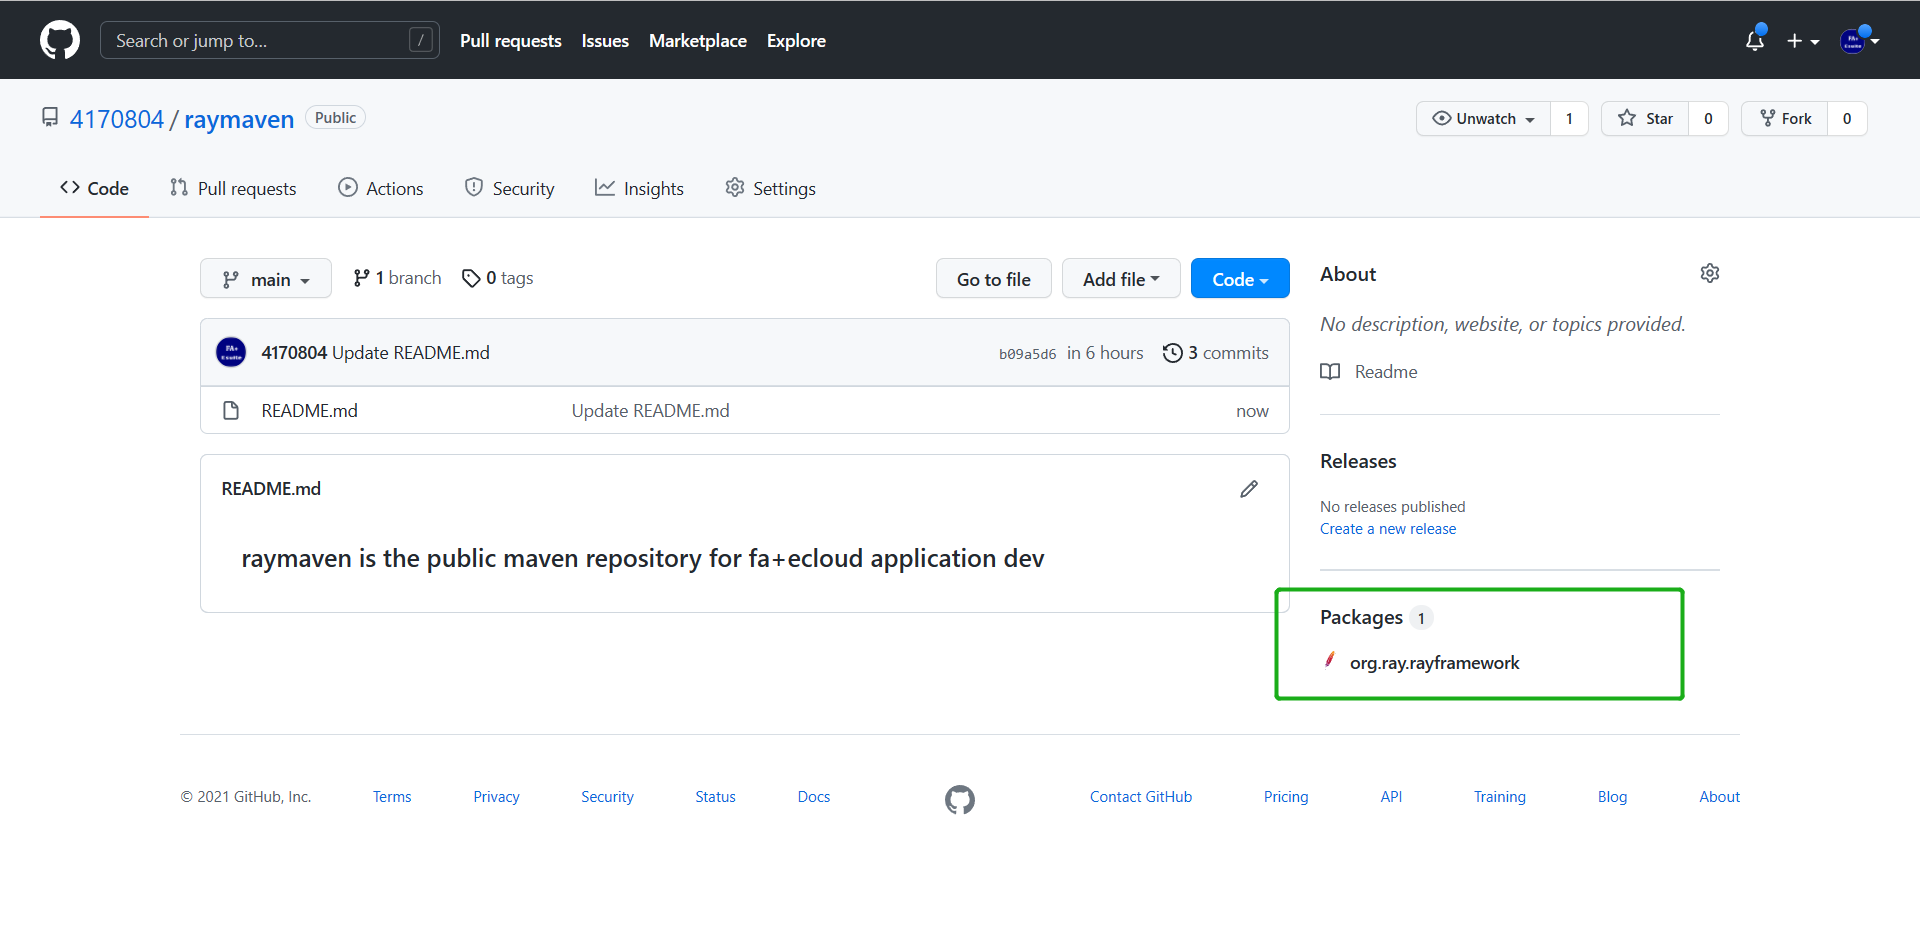
在 GitHub 上,导航到用户帐户的主页面Your Profile;
在个人资料页面的右上角,单击Packages,选择指定的包;
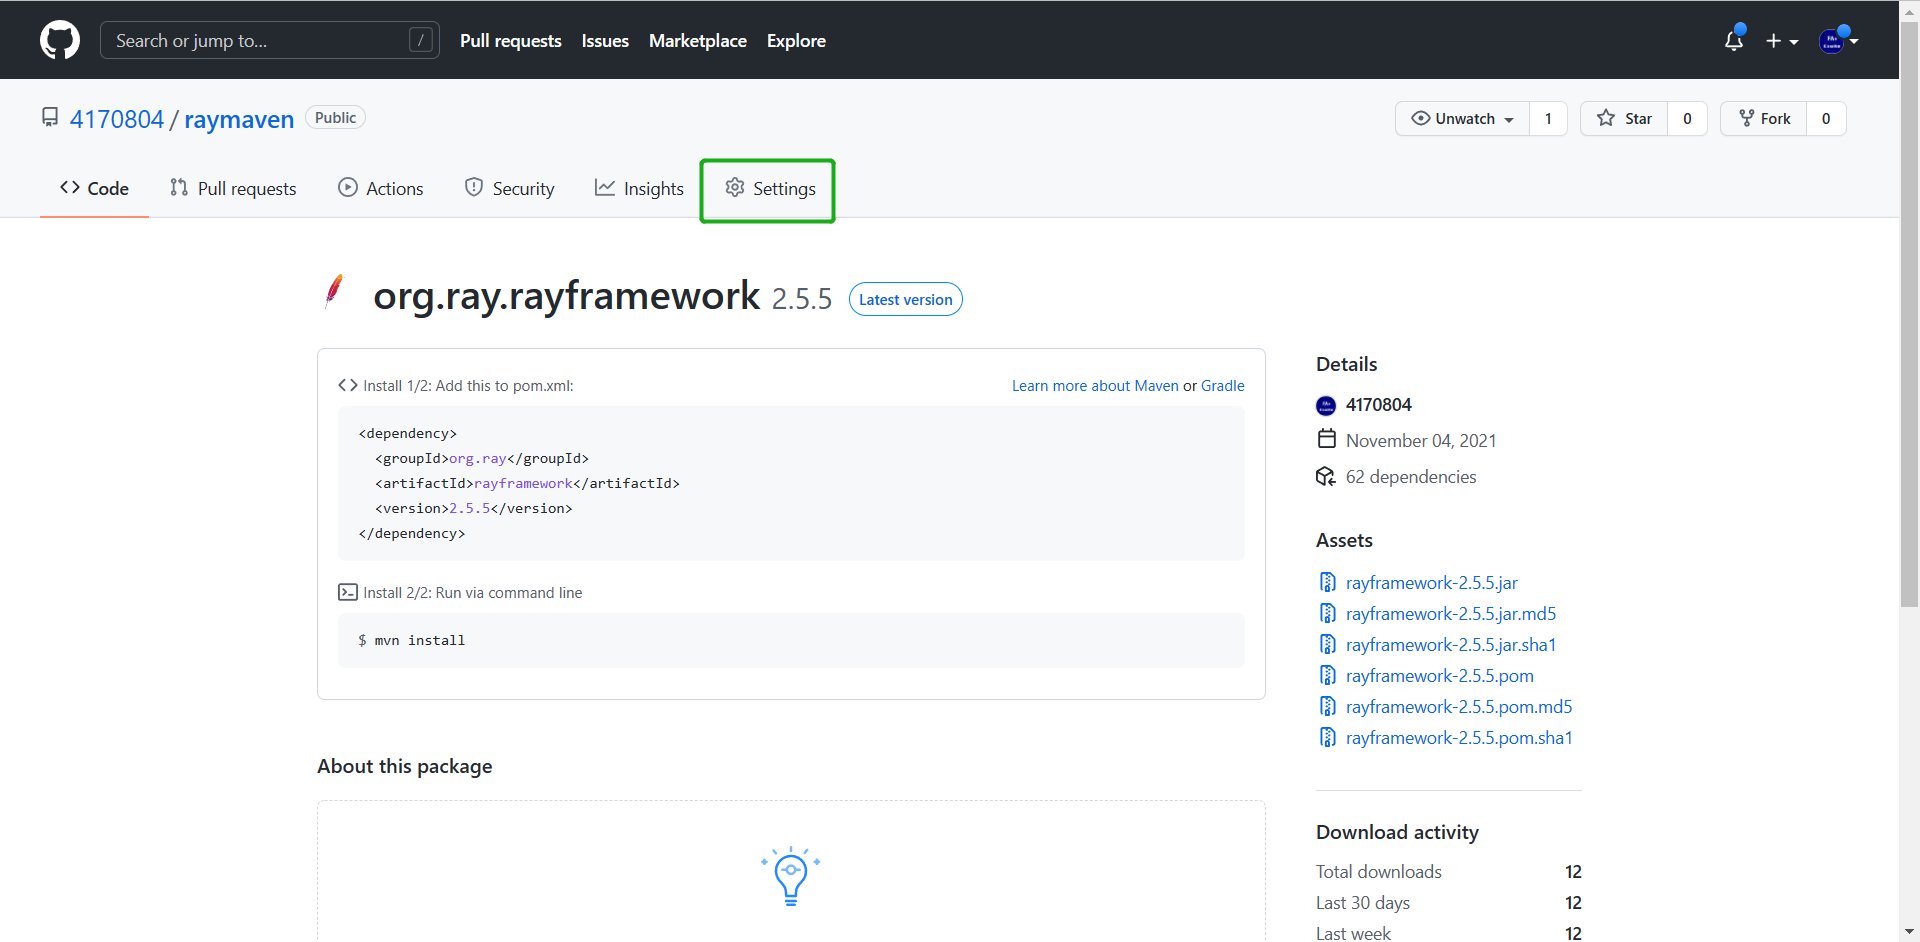
进入设置页面的Danger Zone,更改包的可见性;
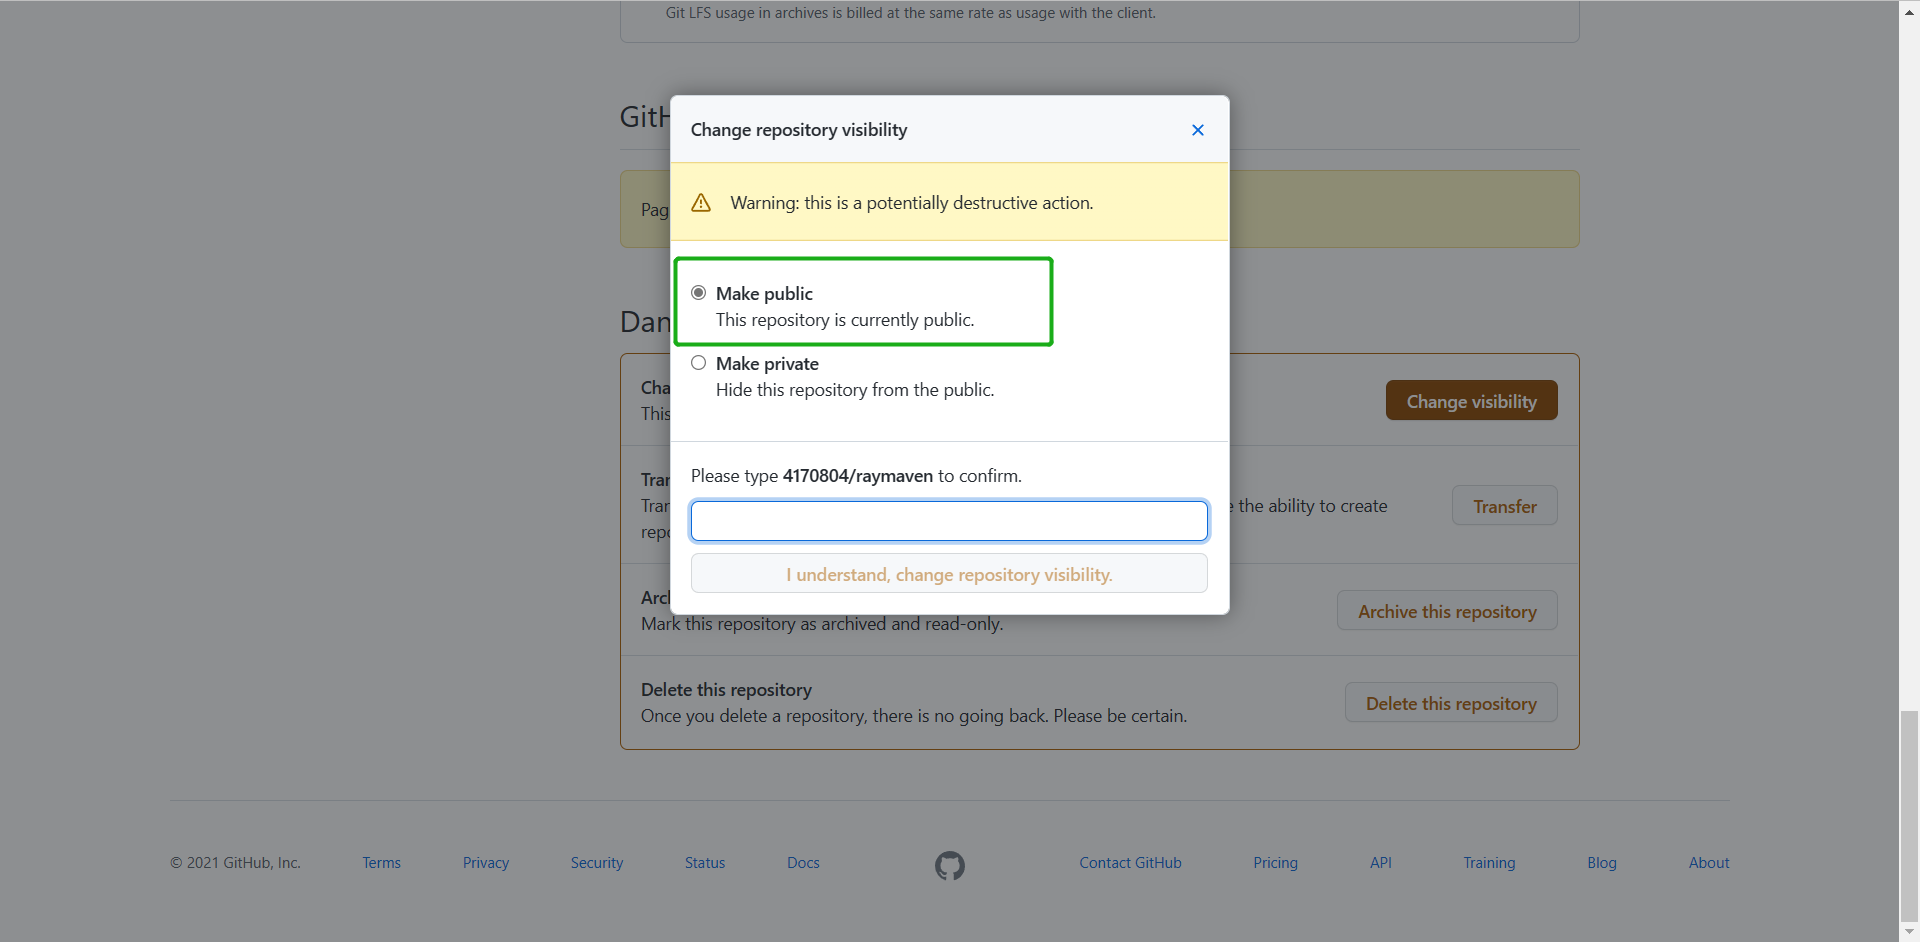
即可;
### **工程中引用**
**配置文件:**
需要在eclipse中,配置Maven的全局设置,设定一个设置文件;
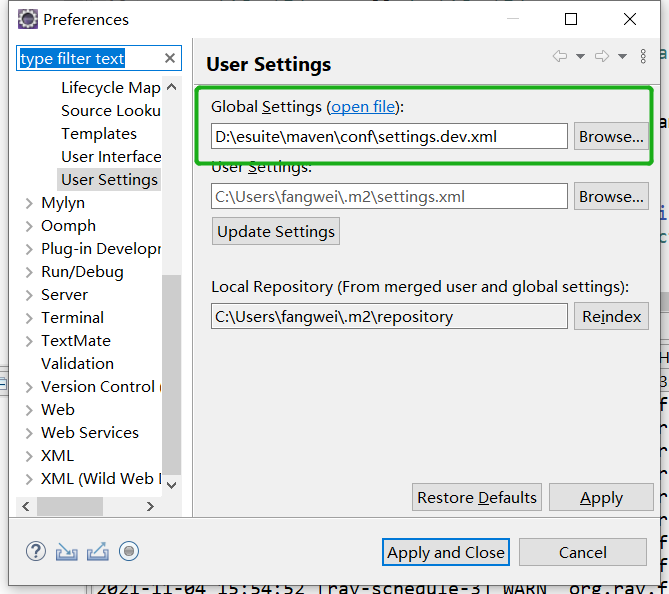
配置文件中的内容,可以直接复制下面的文本,完全覆盖即可;
```
<settings xmlns="http://maven.apache.org/SETTINGS/1.0.0"
xmlns:xsi="http://www.w3.org/2001/XMLSchema-instance"
xsi:schemaLocation="http://maven.apache.org/SETTINGS/1.0.0
http://maven.apache.org/xsd/settings-1.0.0.xsd">
<activeProfiles>
<activeProfile>github</activeProfile>
</activeProfiles>
<profiles>
<profile>
<id>github</id>
<repositories>
<repository>
<id>central</id>
<url>https://repo1.maven.org/maven2</url>
</repository>
<repository>
<id>github</id>
<url>https://maven.pkg.github.com/4170804/raymaven</url>
<snapshots>
<enabled>true</enabled>
</snapshots>
</repository>
</repositories>
</profile>
</profiles>
<servers>
<server>
<id>github</id>
<username>4170804</username>
<password>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</password>
</server>
</servers>
</settings>
```
>[danger] token使用只读的`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`
>
**工程的POM**
就可以如同公有仓库里面的介质一样,引入依赖即可;
```
<dependencies>
<dependency>
<groupId>org.ray</groupId>
<artifactId>rayframework</artifactId>
<version>3.0.1</version>
</dependency>
</dependencies>
```
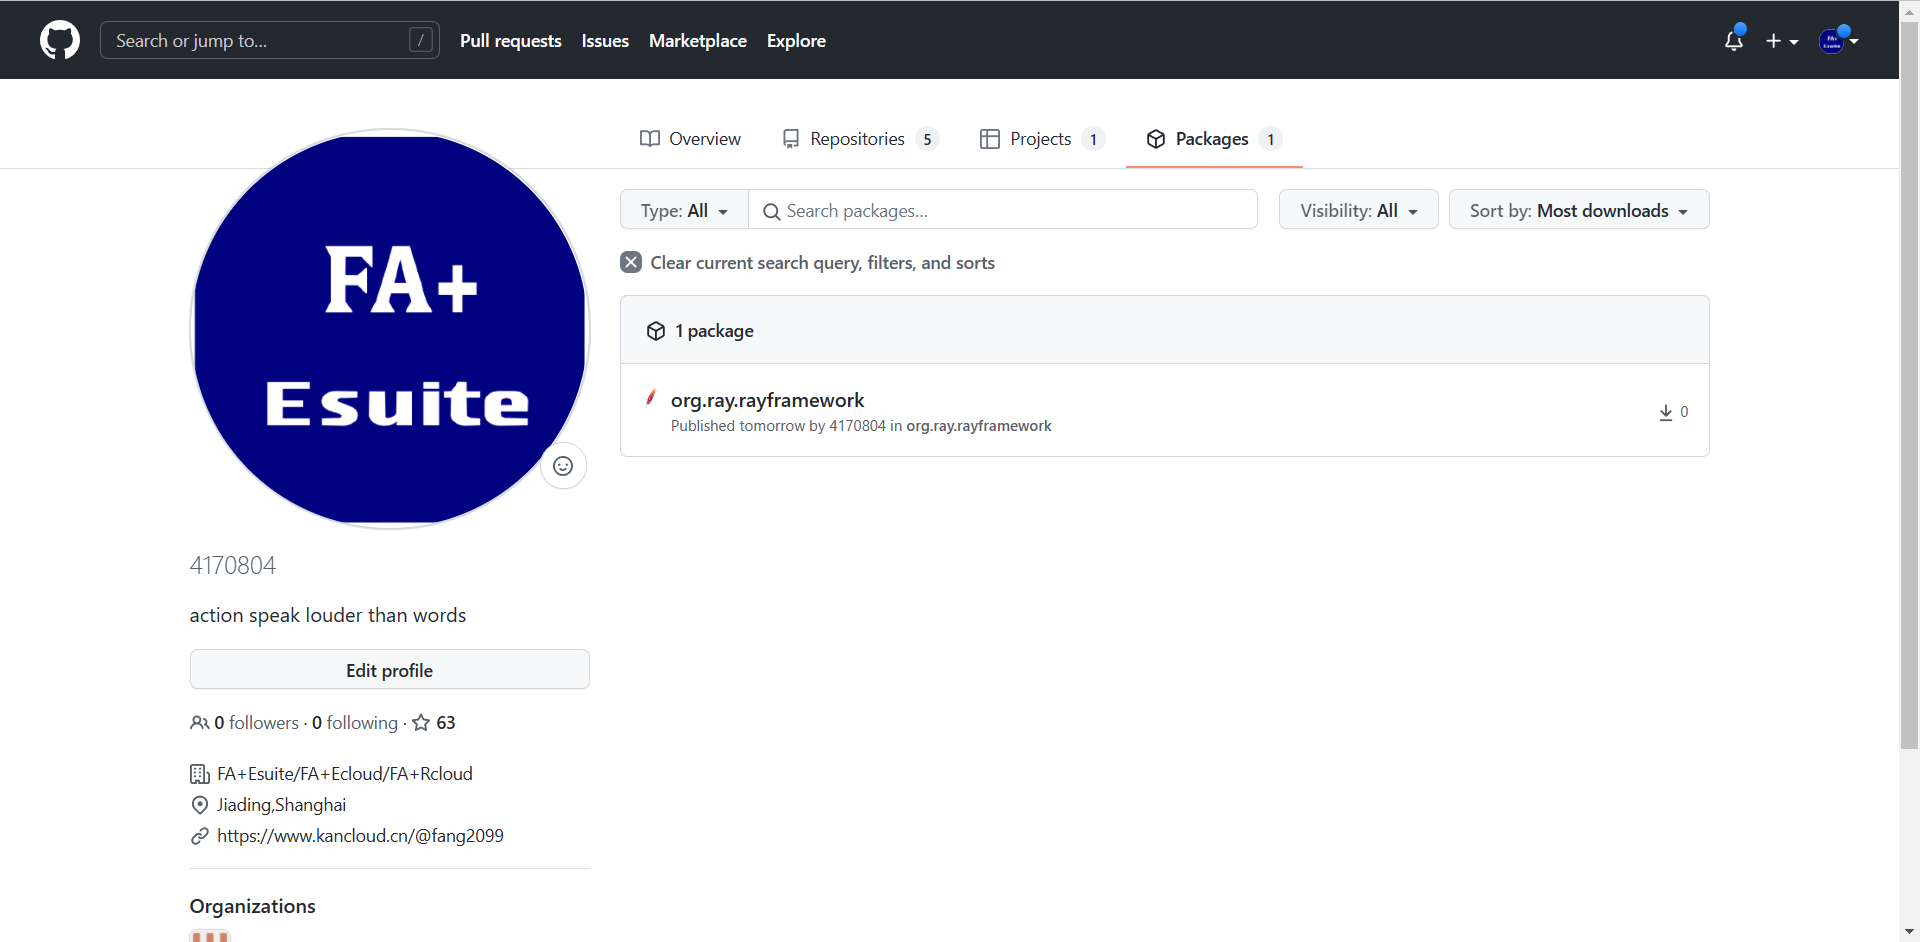
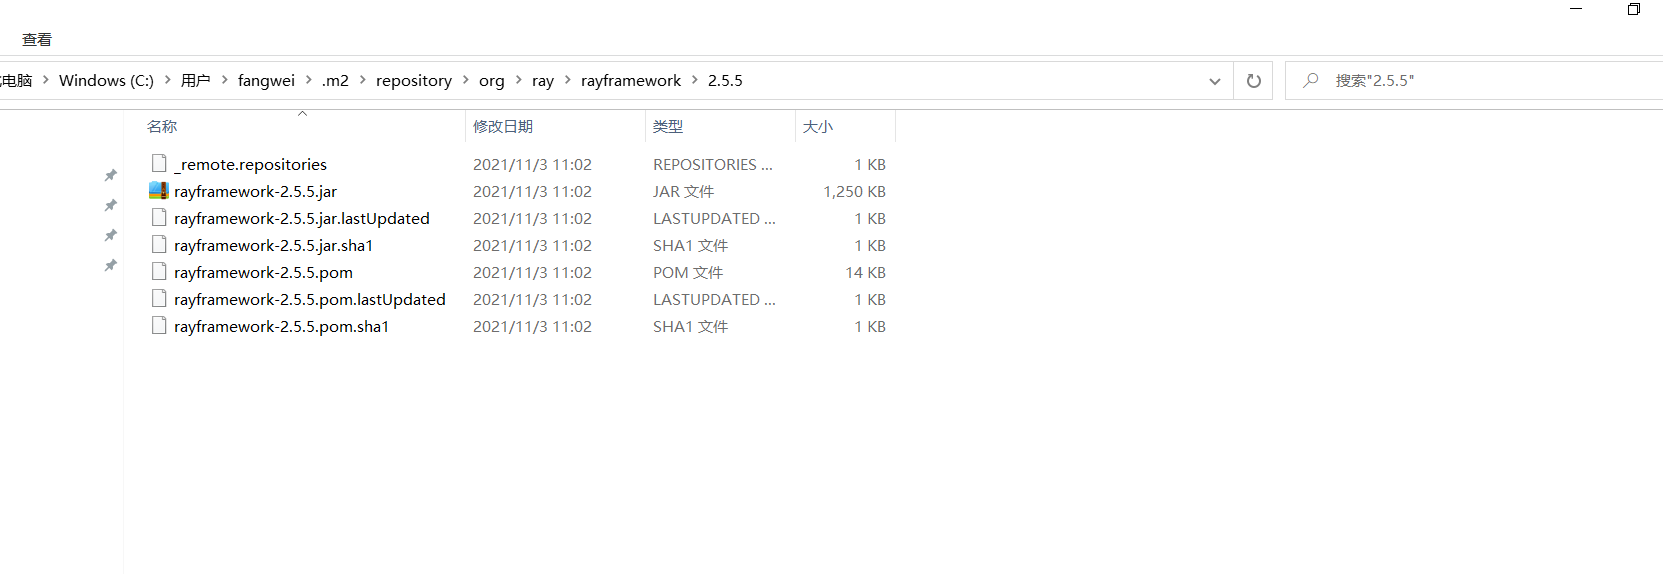
下载到本地库效果:
## 三、前置条件
为了简化发布库包,把待发布的库包的所有本地依赖包都打入了库包,方便开发者只需要引入一个包即可;
因此,发布库包前,需要把各依赖库全部安装到本地,方可,后续更新,只需更新本地包文件,即可自动更新本地依赖包了;
安装本地包的方法参考:[本地包安装](../Maven/%E6%9C%AC%E5%9C%B0%E5%8C%85%E5%AE%89%E8%A3%85.md)
需要安装的包包括:
```
<!-- uniframework core libs start -->
<dependency>
<groupId>org.wbase</groupId>
<artifactId>org.wbase.framework.core</artifactId>
<version>${uniframework.version}</version>
</dependency>
<dependency>
<groupId>org.wbase</groupId>
<artifactId>org.wbase.framework.engine</artifactId>
<version>${uniframework.version}</version>
</dependency>
<dependency>
<groupId>org.wbase</groupId>
<artifactId>org.wbase.framework.integrate</artifactId>
<version>${uniframework.version}</version>
</dependency>
<dependency>
<groupId>org.wbase</groupId>
<artifactId>org.wbase.framework.internet</artifactId>
<version>${uniframework.version}</version>
</dependency>
<dependency>
<groupId>org.wbase</groupId>
<artifactId>org.wbase.framework.iot</artifactId>
<version>${uniframework.version}</version>
</dependency>
<dependency>
<groupId>org.wbase</groupId>
<artifactId>org.wbase.framework.open.core</artifactId>
<version>${uniframework.version}</version>
</dependency>
<dependency>
<groupId>org.wbase</groupId>
<artifactId>org.wbase.framework.ray.core</artifactId>
<version>${uniframework.version}</version>
</dependency>
<dependency>
<groupId>org.wbase</groupId>
<artifactId>org.wbase.framework.sysadmin</artifactId>
<version>${uniframework.version}</version>
</dependency>
<dependency>
<groupId>org.wbase</groupId>
<artifactId>org.wbase.framework.taglib</artifactId>
<version>${uniframework.version}</version>
</dependency>
<dependency>
<groupId>org.wbase</groupId>
<artifactId>org.wbase.framework.oauth</artifactId>
<version>${uniframework.version}</version>
</dependency>
<!-- uniframework core libs end -->
```
- 引言
- 01、开发工具
- Maven
- 术语
- 仓库
- Archetype
- 安装配置
- 典型配置
- 内置变量
- eclipse插件
- 本地包安装
- 依赖库更新
- 依赖库排错
- 常见问题
- Gradle
- build.gradle
- gradle插件
- eclipse插件
- Eclipse
- json生成bean
- 常见问题
- IDEA Community
- 工程管理
- maven操作
- 格式化
- 常见问题
- Git
- GitHub
- 快速开始
- 既有工程
- 新建工程
- 日常提交
- PR操作
- 多人协作
- 常用命令
- 常见问题
- 同步代码
- 发布库包
- CodeGenerator
- VSCode
- 安装
- 配置
- 快速开始
- 与GitHub整合
- 断点调试
- 便捷开发
- 扩展
- prettier+
- Vetur
- 前端调试
- F12调试工具
- Vue前端调试
- 测试工具
- 压力测试
- 接口测试
- 抓包工具
- 导入证书
- SecureCRT
- 02、前端技术
- 前端设计
- javascript
- 基本语法
- 数据类型
- 类型转换
- 错误处理
- console对象
- 标准库
- 异步操作
- ES6及后续增强
- 模块化
- 扩展运算符
- 解构变量
- 箭头函数
- 混入模式
- web标准
- css
- html
- HistoryApi
- dom
- 如何理解
- 虚拟dom
- JSON
- svg
- WebAssembly
- web components
- HtmlComponents
- Custom Elements
- 标准扩展
- javascript
- Babel
- TypeScript
- JavaScript
- ECMAScript
- 模块化
- CommonJS
- require
- exports与module.exports
- ES6模块
- export
- import
- AMD
- define
- require
- CMD
- define
- require
- Web Storage
- JSX
- ES6语法
- 语法糖
- ==和===
- let与const
- call&apply
- 内置对象
- Object
- Class
- Promise对象
- then
- catch
- finally
- resolve
- reject
- Module
- Generator函数
- arguments
- 函数扩展
- 数组
- 对象
- Set和Map
- Proxy对象
- css
- sass
- less
- postcss
- CSS Modules
- Node.js
- 安装
- npm
- ls
- init
- install
- run
- uninstall
- update
- version
- npm生态
- yarn
- package.json
- node_modules
- 常用技术
- 应用实例
- Web框架
- Express
- Egg.js
- Mock
- Mock.js
- 语法规范
- 非核心api
- 核心api
- easymock
- 开发测试
- ESLint
- jest
- Travis
- Prettier
- stylelint
- 构建工具
- gulp
- Browserify
- webpack
- 安装配置
- 入口起点entry
- 输出output
- 装载器loader
- 插件plugins
- webpack-cli
- public目录
- 技术概念
- CSR与SSR
- polyfill
- axios
- 请求对象
- 响应对象
- 自定义实例
- 拦截器
- 跨域访问
- 03、前端框架
- mvvm
- vue.js
- 简明指南
- vue文件结构
- 组件指南
- 组件命名
- 应用流程
- 单文件组件
- 组件导入导出
- 生命周期
- Prop
- 复用方法
- 懒加载
- 全局环境
- 全局配置
- 全局API
- 选项对象
- 混入选项
- vue实例$
- vue指令
- v-bind(:)
- v-on(@)
- v-model
- 特殊属性
- 内置组件
- 自定义机制
- 组件
- 指令
- 过滤器
- 混入
- slot插槽
- 渲染函数
- 注意事项
- 总结
- vueCli
- 安装
- 组成部分
- vue.config.js
- vue核心文件
- 状态管理
- 简单状态
- Vuex
- 构造器选项
- 实例属性
- 实例方法
- 绑定辅助函数
- 模块化
- 总结
- 路由管理
- 简单路由
- Vue Router
- 路由模式
- route
- router
- <router-link>与编程式
- <router-view>
- 嵌套路由
- 导航守卫
- 总结
- vue插件
- Vue Loader
- 实战举例
- vue快速入门
- vue与后台联动
- vue完整实例
- vue组件库
- vue-ls
- Enquire.js
- lodash
- md5.js
- moment
- nprogress
- viser-vue
- vue-clipboard2
- vue-cropper
- vue-quill-editor
- wangeditor
- vue-svg-icon-loader
- 实战参考
- Vue Antd Admin
- ant-design-vue
- 快速开始
- 要点解析
- vuepress
- vant
- 04、后端框架
- SprigBoot
- 快速入门
- 完整示例
- 完整进阶
- 核心技术
- 核心标记
- 页面技术
- Thymeleaf
- 数据访问
- 基本用法
- 事务控制
- 事务规则
- 注意事项
- 实体状态
- 数据查询
- 普通查询
- 分页查询
- 统计查询
- 命名访问
- 公用共享
- 缓存机制
- 服务层
- 控制器
- AOP
- 定时任务
- 异步任务
- 静态注入
- WebClient
- 启动机制
- 应用监控
- 线程安全
- 调试测试
- 打包部署
- 打jar包
- 常见问题
- 配置问题
- 开发问题
- 文档生成
- 相关技术
- springfox
- knife4j
- actuator
- kaptcha
- YAML
- API Blueprint
- 启用https
- SpringSecurity
- 快速入门
- 核心元素
- jwt
- 与springsecurity集成
- 05、运行容器
- artemis
- 协议支持
- mqtt
- 安装运行
- 管理配置
- 日志配置
- 业务配置
- 安全配置
- 数据存储
- SSL支持
- 运行维护
- mosquitto
- 安装运行
- 管理配置
- SSL支持
- rocketmq
- 安装运行
- 控制台
- 代码实例
- kafka
- ZooKeeper
- 安装运行
- 代码实例
- zookeeper
- 安装运行
- 应用实例
- dubbo
- 代码实例
- hadoop
- 安装配置
- 快速运行
- netty
- 06、相关技术
- Serverless
- Protobuf
- SSL
- 证书
- 认证类型
- 硬件技术
- 基础知识
- 开发技术
- 消息协议
- 07、项目实战
- 前端开发
- 从零开始开发
- 开发环境搭建
- 原生技术开发
- 路由守卫
- 动态路由菜单
- 全局API
- 登录认证
- 与后端交互
- 代码开发调试
- 快速打包发布
- 常见问题收集
- 后端开发
- 从零开始开发
- 开发环境搭建
- 常用注解说明
- 常用基础设施
- 核心业务约定
- 平台配置文件
- 业务配置清单
- 关键配置参数
- 项目必配参数
- 项目调优参数
- 返回结果处理
- 字段翻译机制
- 列表字段翻译
- 实体字段翻译
- 组合字段翻译
- 列表数据增强
- 列表数据简化
- 返回字段过滤
- 返回字段改名
- 定制返回结果
- 原生技术开发
- 动态级联字典
- 简单数据查询
- 短信验证业务
- 测试数据模拟
- 开放平台登陆
- 微信开放平台
- 抖音开放平台
- 文件处理方案
- 文件字段存储
- 文件字段解析
- 图像数据存取
- 文件资源方案
- 服务集成开发
- redis服务集成
- mqtt服务集成
- kafka集成
- rocketmq集成
- websocket集成
- elasticsearch集成
- netty集成
- 外部工具开发
- 发送短信服务
- 发送邮件服务
- 动态pdf生成
- 数据处理开发
- 同步导出数据
- 异步导出数据
- 同步导入数据
- 异步导入数据
- 多线程与并发
- 线程并发安全
- 操作间隔控制
- 异步待办机制
- 平台定时任务
- 平台异步任务
- 常见注意事项
- 安全相关开发
- 接口安全策略
- 接口限流策略
- 接口授权策略
- 权限相关开发
- 路由权限方案
- 组织权限方案
- 数据权限方案
- 字段权限方案
- 按钮权限方案
- 支付相关开发
- 微信原生支付
- 微信H5支付
- 微信JSAPI支付
- 微信批量转账
- 微信动态支付
- 支付宝移动网站支付
- 支付宝PC网站支付
- 平台缓存机制
- 内置进程内缓存
- 内置分布式缓存
- 平台自定义缓存
- 平台插件机制
- 账号的邀请码
- 账号的二维码
- 定制事件机制
- 约定实现机制
- 请求回调机制
- 启动自动加载
- 平台基础设施
- 动态参数加载
- 定制待定常量
- 定制单位组织
- 平台缓存机制
- 平台外访机制
- 静态资源获取
- 调试打印机制
- 数据源随时用
- 上下文随处拿
- 平台诊断机制
- 平台内置资源
- 强制间隔时间
- 账号扩展开发
- 账号变更事件
- 业务开发指南
- 字典数据获取
- 数据层持久化
- 基础服务调用
- 查询时间范围
- 代码开发调试
- 常见问题收集
- 从零开始
- PCV1运行
- PCV2运行
- H5端运行
- 开发进阶
- 最佳实践
- 开发方案
- 前后分离
- 跨域访问
- 库表设计
- 模型设计
- 容器部署
- 集群部署
- 日志收集
- 动态配置
- 开发管理
- 开发环境
- 代码控制
- 问题跟踪
- 进度跟踪
- 测试环境
- 调试辅助
- DevOps
- 代码风格
- 运行维护
- 基本监控知识
- 线程堆栈分析
- 内存堆栈分析
- 应用诊断工具
- 工程示范
- 后端开发
- 前端开发
- PC端
- 移动端
- 08、内置容器
- 调度服务
- 调度容器
- 快速开发
- 线程并发
- 多点部署
- 本地调试
- 常见问题
- 开放服务
- 快速接入
- 接口开发
- 09、开放平台
- 微信公号
- 环境准备
- 环境配置
- 技术方案
- 获取OpenId
- 常见问题
- 10、平台功能
- 系统管理
- 单位组织
- 角色管理
- 账号管理
- 子账号
- 财务账户
- 开放数据
- 绑定数据
- 套餐权益
- 会员定义
- 变更审核
- 注册审核
- 系统配置
- 路由配置
- 参数配置
- 属性配置
- 树形设置
- 服务接口
- 访问设置
- 系统监控
- 在线用户
- 内存数据
- 系统变量
- 外访数据
- 到访数据
- 操作记录
- 静态字典
- 日志管理
- 元数据
- 接入管理
- 微信公号
- 微信支付
- 开放服务
- 客户端
- 服务列表
- 请求历史
- 请求服务
- 调度服务
- 调度监控
- 11、补充语言
- php
- 生产环境
- 安装
- 初始配置
- nginx集成
- 配置文件
- 语法
- 变量和常量
- 数据类型
- 条件控制
- 运算符
- 数组
- 指针
- 循环控制
- 函数
- 语法糖
- 预定义变量
- session和cookie
- 命名空间
- 面向对象
- 数据库操作
- 表单
- 错误
- 异常
- 过滤器
- JSON
- XML
- AJAX
- Composer
- 开发环境
- 本地调试
- 远程调试
- .net
- 开发环境
- C#快速入门
- 12、依赖容器
- elasticsearch
- 运行配置
- 命令操作
- 中文分词
- Kibana
- Logstash
- 开发技术
- 搜索类型
- 代码示例
- 应用场景
- 常见问题
- nginx
- 下载安装
- 基本配置
- 服务启停
- 安全防护
- 常见问题
- linux
- 常用操作
- 常用命令
- 用户管理
- ftp服务
- 防火墙
- 运维
- 网络安全
- 内核参数
- 安装
- yum源问题
- mysql
- 安装配置
- 快速安装
- 正式安装
- 参数配置
- 性能优化
- 语句优化
- 配置优化
- 设计优化
- 运维常识
- 系统监控
- 连接数
- 超时
- cpu利用率
- 数据备份
- 导入复制
- 经验举例
- 故障处理
- 用户管理
- 系统日志
- 日志清理
- 安全经验
- 集群方案
- MySQL Replication
- MySQL Cluster
- 常见问题
- redis
- 安装配置
- 安装运行
- 参数配置
- 运维常识
- 技术要点
- pubSub
- 操作命令
- 持久化
- 常见问题
- docker
- 安装运行
- 镜像操作
- 容器操作
- 仓库操作
- 实战案例
- kubernetes
- 后记