### **简介**
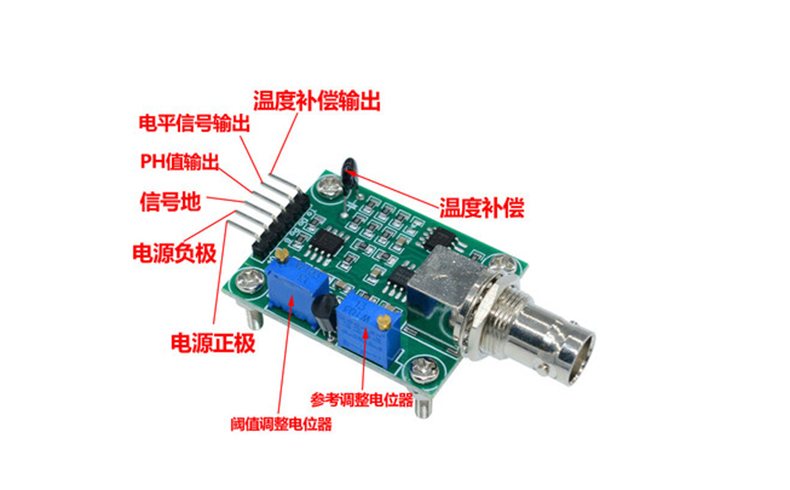
本PH值传感器能够采集液体、泥土的酸碱度,其采用免充KCl溶液设计,使用简单方便。
<br/>
## **技术参数**
* 工作电压: 5±0.2V (交流直流)
* 工作电流: 5-10mA
* 可检测浓度范围: PH0-14
* 检测温度范围: 0-80℃
* 响应时间:≤5S
* 沉降时间:≤60S
* 元件功率:≤0.5W
* 工作温度: - 10~50℃(标称温度20℃)
* 湿度: 95 %相对湿度(标称湿度65 %相对湿度)
* PH测试模块尺寸: 42毫米*32毫米*20毫米
* 输出:模拟电压信号输出
* 带有4pc M3安装孔
<br/>
### **引脚说明**

<br/>
### **使用方法**
(1)首先连接好 PH 电极通过 BNC 接头,再 PH 传感器模块按简介图连接好电源,PH 传感器输出端为模拟输出,可以连接 ADC 转换设备,例如 ARUDUINO 模拟输入口,连接好后,对 Arduino 主控器供电后,可以看到 pH meter 电路板的红色指示灯变亮。
(2)对 Arduino 主控器烧写样例代码。
(3)将 pH 电极插入到 pH 值为7.00的标准溶液中,或者直接短接 BNC 接口的两个输入,打开 Arduino IDE 的串口监视器,可以看到当前打印出的 pH 值,误差不会超过0.3。记录下此时打印的值,然后与7.00相比,把差值修改到程序中的 Offset 处。比如,打印出的 pH 值为6.88,则差值为0.12,则在样例程序中把#define Offset 0.00改成#define Offset 0.12。
(4)将 pH 电极插入 pH 值为4.00的校准液中,等待一分钟后,调整增益电位器,使打印出的 pH 值尽量稳定在4.00 左右。此时,酸性段校准已经完成,您可以测试酸性溶液的 pH 值。
注意:测量其他溶液时,必须清洗电极。
(5)依靠pH 电极自身的线性特性,经过以上的校准,可以直接测量碱性溶液的 pH 值,但如果您想获得更好的精度, 建议重新校准。碱性段校准采用 pH 值为9.18的标准液,同样是调节增益电位器,使之稳定在9.18左右。经过校准, 此时您可以测量碱性溶液的 pH 值了。
<br/>
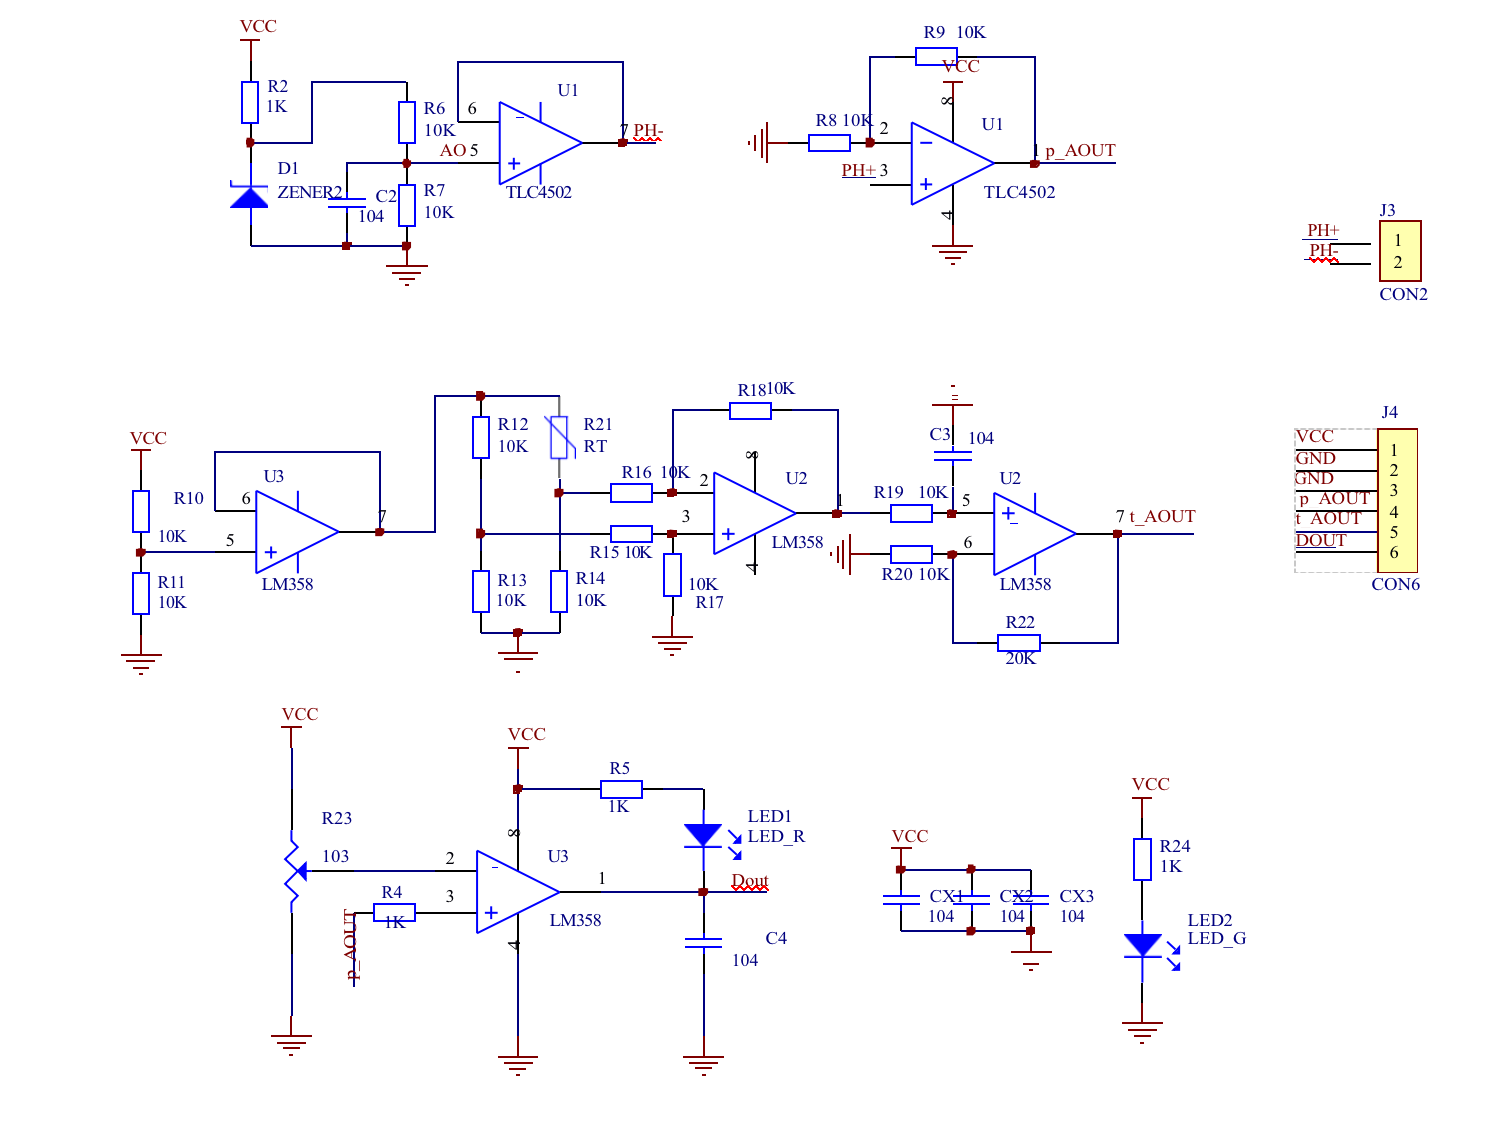
### **原理图**

<br/>
### **注意事项**
* 在长期的连续使用时,液接界处的KCl浓度会减少,会影响测试精度。因此如果在不使用时,应浸泡在电极浸泡液中。
* 请使用外接开关电源,使电压尽量接近+5.00V,电压越准,精度越高!
* 电极在每次连续使用前均需要使用标准缓冲溶液进行校正,为取得更正确的结果,环境温度最好在25℃左右,已知
PH值要可靠,而且其 PH 值愈接近被测值愈好。如您测量的样品为酸性,请使用 PH4.00的缓冲溶液对电极进行校正,
* 如果您测量的样品为碱性,请使用 PH9.18缓冲溶液对电极进行校正。分段进行校准,只是为了获得更好的精度。
* PH 电极每测一种 PH 不同的溶液,都需要使用清水清洗,建议使用去离子水清洗。
<br/>
### **参考代码**
* Arduino IDE 参考代码
```
/*
# This sample codes is for testing the pH meter V1.0.
# Editor : YouYou
# Date : 2013.10.21
# Ver : 0.1
# Product: pH meter
# SKU : SEN0161
*/
#define SensorPin 0 //pH meter Analog output to Arduino Analog Input 0
#define Offset 0.00 //deviation compensate
unsigned long int avgValue; //Store the average value of the sensor feedback
void setup()
{
pinMode(13,OUTPUT);
Serial.begin(9600);
Serial.println("Ready"); //Test the serial monitor
}
void loop()
{
int buf[10]; //buffer for read analog
for(int i=0;i<10;i++) //Get 10 sample value from the sensor for smooth the value
{
buf[i]=analogRead(SensorPin);
delay(10);
}
for(int i=0;i<9;i++) //sort the analog from small to large
{
for(int j=i+1;j<10;j++)
{
if(buf[i]>buf[j])
{
int temp=buf[i];
buf[i]=buf[j];
buf[j]=temp;
}
}
}
avgValue=0;
for(int i=2;i<8;i++) //take the average value of 6 center sample
avgValue+=buf[i];
float phValue=(float)avgValue*5.0/1024/6; //convert the analog into millivolt
phValue=3.5*phValue+Offset; //convert the millivolt into pH value
Serial.print(" pH:");
Serial.print(phValue,2);
Serial.println(" ");
digitalWrite(13, HIGH);
delay(800);
digitalWrite(13, LOW);
}
```
*


- IoT 传感器
- 气体传感器系列
- 烟雾传感器 QT-MQ-2
- 有毒气体传感器 QT-MQ-135
- 气体酒精传感器 QT-MQ-3
- 氢气传感器 QT-MQ-8
- 超声波测距传感器 CSB-A1
- 继电器 JDQ-A1
- 温湿度传感器 WSD-A1
- 液体温度传感器 YTWD-A1
- 人体红外传感器 RTHW-A1
- 蜂鸣器 FMQ-A1
- 声音传感器 SY-A1
- 触摸按钮 CM-A1
- 土壤湿度传感器 TRSD-A1
- 雨滴传感器 YD-A1
- 光照强度传感器 GZ-A1
- 压力传感器 YL-A1
- 震动传感器 ZD-A1
- 磁感应传感器 CGY-A1
- PH值传感器 PH-A1
- 浑浊度传感器 HZD-A1
- 火焰传感器 HY-A1
- 土壤碳磷钾传感器 TRTLJ-A1
- IoT 云模组
- ZigBee 系列模组
- ZB1-TI-CC2530F256-PCB 模组规格说明书
- 主要特性
- 应用领域
- 主控芯片简介
- 模组尺寸与引脚定义
- 电器参数
- 射频参数
- 天线参数
- 封装及生产指导
- ZB-TI-CC2530F256-IPX模组规格说明书
- ZB-Silicon-31 模组规格说明书
- ZB-Silicon-32 模组规格说明书
- ZB-Silicon-33 模组规格说明书
- ZB-Silicon-34 模组规格说明书
- 蓝牙Mesh 系列模组
- CAT1 系列模组
- NB-IoT 系列模组
- WiFi 系列模组
- GPRS 系列模组
- Sub-G 系列模组
- 蓝牙 BLE 系列模组
- WiFi & 蓝牙 BLE 双模系列模组
- 商务合作
