#### 第4章:
#### jQuery
jQuery 是一个 JavaScript 库。jQuery 很容易学习。
#### 4.1 jQuery 安装
* 从 jquery.com下载 jQuery 库
~~~
<head>
<script src="jquery-1.10.2.min.js"></script>
</head>
~~~
* 从 CDN 中载入 jQuery, 如从 Google 中加载 jQuery
~~~
<head>
<script src="https://cdn.staticfile.org/jquery/1.10.2/jquery.min.js">
</script>
</head>
~~~
#### 4.2 jQuery 语法
基础语法: **$(selector).action()**
* 美元符号定义 jQuery
* 选择符(selector)"查询"和"查找" HTML 元素
* jQuery 的 action() 执行对元素的操作
实例:
* $(this).hide() - 隐藏当前元素
* $("p").hide() - 隐藏所有 元素
* $("p.test").hide() - 隐藏所有 class="test" 的 元素
* $("#test").hide() - 隐藏 id="test" 的元素
~~~
<!DOCTYPE html>
<html>
<head>
<meta http-equiv="Content-Type" content="text/html; charset=utf-8">
<script src="https://cdn.staticfile.org/jquery/1.10.2/jquery.min.js">
</script>
<script>
$(document).ready(function(){
$("p").hide();
})
</script>
</head>
<body>
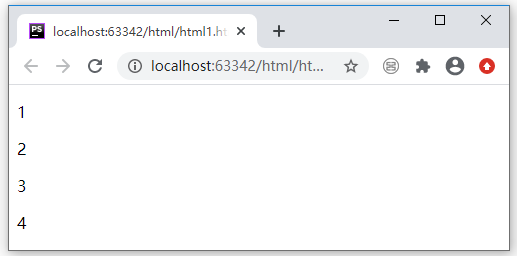
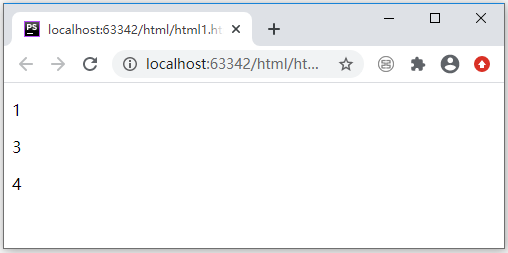
<p>1</p>
<p>2</p>
<p>3</p>
<p>4</p>
</body>
</html>
~~~
:-: 
通过`$("p").hide()`使所有的标签元素被隐藏了。
##### 文档就绪事件
防止文档在完全加载(就绪)之前运行 jQuery 代码,即在 DOM 加载完成后才可以对 DOM 进行操作。
~~~
$(document).ready(function(){
// 执行代码
});
或者
$(function(){
// 执行代码
});
~~~
JavaScript 入口函数:
~~~
window.onload = function () {
// 执行代码
}
~~~
jQuery 入口函数与 JavaScript 入口函数的区别:
* jQuery 的入口函数是在 html 所有标签(DOM)都加载之后,就会去执行。
* JavaScript 的 window.onload 事件是等到所有内容,包括外部图片之类的文件加载完后,才会执行。
#### 4.3 jQuery 选择器
#id 选择器
~~~
$(document).ready(function(){
$("button").click(function(){
$("#test").hide();
});
});
~~~
.class 选择器
~~~
$(document).ready(function(){
$("button").click(function(){
$(".test").hide();
});
});
~~~
| 语法 | 描述 |
| --- | --- |
| $("\*") | 选取所有元素 |
| $(this) | 选取当前 HTML 元素 |
| $("p.intro") | 选取 class 为 intro 的 元素 |
| $("p:first") | 选取第一个 元素 |
| $("ul li:first") | 选取第一个 元素的第一个 元素 |
| $("ul li:first-child") | 选取每个 元素的第一个 元素 |
| $("\[href\]") | 选取带有 href 属性的元素 |
| $("a\[target='\_blank'\]") | 选取所有 target 属性值等于 "\_blank" 的 元素 |
| $("a\[target!='\_blank'\]") | 选取所有 target 属性值不等于 "\_blank" 的 元素 |
| $(":button") | 选取所有 type="button" 的 元素 和 元素 |
| $("tr:even") | 选取偶数位置的 元素 |
| $("tr:odd") | 选取奇数位置的 元素 |
#### 4.4 jQuery 事件
| 鼠标事件 | 键盘事件 | 表单事件 | 文档/窗口事件 |
| --- | --- | --- | --- |
| click | keypress | submit | load |
| dblclick | keydown | change | resize |
| mouseenter | keyup | focus | scroll |
| mouseleave | | blur | unload |
| hover | | | |
##### click()
click() 方法是当按钮点击事件被触发时会调用一个函数。
~~~
$("p").click(function(){
// 动作触发后执行的代码!!
});
~~~
##### dblclick()
当双击元素时,会发生 dblclick 事件。
~~~
$("p").dblclick(function(){
$(this).hide();
});
~~~
例子:
~~~
<!DOCTYPE html>
<html>
<head>
<meta http-equiv="Content-Type" content="text/html; charset=utf-8">
<script src="https://cdn.staticfile.org/jquery/1.10.2/jquery.min.js">
</script>
<script>
$(document).ready(function(){
$("p").dblclick(function(){
$(this).hide();
});
})
</script>
</head>
<body>
<p>1</p>
<p>2</p>
<p>3</p>
<p>4</p>
</body>
</html>
~~~
:-: 
:-:
:-: 
我们为所有`<p>`标签元素添加了双击事件。所以当我双击2时,2所在的`<p>`元素被隐藏了。如果双击1、3、4它们同样也会被隐藏。
##### mouseenter()
当鼠标指针穿过元素时,会发生 mouseenter 事件。
~~~
$("#p1").mouseenter(function(){
alert('您的鼠标移到了 id="p1" 的元素上!');
});
~~~
##### mouseleave()
当鼠标指针离开元素时,会发生 mouseleave 事件。
mouseleave() 方法触发 mouseleave 事件,或规定当发生 mouseleave 事件时运行的函数:
~~~
$("#p1").mouseleave(function(){
alert("再见,您的鼠标离开了该段落。");
});
~~~
##### mousedown()
当鼠标指针移动到元素上方,并按下鼠标按键时,会发生 mousedown 事件。
~~~
$("#p1").mousedown(function(){
alert("鼠标在该段落上按下!");
});
~~~
##### mouseup()
当在元素上松开鼠标按钮时,会发生 mouseup 事件。
~~~
$("#p1").mouseup(function(){
alert("鼠标在段落上松开。");
});
~~~
##### hover()
hover()方法用于模拟光标悬停事件。
~~~
$("#p1").hover(
function(){
alert("你进入了 p1!");
},
function(){
alert("拜拜! 现在你离开了 p1!");
}
);
~~~
##### focus()
当元素获得焦点时,发生 focus 事件。
~~~
$("input").focus(function(){
$(this).css("background-color","#cccccc");
});
~~~
##### blur()
当元素失去焦点时,发生 blur 事件。
~~~
$("input").blur(function(){
$(this).css("background-color","#ffffff");
});
~~~
#### 3.5 jQuery方法
##### 3.5.1 常用方法
##### hide() 和 show()
~~~
$("#hide").click(function(){
$("p").hide();
});
$("#show").click(function(){
$("p").show();
});
~~~
可选的 speed 参数规定隐藏/显示的速度,可以取以下值:"slow"、"fast" 或毫秒。
可选的 callback 参数是隐藏或显示完成后所执行的函数名称。
~~~
$("button").click(function(){
$("p").hide(1000,function(){
alert("hide 已完成");
});
});
~~~
toggle() 方法来切换 hide() 和 show() 方法。
~~~
$("button").click(function(){
$("p").toggle();
});
~~~
##### 淡入淡出
* fadeIn()
* fadeOut()
* fadeToggle()
* fadeTo()
fadeIn() 用于淡入已隐藏的元素。
~~~
$("button").click(function(){
$("#div1").fadeIn();
$("#div2").fadeIn("slow");
$("#div3").fadeIn(3000);
});
~~~
fadeOut() 方法用于淡出可见元素。
~~~
$("button").click(function(){
$("#div1").fadeOut();
$("#div2").fadeOut("slow");
$("#div3").fadeOut(3000);
});
~~~
fadeToggle() 方法可以在 fadeIn() 与 fadeOut() 方法之间进行切换。
~~~
$("button").click(function(){
$("#div1").fadeToggle();
$("#div2").fadeToggle("slow");
$("#div3").fadeToggle(3000);
});
~~~
fadeTo() 方法允许渐变为给定的不透明度(值介于 0 与 1 之间)。
~~~
$("button").click(function(){
$("#div1").fadeTo("slow",0.15);
$("#div2").fadeTo("slow",0.4);
$("#div3").fadeTo("slow",0.7);
});
~~~
##### 滑动方法
slideDown() 方法用于向下滑动元素。
~~~
$("#flip").click(function(){
$("#panel").slideDown();
});
~~~
slideUp() 方法用于向上滑动元素。
~~~
$("#flip").click(function(){
$("#panel").slideUp();
});
~~~
slideToggle() 方法可以在 slideDown() 与 slideUp() 方法之间进行切换。
~~~
$("#flip").click(function(){
$("#panel").slideToggle();
});
~~~
##### 动画 - animate()
~~~
$("button").click(function(){
$("div").animate({left:'250px'});
});
~~~
操作多个属性
~~~
$("button").click(function(){
$("div").animate({
left:'250px',
opacity:'0.5',
height:'150px',
width:'150px'
});
});
~~~
操作相对值
~~~
$("button").click(function(){
$("div").animate({
left:'250px',
height:'+=150px',
width:'+=150px'
});
});
~~~
动画属性设置为预定义值"show"、"hide" 或 "toggle"
~~~
$("button").click(function(){
$("div").animate({
height:'toggle'
});
});
~~~
动画效果队列
~~~
$("button").click(function(){
var div=$("div");
div.animate({height:'300px',opacity:'0.4'},"slow");
div.animate({width:'300px',opacity:'0.8'},"slow");
div.animate({height:'100px',opacity:'0.4'},"slow");
div.animate({width:'100px',opacity:'0.8'},"slow");
});
~~~
##### 停止动画
stop用于停止
~~~
$("#stop").click(function(){
$("#panel").stop();
});
~~~
##### 动画回调
~~~
$("button").click(function(){
$("p").hide("slow",function(){
alert("段落现在被隐藏了");
});
});
~~~
##### 3.5.1 jQuery 链式方法
允许我们在相同的元素上运行多条 jQuery 命令,一条接着另一条.
~~~
$("#p1").css("color","red").slideUp(2000).slideDown(2000);
~~~
~~~
$("#p1").css("color","red")
.slideUp(2000)
.slideDown(2000);
~~~
#### 3.6 获取/设置内容和属性
##### 获得内容-text()、html() 以及 val()
~~~
$("#btn1").click(function(){
alert("Text: " + $("#test").text());
});
$("#btn2").click(function(){
alert("HTML: " + $("#test").html());
});
$("#btn1").click(function(){
alert("值为: " + $("#test").val());
});
~~~
##### 设置内容 - text()、html() 以及 val()
~~~
$("#btn1").click(function(){
$("#test1").text("Hello world!");
});
$("#btn2").click(function(){
$("#test2").html("<b>Hello world!</b>");
});
$("#btn3").click(function(){
$("#test3").val("RUNOOB");
});
~~~
text()、html() 以及 val() 的回调函数
~~~
$("#btn1").click(function(){
$("#test1").text(function(i,origText){
return "旧文本: " + origText + " 新文本: Hello world! (index: " + i + ")";
});
});
$("#btn2").click(function(){
$("#test2").html(function(i,origText){
return "旧 html: " + origText + " 新 html: Hello <b>world!</b> (index: " + i + ")";
});
});
~~~
##### 获取/设置属性 - attr()
~~~
$("button").click(function(){
alert($("#runoob").attr("href"));
});
~~~
attr() 方法也用于设置/改变属性值。
~~~
$("button").click(function(){
$("#runoob").attr("href","http://www.runoob.com/jquery");
});
~~~
arrt()的回调函数
~~~
$("button").click(function(){
$("#runoob").attr("href", function(i,origValue){
return origValue + "/jquery";
});
});
~~~
##### 添加元素
append() 方法在被选元素的结尾插入内容(仍然在该元素的内部)
~~~
$("p").append("追加文本");
~~~
prepend() 方法在被选元素的开头插入内容
~~~
$("p").prepend("在开头追加文本");
~~~
append() 和 prepend() 方法添加若干新元素
~~~
function appendText(){
var txt1="<p>文本-1。</p>"; // 使用 HTML 标签创建文本
var txt2=$("<p></p>").text("文本-2。"); // 使用 jQuery 创建文本
var txt3=document.createElement("p");
txt3.innerHTML="文本-3。"; // 使用 DOM 创建文本 text with DOM
$("body").append(txt1,txt2,txt3); // 追加新元素
}
~~~
##### after() 和 before() 方法
jQuery after() 方法在被选元素之后插入内容。
jQuery before() 方法在被选元素之前插入内容。
~~~
$("img").after("在后面添加文本");
$("img").before("在前面添加文本");
~~~
##### after() 和 before() 方法添加若干新元素
~~~
function afterText()
{
var txt1="<b>I </b>"; // 使用 HTML 创建元素
var txt2=$("<i></i>").text("love "); // 使用 jQuery 创建元素
var txt3=document.createElement("big"); // 使用 DOM 创建元素
txt3.innerHTML="jQuery!";
$("img").after(txt1,txt2,txt3); // 在图片后添加文本
}
~~~
##### 删除元素/内容
如需删除元素和内容,一般可使用以下两个 jQuery 方法:
* remove() - 删除被选元素(及其子元素)
~~~
$("#div1").remove();
$("p").remove(".italic"); 删除.italic类的p元素
~~~
* empty() - 从被选元素中删除子元素
~~~
$("#div1").empty();
~~~
##### 获取并设置 CSS 类
* addClass() - 向被选元素添加一个或多个类
* removeClass() - 从被选元素删除一个或多个类
* toggleClass() - 对被选元素进行添加/删除类的切换操作
* css() - 设置或返回样式属性
~~~
.important
{
font-weight:bold;
font-size:xx-large;
}
.blue
{
color:blue;
}
~~~
##### addClass() 方法
~~~
$("button").click(function(){
$("h1,h2,p").addClass("blue");
$("div").addClass("important");
});
//规定多个类
$("button").click(function(){
$("body div:first").addClass("important blue");
});
~~~
##### removeClass() 方法
~~~
$("button").click(function(){
$("h1,h2,p").removeClass("blue");
});
~~~
##### toggleClass() 方法。该方法对被选元素进行添加/删除类的切换操作
~~~
$("button").click(function(){
$("h1,h2,p").toggleClass("blue");
});
~~~
#### css() 方法
##### 返回 CSS 属性
~~~
$("p").css("background-color");
~~~
##### 设置 CSS 属性
~~~
$("p").css("background-color","yellow");
~~~
##### 设置多个 CSS 属性
~~~
$("p").css({"background-color":"yellow","font-size":"200%"});
~~~
#### 尺寸
* width()(返回元素宽度,不包括边框和内边距)
* height() (返回元素高度,不包括边框和内边距)
* innerWidth() (返回元素宽度,包括内边距)
* innerHeight() (返回元素高度,包括内边距)
* outerWidth() (返回元素宽度,包括边框和内边距)
* outerHeight() (返回元素高度,包括边框和内边距)

#### 3.7 jquery遍历
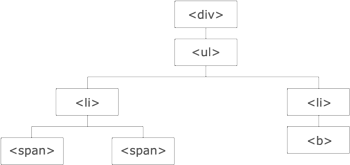
图示解析:
* `<div>` 元素是 `<ul>` 的父元素,同时是其中所有内容的祖先。
* `<ul>` 元素是 `<li>` 元素的父元素,同时是 `<div>` 的子元素
* 左边的 `<li>` 元素是 `<span>` 的父元素,`<ul>` 的子元素,同时是 `<div>` 的后代。
* `<span>` 元素是 `<li>`的子元素,同时是 `<ul>` 和 `<div>` 的后代。
* 两个 `<li>`元素是同胞(拥有相同的父元素)。
* 右边的 `<li>` 元素是`<b>` 的父元素,`<ul>` 的子元素,同时是 `<div>`的后代。
* `<b>` 元素是右边的`<li>` 的子元素,同时是`<ul>`和 `<div>`的后代。
##### 向上遍历 DOM 树
parent() 方法返回被选元素的直接父元素。
~~~
$(document).ready(function(){
$("span").parent();
});
~~~
parents() 方法返回被选元素的所有祖先元素
~~~
$(document).ready(function(){
$("span").parents();
});
~~~
parentsUntil() 方法返回介于两个给定元素之间的所有祖先元素
~~~
$(document).ready(function(){
$("span").parentsUntil("div");
});
//返回介于span和div之间的祖先元素
~~~
##### 向下遍历 DOM 树
children() 方法返回被选元素的所有直接子元素。
~~~
$(document).ready(function(){
$("div").children();
});
~~~
find() 方法返回被选元素的后代元素,一路向下直到最后一个后代。
~~~
$(document).ready(function(){
$("div").find("span");
});
~~~
##### 在 DOM 树中水平遍历
siblings() 方法返回被选元素的所有同胞元素。
~~~
$(document).ready(function(){
$("h2").siblings();
});
~~~
next() 方法返回被选元素的下一个同胞元素。
~~~
$(document).ready(function(){
$("h2").next();
});
~~~
nextAll() 方法返回被选元素的所有跟随的同胞元素。
~~~
$(document).ready(function(){
$("h2").nextAll();
});
~~~
nextUntil() 方法返回介于两个给定参数之间的所有跟随的同胞元素。
~~~
$(document).ready(function(){
$("h2").nextUntil("h6");
});
~~~
##### 缩小搜索元素的范围
first() 方法返回被选元素的首个元素。
~~~
$(document).ready(function(){
$("div p").first();
});
~~~
last() 方法返回被选元素的最后一个元素。
~~~
$(document).ready(function(){
$("div p").last();
});
~~~
eq() 方法返回被选元素中带有指定索引号的元素。
~~~
$(document).ready(function(){
$("p").eq(1); //选取第二个p元素,下标从0开始
});
~~~
filter() 方法允许您规定一个标准。不匹配这个标准的元素会被从集合中删除,匹配的元素会被返回。
~~~
$(document).ready(function(){
$("p").filter(".url");
});
~~~
not() 方法返回不匹配标准的所有元素。
提示:not() 方法与 filter() 相反。
~~~
$(document).ready(function(){
$("p").not(".url");
});
~~~
#### 3.8 Jquery-AJAX
load() 方法从服务器加载数据,并把返回的数据放入被选元素中。
~~~
$("#div1").load("demo_test.txt");
$("#div1").load("demo_test.txt #p1");// 把demo_test.txt 中p1指定到div中去
~~~
这是示例文件("demo\_test.txt")的内容:
~~~
<h2>jQuery AJAX 是个非常棒的功能!</h2>
<p id="p1">这是段落的一些文本。</p>
~~~
可选的 callback 参数规定当 load() 方法完成后所要允许的回调函数。回调函数可以设置不同的参数:
* *responseTxt* - 包含调用成功时的结果内容
* *statusTXT* - 包含调用的状态
* *xhr* - 包含 XMLHttpRequest 对象
~~~
$("button").click(function(){
$("#div1").load("demo_test.txt",function(responseTxt,statusTxt,xhr){
if(statusTxt=="success")
alert("外部内容加载成功!");
if(statusTxt=="error")
alert("Error: "+xhr.status+": "+xhr.statusText);
});
});
~~~
##### AJAX get() 和 post() 方法
$.get() 方法通过 HTTP GET 请求从服务器上请求数据。
~~~
$("button").click(function(){
$.get("demo_test.php",function(data,status){
alert("数据: " + data + "\n状态: " + status);
});
});
~~~
$.post() 方法通过 HTTP POST 请求向服务器提交数据。
~~~
$("button").click(function(){
$.post("/try/ajax/demo_test_post.php",
{
name:"spring",
url:"http://www.xxx.com"
},
function(data,status){
alert("数据: \n" + data + "\n状态: " + status);
});
});
~~~
* *data* - 包含来自请求的结果数据
* *status* - 包含请求的状态("success"、"notmodified"、"error"、"timeout"、"parsererror")
* *xhr* - 包含 XMLHttpRequest 对象
| 方法 | 描述 |
| --- | --- |
| $.ajax() | 执行异步 AJAX 请求 |
| $.ajaxPrefilter() | 在每个请求发送之前且被 $.ajax() 处理之前,处理自定义 Ajax 选项或修改已存在选项 |
| $.ajaxSetup() | 为将来的 AJAX 请求设置默认值 |
| $.ajaxTransport() | 创建处理 Ajax 数据实际传送的对象 |
| $.get() | 使用 AJAX 的 HTTP GET 请求从服务器加载数据 |
| $.getJSON() | 使用 HTTP GET 请求从服务器加载 JSON 编码的数据 |
| $.getScript() | 使用 AJAX 的 HTTP GET 请求从服务器加载并执行 JavaScript |
| $.param() | 创建数组或对象的序列化表示形式(可用于 AJAX 请求的 URL 查询字符串) |
| $.post() | 使用 AJAX 的 HTTP POST 请求从服务器加载数据 |
| ajaxComplete() | 规定 AJAX 请求完成时运行的函数 |
| ajaxError() | 规定 AJAX 请求失败时运行的函数 |
| ajaxSend() | 规定 AJAX 请求发送之前运行的函数 |
| ajaxStart() | 规定第一个 AJAX 请求开始时运行的函数 |
| ajaxStop() | 规定所有的 AJAX 请求完成时运行的函数 |
| ajaxSuccess() | 规定 AJAX 请求成功完成时运行的函数 |
| load() | 从服务器加载数据,并把返回的数据放置到指定的元素中 |
| serialize() | 编码表单元素集为字符串以便提交 |
| serializeArray() | 编码表单元素集为 names 和 values 的数组 |
标准ajax写法:
~~~
$.ajax({
url:url, //地址
type:'post', //请求方式 还可以是get
dataType:'html', //返回格式 ,还可以是json
async:false, //同步异步 ,一般为异步flase
data:{"id":"value"}, //参数值
beforesend:function(){ // 请求前的处理
},
success:function(){ //请求成功时的处理
},
complete:function(){ //请求完成时的处理
},
error:function(){ //请求出错误时的处理
}
});
~~~