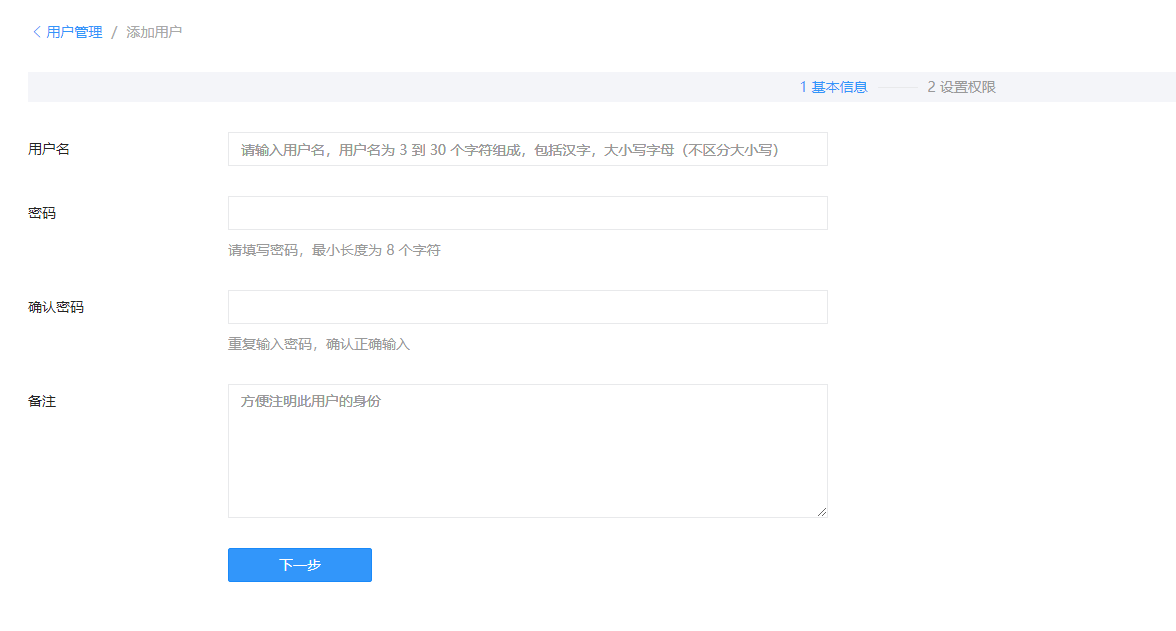
1、进入超管后台,选择“用户管理”,点击“添加用户”,根据提示内容进行填写,!!!注意附加应用和附加天数的设置


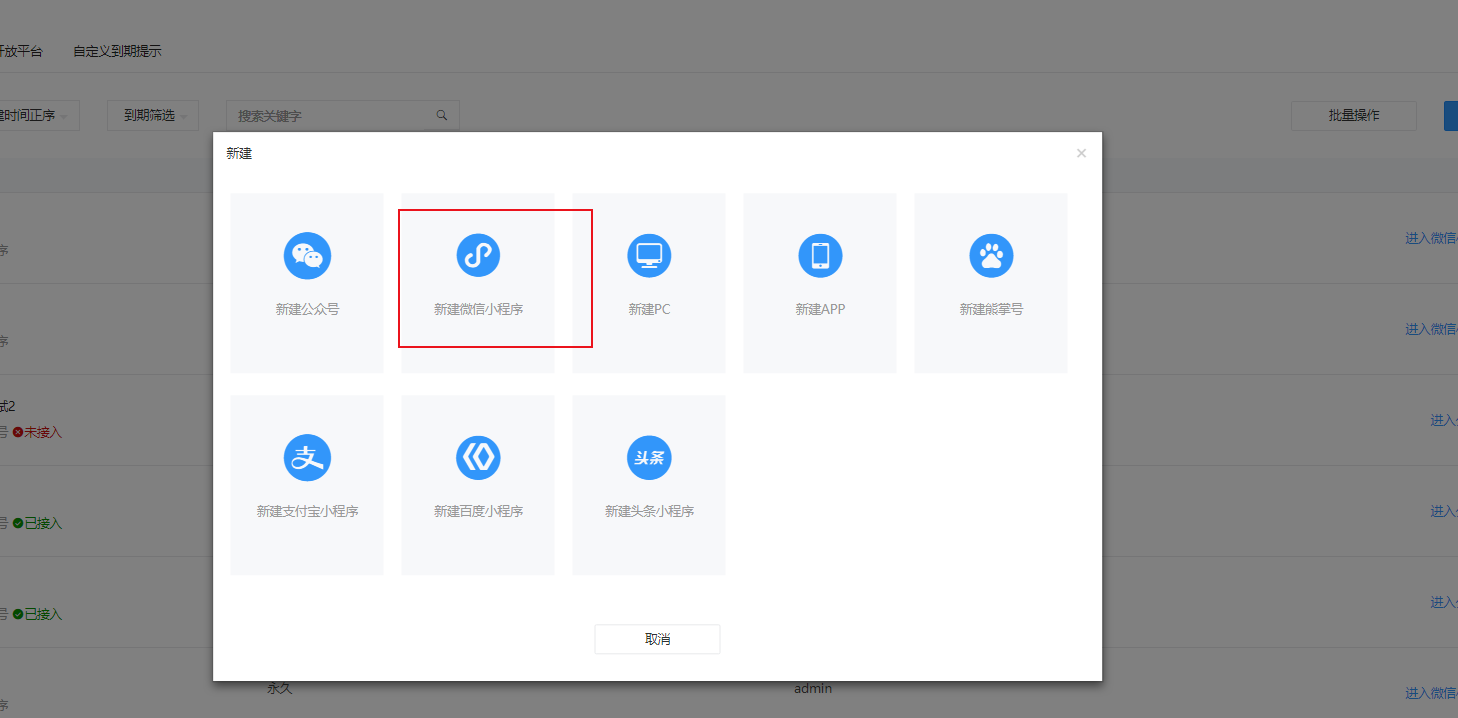
2、选择“平台管理”,点击“添加平台”,根据提示内容进行填写,!!!原始id,appid,appSecret可以不用填写。



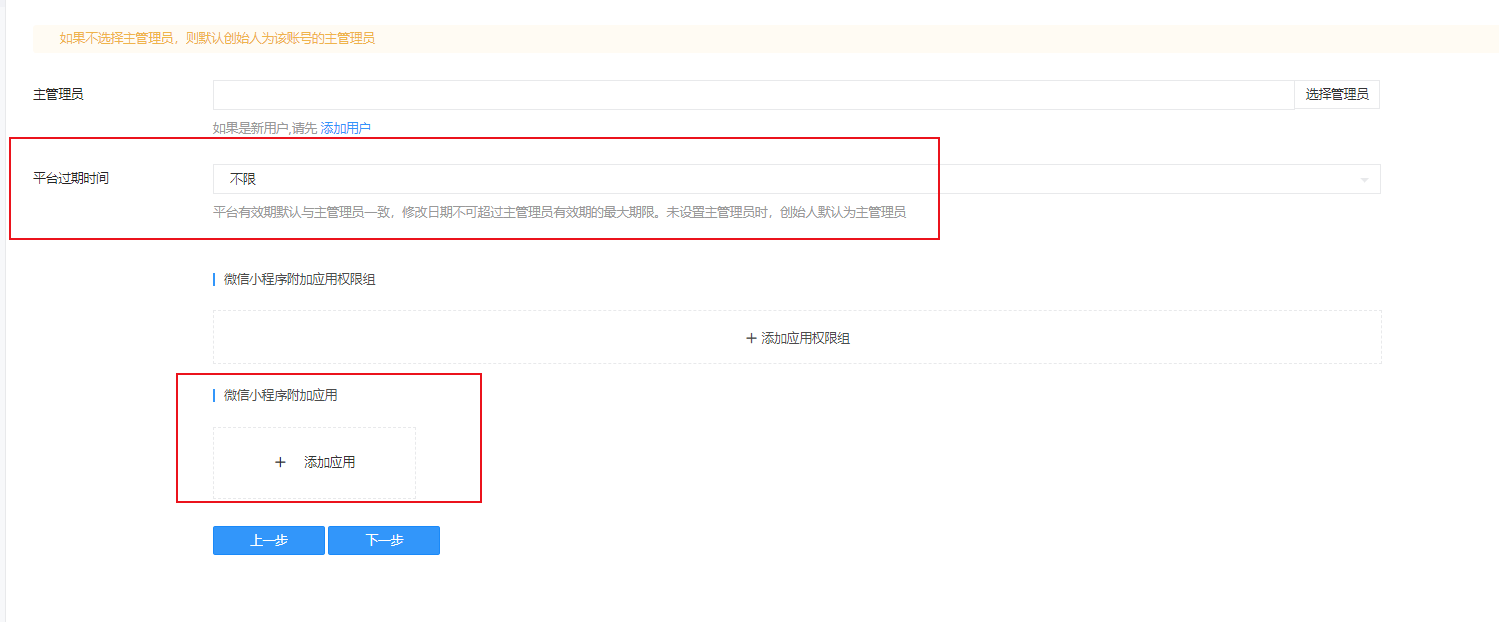
注意!!!!!!一定要添加对应的应用
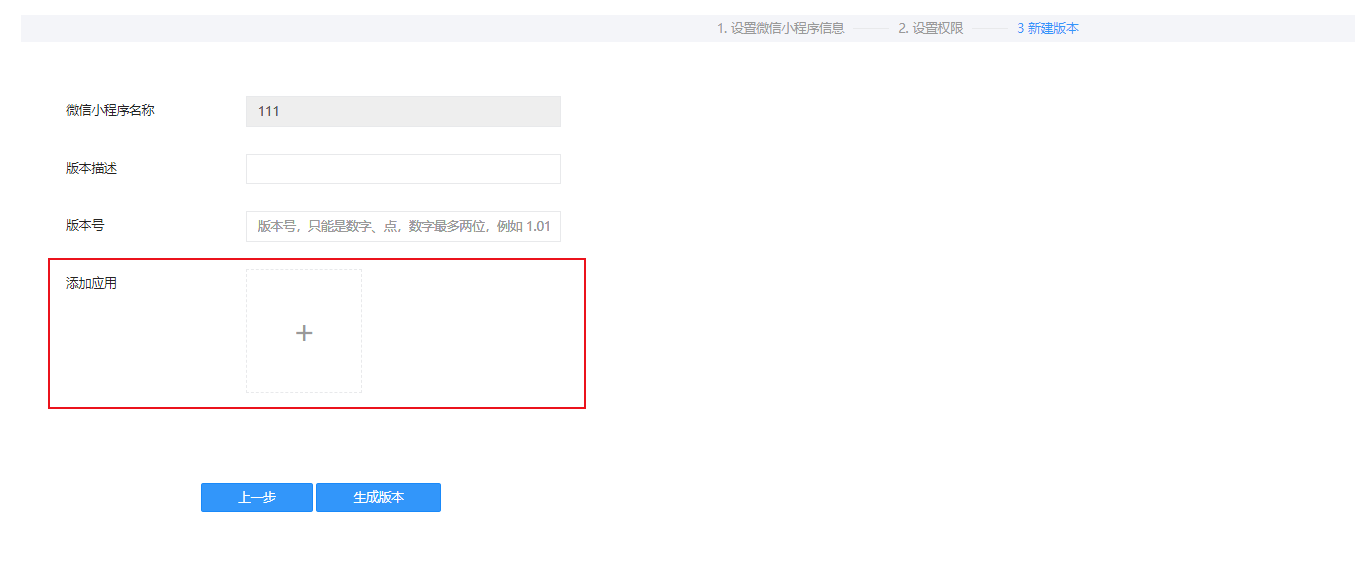
3、进入添加好的平台,点击“系统”——“权限管理”——“用户组”——“添加对应的权限组”。
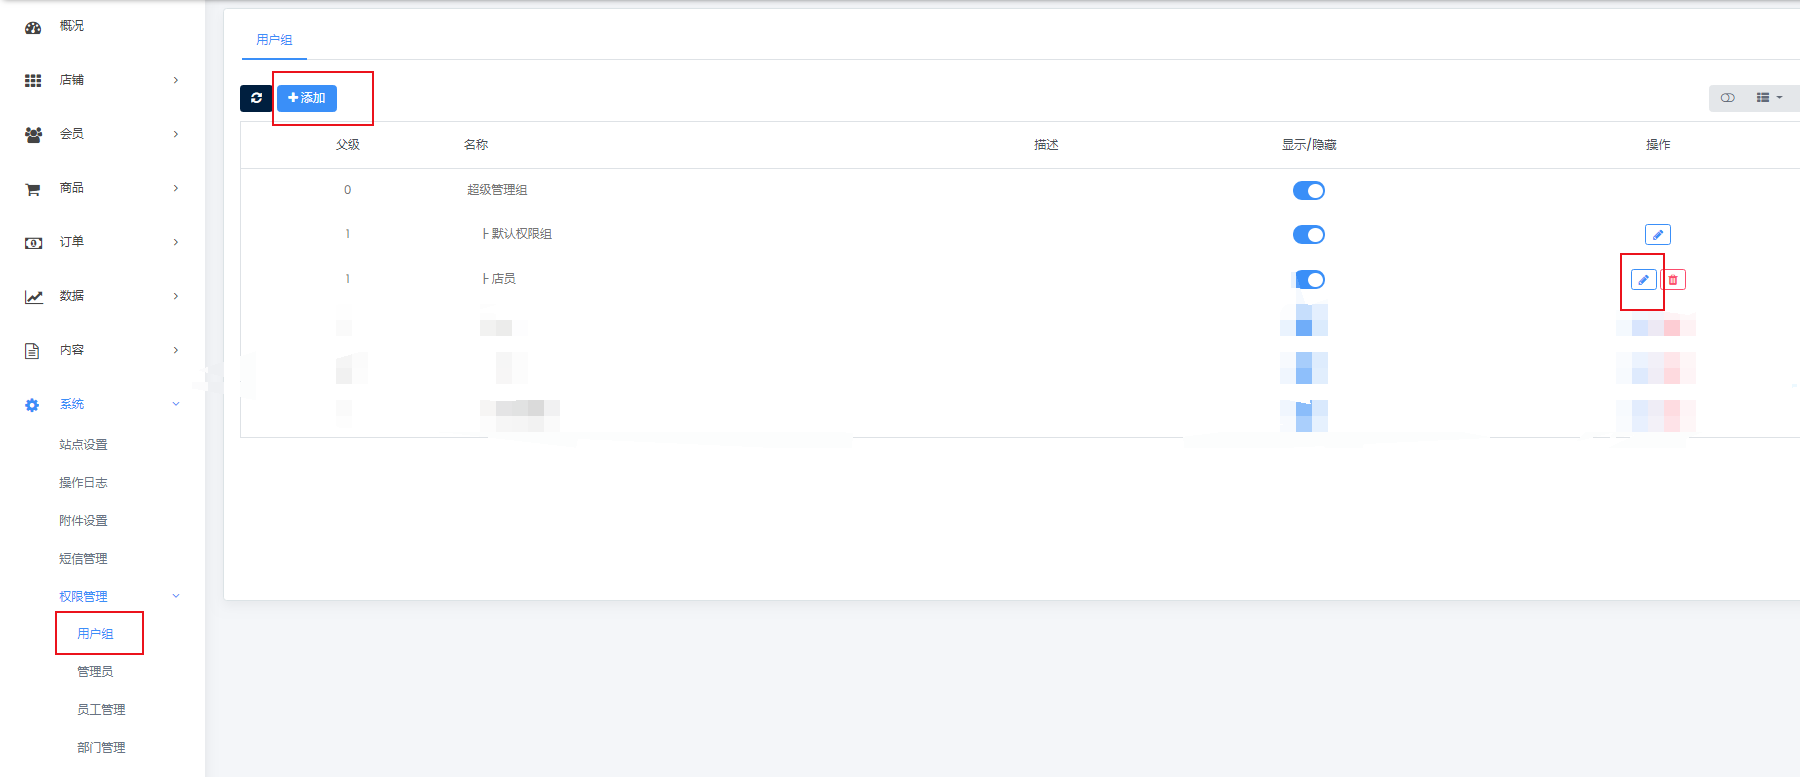
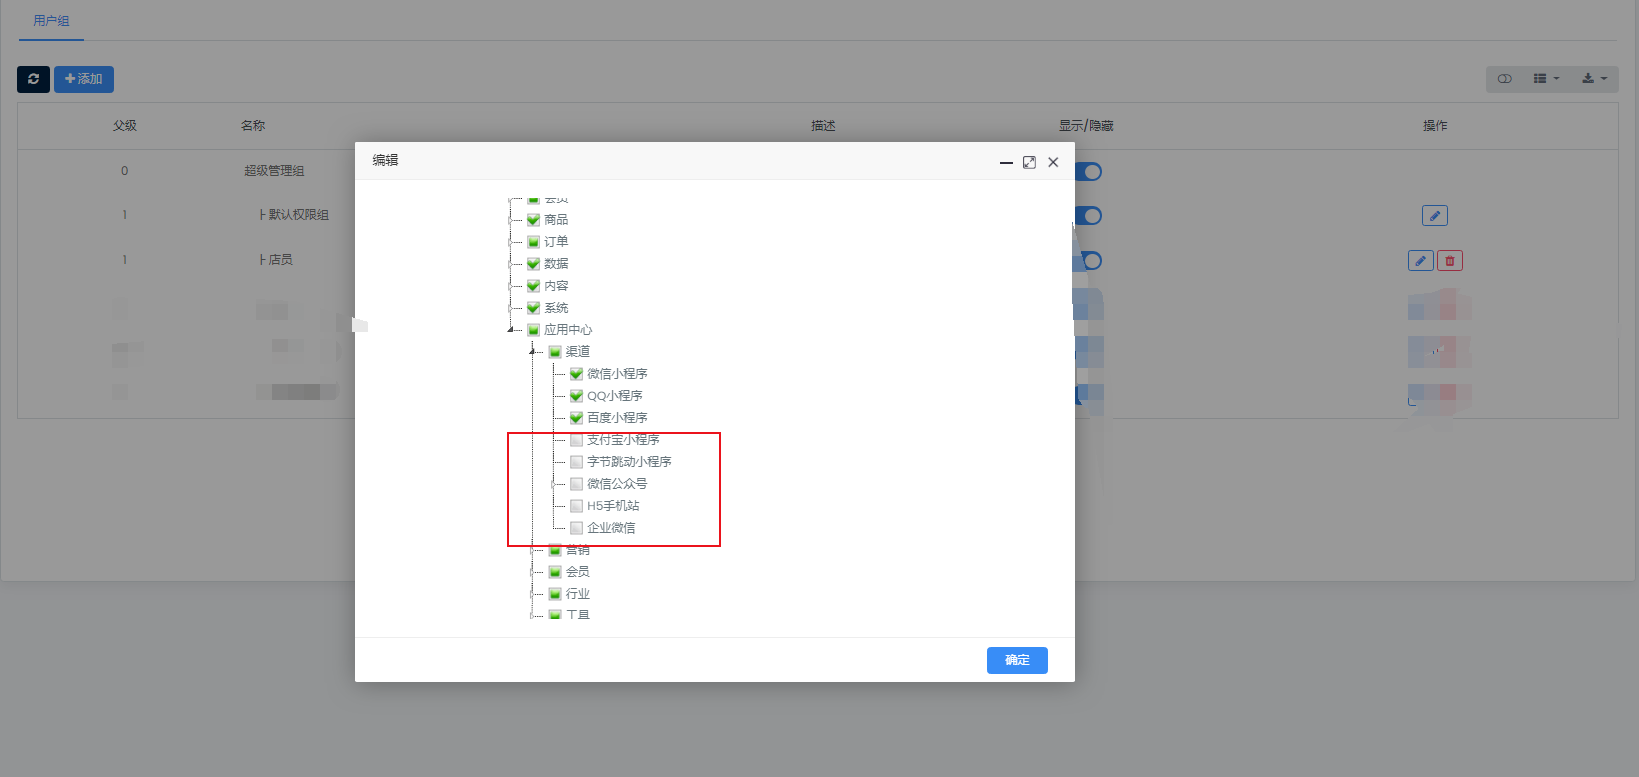
4、点击“系统”——“权限管理”——“管理员”——“点击编辑”。修改所属组别,选择添加的权限组。
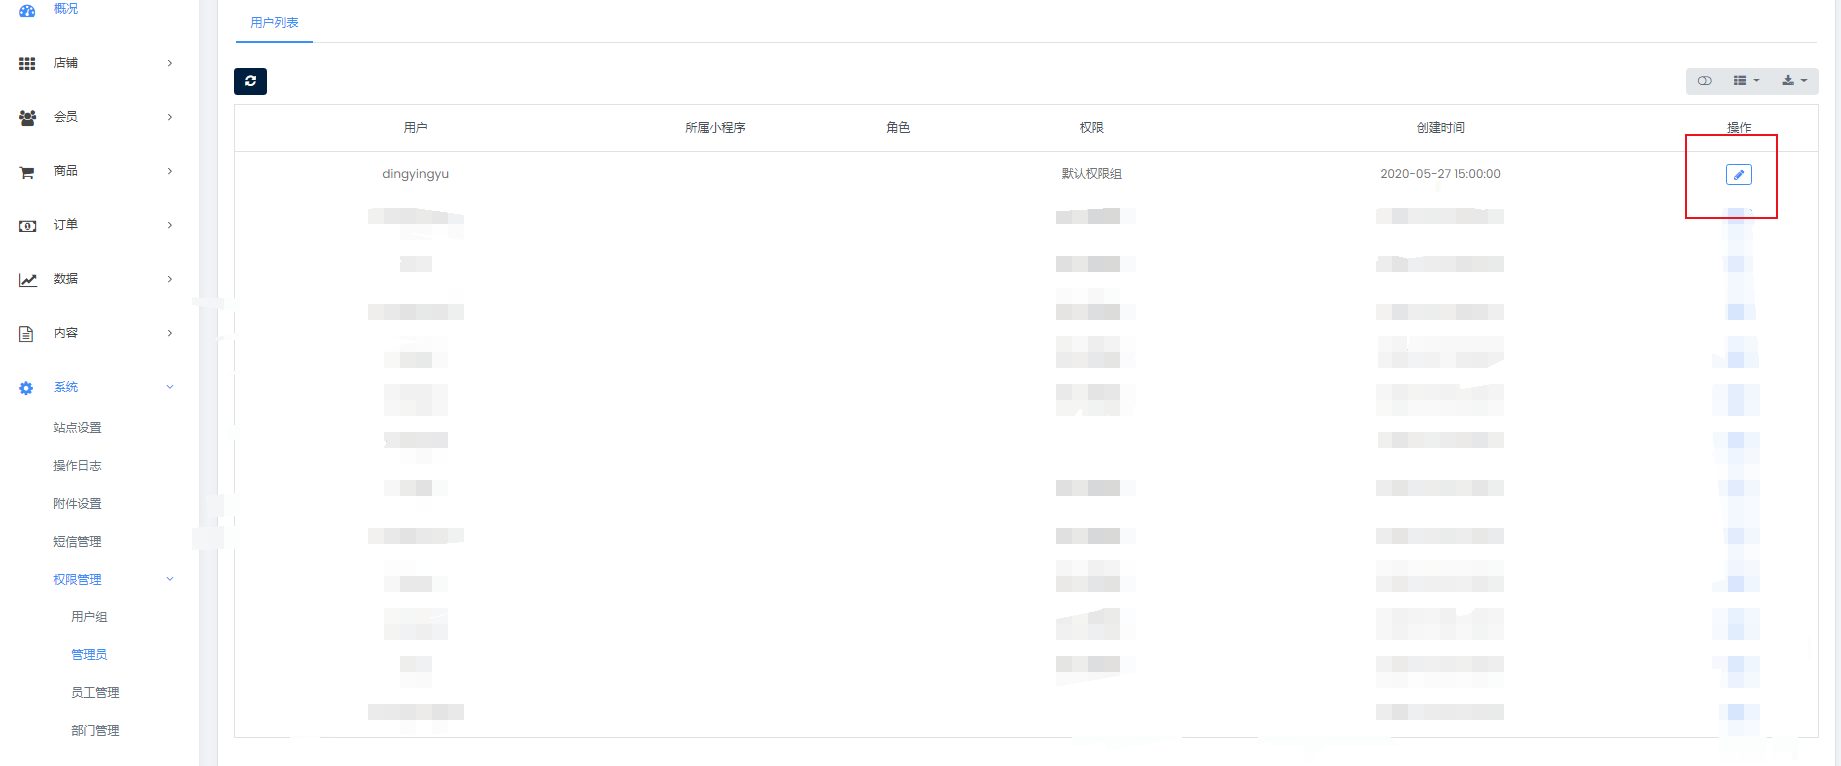


5、打开另外一个浏览器,登录用户后台,查看权限

6、在超管后台,应用中心——平台管理——应用管理——插件显示列表,可以设置没有权限的插件是否显示隐藏。


- 壹佰智慧门店系统说明
- 推荐服务器配置
- 小程序提交审核注意事项
- 字节跳动小程序提交审核注意事项
- 功能说明
- 一、平台管理及小程序信息配置
- 支付宝小程序相关
- 支付宝小程序入驻
- 如何配置支付宝小程序
- 上传小程序提交审核
- 支付宝添加能力
- 创建并关联生活号
- 百度小程序相关
- 申请百度小程序
- 百度小程序对接配置
- 百度小程序上传及预览
- 百度支付配置
- 微信公众号相关
- 如何配置公众号
- 公众号页面打开时提示404
- 配置公众号支付
- 常见报错问题
- 微信公众号端模板消息配置流程
- 如何配置抖音、头条小程序
- 注册账号
- 创建小程序
- 如何配置字节跳动小程序
- 上传小程序
- 小程序提交审核
- 发布小程序
- 申请字节跳动支付功能
- 配置支付宝支付信息
- 配置微信支付
- 抖音视频如何挂载小程序
- 担保支付配置
- 添加抖音小程序开发者流程
- 抖音小程序审核攻略
- 微信小程序相关
- 配置微信小程序
- 微信小程序上传及提交审核
- 微信支付配置
- 小程序订阅消息配置
- 配置微信自动退款
- 证书序列号哪里看
- 下载微信支付平台证书
- 公众号后台快速注册小程序
- QQ小程序相关
- 注册开发者平台
- 在开发者平台创建小程序
- QQ小程序配置
- QQ小程序上传及提交审核
- QQ支付配置
- 微信支付接入
- 企业微信相关
- 企业微信申请
- 企业微信配置
- 企业微信支付配置
- 企业微信功能升级
- H5手机站
- 微信支付相关
- 支付宝支付
- 如何申请H5支付
- 快手小程序相关
- 注册开发平台
- 创建小程序完善基础信息
- 配置快手小程序
- 小程序提交审核
- 快手小程序支付配置
- 二、应用功能介绍
- 1、概况
- 2、店铺
- 2、1我的模板
- 站点设计
- 1、组件
- 1.1、常用模块
- 1.2、商城模块
- 1.3、内容模块
- 1.4、高级模块
- 2、页面
- 3、属性
- 如何设置小程序背景音乐
- 如何使用模板库中的模板
- 商品分类页面风格展示
- 魔方导航设置链接到商品分类
- 侧停组件介绍
- 选项卡组件
- 2.2、店铺设置
- 2.3、配送设置
- 2.4、基础设置
- 首页副标题哪里显示
- 列表导航
- 3、会员
- 3.1、会员列表
- 3.2、会员等级
- 3.3、会员分组
- 4、商品
- 4.1、商品列表
- 4.2、商品分类
- 4.3、商品规格
- 4.4、商品属性
- 5、订单
- 5.1、订单列表
- 5.2、订单售后
- 5.3、评论管理
- 5.4、电子卡券
- 5.5、核销管理
- 6、数据
- 6.1、商城概况
- 6.2、交易分析
- 6.3、商品分析
- 6.4、网站统计
- 6.5、汇总分析
- 7、内容
- 7.1、文章管理
- 7.2、相册管理
- 7.3、内嵌网页
- 7.4、跳转小程序
- 7.5 banner管理
- 7.6 魔方导航
- 8、系统
- 8.1、站点设置
- 8.2、操作日志
- 8.3、附件设置
- 8.4、短信管理
- 8.5、权限管理
- 8.5.1、用户组
- 8.5.2、用户列表
- 8.5.3、员工管理
- 8.5.4、部门管理
- 9、应用中心
- 9.1、渠道
- 9.1.1、微信小程序
- 9.1.2、QQ小程序
- 9.1.3、百度小程序
- 9.1.4、支付宝小程序
- 9.1.5、字节跳动小程序
- 9.1.6、微信公众号
- 9.1.7、H5手机站
- 9.1.8、企业微信
- 9.1.9、安卓APP打包
- 9.1.10、IOS打包
- 9.1.11、门店PC端
- PC端绑定独立域名
- 门店PC端基本设置
- PC端会员价显示
- pc端支付宝配置
- 9.2、营销
- 9.2.1、优惠券
- 9.2.2、拼团
- 9.2.3、秒杀
- 9.2.4、砍价
- 9.2.5、新客有礼
- 9.2.6、支付有礼
- 9.2.7、分销
- 分销佣金计算
- 分销佣金提现
- 分销商升级的条件
- 分销商申请
- 分销商审核
- 分销设置
- 9.2.8、微信直播
- 开通直播提示“线上未检测到直播组件”
- 9.2.9、短视频
- 9.2.10、兑换码
- 9.2.11截流口令
- 9.2.12超级海报
- 超级海报小程序端哪里展示
- 9.2.13活动海报
- 9.2.14门店佣金
- 9.2.15支付返现
- 9.2.16种草
- 9.2.17曝光台
- 9.2.18、发券助手
- 9.2.19、核销优惠券
- 9.2.20、文章营销
- 9.2.21、股东分红
- 股东分红计算
- 9.2.22、团队分红
- 9.2.23、区域代理
- 9.2.24、开屏广告
- 9.2.25、弹窗广告
- 9.2.26、储值卡
- 9.2.27、流量主
- 9.2.28、扩展链接
- 9.2.29、分享有礼
- 微信外部跳转
- 视频号商城
- 视频号订单退款流程
- 满减活动
- 裂变优惠券
- 会员赠礼
- 砸金蛋
- 会员升级卡
- 文章营销
- 找人代付
- 代理股东
- 摇一摇
- 大转盘
- 翻牌
- 刮刮乐
- 店铺笔记
- 九宫格
- 抢福袋
- 老虎机
- 转增优惠券
- 9.3、会员
- 9.3.1、会员价格
- 如何设置会员价格流程
- 会员价格小程序端不显示
- 规格会员价格
- 9.3.2、积分商城
- 9.3.3、积分规则
- 9.3.4、会员储值
- 9.3.5、会员签到
- 9.3.6、积分提现
- 9.3.7、会员卡
- 会员卡设置参与分销
- 9.3.8 礼品卡
- 礼品卡使用场景
- 9.3.9 核销卡
- 使用场景
- 核销卡如何核销
- 哪里出示核销码
- 9.4、工具
- 9.4.1、一码多端
- 9.4.2、服务商支付
- 9.4.3、预约
- 9.4.4、表单
- 9.4.5、小票打印
- 易联云打印机
- 365打印机
- 飞蛾打印机
- 9.4.6、智能获客
- 9.4.8、多门店
- 开启多门店
- 添加门店
- 添加/编辑店员权限组
- 添加部门
- 添加员工
- 添加店员
- 多门店使用流程
- 门店绑定店员
- 9.4.9 商品采集
- 9.4.10对接达达配送
- 9.4.11、独立发布
- 9.4.12、物流助手
- 物流助手配置流程
- 9.4.13、银联支付
- 9.4.14、极光推广
- 9.4.15、资源管理
- 9.4.16、消息群发
- 9.4.17、快速注册
- 9.4.18、一键wifi
- 9.4.19、企微助手接入
- 9.4.20、微信扫码核销
- 9.4.21、扫码付款
- 字节跳动二维码
- 9.4.22、蜂鸟配送
- 9.4.23、美团配送
- 9.4.24 优选推荐
- 9.4.25 投票
- 9.4.26 配送助手
- 9.4.27 收银台
- 9.4.28当面付
- 支付宝支付配置流程
- 微信支付配置流程
- 9.4.29 区域限购
- 9.4.30 多账户收款
- 标签打印
- 统一推送
- 数据查询
- 文章采集
- 批量打款
- 附加服务
- 数据收集
- 库存管理
- 扫码计数
- 供应商管理
- 旺店通
- 视频解析
- vip专区
- 派单
- 创建订单
- 任务管理
- 小程序发货
- 9.5、行业
- 9.5.1、知识付费
- 9.5.2酒店
- 后台设置和小程序端展示教程
- 小程序端预约酒店教程
- 9.5.3房产
- 9.5.4教育培训
- 9.5.5装修
- 9.5.6、社区团购
- 9.5.7 餐厅
- 9.5.8 外卖
- 9.5.9材料
- 9.5.10 商品批发
- 9.5.11客如云
- 9.6、超管工具
- 平台模板库
- 图片压缩
- 域名迁移
- 平台管理
- 平台版权
- 应用管理
- 微信模板库
- 在线教程
- 字段效验
- 站点预警
- 支付宝点餐激励配置
- 站点授权
- 三、常见问题
- 小程序上传
- 小程序上传预览时空白
- 字节跳动小程序无法上传
- 小程序上传提示失败
- 小程序预览提示参数配置错误、快速加购图标不显示
- 短信配置
- 腾讯云短信配置
- 阿里云短信配置
- 配置好之后接收不到短信
- 模板审核不过
- 阿里云购买相关的短信套餐服务
- 阿里云申请短信签名
- 安装相关
- 微擎后台安装多次,一直安装不了轻站应用
- 安装轻站最后一步提示出错is corrupted
- 如何安装门店V2
- 安装到99%时提示安装失败,点击重试
- 应用安装成功进入应用后台报错
- 安装微擎应用时出现闪退
- 支付相关
- 公众号支付时提示:当前页面的URL未注册
- 公众号支付时提示:appid和mch_id不匹配
- 字节跳动小程序支付提示:商户号该产品权限预开通中
- 微信支付时提示:appid和mch_id不匹配
- mch_id参数格式错误
- 手机端下单支付时提示签名错误
- 扫码点餐服务商激励政策
- 微信公众号支付提示受理机构必须传入sub_mch_id
- 企业付钱到零钱v2和v3有什么区别
- 小程序支付提示收款功能已被限制
- 当前交易存在异常,为保障资金安全,暂无法完成支付
- 后台操作提现提示“此ip地址不允许调用该接口”
- 配置服务商支付提示appid于mch_id不匹配
- 小程序端提示后台小程序参数配置有误
- 公众号或小程序端提示“请稍候再试”
- 微擎提示应用有更新,打开详情页面却显示“无须更新”
- 升级应用之后,小程序端有变动,h5/公众号页面却没有变化
- 支付宝小程序上线之后,提示“请稍候重试”
- 修改公众号服务器配置时,提示token验证失败
- 新加的页面为什么没有底部菜单
- 微擎后台安装轻站应用时,提示写入失败
- 如何安装轻站应用(微擎版)
- windows系统如何安装ionCube插件
- 上传到相册内的图片不显示
- H5站点提交表单时提示“后台参数配置有误,请检查”
- 打开公众号页面提示404
- 微擎后台常见提示及解决办法
- 支付宝小程序授权失败,提示在开中心检查对应权限
- 用户登录后台时提示没有权限
- 如何创建门店V2小程序应用
- 支付宝小程序密钥生成乱码
- 微信小程序获取用户手机号时提示错误
- 提交订单小程序端出现错误提示 sub_mch_id与sub_appid不匹配
- 小程序客服提示出现服务故障
- 您的平台账号已过期,请及时联系管理员
- 公众号组件添加之后小程序端不显示
- 无法访问该模块,该模块已经删除或者停用
- 添加直播组件后点击无响应,扫描直播二维码提示页面不存在
- 上传的图片如何删除
- 确认分销商提现操作时,提示此IP地址不允许调用接口
- 公众号页面打开报错
- 微擎升级时提示:处理失败的数据表 core_sessions
- 添加了商品信息,商品分类页面未显示
- 微信开放平台提交全网发布报错
- 支付时风险提示
- 后台和小程序突然无法访问
- 常见报错问题集合
- 基本账户余额不足,请充值后重新发起
- 添加的商品无法修改价格
- 会员如何充值余额
- 如何开启强制授权手机号
- 用户注册协议
- 已经上线的小程序突然无法访问
- 购买商品时提示IOS暂不可购买
- 微信开放平台审核失败原因
- 如何添加普通表单
- 添加商品留言表单
- 开放平台token获取失败,请检查开放平台参数
- 如何创建装修表单
- 短视频组件侧面的手机和微信如何设置
- 如何申请成为分销商
- 客户如何修改登录密码
- 应用上传图片上传失败提示“存储空间不足”
- 小程序无法通过审核解决办法
- 代理商后台添加应用提示“暂无可创建套餐”
- 余额支付密码忘记了怎么办
- 如何延长商家助手账号到期时间
- 登录商家助手订单列表无订单
- 视频号商城常见报错问题
- 访问H5注册,提示邀请码不能为空
- 升级应用时候提示“先升级系统”
- 如何添加商品并调用
- 如何获取FTP链接数据
- 单独设置商品佣金
- 商城数据分析
- 设置公众号自动回复
- 修改商家助手客服电话
- 魔方导航怎么设置每行多个呢
- 显示商品分类,不显示商品
- 已上线小程序修改名称
- 订单详情页客服和电话如何设置
- 商品列表封面图片模糊
- 视频号订单支付失败原因
- 商品评论小程序端不显示
- 商品列表筛选分类字体颜色哪里调整
- 添加公众号菜单时提示:请正确配置公众号信息
- 物流信息不展示
- 在小程序后台版本管理页面显示开发管理已禁用
- 商家电话哪里设置
- 为什么添加了很多商品,手机端只能看到3个商品
- 促销语哪里展示
- 快速购买哪里开启
- 短视频-抖音类型封面图不显示了
- 小程序订单退款流程
- 满减活动图片在哪里展示
- 如何添加快递公司
- 微擎框架升级后进入门店应用空白
- 如何迁移小程序主体
- 标准交易组件如何关闭
- 如何根据交易订单号查询订单支付状态
- 如何确认微信支付打款
- 保存模板时无法保存提示403
- 采集过来的商品规格哪里修改
- 添加商品流程
- 微信客服对接之后收不到消息
- 发货之后查询不到物流信息
- 添加的MP4视频播放时卡顿
- 开启首页订单滚动效果
- 如何给创建好的某个应用添加一个新功能
- 上传支付宝小程序提示“工具私钥配置错误”
- 快速注册小程序时提示:缺少component_access_token关键参数
- 电子卡券转增功能使用流程
- 小程序主题颜色/色调如何设置
- 授权手机号提示“授权失败,请检查小程序参数是否配置”
- 后台有优惠券,为什么调用的时候没有可选择数据
- 实现在小程序里面长按识别二维码
- 微信公众平台接收到能力收费通知
- 如何给客户账号指定权限
- 用户授权时点击头像无响应
- 首页产品如何放上去
- 四、常见操作问题
- 微信直播
- 直播开通条件
- 如何开通直播功能
- 微信公众平台设置
- 门店V2后台设置
- 如何添加直播商品链接
- 分享直播间
- 商家助手
- 如何安装商家助手(独立版)
- 如何创建商家助手小程序(独立版)
- 商家助手配置(商家)
- 如何使用商家助手(手机端)
- 通信服务配置(服务器)
- 商家助手配置(管理员)
- 如何创建商家助手小程序(微擎版)
- 如何修改商家助手电话号码
- 如何修改商家助手微信号
- 公告通知
- 公众号菜单如何跳转小程序
- 基础设置
- 商家信息
- 商家助手权限设置
- 如何判断新用户属于那个员工
- 公众号接收模板消息
- 对接商家助手小程序流程
- 上传商家助手小程序
- 商家助手模板消息配置
- 商家助手无法上传图片和复制订单号
- 独立版相关
- 用户小程序到期后如何续费
- 智慧建站系统如何安装
- 智慧门店系统如何创建小程序应用
- 如何卸载门店V1
- 如何添加特定权限的用户
- 如何手动编辑产品简介栏目内容
- 超管密码遗忘如何重置
- 访问后台时页面空白
- 代理商相关
- 创建代理商账号
- 为代理商充值
- 查看代理商充值记录
- 重置代理商密码
- 代理商如何创建小程序应用
- 代理商如何添加用户账号
- 代理商绑定域名
- 云存储OSS相关
- 七牛云存储申请及文件上传
- 独立版系统配置七牛云
- 阿里云OSS如何配置
- 图片打包迁移至七牛云
- 腾讯云存储配置
- 申请配置七牛云CDN动态加速
- 腾讯云服务器安装宝塔面板
- 阿里云服务器安装宝塔面板
- 如何申请七牛云免费证书
- 本地图片迁移到阿里云
- 服务器相关
- 宝塔面板如何安装php插件ionCube
- wdcp面板安装ionCube
- 开启阿里云服务器端口
- 如何制作服务器快照(阿里云)
- 开启8282端口
- 如何申请阿里云SSL域名证书
- 如何设置数据库自动备份
- H5页面绑定独立域名
- 阿里云CDN全站加速
- CDN加速请求数如何计费
- Linux系统ionCube插件安装
- linux磁盘扩容
- 如何修改宝塔站点名称
- linux服务配置ssl证书
- 如何修改阿里云域名DNS
- 负载均衡配置
- 轻量服务器初始化
- 腾讯云服务器磁盘扩容
- 宝塔面板快速部署临时SSL证书
- 腾讯云域名如何解析
- SSL证书申请之后如何配置到宝塔面板
- 华为云申请免费域名证书并部署证书流程
- 服务器运行堵塞
- 站点提示:no input file specified
- 服务器迁移之后需要修改哪些配置
- windows服务器相关
- ionCube插件安装
- SSL域名证书配置
- 安装应用检测不通过
- 独立版智慧门店安装流程
- 更换站点PHP版本
- 开启TLSv1.2
- 短视频操作
- 如何更换模板
- 如何修改QQ小程序分享页面的名称
- 如何设置客户登录微擎后直接进入门店V2后台
- 如何快速注册小程序
- 小程序体验版路径
- 微信小程序客服功能如何配置
- 后台如何添加魔方导航数量
- 如何设置会员中心的菜单颜色
- 如何配置快递鸟
- 升级应用经常出错
- 如何创建某一端权限的用户账号
- 对接微信开放平台
- 公众号关注组件
- 如何核销自提订单
- 如何设置使用分销
- 如何修改授权文案,开启、关闭授权设置
- 如何设置配送方式
- 如何设置自定义页面链接底部导航
- 关于电子卡券、电子凭证商品
- 如何接入QQ广告
- 如何接入微信流量主广告
- 开通商家转账到零钱
- 腾讯视频去广告(商业版)
- 关闭小程序收藏提示
- 多平台数据互通
- 如何开启余额支付
- 如何设置每个用户的权限
- 如何开启并设置视频及音频文件上传
- 如何让带锁的插件不显示
- 如何从后台上传MP3或MP4文件
- 如果设置小程序底部版权信息
- 如何使用阿里云物流
- 如何升级门店应用,并上传小程序提交审核
- 如何对接微信开放平台
- 微信客服配置流程
- 微擎应用升级重新提审小程序
- 商品海报无法生成,一直加载中
- 商家转账到零钱API设置
- 分销订单结算状态为什么一直是待结算呢
- H5端会员协议设置
- 成长值和积分用途和获取方法以及注意事项
- 如何开启商家助手账号
- 餐厅多端二维码配置流程
- 商家转账到零钱平台端操作
- 如何把小程序分享给其他人
- 个人中心模板如何隐藏
- 如何创建员工账号,设置对应权限
- 申请微信商户号
- 升级套餐提示暂无可升级套餐
- 访问解析好的域名提示没有找到站点
- 如何重置微信支付密钥
- 站点更换域名(微信小程序版)
- 安全设置
- 请先设置会员等级
- 会员如何注销
- 设置主营类目
- 激活码从哪里添加
- 如何更换小程序头像
- 页面背景图铺满全屏
- 访问小程序提示该商户已到期或不存在,无法提供服务
- 如何查看后台版本号
- 设计页面可以看到商品,预览时候商品不显示
- 激励视频如何使用
- 公众号后台找不到模板消息设置入口
- 如何修改商家转账到零钱验证人
- 小程序主体迁移流程
- 宝塔临时链接哪里获取
- 如何让推荐的商品显示到购物车页面
- 如何开通公众号模板消息
- 强制售后功能
- 小程序授权流程
- 微擎应用安装流程
- 混合支付功能
- 如何设置用户权限
- 五、操作视频
- 六、售后问题
- 如何添加微信小程序开发者
- 如何添加公众号开发者
- 如何查看小程序版本号
- 删除小程序浏览记录
- 如何添加支付宝开发者
- 售后沟通须知
- 使用公众平台开发工具排查公众号问题
- 后台或小程序突然无法访问
- 登录后台提示403
- 如何注销小程序
- 壹佰云2.0
- 安装系统框架
- 如何修改版权信息
- 如何关闭首页广告
- 如何创建小程序应用
- 支付配置
- 1、支付宝支付
- 2、微信支付
- 宝塔面板安装门店应用
- 如何为客户创建小程序应用
- 框架2.0对接公众号,微信扫码登录
- 代理商创建及使用
- 首页添加公安备案信息
- 创建应用时候产品详情和功能对比在哪里填写呢
- 如何重置客户登录密码
- 如何创建商家助手小程序
- 系统
- 域名更换
- 客服设置
- 附件配置
- 权限管理
- 平台
- 广告管理
- 平台公告
- 产品管理
- 如何修改应用所属用户
- 壹佰云3.0
- 安装壹佰云框架3.0
- 应用
- 为客户创建小程序应用
- 修改应用所属客户
- 升级应用提示502
- 创建空间套餐
- 3.0系统
- 壹佰云服务
- 系统更新
- 系统信息
- 注册站点
- 站点设置
- 设置公安备案信息3.0
- 如何修改版权信息3.0
- 登录设置
- 修改登录页背景图和头部图
- 开放用户注册功能
- 3.0客服设置
- 支付设置
- 1.支付宝支付
- 2.微信支付
- 公众号设置
- 系统设置
- 权限管理,分配一个客户管理应用
- 相册管理
- 短信设置
- 3.0框架上的附件配置
- 操作日志
- 常用工具
- 域名效验文件上传
- 3.0常用工具域名更换
- 3.0常用工具--站点公告
- 安装门店应用
- 应用发布更新流程
- 微擎版相关
- 如何升级门店应用
- 如何创建微信小程序平台
- 如何将应用分配给客户账号
- 如何快捷登录门店后台
- 设置首页备案号
- 微擎站点更换域名
